Jan 31, 2017
Version 1
Yeast Colony PCR: It doesn't get any easier than this! V.1
- Joe Horecka and Angela M. Chu1
- 1Stanford Genome Technology Center
- Genomes to Natural Products Network
- Yeast Protocols, Tools, and Tips


Protocol Citation: Joe Horecka and Angela M. Chu 2017. Yeast Colony PCR: It doesn't get any easier than this!. protocols.io https://dx.doi.org/10.17504/protocols.io.gzwbx7e
License: This is an open access protocol distributed under the terms of the Creative Commons Attribution License, which permits unrestricted use, distribution, and reproduction in any medium, provided the original author and source are credited
Protocol status: Working
Created: January 18, 2017
Last Modified: March 28, 2018
Protocol Integer ID: 4886
Keywords: protocol for yeast colony pcr, yeast colony pcr, colony pcr, lysed cells as template, lysed cell, lyse cell, pure water for the cell lysi, phire hs ii enzyme, pcr product, cell lysi, pcr, plasmid dna, yeast, small amount of cell, neb q5 enzyme
Abstract
A protocol for yeast colony PCR, starting with intact cells. Can be used to analyze genomic and plasmid DNA, with PCR products up to 2 kb being no problem. It doesn't get easier than this: pick a small amount of cells from a plate into water, lyse cells at 99C for 5 min. Use the lysed cells as template by adding to 1/10th final volume in a PCR. We use this protocol for diagnostics (Phire HS II enzyme) and for Sanger sequencing (Phusion HS II or NEB Q5 enzyme). The main reasons why others might not get this protocol to work could be due to using too many cells and/or not using pure water for the cell lysis. Good luck, and have fun!
See the 'BEFORE START' section of this protocol for photographs that show how to pick cells from a colony and make a suspension. See the 'WARNINGS' section for important points and trouble shooting.
Safety warnings
Surprisingly, some researchers can't get this protocol to work. The three most common mistakes are likely:
1) Using too many cells. See photographs in 'BEFORE START' for cell suspension density. If you're having problems, try using less cells.
2) Suspending cells in something other than molecular biology grade water. Don't use zymolyase, NaOH, etc. Use water only!
3) Centrifuging the heat-popped cells and using the clear supernatent. This protocol lyses cell membranes with water and heat. It's not a nucleic acid extraction. THE DNA IS IN THE SUSPENDED, LYSED CELLS. Use the cell suspension.
Before start
Below are a few photographs of picking cells from a colony and making cell suspensions. Illustrated in the last photo are three cell suspension densities, one of them being just right. We believe a problem of our protocol failing for some researchers is using too many cells, perhaps with the idea of 'the more the better.' If you are having problems, try using less cells.
Preparation of heat-popped yeast cells
- Aliquot 50 µL water per each 0.2 ml PCR tube.
- Use a small pipet tip to pick a small amount of yeast (less than the size of sesame seed). Avoid touching the agar. Transfer the yeast to the water, swirling to get cells off the tip. Cap tubes. Gently vortex to suspend cells.
- Place the tubes in a PCR machine with program: 99C, 5 min; 4C, hold. Remove tubes from machine, quick-spin, place tubes on ice. The heat-popped yeast are ready to use or can be frozen at ‑20C for later with no loss of activity. Important: gently vortex cells into suspension just before adding to PCR reactions. DO NOT use supernatent from pelleted yeast cells. The DNA template is in the cells. Use the cell suspension.
PCR using heat-popped yeast cells - an example with 20 uL PCRs and Phire Hot Start II enzyme
From here forward, PCR is essentially the same as with any template (e.g., plasmid, pure genomic DNA). Make a PCR master mix following the PCR enzyme manufacturer. Below are the final concentrations of reagents in a master mix for 20 µL PCRs using Phire Hot Start II (Thermo Scientific):
PCR Master Mix (20 uL reactions)
1X Phire HS II buffer
0.2 mM each dNTP
0.4 µL Phire HS II enzyme/20 µL PCR
0.5 µM each primer (can be added later to individual tubes)
The master mix can be made with or without primers. Aliquot master mix to new 0.2 ml PCR tubes or to a 96-well plate. If primers are included in the mix, aliquot 18 µL of the mix. If primers are added later, reduce volume/tube accordingly. In any case, the typical tube-filling order is: 1) master mix, 2) primers (if not in the master mix), and 3) 2 µL vortexed, heat-popped yeast. Quick-spin samples using a mini centrifuge (PCR tubes) or a centrifuge with a plate rotor (PCR plates).
Run PCR (Phire HS II extension time is 10-15 sec/1kb PCR product):
98C, 30 sec denature
98C, 5 sec |
60C, 5 sec | 35 cycles PCR
72C, X sec |
72C, 1 min final extension
4C, hold end
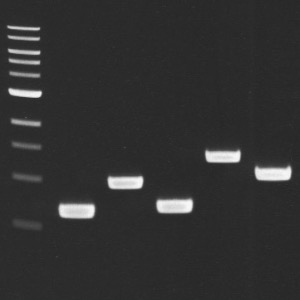
Remove tubes from PCR machine and quick-spin. If using an E-Gel, add 20 µL water to each tube, vortex, and load 20 µL to each E-Gel lane. For other gels, add concentrated loading dye and run on the gel.