Mar 19, 2026
Version 2
Whole organ sample embedding in potato starch suspension for ex vivo high field preclinical MRI V.2
- 1Fred Hutchinson Cancer Center


Protocol Citation: Elena Carlson, Brianna Wrightson 2026. Whole organ sample embedding in potato starch suspension for ex vivo high field preclinical MRI. protocols.io https://dx.doi.org/10.17504/protocols.io.14egn5r3mg5d/v2Version created by Elena Carlson
License: This is an open access protocol distributed under the terms of the Creative Commons Attribution License, which permits unrestricted use, distribution, and reproduction in any medium, provided the original author and source are credited
Protocol status: Working
We use this protocol and it's working
Created: March 19, 2026
Last Modified: April 09, 2026
Protocol Integer ID: 313575
Keywords: MRI Scanner, proton free, ex vivo, MRI, preclinical imaging, preclinical MRI, non destructive sample analysis, sustainable science, magnetic resonance imaging, whole tissue imaging, whole organ, non destructive imaging, ex vivo mr imaging sample prep workflows1, existing ex vivo mr imaging sample, using potato starch, vivo mri imaging, potato starch suspension, vivo high field preclinical mri this protocol, addition of potato starch suspension, fixed mouse organ sample, potato starch for ex, potato starch, whole organ sample, mri, preclinical mri, vivo high field, imaging, using proton
Funders Acknowledgements:
Preclinical Imaging Shared Resource (RRID:SCR_022616) of the Fred Hutch/University of Washington/Seattle Children’s Cancer Consortium
Grant ID: P30 CA015704
NIH Shared Instrumentation Grant S10
Grant ID: NIH S10OD26919
Abstract
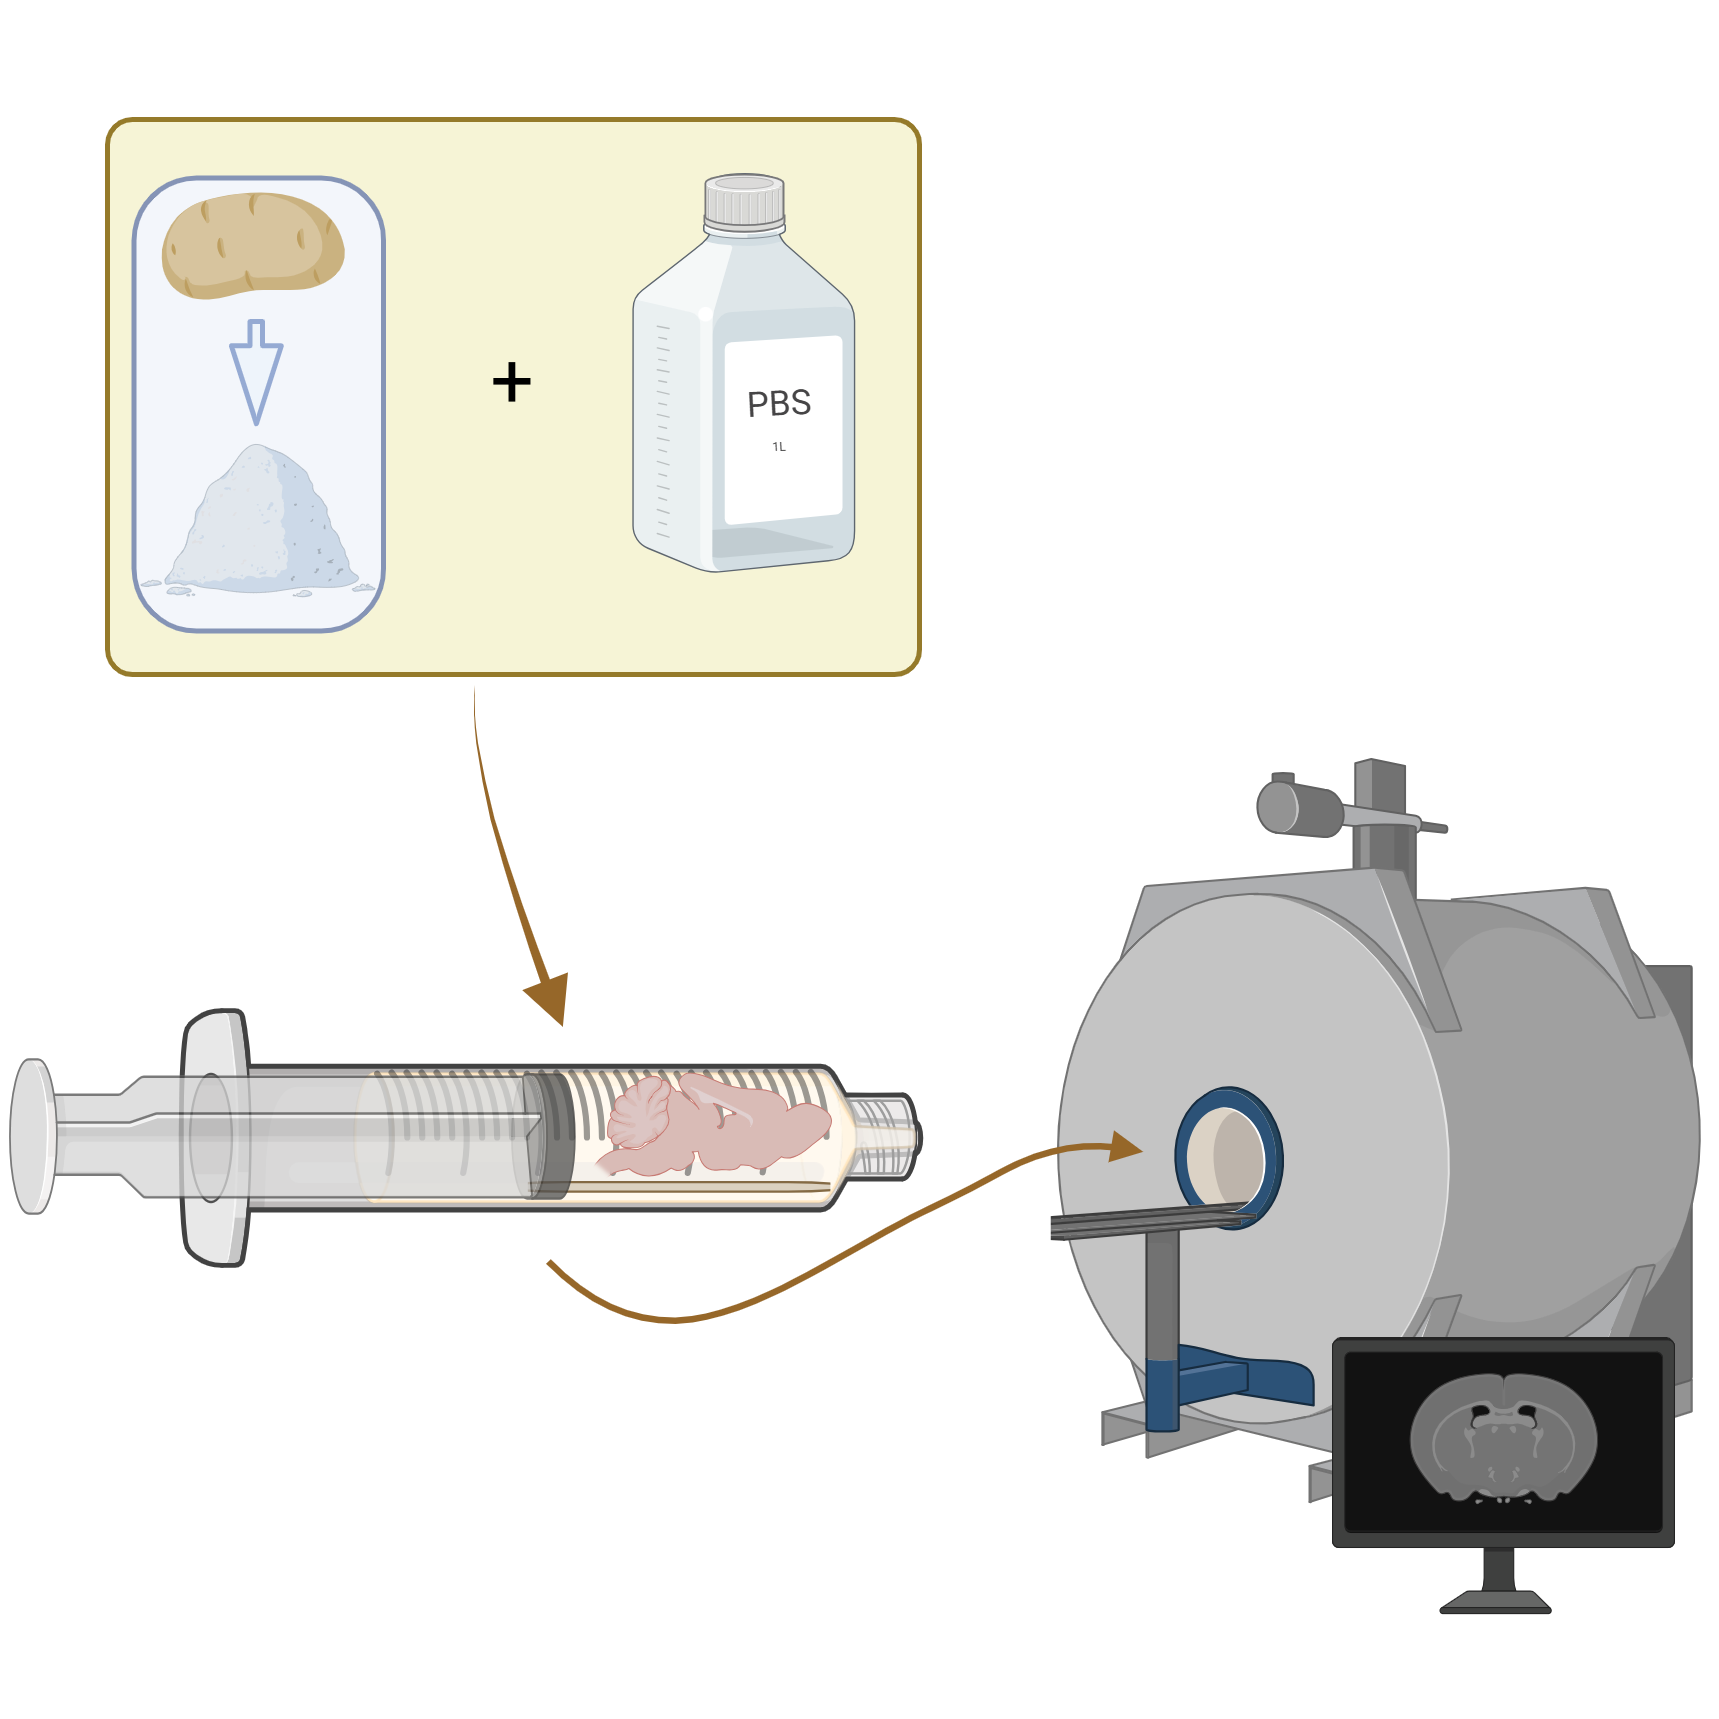
This protocol describes the preparation of fixed mouse organ samples in a syringe of potato starch for ex vivo MRI imaging. This method adapts principles from existing ex vivo MR imaging sample prep workflows1-3 for horizontal‑bore MRI, but is modified for situations in which the sample must remain fixed to a rigid support to prevent shifting during the addition of potato starch suspension. The approach using potato starch is more cost effective and sustainable compared to other techniques using proton-free liquids which are commonly employed.1-3
Materials
- Fixed mouse brain samples (with or without skull)
- 10 mL syringe (without needle)
Equipment
10 mL glass syringe
NAME
Jiaxix
BRAND
B09PHN9NN2
SKU
LINK
Equipment
10 mL Luer Lock Syringe
NAME
BD Biosciences
BRAND
302995
SKU
- Popsicle stick or coffee stir stick (pre-glued to syringe plunger)
we used: 7" wooden stir sticks - Origin sustainables catalog #345097
- Potato starch (Sigma-Aldrich or food-grade)
- PBS or DPBS
- Super glue (cyanoacrylate)
- Funnel
- Scoopula
- Tweezers
- Absorbent paper towels
- Zip ties
- Parafilm
- Tape for labeling
- Transfer pipettes
- Hot glue gun (for securing plunger later)
- Optional: Shaker plate
Before start
Ensure Part 1 protocol "Syringe Assembly for Potato Starch Suspension ex vivo MRI" (where you glue the stick to syringe plunger) is complete.
Prepare Workspace
Lay down paper towels, an absorbent pad, or use a tray to contain spills.
Inspect glued stick-plunger assembly from Part 1.
Verify the plunger moves in and out smoothly within the barrel. This step is incredibly important, especially if you are using a glass syringe. We have had glass syringes get completely stuck with the samples and potato starch in them - so that the only way to get the sample back out was to break the syringe open entirely. Skip this step at your peril!
Gather all materials within reach.
Materials: Pre-assembled syringes + stir sticks, tweezers, potato starch, PBS, tissue tape, a sharpie, transfer pipette, a funnel, and tube rack stands.
Prepare Sample
If sample is in ethanol, transfer to PBS briefly to rinse.
Dry sample gently on absorbent paper towels.
Note
Tip: Tweezers are preferred; avoid direct handling even with gloves.
Mark sample ID clearly on tube and syringe plunger, with a tape that will stick and stay put.
Tape sample to stick
Use something to hold the syringe plunger + stick assembly steady. We taped the plunger to a test tube rack.
Cut a thin strip of 3M tape. The goal here is to simply hold the sample in place while you later pack the potato starch in and around the sample. It does not need to perfectly adhere the sample to the stick but it does need to hold the sample in place while PSS is going around it. Once the PSS is fully packed, the pressure from the slightly damp PSS will also hold the brain in place and keep it from moving.
Position sample so major axes align with MRI planes:
- Sagittal view: Check alignment along stick.
- Axial and coronal views: Rotate and verify, by eye
Mark sample orientation on syringe barrel: Mark syringe with arrows indicating brain orientation and location for later reference. e.g. "rostral, caudal, jaw, top of skull/brain"
Example markings for syringe exterior
Prepare Potato Starch Suspension
Determine how much volume your sample & stick need in the syringe barrel
Make sure that there is at minimum enough dry potato starch cover the volume in the syringe taken up by the sample and stick.
for instance, when assembling the stick/plunger assembly I measured that the top of the plunger seal area was at the 4 mL mark. So I will make sure that I add at least 4 mL of dry potato starch to my syringe barrel.
Tape syringe tip (needle hub) lightly to prevent leaks or add syringe cap, if applicable.
Using funnel, add dry potato starch to syringe barrel: - empty barrell only - no sample is present at this time.
- Fill to mark corresponding to sample depth (e.g., 4 mL ).
Dry potato starch in syringe barrel
Use a transfer pipette to add PBS to reach ~8 mL or more total volume.
Cover opening with parafilm & thumb and shake vigorously until starch is fully dispersed with no clumps.
Note
Tip: Do the most vigorous shaking before adding sample/plunger
Before (left) and after (right) shaking potato starch and PBS in parafilm-covered syringe barrell.
The starch suspension should be somewhat viscous. If it is not, add more PBS and shake again.
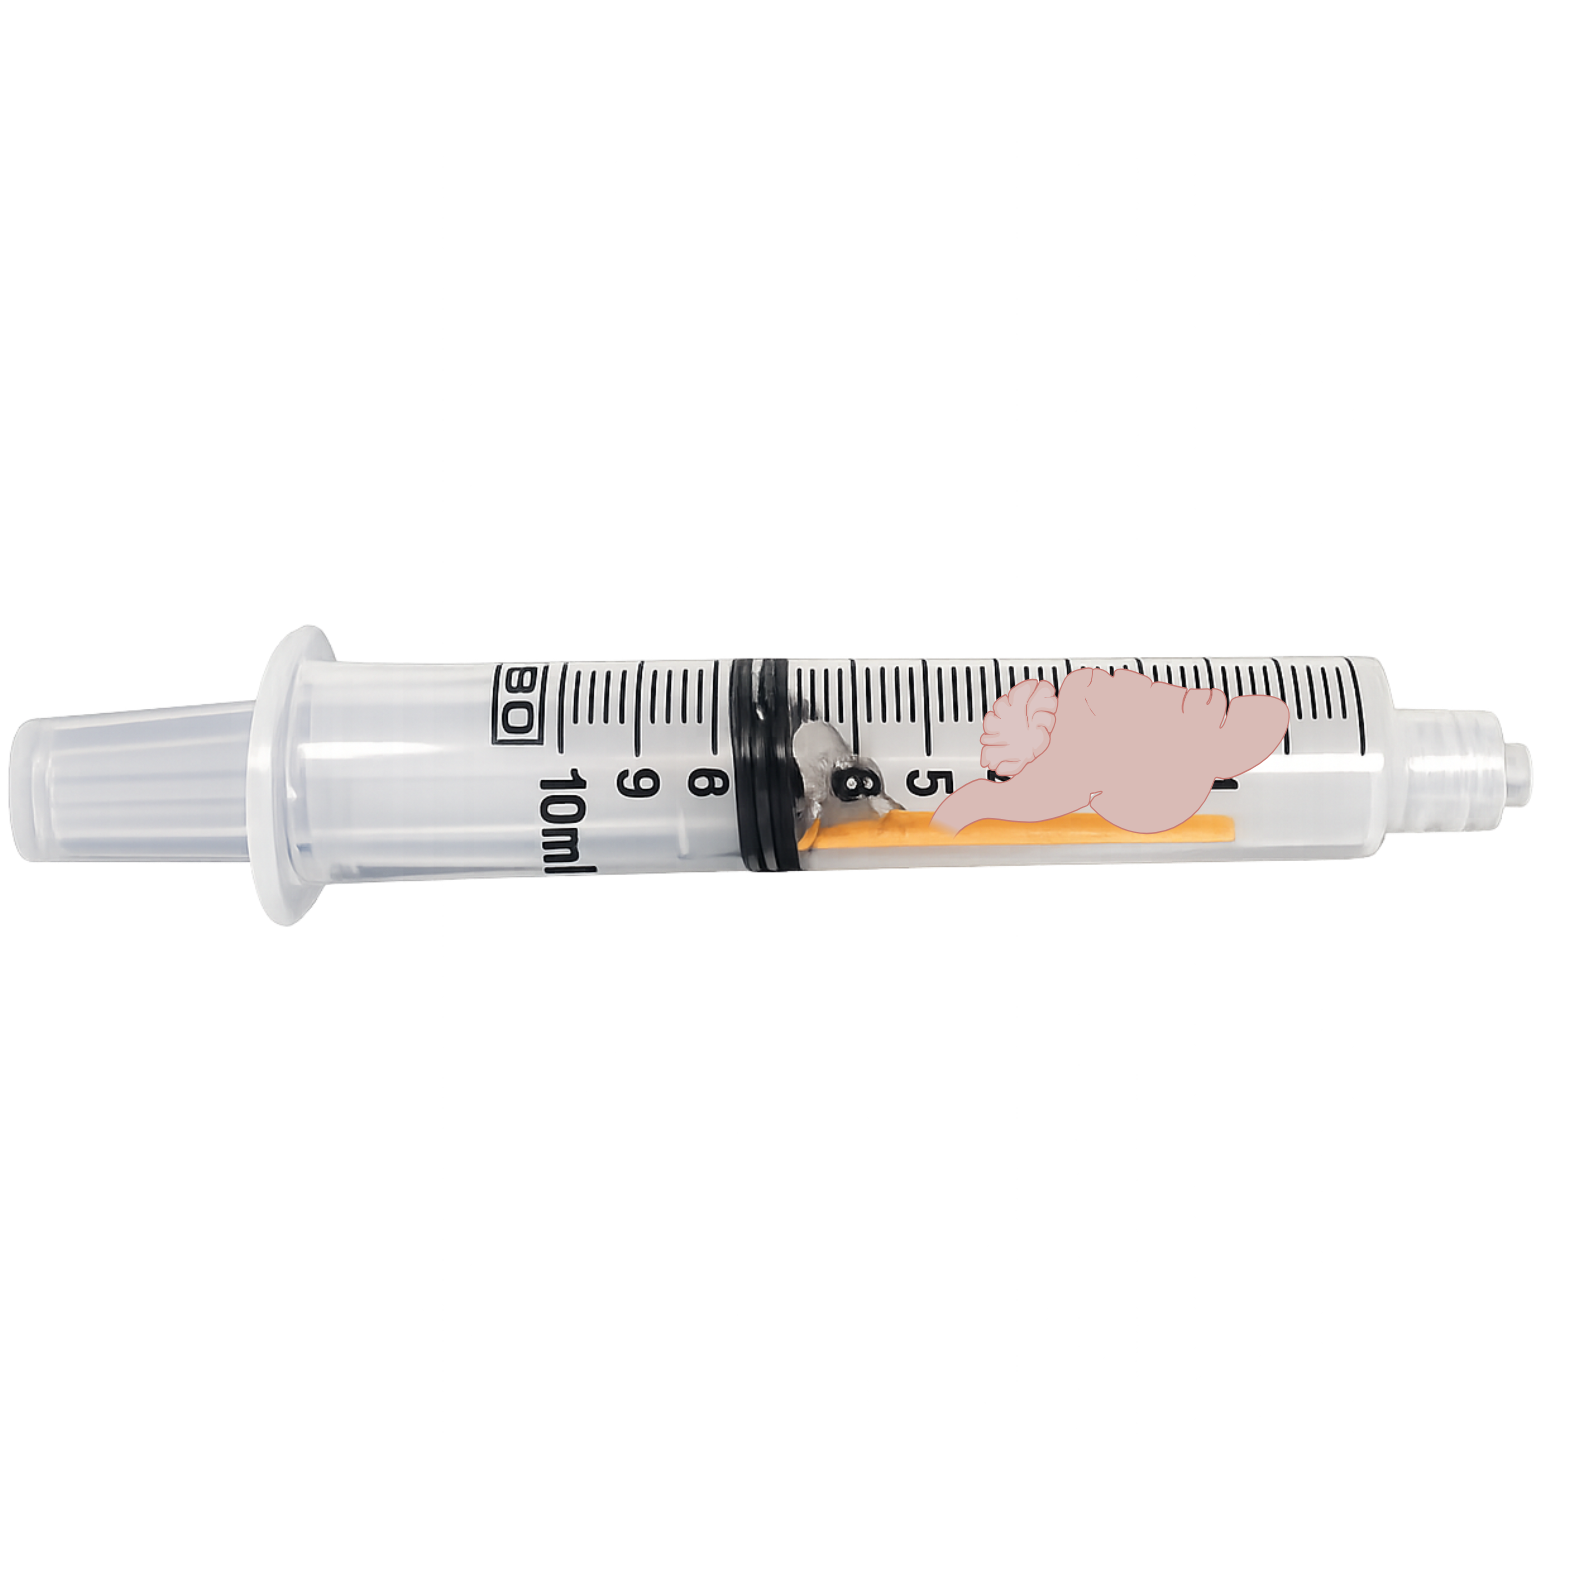
Insert Sample/Plunger to syringe barrel
Check that sample is secure.
Note
Lift plunger/stick/sample, and rotate, making sure that the sample doesn’t fall off the stick.
Tilted sample, taped to stick. Syringe plunger is taped to a mount device to keep in desired orientation during taping process.
Remove needle hub cap.
Insert plunger-stick-sample assembly into syringe barrel carefully.
Flip syringe so opening faces up, plunger down. Let the potato starch settle via gravity.
Before gravity settling of PSS
Tap and rotate gently to release air bubbles around sample.
Note
- Optional: Use shaker plate for gentle agitation if bubbles are especially stubborn.
- Persistent bubbles can cause artifacts; tap gently or rotate plunger to release.
Gravity Settling
As starch settles, slowly push PBS out from top:
Note
Do not force plunger too far; avoid dislodging sample by pushing the stick out of alignment.
Continue until starch is densely packed around sample and PBS is mostly removed from the top of the syringe. You can leave the sample to let the starch settle in the fridge overnight.
Tape 2-4 zip ties to syringe for easy handling and movement in scanner.
Seal plunger-syringe junction with hot glue for easier rotational adjustment during imaging.
Wrap the top of the syringe in parafilm or ceran wrap if a hub cap is not available.
MRI imaging
For a MRI coil with (~20 mm diameter), add parafilm squares around the syringe and the zip ties, so that it fits snugly in the coil. This avoids motion artifacts during imaging.
Note
Approximately ~7 pairs of parafilm squares plus 2 zip ties, around this cat no. of syringe should be the correct size to fit snugly in the MRI coil.
Place syringe in head coil with sample approximately centered.
Check scout images, reposition and rotate syringe / plunger to center the sample and align it so it lays "flat" in the view of the scanner. **this step may not be strictly necessary depending on the kind of scans you plan to take, although it is best practice.
Scout images in MRI scanner
Acquire MR images
Removing the sample
Remove sample from MRI coil
Remove all parafilm and zip ties
Place the opening (where the needle would go) under a running faucet and let the force of the water slowly push the plunger out of the syringe barrell.
Ensure you have a drain cover in place over the drain. If the water forces the sample out too quickly, you could lose your sample down the drain!
Protocol references
1. Plessier A, Le Dret L, Varlet P, Beccaria K, Lacombe J, Mériaux S, Geffroy F, Fiette L, Flamant P, Chrétien F, Blauwblomme T, Puget S, Grill J, Debily M‑A, Castel D. New in vivo avatars of diffuse intrinsic pontine gliomas (DIPG) from stereotactic biopsies performed at diagnosis. Oncotarget. 2017;8:52543‑52559. doi:10.18632/oncotarget.15002.
2. Stowe N, Singh A, Nitz J, Cruz E, Mercord A, Al‑Sakhbouri M, et al. High throughput quantitative ex vivo murine brain MRI capsule. Madison, WI: University of Wisconsin–Madison, Department of Biomedical Engineering; 2023. Available from: https://bmedesign.engr.wisc.edu/projects/s23/mouse_MRI/file/view/cabc9ebd-cf1e-48d3-bb1e-507cfd222ad6/FinalReport_BME301_MurineBrainTeam_3-1.pdf
3. Petiet A, Delatour B, Dhenain M. Models of neurodegenerative disease: Alzheimer's anatomical and amyloid plaque imaging. Methods Mol Biol. 2011;771:293‑308. doi:10.1007/978-1-61779-219-9_16.
4. Tsurugizawa T, Kumamoto T, Yoshioka Y. Utilization of potato starch suspension for MR‑microimaging in ex vivo mouse embryos. iScience. 2022;25(12):105694. doi:10.1016/j.isci.2022.105694.
5. Tsurugizawa T, Kumamoto T, Yoshioka Y. Micro‑magnetic resonance imaging of ex vivo mouse embryos with potato starch suspension. STAR Protoc. 2023;4(3):102483. doi:10.1016/j.xpro.2023.102483.
Acknowledgements
Graphical Abstract created in BioRender. Carlson, E. (2026) https://BioRender.com/o9g0az8