Feb 25, 2026
Wheat disease symptoms observation, capture, description, and evaluation v2026
- 1Australian National University
- BIOL3106/6106


Protocol Citation: Erin Hill, Benjamin Schwessinger 2026. Wheat disease symptoms observation, capture, description, and evaluation v2026. protocols.io https://dx.doi.org/10.17504/protocols.io.ewov1km9ogr2/v1
License: This is an open access protocol distributed under the terms of the Creative Commons Attribution License, which permits unrestricted use, distribution, and reproduction in any medium, provided the original author and source are credited
Protocol status: Working
We use this protocol and it's working
Created: February 23, 2026
Last Modified: February 25, 2026
Protocol Integer ID: 243821
Keywords: different wheat pathogen, wheat pathogen, plant pathogen diagnostic, uninfected wheat plant, wheat disease, wheat disease symptom, wheat leaf disease symptom, diseased leaves for each treatment group, wheat plant, provided wheat plant, pathogen, week old wheat plant, diseased leaf, major pathogen, infective agent for each treatment group, old wheat plant, observed disease symptom, observed disease symptoms with the uninfected negative control, timing of disease symptom development post infection, disease symptom development post infection, diagnostic, infective agent, causal infective agent, fifth treatment group, infection, treatment group, disease, detailed description of the symptom
Abstract
This protocols is part of the ANU Biosecurity mini-research project #1 "Plant Pathogen Diagnostics: Visuals, subcultures, and genomics".
You will be provided four pots of 3-4 week old wheat plants that have been infected with different wheat pathogens. Each pot has been infected with one major pathogen. You will not know which pot has been infected with which pathogen. However, you will be provided a compendium of 10-15 wheat pathogens that will guide you to identify the infective agent for each treatment group. The fifth treatment group will be uninfected wheat plants which will be clearly identified. You can use treatment group #5 as negative control for your experiments.
In total, each group will obtain five pots each:
| A | B | |
| Treatment group 1 | Unknown infective agent | |
| Treatment group 2 | Unknown infective agent | |
| Treatment group 3 | Unknown infective agent | |
| Treatment group 4 | Unknown infective agent | |
| Treatment group 5 | Uninfected control |
This specific protocol is a step by step guide to capture and describe the disease symptoms the provided wheat plants display in semester week 2 and 3. You can then compare the observed disease symptoms with the provided compendium and other online sources to try to identify the causal infective agent.
The final goal is to achieve the following:
- obtain high quality images of your diseased leaves for each treatment group that are representative. These pictures can be taken with your mobile phone for the complete attached leaves lined up on black cardboard paper or via the stereo microscope as demonstrated by the support staff.
- provide a detailed description of the symptoms observed on the leaves. This includes the following: size, shape, form, color, microscopic structure, spore shape and color, and timing of disease symptom development post infection.
- Compare your observed disease symptoms with the uninfected negative control, the provided compendium, and online sources.
This protocol is applicable to semester week 2 and 3.
Protocols progress overview:
- Week 2 observe, capture, and describe wheat leaf disease symptoms.
- Week 3 observe, capture, describe, and evaluate wheat disease symptoms.
Guidelines
You must have read, understood, and follow the health and safety instructions provided in the "Overview Mini-Research Project #1 BIOL3106/6106" provided on Canvas (ANU learning portal).
You must have signed and returned one copy of the "Student Safety Declaration Form For Practical Class Work" before starting the any laboratory work.
You must have read and understood the Hazard Sheets (Risk assessment) of all chemicals listed bellow in the "Safety Warnings" section. These Hazard Sheets are provided on Canvas as part of the "Overview Mini-Research Project #1 BIOL3106/6106" document.
Materials
As always you need to bring a lab notebook, a printed version of this protocol, and a pen to record your adventures in the lab.
Consumables and culture material needed:
- Black cardboard paper.
- Double sided transparent tape e.g. Sellotape Double-sided.
Equipment needed:
- Scissors; week 2 and 3.
- Ruler; week 2 and 3.
- Forceps; week 2 and 3.
- Pencil or light marker pen; week 2 and 3.
- Camera (only to be handled without gloves).
Safety warnings
This protocol does not require any hazardous substances.
Greatest care needs to be giving when using scissors.
You need to wear safety equipment at all times including lab coats, gloves, and safety goggles when handling chemicals and biological agents. While the major biological agents used for the wheat infection are pathogens commonly found in Australia, you must treat them as they were infective agents of general concern. Treat them with care. Do not remove them from the laboratory. Do not spread them via clothing. Use a dedicated notebook and pen to make notes during the mini-research project. Do not put anything into your mouth while in the laboratory. Wash your hands each time you leave the laboratory.
Before start
You must study the protocol carefully before you start. If anything is unclear post questions directly here on protocols.io.
Week 2-3/4-11 March 2026 Disease symptom capture
You will receive five pots with wheat plants as detailed in the "Description" section. Please label each pot with your research group number and the treatment group number if not already done so.
Carefully, study the plants in each pot. Check for symptoms as described in your disease compendium or online. Select two to three leaves for each treatment group that show representative symptoms [TG#1-4] or not in the case of the negative control [TG#5].
Perform the following steps [3.1 to 3.11 and 4] for all treatment groups [#1-5].
Obtain one black cardboard paper.
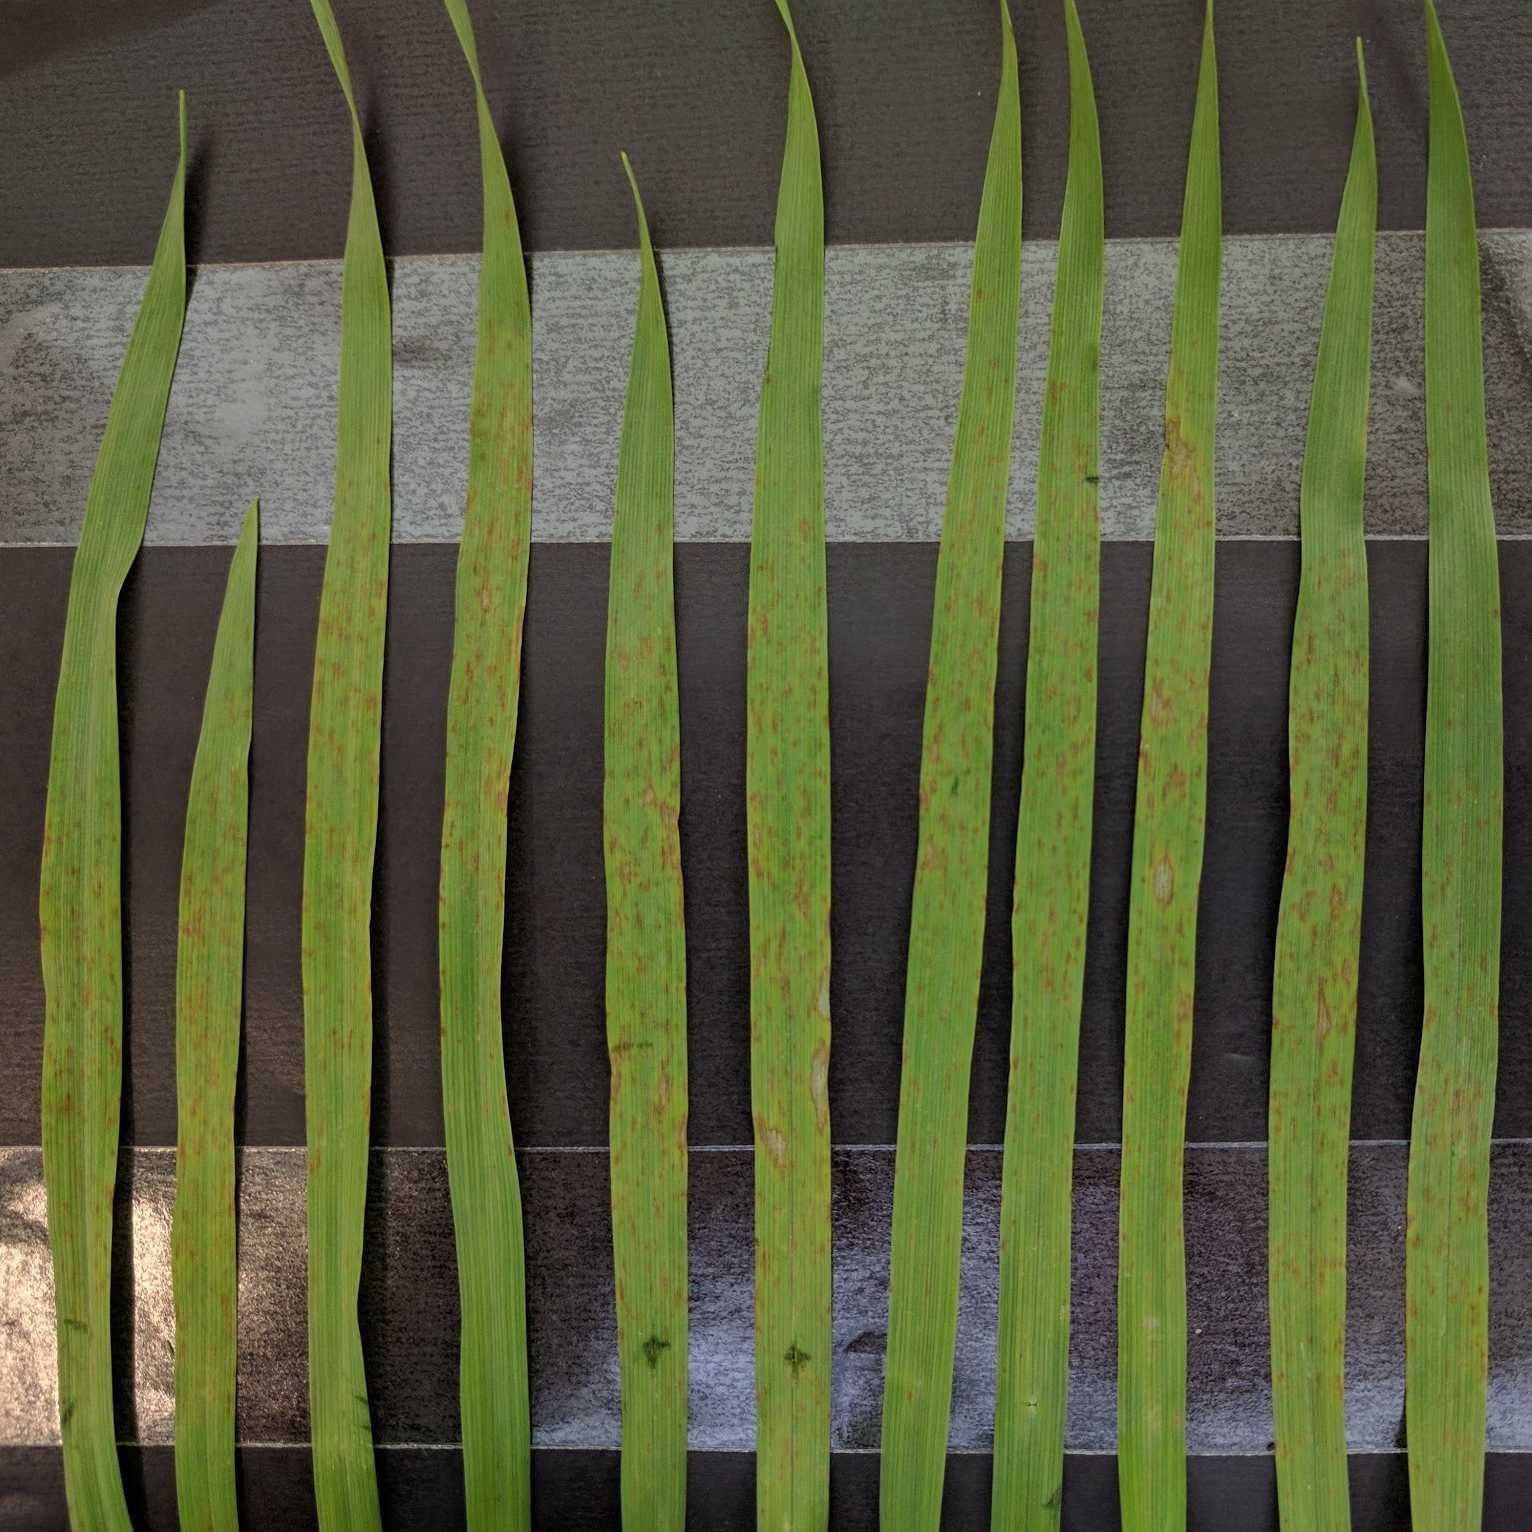
Layout your cardboard paper in front of you like shown in Figure 1.
Figure 1: The starting point of a wonderful plant pathology journey
Attach double sided tape as shown in Figure 2.
Figure 2: The next step in a wonderful plant pathology journey
Remove the protective tape to make the double sided sticky tape sticky on both sides as shown in Figure 3.
Figure 3: Now your plant pathology journey is getting sticky so make sure not to stick the wrong things.
Label the cardboard with your research group number and the date as shown in Figure 4.
Figure 4: Now you make sure that this is really your wonderful plant pathology journey so don't forget to label it properly including RG and date. TG is to follow in later steps.
but not artificial You do the real thing.For your each treatment group, one after another, cut the selected leaves at the base, and stick them to the cardboard by attaching them to the double sided tape (Figure 5).
Figure 5: Attaching the first leave of TG1 to the cardboard in abstraction but not artificial. You do the real thing.
Label the treatment groups below the attached leaves as shown in Figure 6.
Figure 6: Keeping the labels golden and tidy.
Make it all count for all the treatment groups attaching two to three representative leaves each (Figure 7).
Figure 7: Keep it real like real life as in biology and not artificial
Place a ruler next to your cardboard and take a clear picture with a camera. Having clear labels and a ruler will allow you to easily identify the specific sample later on and add a scale bar to the picture digitally if required. You will know how long 1 cm is based on the ruler. Ideally, you take the picture holding your camera completely parallel to your leaves mounted to the cardboard. You will use these pictures to add them to your weekly lab archive lab notebook and for your final mini-research report.
In addition, you can also take pictures of the disease symptoms with the stereo microscope. Please see a demonstrater for hands on instructions. The microscopes will be connected directly to a laptop. Alternatively you can connect via the Leica Airlab app (Google Play or App Store).
Make sure to label your pictures as follows so we can share them online after class and you can clearly identify your pictures.
YYYYMMDD_ResearchGroupNumber_TreatmentGroupNumber_PictureNumber
For example:
20260204_RGX_TG1_2.jpg
Pictures that do not follow this naming convention will not be shared with the class.
Repeat all steps for each treatment group in week 2 and week 3.