Apr 23, 2026
Version 3
User guide for Daphnia microinjection V.3
- Sam Paplauskas1,2
- 1University of Utsunomiya;
- 2University of Stirling


Protocol Citation: Sam Paplauskas 2026. User guide for Daphnia microinjection. protocols.io https://dx.doi.org/10.17504/protocols.io.bp2l6je8rvqe/v3Version created by Sam Paplauskas
License: This is an open access protocol distributed under the terms of the Creative Commons Attribution License, which permits unrestricted use, distribution, and reproduction in any medium, provided the original author and source are credited
Protocol status: Working
We use this protocol and it's working
Created: April 22, 2026
Last Modified: April 23, 2026
Protocol Integer ID: 315494
Keywords: Daphnia, Microinjection, gRNA, CRIPSR, genetics, user guide for daphnia microinjection, english guide to daphnia microinjection, daphnia microinjection, using genetics, embryo deformation, japanese genetics lab, emphasis on the injection, injection, typical patterns of embryo deformation, detailed method, phenotype change, confirmation of phenotype change, user guide
Funders Acknowledgements:
Japanese Society for the Promotion of Science (JSPS)
Grant ID: NA
Abstract
Based on my personal experience working in a Japanese genetics lab, I have written an English guide to Daphnia microinjection with the hope that others may use this to avoid some of the challenges I experienced. The guide covers a concise background, project planning and detailed methods. The methodology places emphasis on the injection itself (including typical patterns of embryo deformation) and breifly mentions upstream processes (excludes needle pulling), whilst confirmation of phenotype change using genetics (post-injection) is not addressed.
Materials
Core list of Materials
Reagents
- Filtered freshwater or artificial Daphnia medium (e.g., ADaM or COMBO medium)
- Agarose (low-melting-point, for immobilization; 1–2%)
- Injection solution (depending on experiment), e.g.:
o DNA plasmid / mRNA / CRISPR reagents
o Fluorescent tracer (e.g., Phenol Red or Dextran dye)
- Mineral oil (for backfilling needles, optional depending on setup)
- Ethanol (70%) for sterilization
Consumables
- Glass capillaries for needle pulling (e.g., borosilicate, 1.0 mm outer diameter)
- Microloader tips (for loading injection mix into needles)
- Petri dishes (35 mm and/or 60 mm)
- Coverslips
- Parafilm or sealing film
- Kimwipes or lint-free wipes
- Pipette tips (filtered, sterile recommended)
Equipment
- Micropipette puller (for making injection needles)
- Microinjection system, including:
o Micromanipulator
o Microinjector (pressure or pneumatic system)
- Stereomicroscope (dissection microscope)
- Inverted microscope (optional, depending on injection stage)
- Needle holder compatible with micromanipulator
- Air pressure source (if required by injector)
- Microforge or beveler (optional, for refining needle tips)
Biological Materials
- Healthy Daphnia cultures (e.g., Daphnia magna or Daphnia pulex)
- Early-stage embryos (typically collected from brood chamber)
Preparation Materials
- Glass slides (for agarose pads)
- Heating plate or microwave (for melting agarose)
- Fine forceps (Dumont #5 or similar)
- Dissection needles
- Pasteur pipettes or transfer pipettes
Anesthesia / Immobilization (optional)
- Ice (for cold immobilization)
- CO₂ or anesthetic agents (if used in your lab protocol)
Imaging & Validation
- Fluorescence microscope (if using fluorescent tracers)
- Camera system for documentation
Safety & Waste
- Biohazard waste container
- Sharps disposal container (for needles and capillaries)
- Gloves and lab coat
Introduction
Microinjection was first applied to D. pulex in 2013 as proof-of-principle for RNAi experiments (Hiruta et al., Fig. 1). Although previous studies had demonstrated microinjection in D. magna, including for the introduction of dsRNA into cells (Kato et al., 2011, Miyakawa et al., 2013), overexpression of foreign genes (Kato et al., 2011) and the creation of transgenic individuals (Kato et al., 2012), application of this technique to D. pulex represented a significant advancement in extending functional genetic tools to this species, enabling targeted gene manipulation and expanding its utility as a model organism for molecular and developmental studies (Ebert, 2022). This is particularly important because D. pulex exhibits inducible defensive traits in response to predator cues, making it an ideal system for linking gene function to ecologically relevant phenotypes (Tollrian, 1995).
In the five years following the seminal work by Hiruta et al. (2013), there was a rapid increase in the number of publications related to Daphnia microinjection (2013–2018), encompassing not only direct applications of the technique but also theses, methodological papers, and review articles (Fig. 1). This growing recognition was further reflected in the appearance of studies in high-impact journals (e.g. Nakanishi et al., 2016). However, the technical challenges associated with training researchers to perform Daphnia microinjection—particularly given that the method remains incompletely optimised, with persistent bottlenecks such as high injection failure rates and low embryonic survival—have contributed to fluctuations in publication output between 2018 and 2025.
Despite the continued publication of high-impact studies (e.g. Arao et al., 2020; Shimizu et al., 2024), there has been a noticeable shift towards alternative methodologies and an increased proportion of review-based work (Fig. 1, faded colours). While a substantial share of this non-empirical research originates from institutions outside Japan—based on weighted analyses of authors’ primary affiliations (as opposed to, for example, CRediT taxonomy-based contribution weighting)—experimental Daphnia microinjection studies remain disproportionately concentrated in Japan (Fig. 1, red bars). Although contributions from non-Japanese researchers, particularly in the United States and South Korea (Fig. 1, brown and dark green, respectively), have increased in recent years, Europe remains underrepresented—an unexpected pattern given its longstanding prominence as a hub for Daphnia research.
The geographical imbalance in experimental output suggests that the barriers to adopting Daphnia microinjection extend beyond simple research interest and instead reflect deeper technical and sociocultural constraints. One potential explanation is that there was some initial scepticism from the international research community outside of Japan, partly because early microinjection studies in Daphnia appeared to successfully induce RNA interference (RNAi) but did not yet achieve stable transgenic organisms. Since RNAi effects can sometimes be transient, nonspecific, or difficult to verify definitively, whereas transgenesis is generally considered a more rigorous demonstration of successful delivery and heritable genetic modification, this discrepancy led some researchers to question the robustness of the technique. Although some attempts have been made to summarise and disseminate the methodology—for example, the concise seven-point guidance provided by Toyota et al. (2016)—such resources may not have been sufficient to overcome these initial doubts or enable widespread
uptake.
A second, and likely compounding, explanation is that difficulties in international academic exchange—such as cultural misunderstandings and language barriers—have further exacerbated what is already the primary limiting factor in performing Daphnia microinjection experiments: the need for hands-on training to acquire the technique. Based on my personal experience, mastering this method relies heavily on tacit knowledge that is yet to be fully captured in written protocols. Therefore, the aim of this user guide is to help non-Japanese-speaking researchers master the method without making the same mistakes I did. Ultimately, I hope this will help disseminate the technique more widely and support the broader adoption of this research approach.
Figure 1. Publication trends and geographical distribution of Daphnia microinjection research since 2013. Studies were identified using the search term “Daphnia microinjection” in Google Scholar, following the seminal work of Hiruta et al. (2013), with a small number of earlier studies excluded. A total of 46 relevant articles were selected from over 700 screened records, and metadata were manually extracted from author lists. The total number of peer-reviewed experimental studies published per year is shown by black dots and a dashed line. Author contributions by country were estimated using weighted analyses of authors’ primary institutional affiliations, revealing a strong concentration of experimental work in Japan. Empirical microinjection studies are indicated by bold colours, representing successful implementation of the technique, whereas faded colours denote non-empirical outputs (e.g. reviews, theses, and studies employing alternative methodologies), providing an estimate of broader global interest in Daphnia microinjection. Full dataset and methodological details are available at: https://doi.org/10.5281/zenodo.19217543 (Paplauskas, 2026).
Project time management
Because Daphnia microinjection is inherently a high-risk, high-reward technique, careful time allocation is essential. In principle, only a single successfully modified embryo (often developing into a mosaic/chimeric individual) is required to establish a stable transgenic line, provided that the genetic modification is incorporated into the germline and the target phenotype is heritable. This is facilitated by the clonal (parthenogenetic) reproduction of Daphnia, which allows rapid propagation of a genotype once established. However, in practice, this assumption requires caution. Mosaicism is common following microinjection, and not all tissues—including the germline—may carry the modification. As a result, heritability is not guaranteed, and phenotypic expression may vary across broods or generations. Reports of revertant phenotypes and variable expression (e.g. in studies targeting pigmentation genes such as scarlet) further highlight that stable transmission and consistent expression must be empirically verified.
Consequently, more than a single injected embryo is typically required to successfully establish a transgenic line. The overall success rate of Daphnia microinjection is generally low, and the number of embryos needed before obtaining a viable, heritable mutant is difficult to predict. This depends on multiple factors, including user skill, embryo handling, injection timing, and the biological effect of the targeted mutation (e.g. whether it impacts viability). As such, the time required to complete a microinjection experiment can be highly variable and represents a major practical constraint.
Beyond the initial generation of a chimeric individual, Daphnia microinjection experiments involve several downstream stages that must be accounted for in project planning. These include: (i) screening offspring across multiple broods to confirm germline transmission, (ii) establishing and maintaining clonal lines, (iii) validating the mutation at the molecular level (e.g. PCR, sequencing, or genotyping assays), and (iv) performing detailed phenotypic analyses, which may involve microscopy, imaging, behavioural assays, or physiological measurements. These steps are often iterative and time-intensive, and must be followed by data analysis, interpretation, and manuscript preparation.
With the aim of assessing the feasibility of completing a Daphnia microinjection-dependent project within a fixed timeframe (e.g. a one-year fellowship), I propose the following framework:
- The dependent vatiable is the days required to generate on chimeric embryo. The dependent variable is the number of days required to generate a single chimeric embryo. Time is expressed in days to account for the substantial fixed setup costs associated with each experimental session, including preparing the microinjection apparatus, loading needles, and selecting appropriately staged embryos by screening mothers under a stereomicroscope prior to injection.
- Embryos injected per day. Can be approximated as:
(FECUND x BIRTH) x (COMBINED SUCCESS RATE x USER SKILL MULTIPLIER)
- Where:
o FECUND = number of embryos per individual (clone-dependent; typically ~20–40)
o BIRTH = number of individuals releasing embryos per day (highly variable; empirically ~0–3, here
approximated as a mean of 3 with associated variation)
o COMBINED SUCCESS RATE = proportion of injected embryos that survive, develop, and express the desired phenotype
o USER SKILL MULTIPLIER = adjustment factor reflecting technical proficiency (e.g. <1 for beginners; ~1 for experienced users)
# LINK TO MODEL: https://sam-paplauskas.github.io/interactive-estimator-vtwo/
Subheading: Scenario testing
Under baseline (“optimal”) conditions—where user skill is high and the combined success rate approximates published averages (Fig. 2)—the model suggests that chimeric embryos can be generated relatively quickly, making the overall experimental workflow feasible within the available timeframe (Fig. 3).
Figure 2. Variation in success rate of microinjection across three independent studies.
Fig 3. My proposed model with baseline settings.
However, the model is highly sensitive to both user skill and success rate. When either parameter is reduced—for example, during early stages of training or when targeting genes that negatively affect embryo viability—the estimated time required to obtain a single chimeric embryo increases substantially. In such scenarios, the number of days required can escalate rapidly, particularly when considering that each injection attempt typically occupies an entire working day due to setup and preparation requirements. Consequently, what appears feasible under optimal conditions may become a significant bottleneck in practice, potentially limiting the number of successful lines generated within a fixed-duration project.
For example, taking my case study one year JSPS fellowship and adjusting the some of the model inputs (combined success rate = 0.10, and user skill = 0.45), the estimated time required to generate a single chimeric embryo is approximately 25 days (Fig. 4). While this suggests that producing at least one mutant line is feasible within a one-year project, the timeline becomes tight when scaled to multiple lines or accounting for failures (e.g. mosaicism or lack of germline transmission). Crucially, this estimate excludes substantial additional time costs, including construct design, reagent preparation, needle optimisation, and ongoing animal husbandry, as well as downstream steps such as line establishment, genotyping, phenotypic analysis, and manuscript preparation. When these are considered, completing a full, publication-ready study within one year is possible but challenging, particularly for less experienced users or lower success rates.
Fig. 4 My proposed model under scenario testing.
Additional considerations that may refine this model include:
- Incorporating a failure buffer (extra time allowance)
- Scaling for multi-gene experiments
- Accounting for a learning curve, where success rates improve with experience
Detailed methodology
Prior to the injection attempt, there are several setup steps which require some advance preparation.
Preparation of Daphnia (~2–3 weeks before injection):
If you have a stock of Daphnia, transfer individuals into a new environment with favourable growth conditions prior to the experiment. Use highly fecund individuals that are 2–3 weeks old.
Tip: Maintain a secondary “mini-stock” in addition to your main continuous clonal stock. This mini-stock can be used to replenish the experimental population after sampling, reducing the need to wait for the
population to regrow to adulthood each time the experimental population is depleted.
Plan for a sufficient population size to allow sampling of ~20 Daphnia per attempt.
Design your construct, guide RNAs, or primers (~1–2 weeks before injection):
Synthesis of guide RNA (gRNA):
- Determine the target gene (or region) for genome editing.
Figure 5. Design of gRNA sites using CRIPSR direct.
- Synthesize gRNA using the Precision gRNA Synthesis Kit: https://www.thermofisher.com/order/catalog/product/jp/ja/A29377
- Store at -80 °C.
Reagent preparation (~3–7 days before injection):
- Mix Cas9 protein and gRNA with final concentrations of 600 ng/µL and 500 ng/µL, respectively, using fluorescent dye (Alexa 488) for dilution. Store the RNPs at -80 °C.
- Cas9 protein: TrueCut Cas9 Protein v2
- Alexa 488 dye:
Final prep / injection-ready (1 day before or same day):
- Note: Final concentrations depend on clone (D. pulex or D. magna)
- Dilute reagent to working concentration.
- Prepare Injection Buffer (M4-Sucrose)
o Prepare 120 mM Sucrose Solution
§ MilliQ water: 1 L
§ Sucrose: 41.4 g → Store in the refrigerator after preparation.
o Prepare M4 Solution → Store in the
refrigerator after preparation.
o Prepare M4-Sucrose Solution
§ Mix 120 mM sucrose solution and M4 solution in a 1:1 ratio, while filter sterilizing. The resulting M4 solution containing 60 mM sucrose should be stored in the refrigerator.
§ Filter: MF-Millipore Membrane (Mixed Cellulose Esters)
Description of injection workflow
Sample collection and observation
- Use a stereomicroscope to check the egg development stage in the brood chamber, ovary development, and carapace color to select females that are about to lay eggs.
- Collect Daphnia with the following characteristics:
o Embryo development stage: Single black eye (Stage 5)
o Ovary development in the mother: Fully developed and green.
o Carapace color: Darkened due to formation of the next molting shell.
NOTE: Refer to the embryo development stage table (Toyota et al., Zool. Sci, 2016).
- Collect ~20 Daphnia from stock and move to a 48 well-plate with one individual and some media in each well.
Reagent preparation
- Prepare ice in advance.
- Retrieve reagent stock from −80 °C.
- Thaw Cas9–gRNA reagent on ice and keep cold throughout handling.
- Once thawed, gently mix by pipetting and briefly spin down to collect contents (avoid vortexing; handle Cas9–gRNA complexes carefully).
- Determine required working volume.
Dissection and injection setup
(Ideally performed in the same room as injection equipment for efficiency.)
Core Setup
- Ice box (to keep reagents and materials cold)
- Injection buffer (~50 mL in a Falcon tube, kept on ice)
- Petri dish for injection (buffer added later)
- Dissection well plate (buffer added later, keep on ice)
Tools & Accessories
- Stopwatch (to track time post-dissection while embryo membranes harden)
- Small jar with extra media (to replenish lost media during transfers)
- Cover slide (for observing adults and embryo laying)
- 5 mL pipette (intact tip) – remove excess media from slide
- 5 mL pipette (tip cut) – wide aperture for transferring adults
Additional Equipment (if not stored near injection setup)
- Dissecting tweezers (for embryo removal)
- Cover slip (placed in injection dish; embryos adhere to edge for stability during injection)
- P20 micropipette + tips
o Tip: cut tips slightly to widen aperture and prevent embryos sticking
- Small petri dish (35mm) with normal media (For holding injected embryos and tracking progress)
- Scissors (For modifying pipette/micropipette tips)
- Light pad (Improves visibility of Daphnia and helps identify shed carapaces)
Pro Tips
- Paper towels:
o Wipe condensation/ice from plates
o Remove excess water to help immobilise adults during dissection
o Place under well plates to reduce movement
Injection working space setup
Typically available at the working station:
- Micropipette (e.g., P2)
- Microloader tips
- Pulled needles
- Falcon tube for used needles
Optional:
- Spare disposable petri dish (for breaking needles) + appropriate waste bin
- Fluorescence observation setup (if required)
Injection Machine Setup
- Turn on the injection system (Fig. 6)
- Ensure the pressure/air tubing is securely connected before powering on
Figure 6. Microinjection pressure machine and corresponding microscope. Gemini generated image.
- Allow the system to complete automatic pressure calibration
- Set injection parameters according to species (D. pulex or D. magna) and needle type (e.g. pressure, injection time, compensation pressure)
- Select the correct capillary/needle settings from the menu (if applicable)
Microscope & Injection Dish Setup
- Place a petri dish under the stereomicroscope (Fig. 7)
Figure 7. Microinjection apparatus. Gemini generated image.
- Add injection buffer (e.g. M4 or equivalent)
- Place a clean cover slip into the dish and fully submerge it
- Position the cover slip against the edge of the dish to keep it stable
- Embryos will be aligned along this edge for injection
- Prepare a separate 35 mm petri dish with standard media
- For transferring injected embryos post-injection
Figure 8. Dimensions of micromanipulator.Figure 8. Dimensions of micromanipulator.Figure 8. Dimensions of micromanipulator.Figure 8. Dimensions of micromanipulator.micromanipulatorFigure 8. Dimensions of micromanipulator.Micromanipulator setup
- Position the micromanipulator and secure the needle holder
- Zero or calibrate axes if required (Fig. 8)
Figure 8. Micromanipulator dimensions. Adapted version of Gemini generated image.
- Check that movement is smooth and responsive (coarse and fine controls)
Needle Preparation & Inspection (prior to loading the needle)
- Retrieve a pulled glass needle from storage (Fig. 9) and mount the needle onto the micromanipulator
Figure 9. Standard storage of microinjection needles. Gemini generated image.
- Inspect under the microscope:
o Ensure the tip is straight, sharp, and not broken or bent
- Align the needle within the microscope field of view
- Confirm correct angle (typically shallow, ~20–40° relative to dish surface)
- Avoid touching or contaminating the needle tip
- Discard and replace if any defects are observed
Needle Loading
- Load reagent using a microloader tip, injecting 5–10 μL of the sample directly into the wide, blunt end of the glass capillary (Fig. 10).
Figure 10. Charging microinjection needle (backloading technique). Gemini generated image.
- Eject the sample while slowly withdrawing the loading tip to prevent air bubbles from getting trapped in the needle.
o If bubbles are present, gently tap the needle to dislodge them
- After loading:
o Briefly apply pressure to confirm flow
o Ensure reagent reaches the needle tip
Tips:
o Adjust illumination and contrast to clearly visualise both embryos and needle tip
o Focus progressively: Start broad, then refine until the needle tip is sharply resolved
- If the needle is clogged:
o Increase pressure slightly
o Gently tap the needle holder
Dissection
- Check for molting every 30 minutes – if possible, keep them on light pad with light off to avoid interfering with development (might be sensitive to stress).
- Individuals that have molted are likely to start laying eggs soon. Using stereomicroscope (Fig. 11) check those individuals every 10 minutes. If possible return to well plate to maintain natural conditions and avoid possibly stress of leaving them under microscope.
Figure 11. Dissecting microscope with gooseneck-style illumination. Adapted version of a Gemini generated image.
- Once oviposition begins, transfer the Daphnia into an embryo dish containing M4-Sucrose cooled on ice.
- After egg-laying finishes (some protocols say 80%, some say once eggs are round), start the stopwatch and dissect the individual and collect the eggs.
- Standard dissection technique:
- Immobilise whilst prioritizing humane treatment. Rapid euthanasia is performed by applying gentle pressure to the dorsal region corresponding to the heart, resulting in immediate cessation of cardiac activity.
- Each organism is carefully held in place using fine forceps or dissecting needles by gently securing the
appendages (antennae). Whilst taking care not minimise damage, the carapace is then opened along the dorsal side using micro-dissection tools. Once exposed, embryos are carefully removed using a pipette.
- Alternative dissection technique: immobilise the Daphnia on a flat surface. Then the carapace is torn open, and embryos are released by gently agitating the specimen in a droplet of medium.
Pro tip: Gentle dissection may help reduce embryo damage and improve survival.
Pro tip: There may be a trade-off between cooling embryos (by keeping them temporarily in cold media before transfer to the room-temperature injection dish) and the rate of membrane hardening. This balance may require optimisation.
Injection (prior to injecting a sample)
- Check reagent is flowing (looks like a colourless puff of air)
- Apply gentle, controlled pressure using the foot pedal—avoid sudden bursts
- Troubleshooting - Reagents are viscous and Daphnia carapace is relatively tough. You need a needle that is:
- Long and thin enough to enter gently.
- Not too fine at the tip — overly narrow tips break or clog easily.
- Ideal tip size: approx. 1–2 μm.
- Use sharp needles with minimal bend.
Note: Flush the injection needle between attempts to prevent clogging and ensure consistent reagent delivery.
Inject experimental samples
- Embryos are veiwed under the microscope during injection (Fig. 12 and Scale Video)
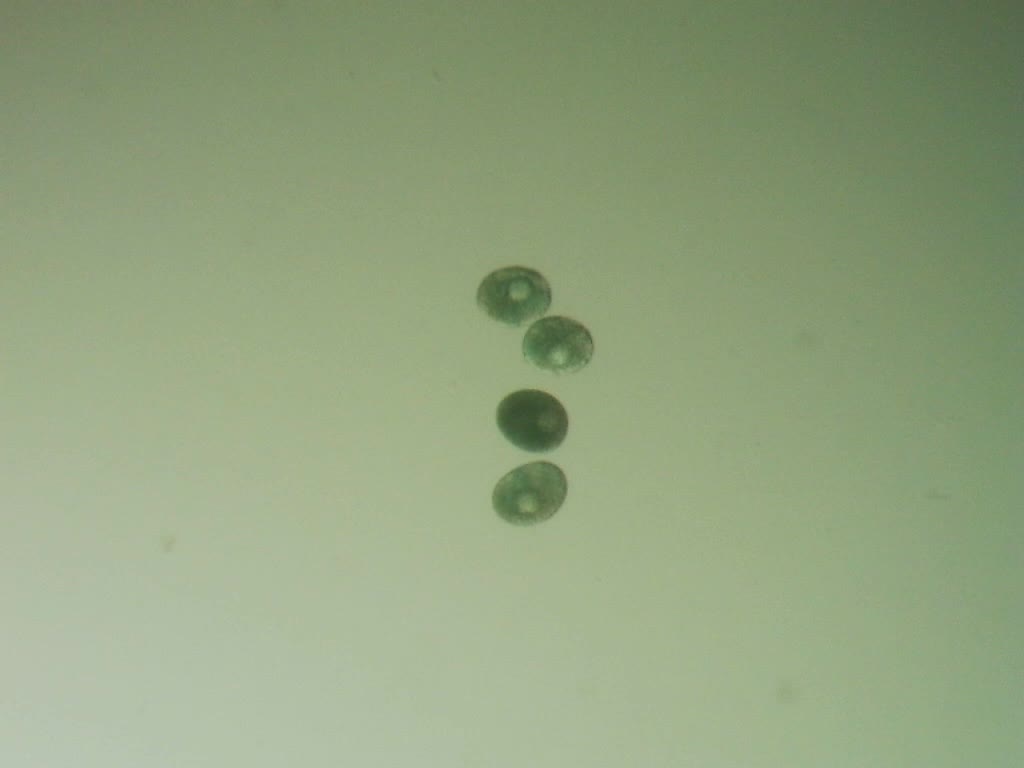
Figure 12. Scale of microinjection. A) Adult Daphnia with embryos. B) Embryos with similar magnification to A. C) Embryos with high magnification.
Scale of microinjection (Video)
Scale video - by focusing outwards this video demonstrates the scale of the embryos relative to focus capability of the microscope.
Timing of injection
- Timing of injection relative to the hardening of embryos membranes is critical (Fig. 13).
Figure 13. Change in embryo permeability. A) Embryo with soft membrane appears dark green. B) Embryo at a later stage of development with a hard outer membrane that is impermeable to microinjection (inner and outer edges of the membrane = red arrows). Red box shows vacuole.
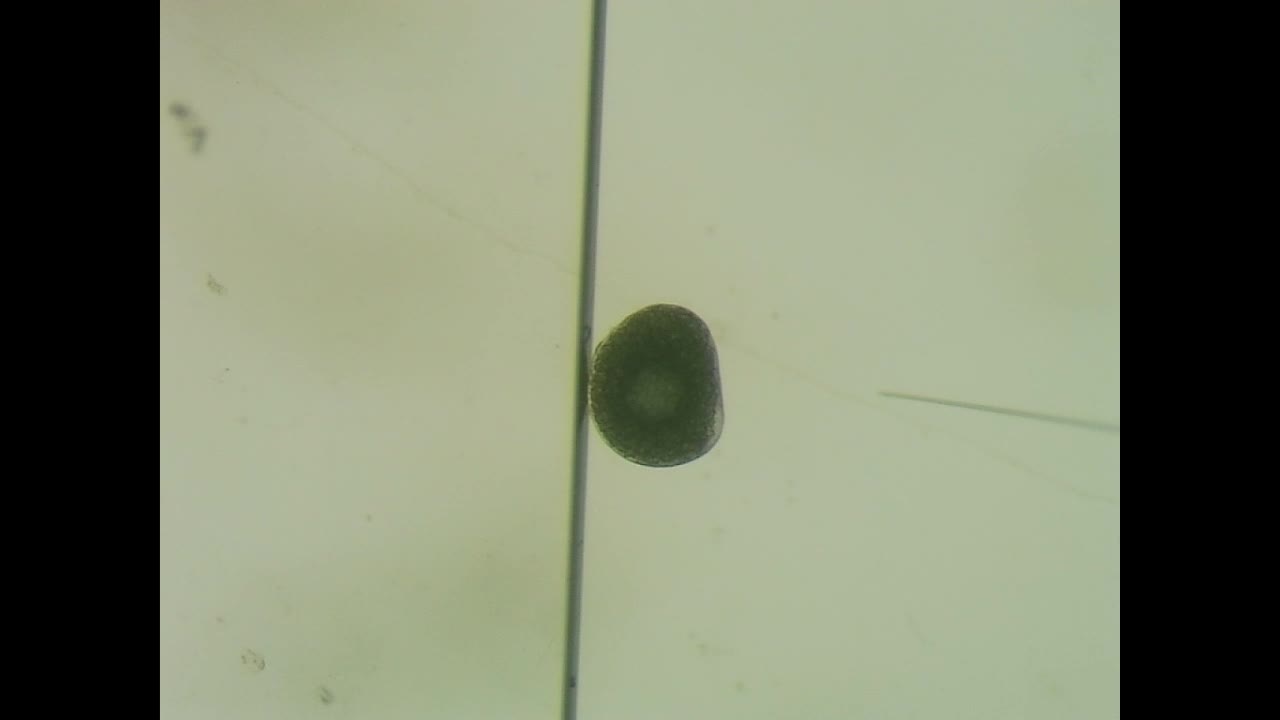
Embryo orientation
- Correct embryo orientation ensures that the embryo will be propped up against the cover slide against its longest side (Fig. 14A-B), creating a wide surface area that can withstand the pressure of needle injection whilst also creating a larger target for the needle (Fig. 14C).
- Incorrect embryo orientation, where the shortest side of the embryo will be facing the cover slide (Fig. 14D-E), increases the risk of bursting due to creating high pressure under injection whilst also offering a smaller (and therefore more challenging) target for the needle (Fig. 14F).
Figure 14. Good and bad examples of embryo orientation. A) An illustration of the top-down view of an embryo with correct orientation such that the longest side of the embryo is parallel to the cover slide. B) The corresponding photograph of correct embryo orientation. C) The lateral-view of an embryo with the correct orientation shows a large surface area which can be targeted during injection. D) An illustration of the top-down view of an embryo with incorrect orientation such that the shortest side of the embryo is parallel to the cover slide. E) The corresponding photograph of incorrect embryo orientation. F) The lateral-view of an embryo with the incorrect orientation shows that there is a smaller surface area that can be targeted during injection compared to C.
Embryo positioning
- Correct positioning of the embryo ensures that it is in direct contact with the cover slide (Fig. 15A-C) so that it would be fixed in position during injection.
- Incorrect positioning of the embryo means that it is not in contact with the cover slide (Fig. 15D-C) so it will move under the application of physical pressure.
Figure 15. Good and bad examples of embryo positioning. A) An illustration of the top-down view of an embryo with correct positioning such that the embryo is directly touching the the cover slide. B) The corresponding photograph of correct embryo positioning. C) The lateral-view is the same as Fig. 14C. D) An illustration of the top-down view of an embryo with incorrect positioning such that the embryo is not in contact with the cover slide. E) The corresponding photograph of incorrect embryo positioning. F) The lateral-view is the same as Fig. 15C and Fig. 14C.
Needle location
- Correct needle location in the centre (Fig. 16A-B) ensures that the physical pressure from the needle is less likely to burst the embryonic membrane.
- Incorrect needle location at the edge (Fig. 16C-E) increases the pressure and the risk of damage.
Useful note: A clear indication of how the incorrect needle location can burst an embryo membrane is shown in the additional injection troubleshooting section (Practice Video 4).
Figure 16. Good and bad examples of needle location. A) An illustration of the top-down view of correct needle location in the embryo centre (red cross). B) The lateral-view of correct needle location. C) An illustration of the top-down view of incorrect needle location at the edge of the embryo. D) The corresponding photograph of incorrect needle location. E) The lateral-view of incorrect needle location.
Needle focus
- Correct focus where both the embryo and ONLY the tip of the needle is in focus - body of the needle is out of focus (Fig. 17A) ensures that the needle will hit its target. Note that the setup involving the use of the micromanipulator prevents a perpendicular path for injection into the embryo. Instead the optimal angle is approx. 20-40 degrees, which explains why the body of the needle is closer to the microscope and should be out of focus.
- Incorrect focus where both the embryo and entire body of the needle are in focus (Fig. 17B-C) such that the needle misses the embryo by wither over- or undershooting its target.
Figure 17. Good and bad examples of needle focus. A) An illustration of the top-down view of a needle with correct focus such that both the embryo and ONLY the tip of the needle are in focus. B) An illustration of the top-down view of incorrect needle focus such that the tip is out of focus - the body is in focus. C) The corresponding photograph of incorrect needle focus.
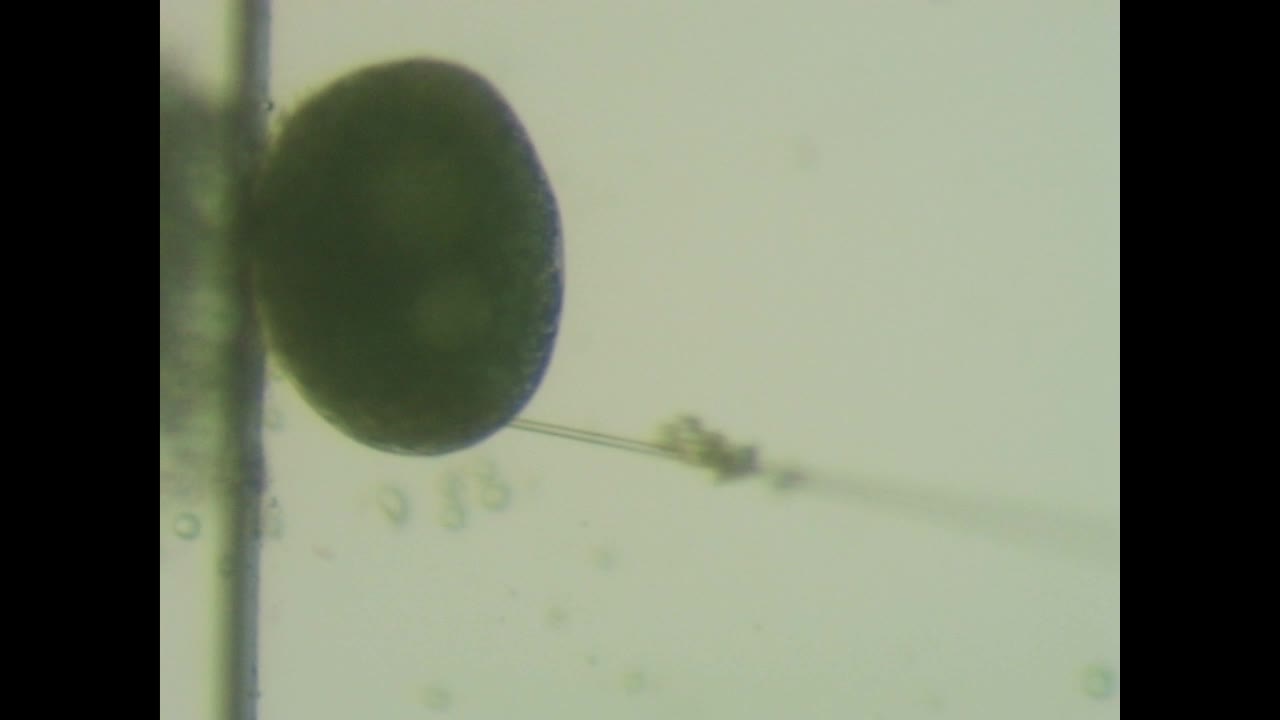
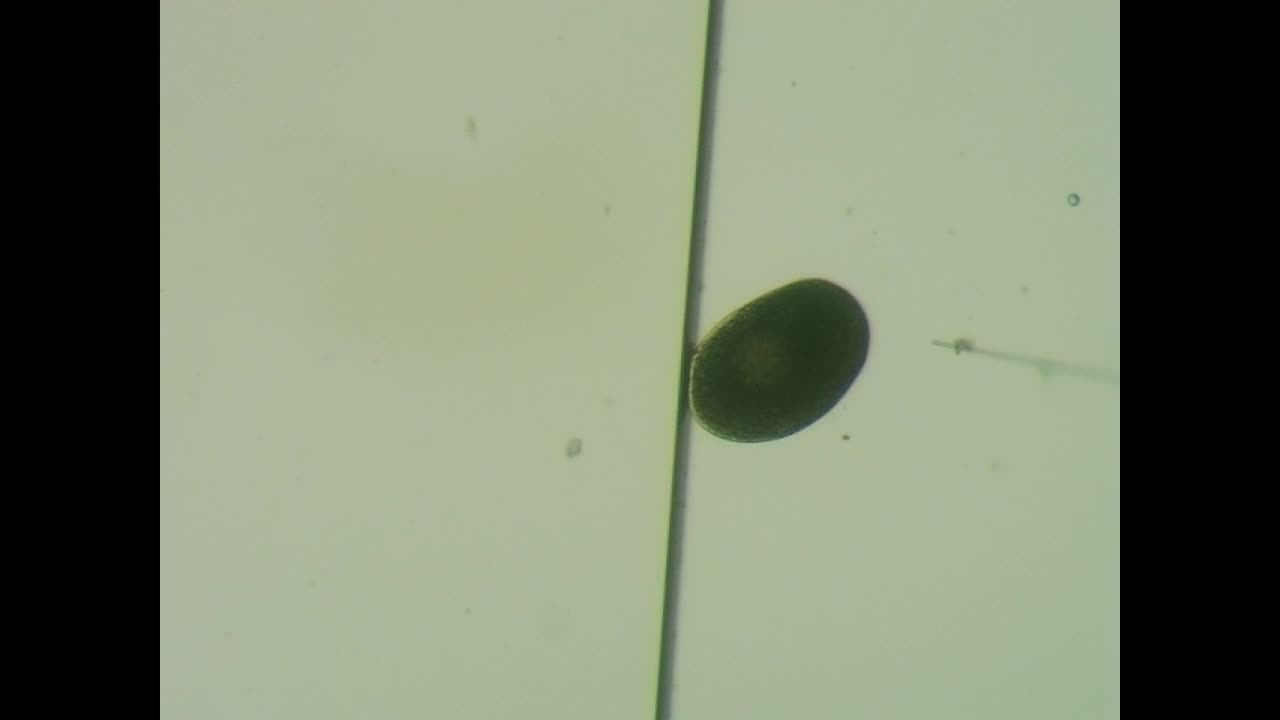
Embryo deformation and depth of needle penetration
- During injection, the needle may cause a temporary deformation of the embryo membrane that appears as a transparent divet with an aggregaton of the green lipid cells in the approximate vicinity (Fig. 18A-B). The embryo may slightly squash too (Fig. 18C).
- Correct depth of needle penetration is approximately 1/3 of the embryo width (Fig. 18 D-E). Under continued pressure, the embryo may squash further (Fig. 18F).
- Incorrect depth of needle penetration that goes too far may damage the vacuole and break the other side of the embryo membrane (Fig. 18G-I).
- Extreme depth of needle penetration that pushes against the cover slide may break the needle (Fig. 18H-J).
Figure 18. Good and bad examples of needle penetration. A) An illustration of the top-down view of an embryo with minor deformation. B) The lateral-view of an embryo with minor deformation shows some squashing. C) An illustration of the top-down view of an embryo with correct needle depth (red dotted line). D) The lateral-view of an embryo with the correct neelde depth is the same as C with some additional squashing. E) An illustration of the top-down view of an embryo with incorrect needle depth. F) The corresponding photograph of an embryo with incorrect needle depth. G) The lateral-view of an embryo with incorrect needle depth is the same as F with some additional squashing. H) An illustration of the top-down view of an embryo with extreme needle depth leading to a break. I) The lateral-view is the same as G.
Embryo Deformation
Sometimes eggs deform during injection, and sometimes they do not. This likely depends on a combination of controllable factors (such as injection site and needle aperture size) and natural variation (e.g., differences in membrane hardness and egg shape between embryos). One possible explanation is the time elapsed between successive injection attempts. Embryos injected later may have tougher membranes, making them more resistant to the needle and more likely to deform rather than allow smooth penetration.
Observed deformation pattern:
Pressure from the needle creates a visible divot in the membrane, which then relaxes once the needle successfully penetrates.
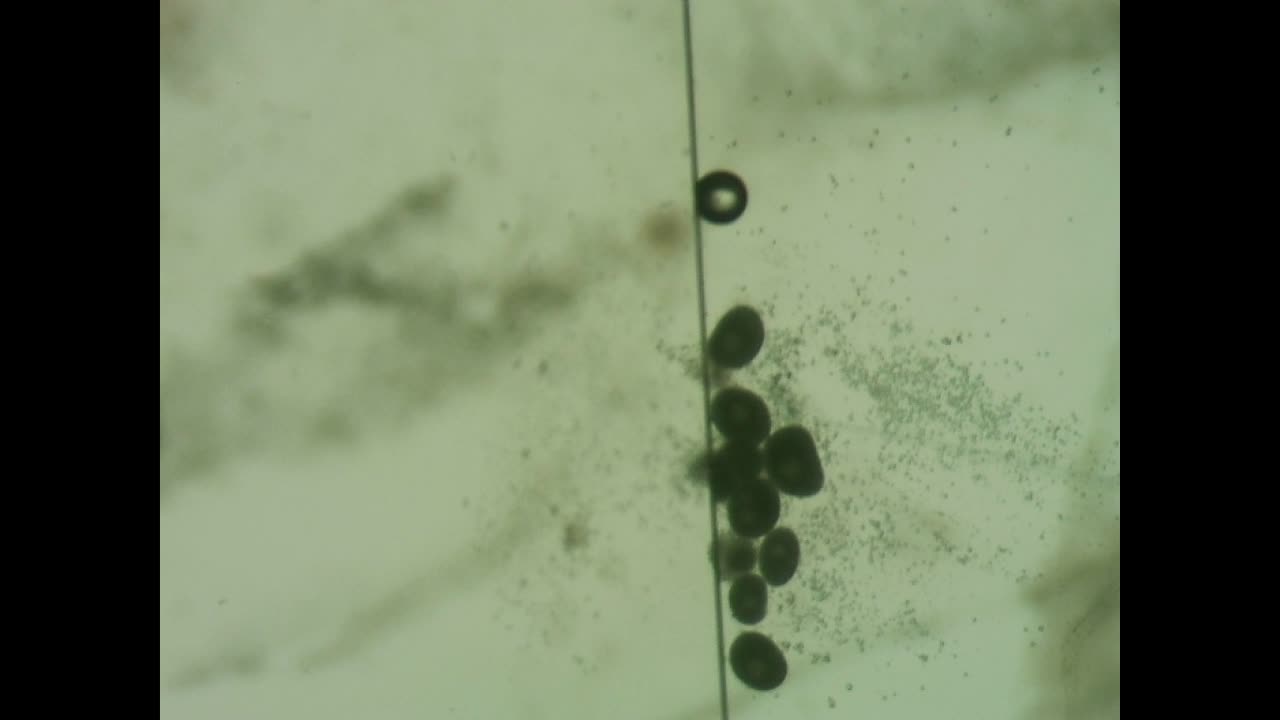
Instinctively, some degree of deformation may seem desirable, as it provides a visual cue that injection has occurred. However, aiming for deformation is unnecessary and can be harmful. Excessive force or repeated attempts can damage or break the eggs. Instead, successful injection (fluorescence, if applicable) should be verified after the attempt. After each injection, embryos should be immediately separated using a micropipette into individually labeled Petri dishes containing media. This step is important, as it quickly becomes difficult to track which embryos have already been injected.
Important note: Transfer embryos immediately after each injection attempt to avoid confusion.
Reference videos for comparison:
- Deformation observed (non-burst)
- Deformation observed leading to bursting
- No deformation observed, but fluorescence confirmed (slow but successful)
The instructional video for this step is temporarily unavailable and will be provided in an updated version of this protocol.
Deformation video 1 - Deformation observed.
The instructional video for this step is temporarily unavailable and will be provided in an updated version of this protocol.
Deformation video 2 - Deformation observed but caused bursting.
The instructional video for this step is temporarily unavailable and will be provided in an updated version of this protocol.
Deformation video 3 - No deformation but successful injection was later confirmed by fluoresence.
Additional injection troubleshooting
- Some additional examples of unsucessful attempts along with an explanation for their failure.
- Practice video 1:
- Likely reason(s): Incorrect embryo orientation, wrong needle depth, dirty environment. Alternatively, the membrane is too hard, so the developmental timing of the embryo should be better.
- Practice video 2:
- Likely reason(s): Needle tip is out of focus and passes underneath the embryo, so it needs to be better focused.
- Practice video 3:
- Likely reason(s): Needle penetration is too deep and too fast and the area is not clean which makes the embryo stick to the needle. Instead the area of injection should be cleaned and needle penetration is slow and controlled.
- Practice video 4:
- Likely reason(s): Edge of embryo injected leading to membrane burst, instead of choosing the centre (i.e. optimal needle location; also see previous section and corresponding figure).
Practice video 1 - Embryo moves under pressure from the needle.
Practice video 2 - Needle misses the embryo and passes underneath it.
Practice video 3 - needle penetrates embryo and the embryo sticks to it.
Practice video 4 - Edge of embryo injected leading to membrane burst.
Between Injection Attempts
- Flush the injection needle between attempts to prevent clogging and ensure consistent reagent delivery
- Transfer embryos carefully:
- Use gentle pipetting to avoid mechanical damage
- Avoid introducing air bubbles during transfer
- Reposition embryos efficiently:
- Gently move the petri dish to bring the next embryo into the field of view
- Avoid repeatedly repositioning individual embryos with a pipette, as this can be more difficult and may increase handling stress
Turn off the microinjection machine
- Ensure that you press and hold the off switch while the pressure releases (a small noise will emit) to avoid damaging the machine.
Check for signs of successful injection
- Wait for embryo membranes to harden prior to handling (approx. 120 minutes).
- Using a fluoresence microscope in a dedicated dark room facility with minimal lighting, apply the appriopriate filter - Make sure to avoid long and intense exposure to light that could degrade flouresence.
- Fluorescence should be fairly evenly distributed throughout the cells of the embryo (cf. small spots reflecting partial and unsucessful needle penetration, see figures below).
- Troubleshoot - lack of fluorescence may be due to degradation of dye rather than a poor micro-injection technique. Therefore, take a small volume of stock dye using a micropipette and slide - this should provide a strong control with an intense bright colour.
Incubate succesfully injected samples and assess phenotype change
- Incubate under normal conditions with fresh media replaced every 1-2 days.
- Apply antibiotics.
- Some labs find that agar increases survival rate of injected embryos (Hiruta et al., 2013).
- Check for development and survival to juvenile stage - at juvenile stage, transfer individuals to separate larger jars or containers.
- Visually assess phenotype change under microscope in the second generation (quantify the extent of heritability and complex 'mosaic' phenotype expression [i.e. expression of mixed or partial phenotype change]).
Discussion
- There is considerable variation among labs in certain steps, such as incubation (discussed above), but also there is scope for further optimisation of limiting factors (DIY moulds for fixing embryos).
Protocol references
Arao, T., Kato, Y., Nong, Q.D., et al. (2020). Production of genome-edited Daphnia for heavy metal detection by fluorescence. Scientific Reports, 10, 21490. https://doi.org/10.1038/s41598-020-78572-z
Ebert, D. (2022). Daphnia as a versatile model system in ecology and evolution.
Hiruta, C., et al. (2013). Development of a microinjection system for RNA interference in the water flea Daphnia pulex.
Kato, Y., Kobayashi, K., Watanabe, H., & Iguchi, T. (2011). Environmental sex determination in the branchiopod crustacean Daphnia magna: deep conservation of a Doublesex gene in the sex-determining pathway. PLoS Genetics, 7, e1001345.
Kato, Y., Matsuura, T., & Watanabe, H. (2012). Genomic integration and germline transmission of plasmid injected into crustacean Daphnia magna eggs. PLoS ONE, 7, e45318.
Kato, Y., Shiga, Y., Kobayashi, K., Tokishita, S., Yamagata, H., Iguchi, T., & Watanabe, H. (2011). Development of an RNA interference method in the cladoceran crustacean Daphnia magna. Development Genes and Evolution, 220, 337–345.
Miyakawa, H., Toyota, K., Hirakawa, I., et al. (2013). A mutation in the receptor Methoprene-tolerant alters juvenile hormone response in insects and crustaceans. Nature Communications, 4, 1856.
Nakanishi, T., Kato, Y., Matsuura, T., et al. (2016). TALEN-mediated homologous recombination in Daphnia magna. Scientific Reports, 5, 18312. https://doi.org/10.1038/srep18312
Paplauskas, S. (2026). Dataset for Fig. 1: Global distribution of Daphnia microinjection research (2013–2025) [Data set]. Zenodo. https://doi.org/10.5281/zenodo.19217543
Shimizu, R., Sakamoto, J., Adhitama, N., et al. (2024). Spatiotemporal control of transgene expression using an infrared laser in the crustacean Daphnia magna. Scientific Reports, 14, 25696. https://doi.org/10.1038/s41598-024-77458-8
Toyota, K., et al. (2016). Microinjection-based RNA interference method in the water flea, Daphnia pulex and Daphnia magna.