Feb 13, 2026
Standard Protocol for Lithic Use-Wear and Residue Analysis
This protocol is a draft, published without a DOI.
- Paolo Sferrazza1
- 1LEIZA, Tracer


Protocol Citation: Paolo Sferrazza 2026. Standard Protocol for Lithic Use-Wear and Residue Analysis. protocols.io https://dx.doi.org/
License: This is an open access protocol distributed under the terms of the Creative Commons Attribution License, which permits unrestricted use, distribution, and reproduction in any medium, provided the original author and source are credited
Protocol status: In development
We are still developing and optimizing this protocol
Created: February 13, 2026
Last Modified: February 13, 2026
Protocol Integer ID: 243181
Keywords: Use-wear, archeological lithic analysis, standard protocol for lithic use, lithic use, wear, analysis, residue analysis
Abstract
This is a generic and simplified protocol for lithic functional analyses
Safety warnings
- Avoid cross-contamination; change tools between samples.
- More aggressive chemical treatments (e.g., strong acids/bases) risk altering surface morphology and should be justified only when necessary for specific analytical needs and after documentation.
1. Preliminary Documentation and Macroscopic Assessment
Preliminary artefact documentation in context and lab
Assign unique identifiers (and plastic bag!) to each artefact.
Document provenience, context, and condition (including visible residues, corrosion, or concretion).
Photograph in situ (if possible) and after excavation under standardised lighting conditions.
Preliminary macroscopical observations.
Note: improper pre-cleaning can obliterate diagnostic evidence; thus, documentation before intervention is critical.
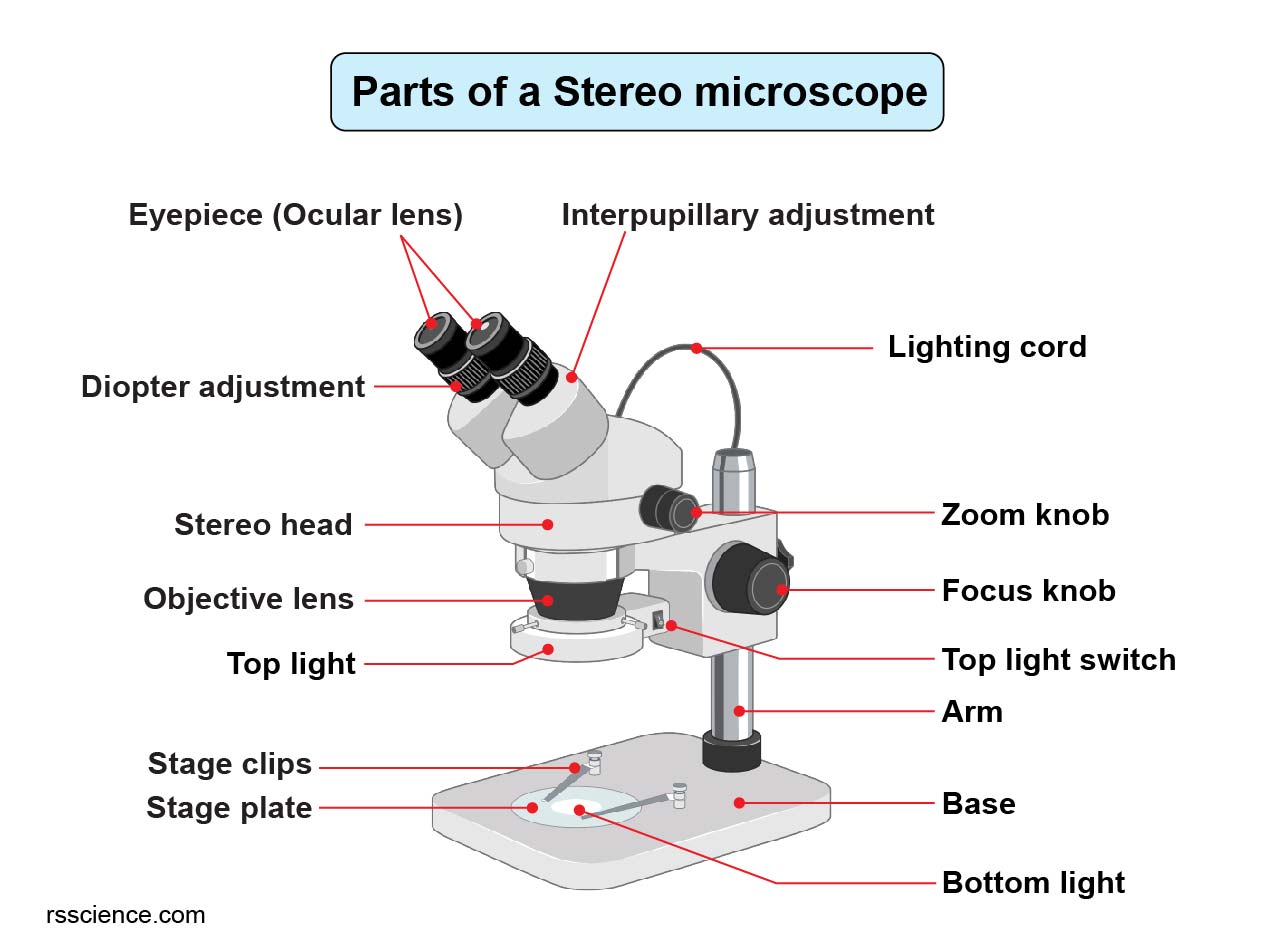
Examine surfaces with a hand lens or stereomicroscope (up to ~5× objectives) to map visible edge damage, residues, and potential use-wear features.
Photograph and map regions of interest before any cleaning to preserve evidence of original residue distribution.
2. Controlled Cleaning While Preserving Residues
Notes: Do not use harsh acids, bases, or oxidisers before residue documentation and collection.
If carbonate concretion is present and obscures surface microstructure, only after complete documentation of residue (steps 1-2) is obtained, it is possible to proceed to the next phase.
Dry cleaning
Use powder-free nitrile gloves throughout.
Gently remove adherent particles with soft brushes, wooden needles, and compressed air at low pressure.
Avoid any liquid contact at this stage to minimise early dissolution of residues.
Wet cleaning
Rinse briefly with deionised water to remove loose soil.
If adherent sediment remains, immerse briefly (~5–10 minutes) in an ultrasonic bath with deionised water.
For lipid-rich contaminants, a brief rinse in acetone or soap within the ultrasonic bath may be used, but only at this stage and documented meticulously.
2.1 Residue Documentation
Photograph residue patches at multiple magnifications before removal.
Map their positions relative to tool morphology.
Label vials and slides clearly for traceability.
3. Targeted Cleaning for Concretion Removal (Post-Residue Documentation)
Use dilute HCL (e.g., 5-20%), applied in brief, controlled intervals to dissolve carbonate without etching the lithic surface.
Rinse immediately with deionised water after treatment and document any changes.
A final ultrasonic rinse in deionised water (e.g., 5–10 minutes) can remove residual acid and reaction products.
More aggressive chemical treatments (e.g., strong acids/bases) risk altering surface morphology and should be justified only when necessary for specific analytical needs and after documentation.
Record all parameters (concentration, duration, temperature) for reproducibility.
Photograph before and after the concretion removal.
4. Qualitative Use-Wear Analysis
Use a stereomicroscope (magnification ~10–50×) to identify macro wear patterns (edge rounding, fractures, macroscopic scars)
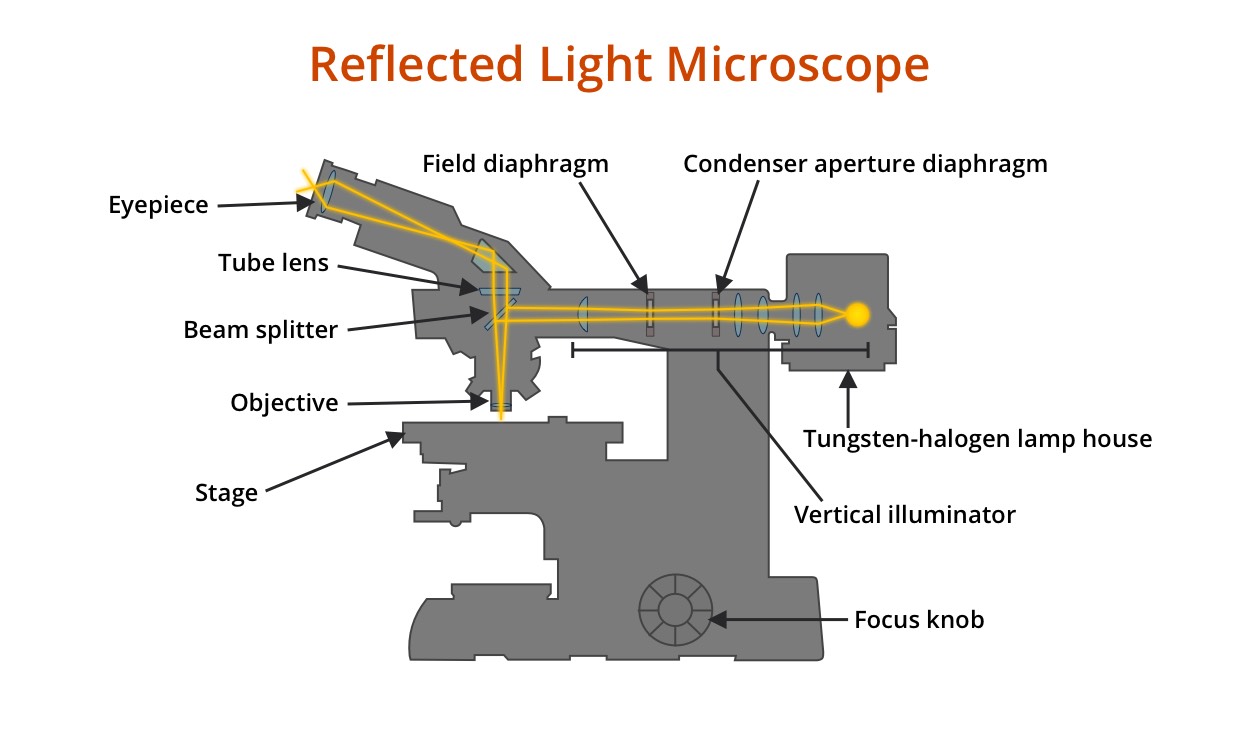
Use a Metallographic or reflected-light microscopy (~50–200× and higher) to identify micro wear patterns (polish, striations, rounding)
5. Experimental Framework and Construction of a Reference Collection
A robust experimental program and a systematically constructed reference collection are fundamental to the reliability, reproducibility, and interpretive strength of lithic use-wear analysis. Functional interpretations must be grounded in experimentally generated analogues produced under well-documented conditions.
5.1. Objectives of the Experimental Program
Replicate tool use against well-defined worked materials (e.g. wood, hide) under well-documented conditions.
Document the development and progression of wear over time (e.g. 30 min, 1 h, 1 h and 30 min).
Establish diagnostic qualitative criteria (same as the Excel of the archaeological).
Experimental design should explicitly address variables known to influence wear formation:
Contact material (e.g. plant, bone, wood, hide)
Contact material conditions (e.g., dry hide, fresh bone, dry bone, fresh wood)
if applicable, contact material species (e.g. wood/plant species, animal species)
Mechanical properties (when measurable: hardness, elasticity)
Each experiment must isolate and document these variables systematically (labeling, photos, videos).
6.2 Curation and Long-Term Archiving of the Reference Collection
The reference collection must be curated as a permanent research asset:
Store experimental tools in stable environmental conditions (no direct sun) and label them with a unique ID.
Maintain digital archives of all imaging data labelled with the same ID given to the experimental tool.
Provide metadata (check the option in your microscope software) for reproducibility and future re-analysis.
7. Quantitative Use-Wear Analysis (Optional)
Quantification increases objectivity and reproducibility in functional interpretation.
7.1 2D-3D textural analysis
Use 2D images taken from the metallurgical microscope to extract numerical features.
using GLCM or other matrices approaches to extract features and then classify them through statical approaches (e.g. kNN, Robust Forest, SVM).
Deep learning approach using pre-trained or custom-trained models to extract and classify.
Compute standard roughness parameters (ISO25178).
Use 3D surface images (X, Y, Z axis)
Use different microscopical techniques (e.g. confocal microscopy, infinite focus microscopy, SEM) to acquire and process 3D data, then classify them through statistical approaches.
8. Integrated Interpretation
Combine qualitative and quantitative observations with residue evidence and contextual data:
Correlate wear patterns with residue types.
Use residue analysis to refine interpretations of worked material.
Cross-validate use-wear and residue results with experimental analogues.
Document uncertainty and alternative interpretations explicitly. Acknowledge where results are ambiguous or where residues might reflect post-depositional processes.
9. Reporting
All results should be reported rigorously and transparently:
Methodological Details. Include cleaning protocols, microscopy configurations, measurement settings, and analytical software used.
Visual Archive. High-resolution images (before/after cleaning, micrographs at multiple scales).
Interpretive Narrative. Justify functional interpretations with reference to summed evidence (use-wear plus residues, plus contextual info and multidisciplinary results).
Reference to Experimental Baselines. Explicit comparison with experimental replicas or published reference libraries.