Jan 30, 2026
Site Directed Mutagenesis using Three Fragment HiFi assembly
- Nilmani Singh1,
- Stephan Lane2,
- Jingxia Lu2,
- Steven Jarsen1,
- Huimin Zhao1
- 1University of Illinois Urbana-Champaign;
- 2Cornell University
- NSF iBioFoundry UIUC


Protocol Citation: Nilmani Singh, Stephan Lane, Jingxia Lu, Steven Jarsen, Huimin Zhao 2026. Site Directed Mutagenesis using Three Fragment HiFi assembly. protocols.io https://dx.doi.org/10.17504/protocols.io.e6nvw4889lmk/v1
Manuscript citation:
A generalized platform for artificial intelligence-powered autonomous enzyme engineering
N. Singh, S. Lane, T. Yu, J. Lu, A. Ramos, H. Cui, H. Zhao
Nature Communications
volume 16, Article number: 5648 (2025)
License: This is an open access protocol distributed under the terms of the Creative Commons Attribution License, which permits unrestricted use, distribution, and reproduction in any medium, provided the original author and source are credited
Protocol status: Working
We use this protocol and it's working.
Created: September 20, 2025
Last Modified: January 30, 2026
Protocol Integer ID: 227786
Keywords: site directed mutagenesis, automation, protein engineering, mutagenesis, targeted mutagenesis, synthetic biology, HiFi mutagenesis, HiFi assembly, high-throughput site directed mutagenesis, mutagenesis library, high-throughput mutagenesis, automated mutagenesis, biofoundry, NSF iBioFoundry, autonomous protein engineering, site directed mutagenesi, targeted mutation, mutation site, fragment hifi assembly this protocol, directed mutagenesi, using hifi assembly, fragment hifi assembly, hifi assembly, pcr fragment, sequencing burden, minimizing parental contamination
Funders Acknowledgements:
NSF iBioFoundry
Grant ID: DBI- 2400058
U.S. Department of Energy (DOE) Center for Advanced Bioenergy and Bioproducts Innovation
Grant ID: DE-SC0018420
NSF Global Center for Reliable and Scalable Biofoundries
Grant ID: OISE-2435374
NSF MMLI
Grant ID: 2019897
Abstract
This protocol outlines a method for site-directed mutagenesis (SDM) using HiFi assembly with three PCR fragments. This approach yields a success rate exceeding 90–95%, effectively creating targeted mutations while minimizing parental contamination. Given this high efficiency, typically only one colony needs to be picked per mutation site, significantly reducing the sequencing burden. The method is suitable for high-throughput applications and is compatible with automation in a 96-well plate format.
Image Attribution
Image created using Biorender.com
Materials
Materials from New England Biolabs (NEB)
Q5 High-Fidelity DNA Polymerase (M0491L)
HiFi Assembly Master Mix (E2621L)
DpnI (R0176L)
Homemade competent cells: The Hanahan Method
Green MR, Sambrook J. The Hanahan Method for Preparation and Transformation of Competent Escherichia coli: High-Efficiency Transformation. Cold Spring Harb Protoc. 2018 Mar 1;2018(3). doi: 10.1101/pdb.prot101188. PMID: 29496820.
Protocol Overview
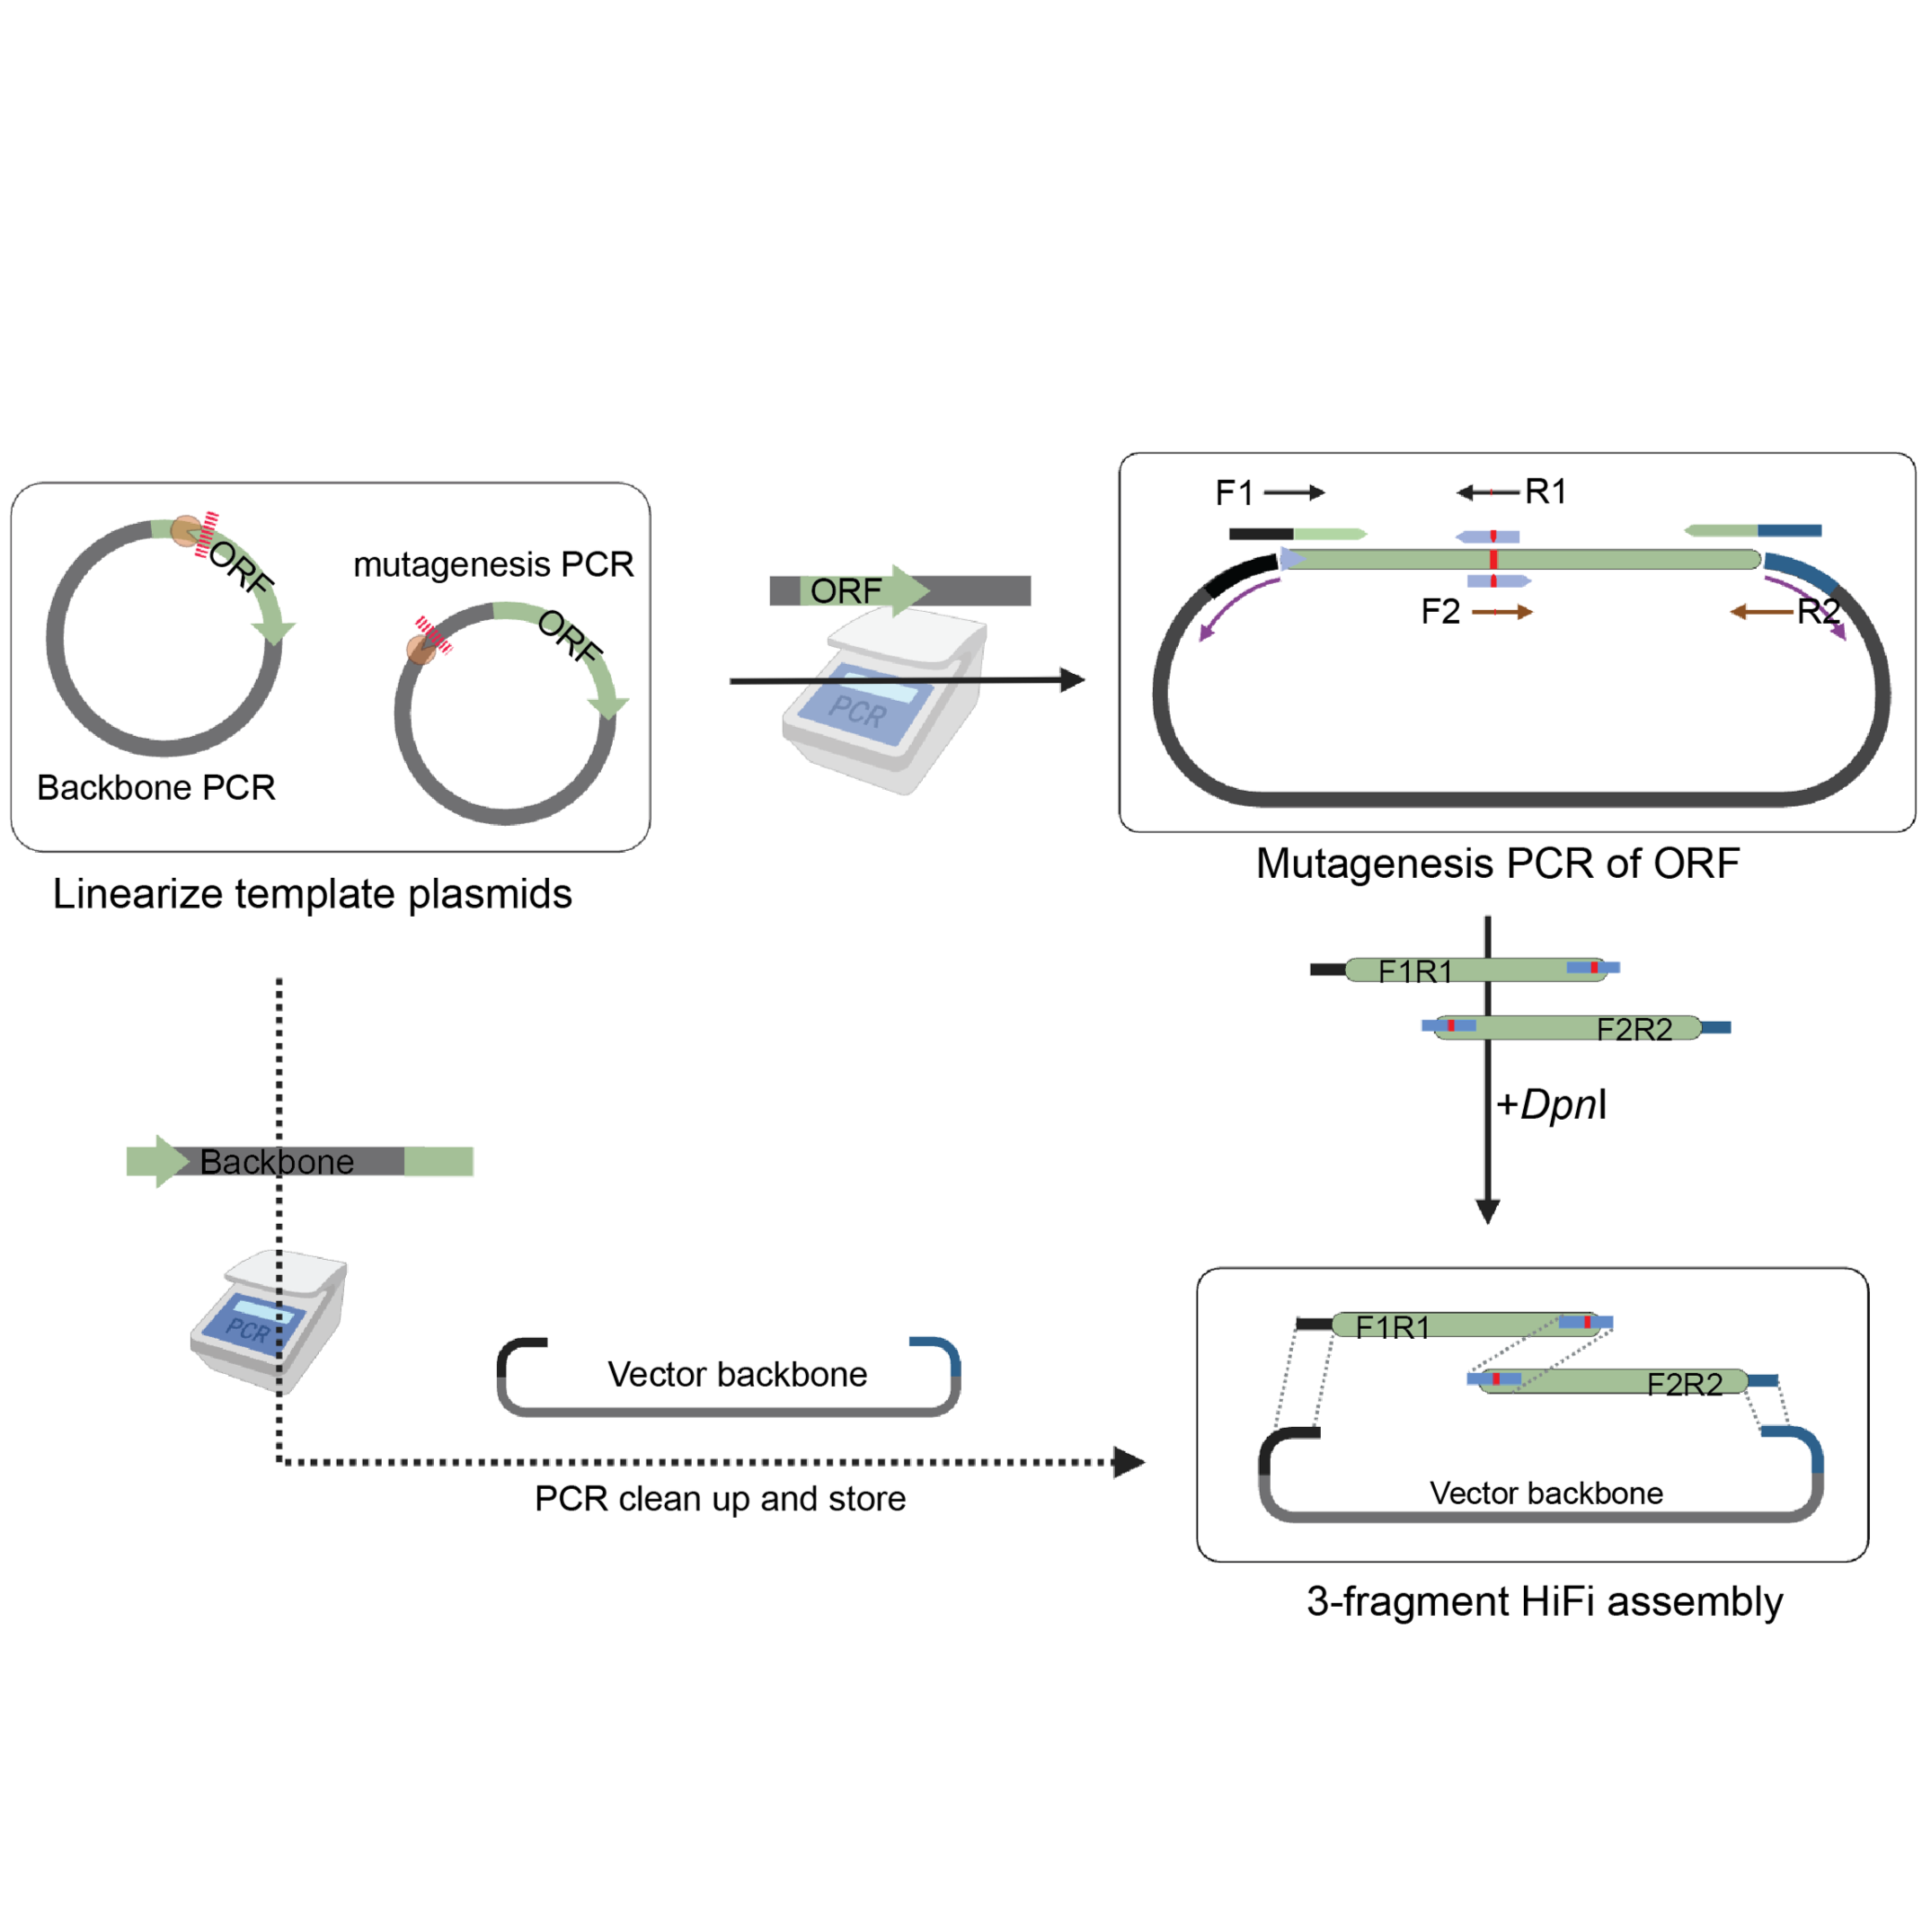
This protocol aims to perform site-directed mutagenesis using NEB NEB HiFi assembly of three PCR fragments (Figure 1). The method involves mutagenic primers, linearies, PCR assembly.
For primer designs
For primer designs, there shoufully sequenced plasmid with wild-typeld b, th prcloned in a done iation expression vectorike pEpET-288a
The three PCR fragments consist of: (1) vector backbone, (2) forward mutagenic fragment, and (3) reverse mutagenic fragment. Each fragment contains 27-40 overlapping base pairs for efficient HiFi assembly.
Note: Using three fragments nstead of two, keeps the ORF
Note: Using three fragments instead of two, keeps the mutagenic fragment PCR size comparatively smaller leading to better PCR yield and success. This method can also be adapted to use two fragments.
Figure 1: Overview of site-directed mutagenesis workflow. Three PCR fragments are assembled using HiFi assembly to create mutated variants.
Primer Design and Template Preparation
Design mutagenic primers
Overview For this specific protocol Mutagenic primers are designed as 27 base-pairs with a specific structure (12 + 3 + 12 nucleotides) to introduce desired mutations while maintaining sufficient homology for PCR amplification. The 3 basepairs are the codon you want to change so you must keep in mind the ORF if designing manually. The forward and reverse mutagenic primers are complementary providing ~27bp homology.
You can also work with a different mutagenic primer design strategy if that is more suited to your work. These are the primers that will change between designs.
Mutagenic primers designed to mutate V124 to F that contain 3 mutations flanked by 12bp regions homologous to the WT protein. The resulting forward and reverse mutagenic PCR products will have 27bp of homology.
Design mutagenic primers using a Python script or primer design software.
Specifically the Primer_Design_SDM.py script for primer design for this protocol.
Ensure that designed primer sequences follow principle for a effective primer design.
Primer Quality Check
- Either manually or computationally verify potential issues with primers.
- These could include homopolymer runs, high or low GC, pallindromic sequences or Primer binding to multiple sites in the template DNA.
Order primers in suitable format in tubes or 96-deepwell plates at your desired concentration. Store primers according to manufacturer's instructions
Design overlapping primers for ORF and backbone
Overview: In order to amplify the 2 mutagenic fragments and the vector backbone, you will need to design: 1) ORF forward primer, 2) ORF reverse primer, 3) backbone forward primer, and 4) backbone reverse primer.
As stated the end goal is to amplify 3 separate fragments that are cloned together using homology regions:
Forward mutagenesis fragment which contains at a minimum the N-terminal region of the protein leading up to 12bp past the mutation in question. This is comprised of ORF forward primer and mutagenesis reverse primer. This can include backbone elements before the protein like your promoter. This design can help reduce the size of the backbone fragment making PCR conditions more consistent across fragments, increases the pool of viable restriction enzymes that are used prior to PCR, and potentially increase the number of design targets you can make - e.g. promoter/RB site fine tuning, more N-terminal designs without having very disproportionate fragment sizes, etc.
Reverse mutagenesis fragment which contains at a minimum 12 bp upstream of the target mutation and the rest of the C terminal region of the protein. This is comprised of the mutagenesis F primer and ORF reverse primer. Can similarly include more elements of the backbone.
Backbone fragment is basically the rest of the plasmid outside of the regions between the ORF primers. This is comprised of the backbone forward and backbone reverse primer. This should only include backbone elements
It is important to note that these 4 primers will be used across all your designs for the same protein and backbone. The only primers you would change are the mutagenesis forward and reverse primers.
For successful HiFi assembly of the ORF fragments into the backbone, at least 20 bp of homology between the backbone and ORF primers are used:
20 bp of homology between the ORF forward primer and backbone reverse primer.
21 bp of homology between the ORF reverse primer and the backbone forward primer.
When designing the junctions between the ORF fragments and the backbone, use best primer design guidelines as discussed above and test the ORF F/R and backbone F/R primer pairs to ensure high success rate.
Prepare linearized plasmid templates
Overview: Culture transformed high-copy e. coli cloning strain, isolate the plasmid, run post-isolation QC, set up ORF and backbone digests, purify, and run post-purification QC.
Important note 1: Ultimately you will only need 200-500pg of final digested and purified plasmid per reaction (3 reactions per design) so it is up to you to consider what scale of culture, prep, and digestion you would like to do. You can get by with a standard 5ml culture, miniprep, and 500ng of the 2 different digests going into purification (more on this later) if you are only doing a few designs.
Important note 2: For DNA concentration, getting accurate measurement is important. We prefer to use Qubit over Nanodrop.
Overnight culture, isolation, and QC
2 days before you plan to set up your overnight culture, streak out around 10ul from your glycerol stock evenly across 1 antibiotic+LB agar plate then use the same spreader to streak across another identical plate to ensure single colonies on at least one of the plates. Grow for 16 hours at 37C.
Transfer the colonies onto a patch plate and into 10ul of water to be used as a template for colony PCR with vector specific primers like ORF F/R. Grow for 16 hours at 37C.
For a large batch: Prepare at least 125 ml of LB broth with antibiotic at standard concentration (e.g. 50ug/ml Kan). Transfer 50 ml of the LB into an autoclaved 250ml flask (optionally set up a second culture for redundancy). Using a pipette tip, touch the replica plate colony which has the brightest correct band based on the colony PCR results and transfer into the culture. Cover with aluminum foil lightly and shake at 37C at 220rpm for 16 hours.
Follow manufacturer protocol for midiprep using warmed elution buffer containing RNase. The goal is to have a final elution volume of 500ul with a concentration of at least 100ng/ul. Confirm concentration using Qubit, Nanodrop measurement may result in wrong concentration. If sufficient concentration, run a 20 minute test digest following manufacturer protocol with 500ng of product using restriction enzymes that are high efficiency and would produce clear, well separated bands. If the product passes these QC steps, submit for whole plasmid sequencing.
For smaller experiments, use smaller culture volume and a miniprep kit following manufacturer suggestions. Still aim for around 100ng/ul concentration.
Digesting parent plasmid
Two linearization digests will be setup for use in the downstream PCR. This linearization will enhance PCR efficiency and reproducibility as well as reduce parental contamination.
For the digest that will be used in the backbone fragment PCR, choose a high fidelity single cutter enzyme that is located within the region between the ORF F and R primers so that the backbone is not interrupted:
XbaI is located within the ORF fragments so it was used for linearizing the backbone in pET-28a HMT.
For the ORF fragment template, similarly pick a single cutter within the backbone fragment (e.g. EcoRV for pET-28a HMT).
For targeting a scale of 96 unique designs, set up the backbone fragment template digest at 25ul with 500ng of added plasmid and the ORF fragments template digest at 50ul with 1000ng of plasmid. Incubate for 2 hours following manufacturer protocol and then perform PCR purification also following protocol using warmed elution buffer. Aim for a final elution volume of 20ul with at least 20ng/ul based on Qubit reading. You want at least 10ng/ul concentration for smaller experiments. Some volume can be used to run a QC gel against undigested plasmid to test for linearization.
Save some volume of the digested plasmid and dilute the rest to 100pg/ul working concentration to use as a PCR template. Low amount of plasmid allows for reduced occurrence of WT clones after the final assembly.
PCR, DpnI digestion, and purification
Overview: Setup and perform the separate PCR reactions to make the forward mutagenic fragment, reverse mutagenic fragment, and the PCR backbone. Digest with DpnI and purify.
Setting up PCR
For each design at least 2 unique PCR products (the forward and reverse mutagenic fragments) are needed and one product that is shared between all designs sharing the same ORF F/R primers (the backbone fragment). Because of this, you can make a batch of the final backbone PCR product and reuse it for multiple designs instead of remaking and purifying it every time since only 30ng of the final product will be used in the cloning reaction.
Note: For the amount of input Template DNA, run a test PCR and check on agarose gel if you get enough PCR yield with 200-500pg input template.
50ul PCR reactions were set up as follows for all 3 fragments (adjust volumes to your enzyme master mix and primer concentrations):
| A | B | |
| Q5 polymerase | 0.5ul | |
| 5x Q5 reaction buffer | 10ul | |
| 2uM Forward primer | 12.5ul | |
| 2uM Reverse primer | 12.5ul | |
| ~100pg/ul digested and purified plasmid | 2ul | |
| dH2O | 12.5ul |
Q5 PCR reaction set up
Q5 polymerase was chosen due to its ability to tolerate a wide range of theoretical annealing temperatures. In practice this allows for a 65C annealing temperature to be used across a broad range of designs while still getting successful and high fidelity target amplification. For calculations of extension time, use the longest PCR fragment.
The thermocycler conditions used are as follows:
| A | B | |
| 98C | 30sec | |
| 98C | 10sec | |
| 65C | 30sec | |
| 72C | 60sec | |
| Go to step 2 | 18X | |
| 72C | 360sec |
Run an agarose gel or fragment analyzer to confirm amplification.
DpnI digestion and PCR purification
Add 0.5ul of DpnI to all of your samples without adding additional buffer as the PCR master mix is sufficient. This enzyme cuts at Dam methylation sites which are found in the parent plasmid, but not the PCR product. Incubate at 37C for 4 hours. After leave at room temperature overnight to ensure the parent plasmid is as degraded as much as possible to reduce the chance of WT colonies.
Next day, we directly add the PCR reaction to the HiFi assembly reaction.
Optional: PCR purification can be done, but is not neccessary. Measure the concentration of the final elution using Qubit.
You should dilute the backbone fragment PCR to a concentration of ~30ng/ul for ease of use. The forward and reverse fragments will be used at the concentration they are.
HiFi reaction and cloning
Overview: Setup and perform the HiFi reaction and transform DH5a.
We directly use the PCR reaction mixture without PCR purification. Although, when PCR reaction yield multiple bands, there may be a need to do Agarose gel cleanup.
HiFi assembly reaction
The HiFi reaction is relatively robust and has been tested across at least 2 plasmids with hundreds of designs with a universal recipe rather than using the recommended molar ratios. To improve the efficiency of the reaction further, 50ng of single-strand binding protein (NEB #M2401) were added to 500ul of 2X HiFi master mix (NEB #E2621). You can adjust the HiFi reaction recipes, 10ul HiFi assembly reaction works well too.
The recipe is as follows:
| A | B | |
| 2X HiFi master mix w/ added SSB protein | 7.5ul | |
| 10ng/ul Backbone fragment | 3ul | |
| Forward mutagenic fragment (DpnI digested PCR reaction) | 2ul | |
| Reverse mutagenic fragment (DpnI digested PCR reaction) | 2ul | |
| dH2O | to 15ul |
Incubate at 50C for 30 minutes.
Transformation of DH5⍺
Transfer 5ul of your HiFi reactions to new strip tubes or plates and put on ice as you thaw DH5⍺. Put the rest of the HiFi product in -20C. Once thawed, add at least 20ul of DH5⍺ to the aliquoted HiFi reactions and allow to incubate on ice for at least 5 minutes, up to 30 minutes.
Heat shock at 42C for 30 seconds and allow to rest on ice for another 5 minutes before transferring to 150ul SOC media. Allow to outgrow for 1 hour at 37C.
Note: We use 330ul PCR plates which allows adding 150ul outgrowth media directly to DH5⍺ + HiFi reaction mixture.
Plate 60ul of the culture on LB agar+antibiotic plates and allow to grow overnight. Pick intermediate-sized single colonies with a tip, make a patch plate, and use the tip same plate to inoculate 5ml of LB+antibiotic media. Allow the cultures and patch plate to grow for 16 hours in. Miniprep, nanodrop, and send for whole plasmid sequencing.
Protocol references
Singh, N., Lane, S., Yu, T. et al. A generalized platform for artificial intelligence-powered autonomous enzyme engineering. Nat Commun 16, 5648 (2025). https://doi.org/10.1038/s41467-025-61209-y