Feb 12, 2026
Version 2
Single_Stranded_Library_Workflow_Gut_Virome V.2
- 1University of Copenhagen



Protocol Citation: Xichuan Zhai 2026. Single_Stranded_Library_Workflow_Gut_Virome. protocols.io https://dx.doi.org/10.17504/protocols.io.8epv5r5w5g1b/v2Version created by Xichuan Zhai
Manuscript citation:
https://doi.org/10.21203/rs.3.rs-4304844/v1
License: This is an open access protocol distributed under the terms of the Creative Commons Attribution License, which permits unrestricted use, distribution, and reproduction in any medium, provided the original author and source are credited
Protocol status: Working
We use this protocol and it's working
Created: February 12, 2026
Last Modified: February 12, 2026
Protocol Integer ID: 243099
Keywords: Single-stranded library preparation, gut virome, single-stranded-library-workflow-gut-virome protocol, sslr, stranded library, preparation for virome study, virome study
Funders Acknowledgements:
VILLUM FONDEN
Grant ID: 23145
VILLUM FONDEN
Grant ID: 36242
Abstract
Protocol of single-stranded library (SSLR) preparation for virome study
Guidelines
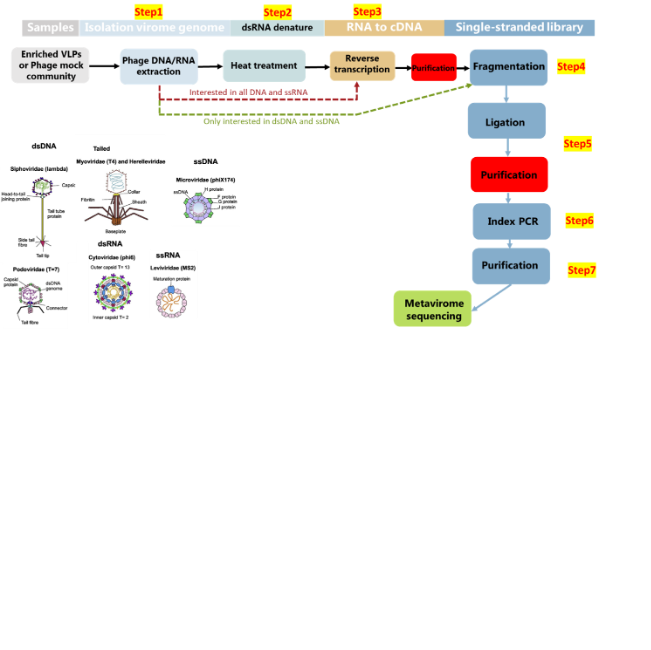
This protocol is designed for virome library preparation with our lab-customed single-stranded library (SSLR). This workflow includes 7 FLEXIBLE steps, virome isolation and extraction, mock community (positive control) preparation, reverse transcription with the purpose of dsRNA denatures, genome fragmentation, ligation with customed designed adaptors and library preparation for sequencing. Detailed information can be found on the next page.
Materials
SM buffer: lab-prepared according to https://cshprotocols.cshlp.org/content/2006/1/pdb.rec8111.full?text_only=true
Pierce‱ Universal Nuclease for Cell Lysis: #88701
QIAamp Viral RNA Mini Kit (250): # 52906
SuperScript‱ IV VILO‱ Master Mix: #11756050
AMPure XP beads, 60 mL: #A63881
TE, pH 8.0, RNase-free: #AM9849
ET SSB (500 µg/mL): #M2401S
T4 Polynucleotide Kinase (10 U/μL): #EK0031
T4 DNA Ligase (5 U/μL): #EL0012
T4 DNA Ligase Buffer (10X) with 50% PEG-4000: #B69
Forward/reverse adapters: Lab designed and produced by IDT
AccuPrime‱ Taq DNA Polymerase System: #12339016
Nextera XT Index Kit v2 Sets: #FC-131-2001, 2002, 2003, 2004
Qubit 1X dsDNA HS Assay Kit: #Q33231
High Sensitivity D5000 ScreenTape Assay: #5067-5593
Protocol materials
Fresh 80% Ethanol
Safety warnings
Not applied
Ethics statement
Not applied
Before start
Fill bucket with crushed ice.
Step1: Virome isolation and extraction
Checklist before starting
Note
Where: Fecal lab
Timing: 180 min
Reagents/kits
- SM buffer: lab-prepared according to https://cshprotocols.cshlp.org/content/2006/1/pdb.rec8111.full?text_only=true
- Pierce‱ Universal Nuclease for Cell Lysis: #88701
- QIAamp Viral RNA Mini Kit (250): # 52906
Equipment
- Centrifuge
- 37°C incubator
Procedure
Make aliquots of 140 μL of enriched virome (procedure can be found from: dx.doi.org/10.17504/protocols.io.b2qaqdse).
Add 1 µL of 100-time diluted nuclease (check the stock for the dilution in SM buffer) to each sample and let them incubate at approximately 00:30:00 at37 °C per. sample. Vortex between each sample.
30m
Consider increasing the incubation time if you expect a lot of external DNA.
Immediately after adding540 µL AVL buffer to inactivate nucleases.
Mix the mixture by pulse vortexing.
Incubate at Room temperature for 00:10:00 .
10m
Change gloves.
Briefly centrifuge the mixture with a microcentrifuge.
Add560 µL of absolute ethanol (96%) to the sample mixture.
CRITICAL STEP: Mix very well by pulse-vortex.
Briefly centrifuge the mixture with a microcentrifuge.
Add630 µL of the sample mixture to the spin column.
CRITICAL STEP: Do not touch the column rim with the pipet.
Centrifuge at 6,000 x g, Room temperature change the collection tube and repeat steps 1.12 to load all the extracts.
Add500 µL AW1 buffer to the spin column the following:
Centrifuge at6,000 x g, Room temperature, 00:01:00 , change the collection tube.
1m
Add 500 µL AW2 buffer to the spin column.
Centrifuge at20,000 x g, Room temperature, 00:03:00 , change the collection tube.
3m
Centrifuge at 20,000 x g, Room temperature, 00:01:00 . Place the spin column in a low-binding RNAse-free 1.5 mL tube.
1m
Add 30 µL of AVE (elution buffer) to the spin column and incubate Room temperature for00:01:00 .
1m
CRITICAL STEP: Pipet the AVE buffer directly onto the filter membrane without touching it with the pipet tip.
·
Make sure ethanol 96% has been added to AW1 and AW2
buffer·
Make sure ethanol 96% has been added to AW1 and AW2
bufferCentrifuge at6,000 x g, Room temperature, 00:01:00 to collect the filtrates.
Note
PAUSE POINT Send for next step or store viral DNA/RNA at -80°C.
CAUTION
- NOT interested in RNA??? THEN GO .
- Interested in DNA and ssRNA, THEN GO .
- Interested in DNA, dsRNA and ssRNA, THEN GO .
- Remember to include positive (Mock from extraction) and Negative (H2O from extraction) controls for each extraction.
- Make sure 96% ethanol has been added to AW1 and AW2 buffers.
- Remember to include a negative control for each extraction.
1m
Step2: Heat treatment
Checklist before starting
Note
Where: Clean-lab
Timing: 3 min
Reagents
No reagents needed
Equipment
- UV-beach
- Thermocycler
- Microcentrifuge
Procedure
Preheated ThermoCycle machine to 95 °C and sterilized PCR tubes or plates depending on the
how many samples are used for reverse transcription.
Add16 µL extracted virome in PCR tubes or platesand prepare on ice.
Briefly centrifuge the mixture with a microcentrifuge.
Put tubes or plates for heat treatment95 °C for00:03:00 .
3m
CRITICAL STEP: Transfer samples to ice immediately after00:03:00 .
3m
PAUSE POINT Ready for reverse transcription.
Note
CAUTION
- If you would like to look at the RNA in your samples, it is better to finish extraction, heat treatment, and reverse transcription on the same day.
- Pipette, filtered pipette tips, and workbench need to be sterilized by UV lamp for 20 min prior work.
- Remember to include Positive (Mock from extraction Step1) and Negative (SM buffer from extraction) controls for the reaction.
Step3: Reverse transcription (RT)
Checklist before starting
Note
Where: Clean-lab
Timing: 25 mim
Reagents/kits
- SuperScript‱ IV VILO‱ Master Mix: #11756050
- AMPure XP beads, 60 mL: #A63881
- TE, pH 8.0, RNase-free: #AM9849
Equipment
- Thermocycler
- Microcentrifuge
- UV workbench
Procedure
Transfer 16 μL of extracted or heat-treated virome DNA/RNA to a clean PCR plate.
Add 4 µL SuperScript‱ IV VILO‱ Master Mix to each sample and mix thoroughly, spin them down.
Carefully place the PCR plate into the ThermoCycle machine and select the following program:
| A | B | |
| Temperature profile | ||
| 25°C | 10 min | |
| 50°C | 10 min | |
| 85°C | 5 min | |
| 4°C | ∞ |
Purified with 1X AMPure XP beads (25 μL / 25 μL PCR reaction) and eluted with20 µL Tris
buffer (10 mM, pH8.0) according to the purification procedures from .
Note
PAUSE POINT Samples can be stored in the fridge or freezer for downstream preparations.
Step4: Fragmentation
Checklist before starting
Note
Where: Basement (using ID card and key for access)
Timing: 15 min
Reagents
No reagent needed
Equipment
- Bioruptor‱ Pico sonication device (#B01060010)
- Microcentrifuge. Bring the microcentrifuge with you to the basement!
- Autoclaved Bioruptor tubes (volume: 650 µL )
Procedure
CRITICAL STEP: Pre-cooled (4°C) the Biorupter and holder at least00:30:00 .
30m
Transfer 22 µL genomic DNA or reverse-transcription products to Bioruptor tubes and briefly spin down to make sure all the liquid is at the bottom of tubes.
Put samples on the ice for at least00:10:00 .
10m
CRITICAL STEP: Set the sonication parameter as following: 15s ON and 90s OFF, using 8 cycles.
CRITICAL STEP: Spin down the samples and carefully load the Bioruptor tubes to sonicater holder and close carefully, make sure there is no liquid at the side of tubes.
CRITICAL STEP: Put the tube holder into the sonication chamber and close the lids. 12 samples can be done each time.
Spin down the tubes after shearing.
The fragmented product is ready for ligation.
Note
PAUSE POINT Samples can be stored in fridge or freezer for downstream preparations.
CAUTION
- Pregnant women should not stay away from the running machine.
- DO NOT turn on the instrument without water.
- Distilled water should be used to fill the tank.
- Always keep 12 tubes for each run to ensure successful shearing.
Step5: Ligation
Checklist before starting
Note
Where: Clean-lab
Timing: 60 min
Reagents
- ET SSB (500 µg/mL): #M2401S
- T4 Polynucleotide Kinase (10 U/μL): #EK0031
- T4 DNA Ligase (5 U/μL): #EL0012
- T4 DNA Ligase Buffer (10X) with 50% PEG-4000: #B69
- Forward/reverse adapters: Lab designed and produced by IDT
- AMPure XP beads, 60 mL: #A63881
- Tris buffer (10 mM, pH 7.5)
- H2O (autoclaved, UV-sterilized MiliQ)
Equipment
- Thermocycler
- Microcentrifuge
- 96-well PCR plate with seal
- Eppendorf tubes
- 50 mL Falcon tube
- Ice/cooling block
Procedure
Denature
According to the number of samples (Include extra 3 for pipetting errors), prepare an ET SSB dilution in a clean tube. In the table below is calculated for a whole plate of 96 wells (Master Mix per 100 samples): diluted ET SSB to 5 ng/µL (500 µg/mL in the stock solution) with Tris and then add same volume of Tris, for example 1 µL ET SSB in 100 µL tris buffer. Mix them, spin them down and place on ice.
| A | B | C | |
| Reagent | Per 1 sample µL | Per 100 samples µL | |
| Fragmented DNA | 20 | - | |
| ET SSB dilution (10 ng) | 2 | 100 | |
| Total denaturation reaction volume | 22 |
Add20 µL of fragmented DNA to each well.
Add2 µL ET SSB solution, pipette several times, and spin down.
Transfer to ThermoCycle and denature for 00:03:00 at95 °C .
3m
Cooling down on ice immediately after heating and set On ice for at least00:05:00 .
5m
Ligation
Spin down the heat denatured sample with a microcentrifuge.
According to the number of samples (Include extra 3 for pipetting errors), prepare a Master Mix containing per sample. In the table below is calculated for a whole plate of 96 wells (Master Mix per 100 samples). Mix them, spin them down and place on ice.
| A | B | C | |
| 95 ℃ for 3min, cool down on ice immediately for at least 5 min | |||
| Reagents | Per 1 sample µL | Per 100 samples µL | |
| PEG-4000 (50%) | 10 | 1000 | |
| H2O | 8 | 800 | |
| T4 ligase buffer (10X final) | 5 | 500 | |
| T4 PNK (10,000 units/mL) | 1 | 100 | |
| Add the above reagents one by one and then mix for the 1st time | |||
| Forward adapter (1 pmol) | 1 | 100 | |
| Reserve adapter (1 pmol) | 1 | 100 | |
| Add the above adapters one by one and then mix for the 2nd time | |||
| T4 DNA ligase (400,000 units/mL) | 2 | 200 | |
| Add the above reagents one by one and then by finger flicking to mix | |||
| Final volume | 50 | 50000 | |
| 37 ℃ for 60 min (set the lid-heating off) | |||
Note
CRITICAL STEP for prepare master mix:
Make sure the T4 ligase buffer and PEG are dissolve and mix thoroughly;
Add the needed volume of PEG-4000 (sticky, do it slowly), ligase buffer and PNK first and mix thoroughly, then add adapters and mix again, ligase should be added lastly during cooling down the samples and mix thoroughly without vortexing.
Add 28 µL ligation master mix to the denatured samples, mix thoroughly with pipette, spin briefly.
Transfer to ThermoCycle for01:00:00 ligation at37 °C .
1h
Purified with 1X AMPure XP beads (25 μL / 25 μL PCR reaction) and eluted with22 µL MiliQ H2O according to the purification procedures from Step7.
Note
PAUSE POINT Store in fridge for short-time or freezer until beads clean-up.
CAUTION
Ensure that you have booked a ThermoCycle and preheated it to95 °C .
Pipette, filtered pipette tips, and workbench need to be sterilized by UV lamp for00:20:00 prior work.
During preparation, reagents and PCR plate must be on ice/cold block. Reagents are stored at -20 °C .
Spin down reagents before using them. Avoid vortexing enzymes.
Remember to include a Positive (Mock from extraction), Negative (H2O from extraction) & Blank (H2O for the ligation) controls for the reaction.
Step6: Post-ligation clean up
Checklist before starting
Note
Where: Clean lab
Timing: 30 min
Reagents
- AMPure XP beads, 60 mL: #A63881
- Qubit 1X dsDNA HS Assay Kit: #Q33231
- High Sensitivity D5000
- ScreenTape Assay: #5067-5593
- Freshly prepared 80% ethanol
Equipments/kits
- HulaMixture, Invitrogen‱
- Qubit‱ 4 Fluorometer
- TapeSation4200 with high-sensitive D5000 Screen Tape (#5067-5592)
Procedure
Place AMPure XP beads into the Hula mixer to resuspend the beads and to equilibrate toRoom temperature for00:15:00 .
Total volume of ligation product (sample) / well in the PCR plate is50 µL .
Transfer40 µL (!!! 0.8X) of Beads solution to each PCR product/well and mix with 100 μL pipette tips (10 times up and down), resulting in a90 µL mixture.
Incubate for 00:05:00 atRoom temperature .
Place the tube or plate with the mixture into the magnetic rack for 2-4 min, until the liquid is clear.
Carefully remove80 µL the liquid/supernatant with 100 μL pipette tips and discard it, keep5 µL without disturbing the beads-pellet.
Wash the beads-pellet with200 µL freshly preparedFresh 80% Ethanol by gently dispensing it over the beads with 200 μL pipette tips. Let it rest for00:00:30 and then remove the liquid.
Repeat washing .
Spin the tubes or plates in a minicentrifuge for00:00:30 to collect all the residual liquid.
Put the tubes or plates on a magnetic rack and remove the excess with 10 μL pipette tips.
Air dry for approximately00:00:30 to evaporate the Ethanol.
Remove the tube or plate from the magnetic rack. Add22 µL nuclease free water and mix with a pipette (>10 times up and down) to resuspend the beads-pellet.
Incubate for 00:02:00 atRoom temperature .
Spin down for00:00:30 if there is liquid on the wall of the tubes or the well.
Place the tube or plate back on the magnetic rack and wait for00:03:00 until the liquid clears.
Transfer22 µL of the liquid/supernatant to a new, labeled Eppendorf tube or a new plate.
Note
PAUSE POINT Store in fridge for short-time or freezer until beads clean-up.
CAUTION
- During the preparation of index PCR, reagents and PCR plate must be on ice/cold block.
- Lead opens while on the cold block.
- Reagents are stored at -20°C.
- Gently mix and spin down reagents before using them. Avoid vortexing enzymes.
- WARNIN!!! Change pipette tips and PCR leads during work process!
Step7: Index PCR
Checklist before starting
Note
Where: Sequencing lab
Timing: 30 mim
Reagents
- AccuPrime‱ Taq DNA Polymerase System: #12339016
- Nextera XT Index Kit v2 Sets: #FC-131-2001, 2002, 2003, 2004
Equipment
- Thermocycler
- Minicentrifuge
Procedure
Book an available ThermpCycler.
Take the index primer (illumina i5 + i7) plate from the freezer to the fridge before starting.
Remember to add a Blank control for the index PCR.
According to the number of samples (include an extra 3 for pipetting errors), prepare a master mix containing per sample. The table below is calculated for a whole plate of 96 wells (Master Mix per 100 samples):
| A | B | C | |
| Per 1 sample μL | Per 100 samples μL | ||
| Purified ligated DNA | 21.1 | ||
| 10× AccuPrime buffer | 2.5 | 250 | |
| AccuPrime DNA polymerase | 0.4 | 40 | |
| Primer P5 (i5) | 1 | ||
| Primer P7 (i7) | |||
| Final volume | 25 |
Master Mix: In a clean EP tube, transfer the needed volume of 10× AccuPrime buffer and AccuPrime DNA polymerase from the stock solution, gently mix, and spin down.
Transfer2.9 µL Master Mix to each sample.
Transfer1 µL Primer Mix to each sample.
Carefully mix them and spin them down.
Carefully place the PCR plate into the thermocycle machine and select the following program:
| A | B | C | |
| Temperature profile | |||
| 95°C | 2min | ||
| 95°C | 15s | x 20 cycles | |
| 57°C | 30s | ||
| 68°C | 30s | ||
| 4°C | ∞ |
Note
PAUSE POINT Store in fridge for short-time or freezer until beads clean-up.
CAUTION
- During the preparation of index PCR, reagents and PCR plate must be on ice/cold block.
- Lead opens while on the cold block.
- Reagents are stored at -20°C.
- Gently mix and spin down reagents before using them. Avoid vortexing enzymes.
- WARNIN!!! Change pipette tips and PCR leads during work process!
Step8: Post-PCR clean up and library quality check
27m
Checklist before starting
Note
Where: Sequencing Lab
Timing: 30 min
Reagents
- AMPure XP beads, 60 mL: #A63881
- Qubit 1X dsDNA HS Assay Kit: #Q33231
- High Sensitivity D5000
- ScreenTape Assay: #5067-5593
- Freshly prepared 80% ethanol
Equipments/kits
- HulaMixture, Invitrogen‱
- Qubit‱ 4 Fluorometer
- TapeSation4200 with high-sensitive D5000 Screen Tape (#5067-5592)
Procedure
Place AMPure XP beads into the Hula mixer to resuspend the beads and to equilibrate toRoom temperature for00:15:00 .
15m
Total volume of PCR product (sample) / well in PCR plate is 25 µL .
Transfer20 µL (!!! 0.8X) of Beads solution to each PCR product (25 µL ) and mix with 100 μL pipette tips (10 times up and down), resulting in a45 µL mixture.
Incubate for 00:05:00 atRoom temperature .
5m
Place the tube or plate with the mixture into the magnetic rack for 2-4 min, until the liquid is clear.
Carefully remove40 µL the liquid/supernatant with 100 μL pipette tips and discard it, keep5 µL without disturbing the beads-pellet.
Wash the beads-pellet with175 µL freshly preparedFresh 80% Ethanol by gently dispensing it over the beads with 200 μL pipette tips. Let it rest for00:00:30 and then remove the liquid.
30s
Repeat washing .
Spin the tudes or plates in a minicentrifuge for00:00:30 to collect all the residual liquid.
30s
Put the tubes or plates on a magnetic rack and remove the excess with 10 μL pipette tips.
Air dry for approximately00:00:30 to evaporate the Ethanol.
30s
Remove the tube or plate from the magnetic rack. Add16 µL nuclease free water and mix with a pipette (>10 times up and down) to resuspend the beads-pellet.
2m
Incubate for 00:02:00 atRoom temperature .
Spin down for00:00:30 if there is liquid on the wall of tubes or well.
3m 30s
Place the tube or plate back on the magnetic rack and wait for00:03:00 until the liquid clears.
Transfer15 µL of the liquid/supernatant to a new, labeled Eppendorf tube or a new plate.
Measure concentration of the cleaned PCR product with Qubit.
Pool 10 ng per sample into one Eppendorf tube to prepare a pooled library for library quality check with TapeStation following their standard protocols.
Note
PAUSE POINT Send for sequencing or store in the fridge4 °C for short time or freezer -80 °C for long time.