Nov 27, 2025
Single–Cell Transmission Electron Microscopy (TEM)
- Maia Palka1,
- Kevin Wakeman2,3,
- Eunji Park1,
- Gordon Lax4,
- Brian Leander1,5
- 1Department of Botany, University of British Columbia;
- 2Institute for the Advancement of Higher Education, Hokkaido University;
- 3Graduate School of Science, Hokkaido University;
- 4Department of Biology, Dalhousie University;
- 5Department of Zoology, University of British Columbia
- Single-cell Electron Microscopy


External link: https://doi.org/10.1111/jeu.70061
Protocol Citation: Maia Palka, Kevin Wakeman, Eunji Park, Gordon Lax, Brian Leander 2025. Single–Cell Transmission Electron Microscopy (TEM). protocols.io https://dx.doi.org/10.17504/protocols.io.x54v953xql3e/v1
Manuscript citation:
Palka MV, Wakeman KC, Park E, Lax G, Leander BS (2026) A Practical Approach to Study Uncultivated Protists Using Single‐Cell Techniques for Electron Microscopy. The Journal of Eukaryotic Microbiology 73(2). doi: 10.1111/jeu.70061
License: This is an open access protocol distributed under the terms of the Creative Commons Attribution License, which permits unrestricted use, distribution, and reproduction in any medium, provided the original author and source are credited
Protocol status: Working
We use this protocol and it's working
Created: September 23, 2025
Last Modified: November 27, 2025
Protocol Integer ID: 228022
Keywords: single cell electron microscopy, protist, microbial eukaryote, transmission electron microscopy, uncultivated protists for transmission electron microscopy, cell transmission electron microscopy, electron microscopy, single cell, preparing uncultivated protist, cell fixation, isolated cell, cell, cell resuspension, tem fixation plate, minimizing cell resuspension
Funders Acknowledgements:
National Sciences and Engineering Research Council of Canada
Grant ID: NSERC 2025-04268
Japan Society for the Promotion of Research
Grant ID: 20K1585
Japan Society for the Promotion of Research
Grant ID: 20H03304
Japan Society for the Promotion of Research
Grant ID: 18K14774
Abstract
We present an approach for preparing uncultivated protists for transmission electron microscopy. This approach requires building a small container, hereby referred to as the “TEM fixation plate”, that houses individually isolated cells. This apparatus facilitates single-cell fixation, dehydration, and resin infiltration while minimizing cell resuspension and loss during liquid exchanges. Single cells can then be flat-embedded, sectioned and imaged using TEM.
Guidelines
The exact concentrations of reagents and length of time for each of the following steps can be adjusted as needed for the organisms of interest. Larger organisms and those with a cell wall or pellicle may require longer incubation periods.
Materials
Polypropylene Petri dish
15mL conical Falcon tubes
1000 µL pipette tips
Dissecting forceps
Silicone sealant
Glutaraldehyde
PIPES
HEPES
MgCl2
Osmium tetroxide
Sucrose
Single-edged razor
Troubleshooting
Problem
Inadequate infiltration of resin.
Solution
Increase incubation time during resin infiltration steps.
Problem
Inadequate contrast of specimens when imaging.
Solution
Increase osmium tetroxide concentration from 1% to 2%, and incubate samples for 2 hours during the osmium step
Problem
No cells remain in the TEM plate after resin embedding
Solution
Perform wash steps slower and more carefully to avoid disrupting cells during liquid exchange.
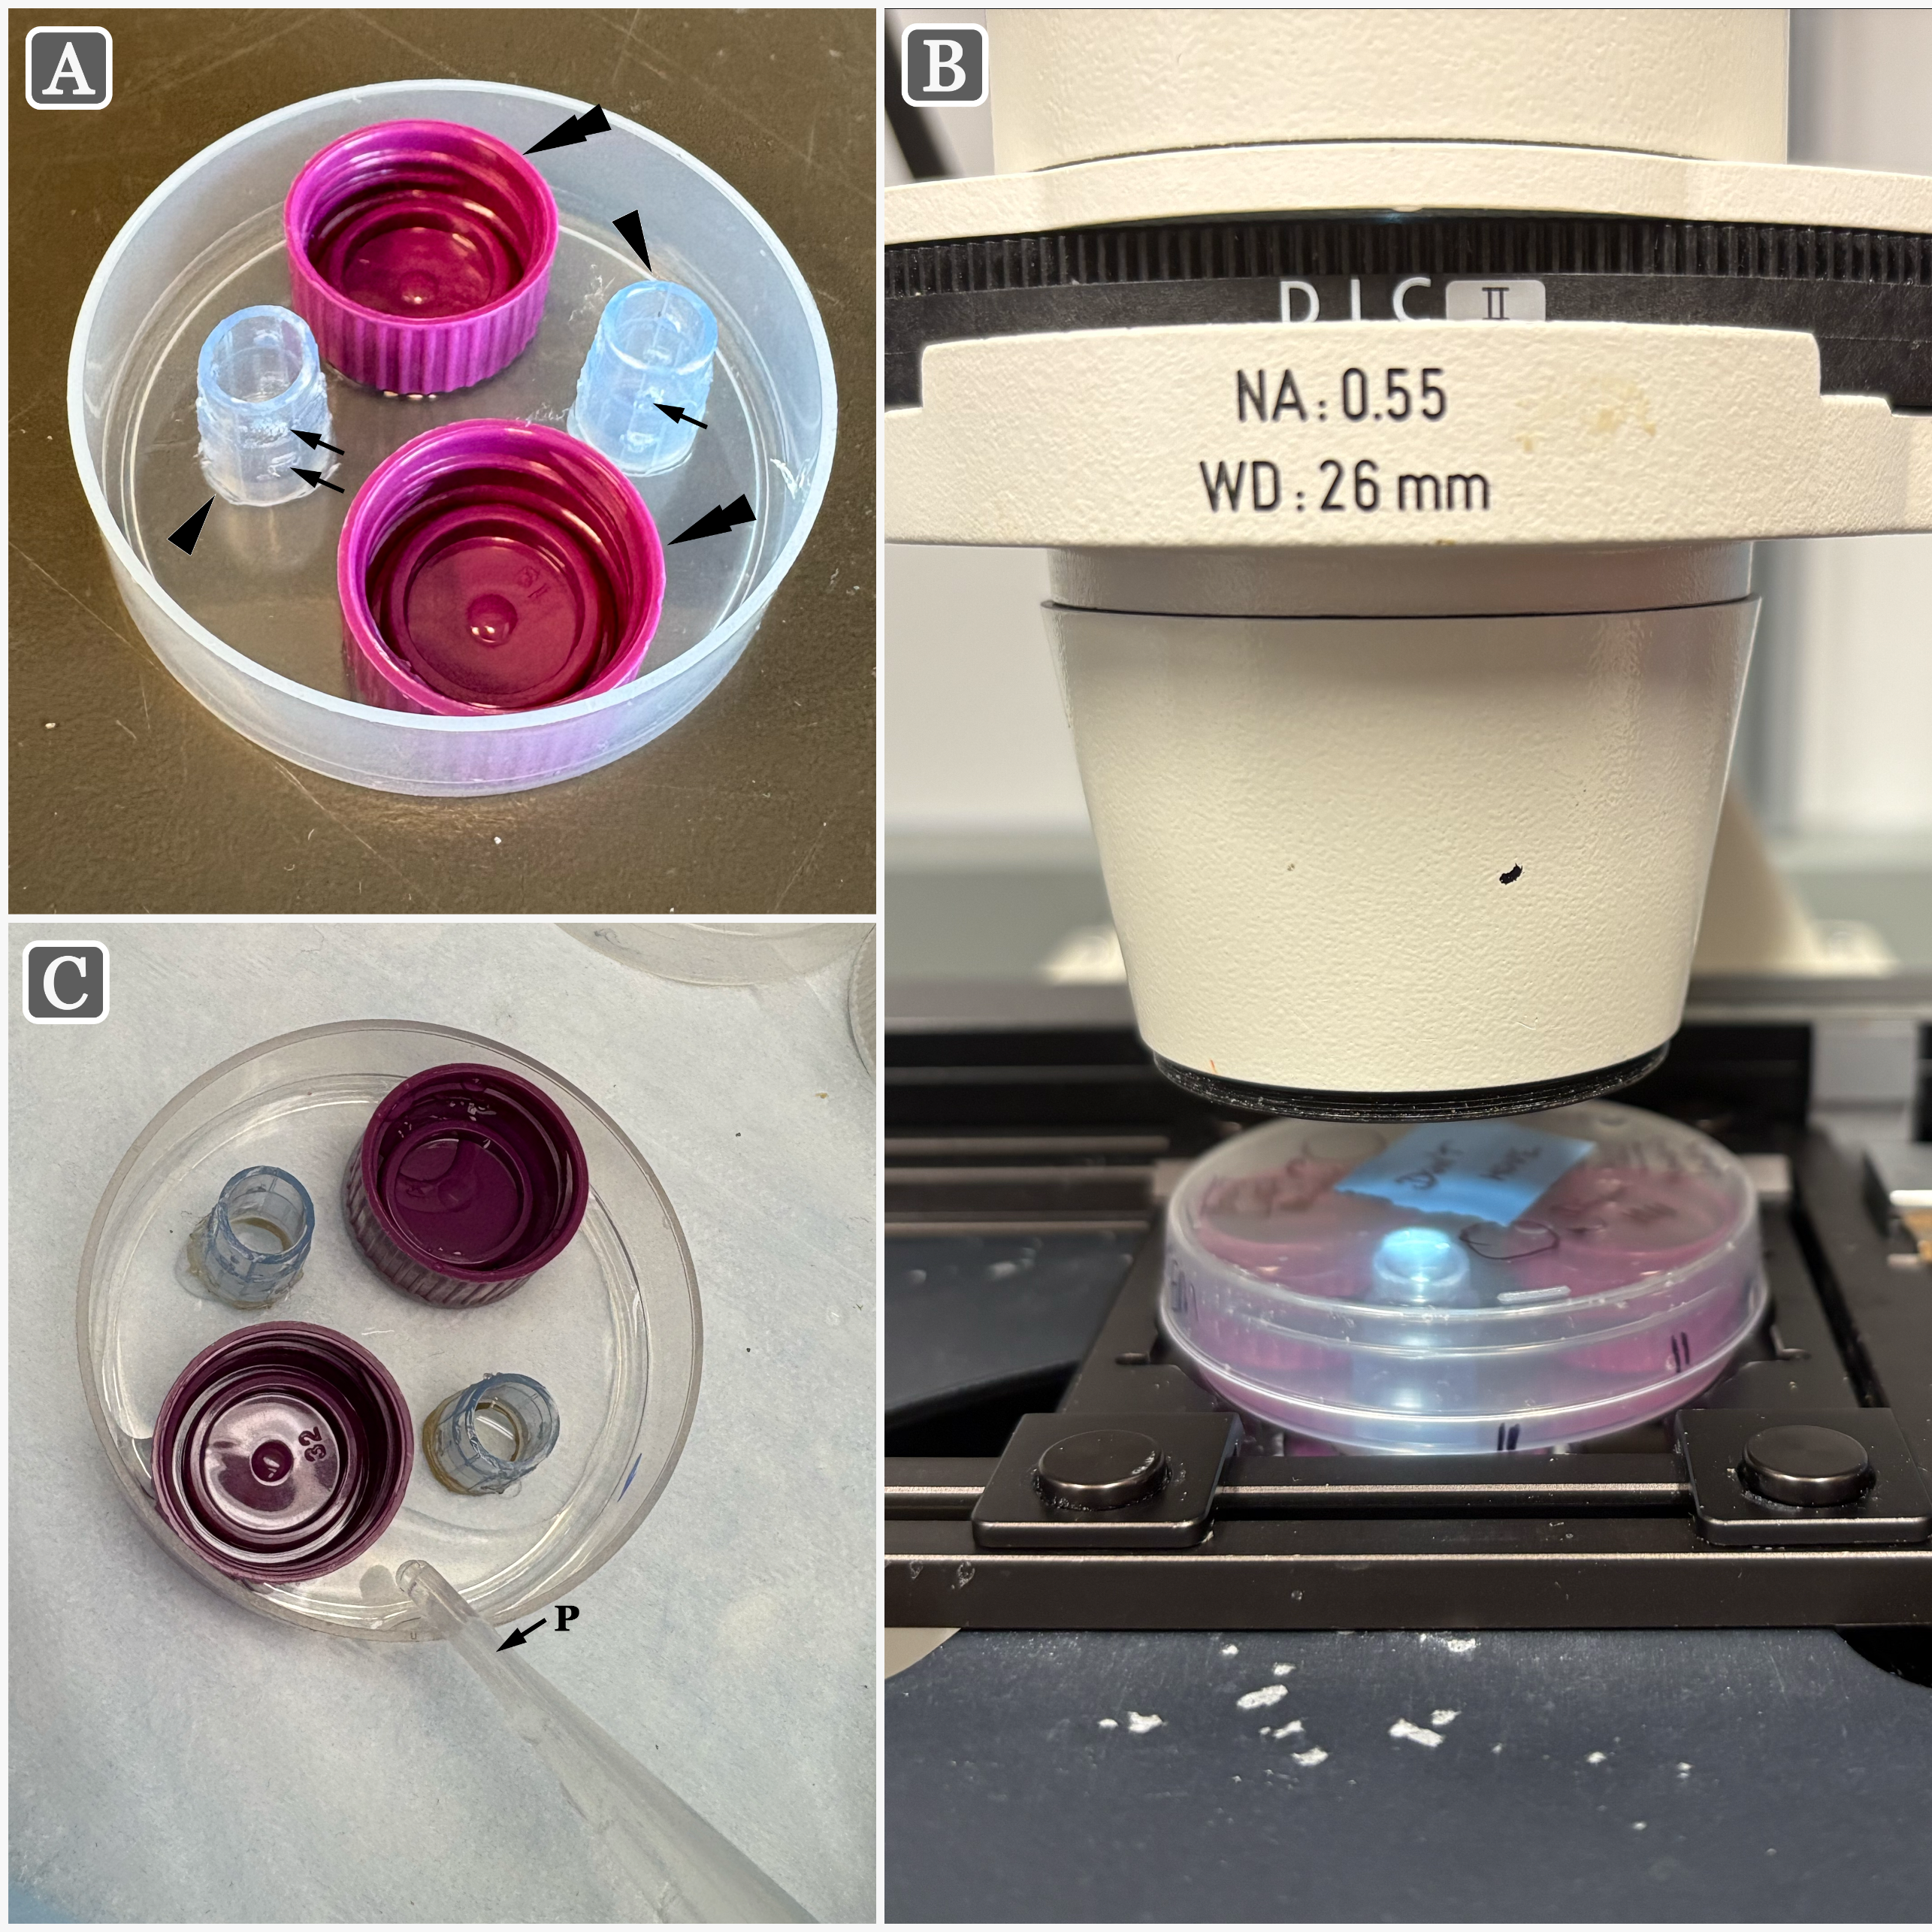
Construction of the TEM fixation plate
Prepare baskets from shortened pipette tips by removing the tapered ends of 1,000 μL pipette tips, leaving 1.5 cm at the blunt end of each pipette tip to form a basket (arrowheads; Figure 1A).
Heat the ends of a pair of fine forceps until red-hot (for example by using an alcohol lamp), and use them to punch ~8-10 evenly spaced small holes in the sides of the baskets. Holes should be placed in two rows, with each row about 1-2 mm from the ends of the basket (arrows; Figure 1A).
It is essential that the holes are large enough to facilitate liquid exchange during the washing steps, but small enough so that the adhesive nature of the liquid fixative keeps the fixative within the chamber while gathering single cells; generally the diameter is of the hole is about 0.7–0.8 mm. Practically, if the holes are too small, water will be unable to enter the chamber during the washing steps. However, if the holes are too large, the fixative will leave the chamber haphazardly through the holes, prior to the washing steps. Therefore, a balance in the diameter of chamber holes must be obtained.
Using a waterproof silicone sealant (such as Silicone Ultra All Purpose Premium Waterproof Sealant Aquarium Safe, DAP Canada), attach the prepared baskets to a polypropylene Petri dish. Use a minimal amount of silicone so that only the edges of the basket contain silicone while ensuring that the silicone evenly coats the basket edge. 15 mL Falcon tube lids are attached to the base of the plate using silicone sealant to reduce the available volume of each plate, so that smaller volumes of solutions and liquid waste are required. Allow the plates to sit exposed to air for 12-24 hours (or however long is specified by the manufacturer) to allow the silicone sealant to cure.
Optional: Poly-L-lysine can be applied to the bottom of the chambers to increase the ability of cells to stay in place during the process.
Aldehyde fixation
Fill the basket to about three-quarters full with your fixative solution of choice. We recommend using a fixative containing 2.5% glutaraldehyde buffered with PHEM (Montanaro et al., 2016). Sucrose can be used to adjust the osmolarity of the fixative solution to match the native osmolarity of the specimen.
Place individual cells directly into the basket containing the fixative using a hand-drawn micropipette or any other single-cell isolation device. Allow the cells to settle to the bottom of the basket before moving the plate.
Single cells can be viewed inside the basket prior to and during fixation using an inverted light microscope. Cover the plates to avoid exposure to fixatives and buffers while viewing samples.
Allow fixation to occur for 20-90 min at the temperature of the environment from which the cell(s) of interest were isolated.
Wash cells three times using your preferred wash solution for 5 min each. Wash solutions can contain the buffers used during fixation (Montanaro et al., 2016), but distilled water or filtered seawater can also be used (depending on the native environment of the fixed organism).
Optional stopping point: Samples can be stored in the wash solution for up to 10 days at 4-8 °C.
Osmium tetroxide post-fixation and dehydration
Remove the wash solution from the plate (as described above) so that only the baskets remain partially filled with wash solution. The liquid levels inside of each basket should drop until just below the lowest hole in the basket. Here, it is important that no moisture or leftover wash solution remains in the TEM plate outside of the baskets.
This step must be performed in a fumehood. Add 4% osmium tetroxide into the basket using a plastic transfer pipette so that the final concentration of osmium tetroxide, when mixed with the remaining wash solution within the basket, is 1%. Place a lid on each plate and allow post-fixation to occur for 1-2 hrs in the dark at ambient temperature.
Optional: Osmium tetroxide concentration can be raised to 2% for greater staining and contrast of organisms.
Wash cells three times for 5 min each using the wash solution that was used in Step 3.
Wash cells three times for 5 min each with distilled water.
Optional: After 3–4 washes to ensure complete removal of osmium tetroxide, baskets can be
examined with an inverted microscope to confirm that cells have not been lost at this stage. Avoid moving the plates once the ethanol washes have begun, as it is especially easy to disturb cells contained in ethanol or acetone.
Dehydrate samples using a graded ethanol series by incubating cells in ethanol solutions of increasing concentrations (using the same liquid exchange technique implemented during washes). We recommend using the following graded ethanol series: 30%, 50%, 70%, 85%, 90%, 95%.
Incubate cells in 100% EtOH three times for 5 min each. It is essential to remove as much ethanol as possible during each step.
Incubate cells in a 1:1 acetone ethanol mixture for 5 min.
Incubate cells in acetone twice for 10 min each. Cover the plate during this step to minimize acetone evaporation.
Resin infiltration and flat embedding
Remove all acetone from TEM plate. Introduce 50% acetone:epoxy resin to the TEM plate and incubate for a minimum of 1-2 hours for infiltration to occur. Leave plate partially uncovered so that some of the acetone can evaporate, naturally increasing the resin concentration.
Incubate samples in 100% resin three times for a minimum of 1-2 hours per incubation. Once the TEM fixation plate is full of resin, then, a few drops of resin can be placed directly into the basket. This helps remove any remaining resin–acetone mixture inside the baskets that could influence polymerization. Each incubation can be extended for up to 12-16 hours if needed (an optional overnight step).
Remove the baskets from each plate. Next, add a small amount of pure resin to form a thin, even layer covering the entire bottom surface of the plate. Cover the Petri dish and place in an incubator at the temperature and time specified by manufacturer's instructions for polymerization to occur
Finding and mounting your cells of interest for ultra-thin sectioning
Polymerized resin disks can be easily removed from the Petri dish which they were polymerized in and directly viewed using an inverted light microscope. Candidate cells for further processing for TEM can be identified. We recommend marking the surface of the resin using a fine-tip lab marker by drawing a circle around the cells of interest.
The piece of resin containing cells for TEM can be removed from the resin disk
using a Dremel tool.
Cells can be visualized at high magnifications, using an inverted light microscope and the position of individual cells within the resin can be observed. The surface of the resin can be marked with a series of guiding lines to indicate which edge of the resin block should be mounted on an empty resin block so that the cell is in the perfect position for sectioning.
A Dremel tool can be used to smooth the edge of the resin block, allowing it to be mounted flush against an empty resin block and aligned precisely with the guiding line to ensure the cell is correctly oriented for trimming, facing, and sectioning.
Protocol references
Montanaro, Jacqueline, Daniela Gruber, and Nikolaus Leisch. “Improved Ultrastructure of Marine Invertebrates Using Non-Toxic Buffers.” PeerJ 4 (2016): e1860. https://doi.org/10.7717/peerj.1860.
Acknowledgements
We wish to thank the UBC Bioimaging Facility (University of British Columbia) and staff members Miki Fujita and Derrick Horne for the use of their facilities and their guidance in sample preparation. We would also like to thank Dr. Samuel Livingston for providing helpful discussions about troubleshooting protocols. Dr. Kevin Wakeman would like to especially thank Mr. Toshio Sasaki for his seemingly bottomless patience and unmatched generosity during hours long discussions and practical lessons on electron microscopy, while at the Okinawa Institute of Science and Technology. Image acquisition and analysis for this project was conducted on the traditional, ancestral and unceded territory of the xʷməθkʷəy̓əm (Musqueam) people.