Feb 24, 2023
Version 3
Set Up Biodata Resource Inventory in Google Colab V.3
- 1University of Arizona


Protocol Citation: Kenneth Schackart 2023. Set Up Biodata Resource Inventory in Google Colab. protocols.io https://dx.doi.org/10.17504/protocols.io.5jyl89o36v2w/v3Version created by Kenneth Schackart
License: This is an open access protocol distributed under the terms of the Creative Commons Attribution License, which permits unrestricted use, distribution, and reproduction in any medium, provided the original author and source are credited
Protocol status: In development
We are still developing and optimizing this protocol
Created: February 24, 2023
Last Modified: February 24, 2023
Protocol Integer ID: 77582
Keywords: GBC, Biodata resource inventory, Google Colab, biodata resource inventory in google colab, biodata resource inventory, google colab, google drive, repository
Abstract
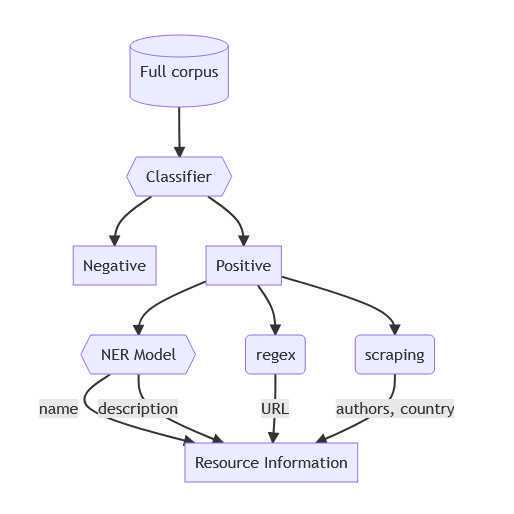
This protocol will guide you on how to get everything in place to update the Biodata Resource Inventory.
This protocol describes how to setup Google Colab, connect your Google Drive, and clone the repository.
Some of the information here came from the following article: https://medium.com/analytics-vidhya/how-to-use-google-colab-with-github-via-google-drive-68efb23a42d
Materials
An active Google Drive account.
An active GitHub account.
Prepare Google Drive
In your Google Drive home directory, create a new folder called GitHub.
Connect Colab to Drive
If you need to change the account you are using, close the pop up by clicking Cancel at the bottom right. Change your Google account by clicking the icon at the top right.
A menu will pop up. At the bottom right, select: "New Notebook"
In the cell, paste or type the following:
from google.colab import drive
drive.mount('/content/drive')
Click the "run" button to the left of the cell or run with ctrl+enter
You will be prompted to allow Google Colab to access your Drive, say yes.
Note
Do not try to change accounts at this stage, it will cause an error. If you need to change your account, go back to step 2.
Create a new code chunk by clicking "+ Code" under the top-left banner. In that cell paste or type the following, then run:
%cd /content/drive/MyDrive/GitHub/
This has changed your current directory to GitHub.
Note
If you named the folders something else, you will need to modify the above command to reflect the actual folder names.
Create GitHub Access Token
Click Generate new token button on the top right corner of the page.
Click the repo checkbox under Select scopes.
Click the Generate token button at the bottom of the page.
You have now created a new access token. Copy the token to your clipboard. Do not close this page yet.
Safety information
Do not share this access token.
Clone the Repository
Go back to your Colab Notebook, create a new Code cell, and enter the following, pasting your access token into the quotations, then run:
git_token = ''
Create a new code cell and paste or type the following, then run:
!git clone https://{git_token}@github.com/globalbiodata/inventory_2022
And cd into the repository:
% cd inventory_2022
Note: During development, the main branch is mostly empty. To switch to the development branch run the following in a code cell:
# Switch to development branch if desired
!git checkout inventory_2022_dev
Congrats! You now have linked Google Colab to GitHub for access to their API, and you have cloned the repository into your Google Drive. You can now close the page with your access token.
Running the pipelines
You can now access all the files in the repository via traditional Google Drive.
You will find two notebooks in the repository:
- running_pipeline.ipynb: This allows reproduction of the original results
- updating_inventory.ipynb: This guides you to update the inventory
Each notebook provides instructions on their respective process, and includes already filled-in code chunks. So you should have to do little more work to run those pipelines.