Dec 02, 2025
Sample-Multiplexed, FACS-Preprocessing of PBMCs with Rare Cell Type enrichment Enables Scalable scRNA-seq workflow
- Timothy Ramnarine1,
- Mohammad Mokhtari1,
- Antonia Eicher1,
- Görkem urmaz1,
- Johanna Klughammer1
- 1Gene Center and Department of Biochemistry, Ludwig-Maximilians-Universität München 81377 Munich, Germany


Protocol Citation: Timothy Ramnarine, Mohammad Mokhtari, Antonia Eicher, Görkem urmaz, Johanna Klughammer 2025. Sample-Multiplexed, FACS-Preprocessing of PBMCs with Rare Cell Type enrichment Enables Scalable scRNA-seq workflow. protocols.io https://dx.doi.org/10.17504/protocols.io.j8nlk82m5l5r/v1
License: This is an open access protocol distributed under the terms of the Creative Commons Attribution License, which permits unrestricted use, distribution, and reproduction in any medium, provided the original author and source are credited
Protocol status: Working
We use this protocol and it's working
Created: August 11, 2024
Last Modified: December 02, 2025
Protocol Integer ID: 105097
Keywords: scRNA-seq, Scalable single-cell processing, Cell preprocessing, Fluorescence-activated cell sorting (FAC..., FACS, Rare immune cell populations, rare cell enrichment, Peripheral blood mononuclear cells (PBMCs), PBMCs, Sample multiplexing, Dead cell removal, high-throughput single cell processing, antibody-based hashtags, flow cytometry, cell sorting, selective enrichment of rare immune cell type, rare cell type enrichment enable, preprocessing peripheral blood mononuclear cell, rare immune cell type, peripheral blood mononuclear cell, overall balance of major pbmc population, preprocessing of pbmc, such as plasmacytoid dendritic cell, major pbmc population, cell rna, plasmacytoid dendritic cell, sample multiplexing, immune heterogeneity, pbmc, targeted enrichment, dead cell removal, allowing multiple sample, selective enrichment, scrna, antibody, multiple sample
Funders Acknowledgements:
German Research Foundation (DFG)
Grant ID: CRC237 369799452/B21
German Research Foundation (DFG)
Grant ID: CRC274 408885537
Else-Kröner-Fresenius-Stiftung
Grant ID: 2019_A70
Disclaimer
DISCLAIMER – FOR INFORMATIONAL PURPOSES ONLY; USE AT YOUR OWN RISK
The protocol content here is for informational purposes only and does not constitute legal, medical, clinical, or safety advice, or otherwise; content added to protocols.io is not peer reviewed and may not have undergone a formal approval of any kind. Information presented in this protocol should not substitute for independent professional judgment, advice, diagnosis, or treatment. Any action you take or refrain from taking using or relying upon the information presented here is strictly at your own risk. You agree that neither the Company nor any of the authors, contributors, administrators, or anyone else associated with protocols.io, can be held responsible for your use of the information contained in or linked to this protocol or any of our Sites/Apps and Services.
Abstract
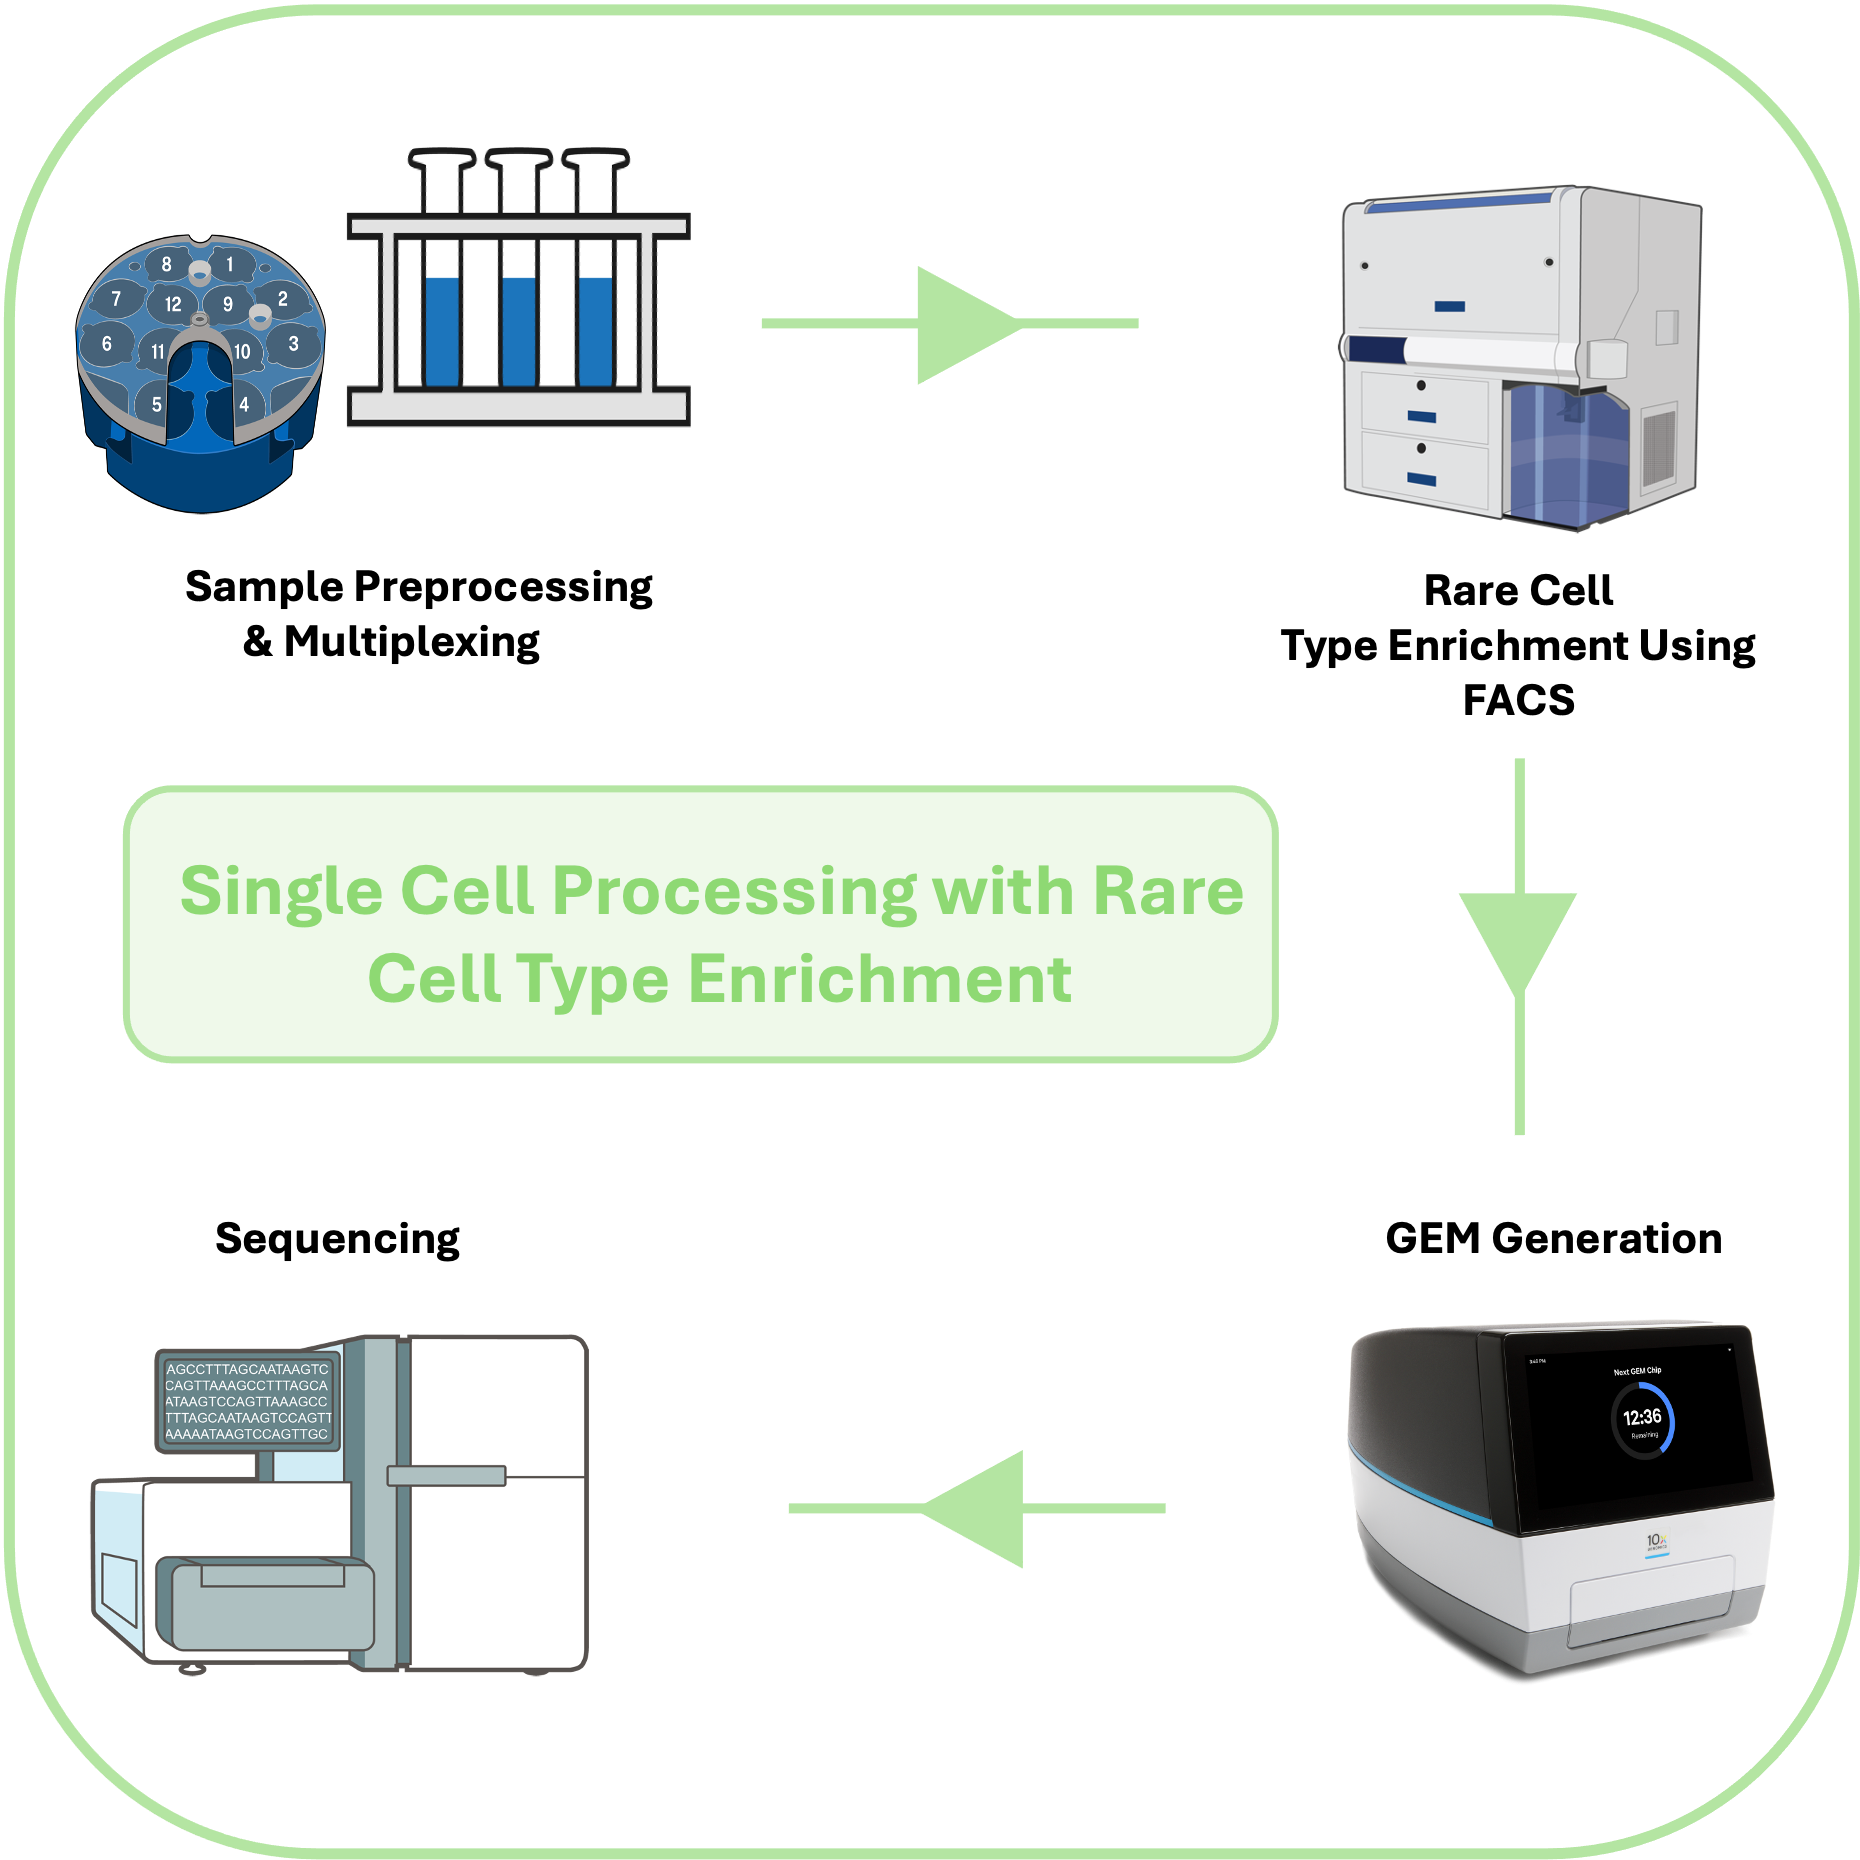
This protocol describes an optimized fluorescence-activated cell sorting (FACS)–based workflow for preprocessing peripheral blood mononuclear cells (PBMCs) prior to single-cell RNA sequencing (scRNA-Seq). It enables selective enrichment of rare immune cell types, such as plasmacytoid dendritic cells (pDCs), while maintaining the overall balance of major PBMC populations. The workflow integrates dead cell removal, targeted enrichment, and antibody-based hashing (sample multiplexing), allowing multiple samples to be processed in parallel with minimal handling time and reduced batch effects. This protocol is designed to minimize cellular stress and technical variability, the protocol supports both fresh and cryopreserved PBMCs from clinical or laboratory sources, improving throughput and reproducibility in studies of immune heterogeneity.
Guidelines
All steps where possible are performed on ice (4°C).
For the first time, it is recommended to do a full test run with non-precious samples.
As the volume used of the hashtag antibody is quite small be sure to pipette directly into the sample and confirm that there is nothing left in the pipette tip.
Protocol materials
RT Enzyme C 2000085/2000102 - stored in -20°C10x Genomics
Human TruStain FcX™ (Fc Receptor Blocking Solution)BioLegendCatalog #422301, 422302
TotalSeq™-C0253 anti-human Hashtag 3 AntibodyBioLegendCatalog #394665
PE anti-human CD123 AntibodyBioLegendCatalog #306006
TotalSeq™-C0251 anti-human Hashtag 1 AntibodyBioLegendCatalog #394661
TotalSeq™-C0254 anti-human Hashtag 4 AntibodyBioLegendCatalog #394667
APC anti-human CD303 (BDCA-2) AntibodyBioLegendCatalog #354206
TotalSeq™-C0252 anti-human Hashtag 2 AntibodyBioLegendCatalog #394663
poly-dT RT Primer 2000007 - stored in -20°C10x Genomics
Single Cell VDJ 5 Gel Bead 1000264 - stored in -80°C10x Genomics
RT reagent B 2000165 - stored in -20°C10x Genomics
Reducing Agent B 2000087 - stored in -20°C10x Genomics
Trypan BlueInvitrogen - Thermo FisherCatalog #T10282
SYTOX™ Green Nucleic Acid StainThermo Fisher ScientificCatalog #S7020
Fetal Bovine Serum (FBS)ATCCCatalog #30-2020
1X PBS (Phosphate-buffered saline )
10x Vortex Adapter10x GenomicsCatalog #120251/ 330002
Chromium Next GEM Secondary Holder10x GenomicsCatalog #1000142/ 3000332
10X Gasket 300007210x Genomics
Glycerin (glycerol), 50% (v/v) Aqueous SolutionRicca Chemical CompanyCatalog #3290-32
Chromium Next GEM Chip K 2000182 10x Genomics
Partitioning Oil 200019010x Genomics
Safety warnings
Use/Safety training for operation of FACS (laser safety) required.
Ethics statement
For Peripheral Blood Mononuclear Cell (PBMC) isolation from peripheral blood samples, written informed consent was obtained from all participants or their legal guardians. Please refer to the associated article for the complete ethics statement.
Day 1
12h 45m
Preparation of materials - Pre-FACS
Note
Keep the samples on dry ice until all reagents and materials are in place and ready.
Unless a specific temperature is indicated, all steps should proceed with cooling/on ice.
Prepare a water bath - set to 37°C
2m
Prepare fresh FACS Buffer. For 50 mL, add 2.5 ml FBS to 47.5ml PBS.
Fetal Bovine Serum (FBS)ATCCCatalog #30-2020 1X PBS (Phosphate-buffered saline )
Note
For 4 samples, 80 mL of FACS Buffer should be sufficient. Keep on ice
2m
Place (number of samples)x2 15ml conical tubes on ice. One conical tube will be used to contain the real sample (primary conical tube) and the other conical tube will be used as calibration controls (secondary conical tube) for the FACS protocol in later steps.
Label the tubes.
2m
After preparing the FACS Buffer, thaw the samples quickly in a 37°C water bath. Be cautious, as the labeling can come off; marking the tops of the tubes may be a more reliable option.
Note
The freezing medium contains DMSO, which is toxic to cells at room temperature; therefore, these steps should be performed as quickly as possible.
3m
Thawed samples should be quickly transferred into pre-chilled 15ml conical tube (primary conical tube) on ice.
Wash the cryo-tube (sample container) with approximately 2 ml of FACS Buffer.
2m
Transfer the 2 ml of FACS Buffer from the cryo-tube into a 15 ml conical tube.
2m
Top-up the conical tube with FACS Buffer until the total volume reaches 15 ml, then invert the tube 5 times to mix.
1m
550 rcf, 4°C, 00:05:00 , 5 to 8 minutes
Centrifuge the samples. For our purposes, we used a centrifuge with cooling and with adaptors suitable for holding 15 ml conical tubes.
Equipment
Megafuge™ 8R
NAME
Centrifuge
TYPE
Thermo Fisher Scientific
BRAND
75007210
SKU
5m
After centrifugation, carefully decant the solution from each sample tube to the secondary conical tube (prepared in step 1.2), keeping the pellet (primary conical tube) undisturbed.
Note
FOR CALIBRATION CONTROLS (secondary conical tube) ONLY!
Centrifuge the conical tube:
880 rcf, 4°C, 00:05:00 , between 880 and 950 rcf
Decant excess fluid (supernatant)
Wash/resuspend the base of one of the secondary conical tubes with 1 ml FACS Buffer and transfer the whole volume to the next secondary conical tube and wash/resuspend. Repeat for all secondary conical tubes in order to combine into a pool.
Half of the volume of this pool will be directly transferred to a FACS tube through a cell strainer to use in FACS calibration as a "no fluorescent staining" control.
The other half of the volume can be transferred to a 1.5 ml eppendorf tube and centrifuged again:
880 rcf, 4°C, 00:05:00 , between 880 and 950 rcf
Pipette-off the supernatant, leaving approximately 50 μL and then handle the same as the real samples with blocking (without the hashtags) and antibody staining (see step 1.16 and 1.17) resulting in a "fluorescent-stained" control
Keep on ice.
15m
Resuspend each pellet (primary conical tube) with 1 ml FACS Buffer
Note
This step is helpful to remove as much of the DMSO as possible without drastically affecting the cells or their number.
2m
Load a 96-well plate with 10µL Trypan BlueInvitrogen - Thermo FisherCatalog #T10282 to each well corresponding a sample.
Note
Can use PCR tubes instead of 96-well plate.
Add 10µL of each sample (primary conical tube) to 10µL Trypan blue and mix well
Note
Counting Cells with Countess using default setting or a specific (custom) profile:
- For counting the cells, add 10 µL of each sample to the corresponding well/tube containing Trypan Blue and mix by pipetting (can use plate or tubes as described in step 1.11).
- Pipette 10 µL of the mixture into a Countess cell counting chamber slide. Follow User guide instructions and recommendations.
1m
Measure and record "initial" cell concentration and viabilities post-thaw using a cell counter. For our purposes we used an automated cell counter.
Equipment
Countess™ II automated cell counter
NAME
Thermo Fisher Scientific
BRAND
AMQAX1000
SKU
2m
Centrifuge the samples (primary conical tube) again 550 rcf, 4°C, 00:05:00
10m
While centrifugation continues, prepare blocking reagent mix:
Human TruStain FcX™ (Fc Receptor Blocking Solution)BioLegendCatalog #422301, 422302
| Reagent | Volume per sample | Volume (4x + 10%) | |
| FACS Buffer | 45 | 198 | |
| Human TruStain FcX (Fc Receptor Blocking Solution) | 5 | 22 |
Blocking Agent Mix
1m
Remove the supernatant by pipetting, leaving approximately 50 μL of the supernatant for each sample (primary conical tube).
1m
Add 50 μL blocking agent mix to each sample (primary conical tube)+ "fluorescent-stained" control (secondary conical tube). Resuspend each sample pellet by pipetting.
Incubate 10m on ice.
10m
While incubating, prepare antibody master mix on ice, pipette mix throughly:
(Red)
PE anti-human CD123 AntibodyBioLegendCatalog #306006
(Blue)
APC anti-human CD303 (BDCA-2) AntibodyBioLegendCatalog #354206
(Hashtags)
TotalSeq™-C0251 anti-human Hashtag 1 AntibodyBioLegendCatalog #394661
TotalSeq™-C0252 anti-human Hashtag 2 AntibodyBioLegendCatalog #394663
TotalSeq™-C0253 anti-human Hashtag 3 AntibodyBioLegendCatalog #394665
TotalSeq™-C0254 anti-human Hashtag 4 AntibodyBioLegendCatalog #394667
50 µL FACS Buffer 0.5 µL Antibody 1 (RED) 0.5 µL Antibody 2 (BLUE) 1.5 µL Hashtag*number of samples
| Reagent | Volume per sample (µL) | 4x + 10% (µL) | |
| FACS Buffer | 50 | 220 | |
| Antibody 1 (red) | 0.5 | 2.2 | |
| Antibody 2 (blue) | 0.5 | 2.2 |
Antibody Master Mix
Note
Do not add the hashtags into master mix, hashtags are required to be unique to each sample.
Note
The antibody volume is based on having an approximate/expected total number of cells per sample (roughly 0.5 μL is used for cell numbers in range of 105 while 1 μL can be used for 106)
| Reagent | Volume per sample (µL) | |
| Sample | ~50 | |
| Hashtag | 1.5 | |
| Antibody Master Mix | 48.5 | |
| total | ~100 |
Component volume per sample
1m
Incubate each sample (primary conical tube) with hashtags and antibody mix at 4°C (on ice) for 20m.
20m
Incubate the "fluorescent-stained" control (secondary conical tube) with Antibody master mix only (no hashtags) for 20m at 4°C (on ice).
20m
Measure cell concentration and viability prior to FACS
After incubation, add FACS Buffer to each sample + "fluorescent-stained" control (secondary conical tube) to be at least 10 mL volume and mix by inverting.
Note
This step washes/removes the excess hashtags and antibody dyes.
1m
550 rcf, 4°C, 00:05:00 , 650 to 800 RCF and 5 to 8 minutes
After its done, remove supernatant by pouring carefully.
5m
Resuspend each sample pellet + "fluorescent-stained" control pellet (secondary conical tube) in 0.5-1 mL FACS Buffer. Keep "fluorescent-stained" control on ice.
Check and record the cell viability and concentration of each sample pellet using the Countess cell counter. This gives us the post-stain viability and cell concentration to use in the pooling calculations.
Note
Counting Cells with Countess using default setting or a specific (custom) profile:
- For counting the cells, add 10 µL of each sample to the corresponding well/tube containing Trypan Blue and mix by pipetting (can use plate or tubes as described in step 1.11).
- Pipette 10 µL of the mixture into a Countess cell counting chamber slide. Follow User guide instructions and recommendations.
2m
Calculate volume to be used per sample to have equalized representation across all samples when pooled
- Volum
e to use is calculated as:
((Lowest Concentration)/(Live Concentration of Sample n))*(Total Volume per sample)
where
Note
Calculation is done according to the total volume of the sample with lowest concentration.
Example:
| Live Concentration (per mL) | Volume to pool (ml) | |
| 2.05*10^5 | 0.45 | |
| 2.64*10^5 | 0.35 | |
| 8.56*10^5 | 0.10 | |
| 9.38*10^4 | 1 |
Above: example calculation of volume to use (if samples were resuspended in 1 ml)
In the table, sample #4 has the lowest live cell concentration, therefore all of the volume is used (1 ml), the volume for every other sample is calculated such that there is an equal number of live cells compared to the lowest sample when combined.
1m
Combine the appropriate volume of each sample into a single tube.
1m
Pass the entire volume of the combined (multiplexed) samples through a cell strainer and into a FACS tube with a pipette. Keep on ice.
1m
FACS Protocol
Follow user guide instructions for FACS start-up protocol according to operating manual(s).
For our purposes we used a BD FACSAria Fusion Cell Sorter with accompanying BD FACSDiva Software.
- Pre-load 200 μL cold FACS Buffer to two protein-LoBind collection tubes (one tube per sorted cell population) before sorting starts. Keep on ice.
Software
BD FACSDiva™ Software
NAME
BD Biosciences
DEVELOPER
Equipment
BD FACSAria™ Fusion Cell Sorter
NAME
Cell sorter
TYPE
BD Biosciences
BRAND
Note
Cell sorting machine preparation and start-up can begin during the hashtags and antibody incubation step (during the 20 minute incubation, see step 1.18).
Be sure to turn on the cooling system (set to 4°C) early, at least 1h before "real" cell sorting starts (primary conical tube).
1h
Gating strategy may vary with cell populations, cell types of interest, sorting machine, etc. Please refer to expert/core facility guidance. Below is a description of the strategy we applied.
For our purposes we used:
1. SSC-A versus FSC-A to visualize the entire pool and define all cells and exclude debris
2. FSC-H versus FSC-A to select singlets only
3. FITC-A versus SSC-A to exclude dead/dying (live versus dead) cells
4. PE-A versus APC-A to define the sorting populations
CALIBRATION CONTROLS:
- Use the "no fluorescent staining" control (from step 1.9) to have a baseline/background fluorescent signal and also to set the gate to exclude debris and doublets. Ready-up the live versus dead plot and gate. Record events.
- Unload the "no fluorescent staining" control and keep on ice.
- Switch to using the "fluorescent stained" control (from step 2.3) to set the gate for rare cell population of interest (antibody-positive cells) versus all other cells. Record events.
- Unload "fluorescent stained" control and keep on ice
- Make a fresh dilution from stock of live/dead dye in a UV-blocked tube with cold PBS. Keep on ice.
We used 1:1000 SYTOX™ Green Nucleic Acid StainThermo Fisher ScientificCatalog #S7020
- Add an initial volume (20-60 µL) of diluted live/dead dye to "fluorescent stained" control to set the gate for live versus dead cells.
- Resume acquisition.
- Incrementally add the 1:1000 diluted live/dead dye by 20-60 µL until an optimal/observable separation between live/dead cells is achieved. Record events.
Note
The initial and subsequent incremental volumes of diluted live/dead dye to be added depends on total number of cells expected in the control. That is, if the control is not very concentrated stay on the lower end of the volume range. Record the total amount of live/dead dye used in the control.
After this point the gates should be in a relatively "finalized" form but will take some minor adjustments when the real sample is run.
Note
Rationale behind this approach is to use these controls for calibration and gate-setting so as not to use/waste sample volume or cells from the "real" pool.
10m
"Real" pooled sample:
Add an initial volume of 1:1000 diluted sytox Green (in UV-blocked tube) to sample pool, dependent on the estimated total number of cells and also using the total volume needed in the calibration control in previous step as a starting point.
Note
It is likely that the "fluorescent stained" calibration control has less cells than the real sample, so the volume needed there to separate live/dead is a safe starting point for the volume to add to the "real" sample.
1m
Pay attention to flow rate and events per second (in accordance to FACS operating manuals) and adjust gating positions as needed.
Incrementally add live/dead dye as needed to achieve good separation between live and dead cells.
Record a similar total number of events as with the controls for comparison later.
1m
Begin sort once collection tubes have been correctly loaded
Note
- Monitor collection tube for overflowing
- To reduce the risk of sample degradation and/or clogging during sort: occasionally pause the sorting to vortex the FACS tube and do not exceed 25 mins total sort time.
20m
Post-FACS
Note
Cell sorting results in these collection tubes:
- sorted pDC (i)
- all other PBMCs (ii)
Add 300 µL 0.1% BSA in PBS to collection tube (i) which contain the sorted pDCs.
Pipette half of this volume to a new protein-LoBind tube.
Leave on ice.
Note
Resulting in two tubes "A" and "B" each containing an aliquot of sorted pDCs where one of these tubes is the "original" collection tube from sorting - this is done to minimize loss due to pipetting. Each tube should now contain:
~250 µL (FACS Buffer + BSA) + "x/2" μL sorted pDCs volume
since the collection tube (i) has these components at this step:
200 μL FACS Buffer + 300 μL BSA + "x" μL sorted pDCs volume
1m
Centrifuge collection tube (ii) which contains the sorted all other PBMCs 800 rcf, 4°C, 00:05:00
Equipment
Eppendorf 5417R Refrigerated Centrifuge
NAME
Micro-centrifuge (1.5-2.0 ml tubes)
TYPE
Eppendorf
BRAND
5m
Remove supernatant from collection tube (ii).
Resuspend the pellet in collection tube (ii) immediately in 100 µL 0.1% BSA in PBS
1m
Check cell concentration and viability in collection tube (ii) and record the values.
Note
Counting Cells with Countess using default setting or a specific (custom) profile:
- For counting the cells, add 10 µL of each sample to the corresponding well/tube containing Trypan Blue and mix by pipetting (can use plate or tubes as described in step 1.11).
- Pipette 10 µL of the mixture into a Countess cell counting chamber slide. Follow User guide instructions and recommendations.
2m
Add a volume from collection tube (ii) equivalent to ~33,000 cells (live cell concentration) into each of the tubes "A" and "B" containing the aliquots of sorted pDCs = two replicates of the pooled cell suspension.
Note
This results in two protein LoBind tubes containing aliquots of the sorted pDCs from collection tube (i) plus a volume of the sorted all other PBMCs from collection tube (ii) resulting in a total volume of least:
~250 µL + "x/2" μL sorted pDCs volume + "y" μL sorted all other PBMCS
in each tube: "A" and "B".
1m
800 rcf, 4°C, 00:05:00
Centrifuge "A" and "B"
5m
Carefully pipette-off the supernatant from each tube until the remaining volume is ≤ 38.7 µL.
Note
Specifically 38.7 µL is used because this is the total allowable volume of Cell Suspension Stock per reaction + Volume of Nuclease-free Water per reaction, according to the Cell Suspension Volume Calculator Table
Carefully remove as much of the supernatant as possible without disturbing the pellet.
Keeping track of the approximate volume in each tube prior to this stage as described in step 4.1 and 4.5 can help with predetermining how much volume can be safely removed by pipetting to leave approximately 38.7 µL behind.
Since the pellet may not be visible, avoid disturbing the area where it is expected to form, according to the centrifugation position.
2m
Thoroughly resuspend pellet based on expected position in the tube with the remaining volume and measure the exact remaining volume (ν) by pipetting.
If resuspension volume of cells < 38.7 µL calculate the volume of ddH2O needed such that cells + ddH2O = 38.7 µL.
- Tube "A":
- Tube "B":
Note
The ddH20 is calculated per tube [(ii) + (i)a] and [(ii) + (i)b] and added independently to the corresponding tubes containing the NEXT GEM kit master mix as instructed in the Chromium Next GEM Single Cell 5' v2 (Dual Index) with Feature Barcode technology for Cell Surface Protein & Immune Receptor Mapping User Guide see here
1m
Proceed with chip loading step in accordance with 10x protocols. Where "A" and "B" represent two replicates of the pooled cell suspension to be loaded into two separate channels (channel splitting).
Note
Channel splitting allows us to increase the target number of recovered cells while keeping the residual doublet rate low.
2m
Materials below are provided by the Chromium Next GEM Single Cell 5' v2 (Dual Index) with Feature Barcode technology for Cell Surface Protein & Immune Receptor Mapping kit.
Note
The following sections of the protocol apply to the Chromium Next GEM Single Cell 5' v2 Chromium Next GEM Single Cell 5' v2 (Dual Index) with Feature Barcode technology for Cell Surface Protein & Immune Receptor Mapping protocol.
For a full list of reagents and materials please review the relevant section in the user guide here.
Alternatively, you may proceed with other protocols, such as the 10x Single Cell 3' protocol.
Thaw reagents at RT
Reducing Agent B 2000087 - stored in -20°C10x Genomics poly-dT RT Primer 2000007 - stored in -20°C10x Genomics Single Cell VDJ 5 Gel Bead 1000264 - stored in -80°C10x Genomics
RT reagent B 2000165 - stored in -20°C10x Genomics
Place reagents on ice
RT Enzyme C 2000085/2000102 - stored in -20°C10x Genomics
Have at hand: other materials & reagents
10x Vortex Adapter10x GenomicsCatalog #120251/ 330002 Chromium Next GEM Secondary Holder10x GenomicsCatalog #1000142/ 3000332
10X Gasket 300007210x Genomics
Glycerin (glycerol), 50% (v/v) Aqueous SolutionRicca Chemical CompanyCatalog #3290-32 Chromium Next GEM Chip K 2000182 10x Genomics Partitioning Oil 200019010x Genomics
Assembly and Loading of Chromium Next GEM Chip K
Note
"Step 1": Follow the Chromium Next GEM Single Cell 5' v2 (Dual Index) with Feature Barcode technology for Cell Surface Protein & Immune Receptor Mapping User Guide
These steps are thoroughly explained in the Chromium Next GEM Single Cell 5' v2 (Dual Index) User Guide, which can be accessed here.
Equipment
Chromium Controller
NAME
microfuidic based single-cell capture
TYPE
10x Genomics
BRAND
1000171
SKU
LINK
Alternatively,
Equipment
Chromium iX/X series
NAME
microfluidic based single-cell capture
TYPE
10x Genomics
BRAND
1000332/1000329
SKU
3h
Post GEM-RT Cleanup & cDNA Amplification
Note
"Step 2": Follow the Chromium Next GEM Single Cell 5' v2 (Dual Index) with Feature Barcode technology for Cell Surface Protein & Immune Receptor Mapping User Guide which can be accessed here.
Equipment
Eppendorf Mastercycler Pro S
NAME
Thermocycler
TYPE
Eppendorf
BRAND
Equipment
Qubit™ 4 Fluorometer, with WiFi
NAME
Fluorometer
TYPE
Invitrogen
BRAND
Q33238
SKU
LINK
Pause: freeze cDNA (-20°C) after verifying and recording concentration. Can resume library generation protocol on the next day.
6h
Day 2
12h
V(D)J Amplification from cDNA
Time dependent on stop options used and may vary with cycling conditions
Note
"Step 3": Follow the Chromium Next GEM Single Cell 5' v2 (Dual Index) with Feature Barcode technology for Cell Surface Protein & Immune Receptor Mapping User Guide which can be accessed here.
3h
V(D)J Library Construction
Time dependent on stop options used and may vary with cycling conditions
Note
"Step 4": Follow the Chromium Next GEM Single Cell 5' v2 (Dual Index) with Feature Barcode technology for Cell Surface Protein & Immune Receptor Mapping User Guide which can be accessed here.
3h 20m
5ʹ Gene Expression (GEX) Library Construction
Time dependent on stop options used and may vary with cycling conditions
Note
"Step 5": Follow the Chromium Next GEM Single Cell 5' v2 (Dual Index) with Feature Barcode technology for Cell Surface Protein & Immune Receptor Mapping User Guide which can be accessed here.
4h
Cell Surface Protein/Immune Receptor Mapping Library Construction
Time dependent on stop options used and may vary with cycling conditions
Note
"Step 6": Follow the Chromium Next GEM Single Cell 5' v2 (Dual Index) with Feature Barcode technology for Cell Surface Protein & Immune Receptor Mapping User Guide which can be accessed here.
After this step the libraries are ready for quality checking (bioanalyzer) and sequencing.
Equipment
Bioanalyzer
NAME
Bioanalyzer
TYPE
Agilent
BRAND
G2991AA
SKU
LINK
Any bioanalyzer will suffice.
SPECIFICATIONS
1h 40m
Protocol references
10x Genomics. (2024, July 29). Chromium Single Cell 5' Reagent Kits User Guide (v2 Chemistry Dual Index) with Feature Barcoding technology for Cell Surface Protein and Immune Receptor Mapping (Document number: CG000330 Rev G) [User guide].
BD FACSDiva Flow Cytometry Software, BD Life Sciences, 2019.
Acknowledgements
We gratefully acknowledge Prof. Dr. med. Martin Kerschensteiner, Prof. Dr. Max Kaufmann, and Dr. Arek Kendirli of the Biomedical Center (BMC), Ludwig Maximilian University of Munich, for providing the laboratory space and equipment essential to this research. We also sincerely thank the Core Facility Flow Cytometry at the Biomedical Center for their support with FACS operations.