Sep 08, 2025
REVA #10: Microcomputed Tomography (MicroCT) of Excised Cadaveric Human Vagus Nerves
- Aniruddha R. Upadhye1,
- Noa B Nuzov1,
- Constantinos Tsipsis1,
- Jichu Zhang1,
- Anandakumar Shunmugavel1,
- Justin Chin1,
- Megan C. Thompson1,
- Nicole A Pelot2,
- Andrew J. Shoffstall1,3
- 1Department of Biomedical Engineering, Case Western Reserve University, Cleveland, OH, USA, 44106;
- 2Department of Biomedical Engineering, Duke University, Durham, NC, USA, 27708;
- 3APT Center, Louis Stokes Cleveland Department of Veterans Affairs Medical Center, Cleveland, OH
- Aniruddha R. Upadhye: ORCID: 0000-0002-9303-5872;
- Noa B Nuzov: ORCID: 0000-0001-8187-2115;
- Jichu Zhang: ORCID: 0009-0005-9791-8786
- Anandakumar Shunmugavel: ORCID: 0000-0001-8230-7361
- Justin Chin: ORCID: 0009-0008-1482-0735
- Megan C. Thompson: ORCID: 0009-0008-6134-2625
- Nicole A Pelot: ORCID: 0000-0003-2844-0190


Protocol Citation: Aniruddha R. Upadhye, Noa B Nuzov, Constantinos Tsipsis, Jichu Zhang, Anandakumar Shunmugavel, Justin Chin, Megan C. Thompson, Nicole A Pelot, Andrew J. Shoffstall 2025. REVA #10: Microcomputed Tomography (MicroCT) of Excised Cadaveric Human Vagus Nerves. protocols.io https://dx.doi.org/10.17504/protocols.io.36wgqpd55vk5/v1
Manuscript citation:
Upadhye, A.R., Kolluru, C., Druschel, L., Al Lababidi, L., Ahmad, S.S., Menendez, D.M., Buyukcelik, O.N., Settell, M.L., Blanz, S.L., Jenkins, M.W., Wilson, D.L., Zhang, J., Tatsuoka, C., Grill, W.M., Pelot, N.A., Ludwig, K.A., Gustafson, K.J., Shoffstall, A.J., 2022. Fascicles split or merge every ~560 microns within the human cervical vagus nerve. J Neural Eng. https://doi.org/10.1088/1741-2552/ac9643
Zhang, J., Lapierre-Landry, M., Kalpatthi, H.K., Jenkins, M.W., Wilson, D.L., Pelot, N.A., Shoffstall, A.J., 2026. Automated 3D segmentation of human vagus nerve fascicles and epineurium from micro-computed tomography images using anatomy-aware neural networks. J Neural Eng. https://doi.org/10.1088/1741-2552/ae33f6
License: This is an open access protocol distributed under the terms of the Creative Commons Attribution License, which permits unrestricted use, distribution, and reproduction in any medium, provided the original author and source are credited
Protocol status: Working
We use this protocol and it's working
Created: July 16, 2025
Last Modified: September 08, 2025
Protocol Integer ID: 225842
Keywords: Human anatomy, Nerve morphology, Vagus nerve, Cranial nerves, Peripheral nervous system, Autonomic nervous system, Neuroanatomy, Microcomputed tomography, MicroCT, microct imaging, microcomputed tomography, microct, excised cadaveric human vagus nerves this protocol, cadaveric human vagus nerves this protocol, cadaveric human vagus nerve, excised cadaveric human vagus nerve, computed tomography, vagus nerve, scanco medical equipment, using scanco medical equipment, imaging, nerve
Funders Acknowledgements:
NIH SPARC
Grant ID: 75N98022C00018
NIH SPARC
Grant ID: OT2 025340
VA Shared Equipment Evaluation Program (ShEEP)
Grant ID: 1IS1BX004384
NIH
Grant ID: R01 EB033403
Disclaimer
DISCLAIMER – FOR INFORMATIONAL PURPOSES ONLY; USE AT YOUR OWN RISK
The protocol content here is for informational purposes only and does not constitute legal, medical, clinical, or safety advice, or otherwise; content added to protocols.io is not peer reviewed and may not have undergone a formal approval of any kind. Information presented in this protocol should not substitute for independent professional judgment, advice, diagnosis, or treatment. Any action you take or refrain from taking using or relying upon the information presented here is strictly at your own risk. You agree that neither the Company nor any of the authors, contributors, administrators, or anyone else associated with protocols.io, can be held responsible for your use of the information contained in or linked to this protocol or any of our Sites/Apps and Services.
Abstract
This protocol describes micro-computed tomography (microCT) imaging of an excised cadaveric human vagus nerve, stained appropriately, using SCANCO Medical equipment and software.
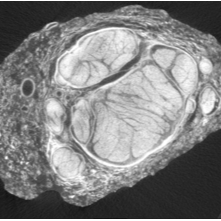
Image Attribution
SR003-CR
Guidelines
N/A
Materials
- SCANCO Medical µCT 100 cabinet microCT scanner
- SCANCO Medical sample tube (U50825, Sample tube (34 mm diameter, 110 mm height))
- Custom 3D printed cap and holder (Figure 1, Figure 2)
- SCANCO Medical AG Proprietary Software: Data Manager Version 1.9.99.99, Evaluation 1.2.99.99, GPU Reconstruction 1.2.99.99, ScanProgram 7.9.9.9, uCT Reconstruction 6.9.99.99, Sample Registration 1.2.9.0
- Gorilla® Micro Precise Super Glue (Prod. #102812)
- 1X Phosphate-buffered saline (PBS; Thermo Fisher Scientific, Cat. #BP399-4)
- 10% Neutral buffered formalin (NBF; VWR, Cat. #16004-128)
- Cheesecloth (Thermo Fisher Scientific, Cat. #13-761-52)
- Polypropylene container (Thermo Fisher Scientific, Cat. #22-026-315)
Figure 1. Custom 3D-printed cap and sample holder with sample positions labeled. Top view.
Figure 2. Custom 3D-printed cap and sample holder. Longitudinal view.
Safety warnings
This protocol might include items and/or substances that may pose hazards (e.g., chemical, physical, biological, or otherwise) to your health upon use or exposure. Before engaging in the processes described in this protocol, familiarize yourself with and follow the safety data sheets, manufacturer safety recommendations, and local regulations.
Ethics statement
Be sure to seek approval for or an exemption from human subjects research from your local regulatory body(ies) as required by local and/or institutional regulations before initiating studies.
This study was determined to be exempt from IRB oversight by the Case Western Reserve University Institutional Review Board (IRB) because it involved de-identified cadaveric tissue and no protected health information was collected from the donors.
Before start
See the protocols for dissecting (dx.doi.org/10.17504/protocols.io.yxmvmb976g3p/v1) and removing (dx.doi.org/10.17504/protocols.io.n2bvje9r5gk5/v1) the human vagus nerve from embalmed cadavers, followed by staining with phosphotungstic acid (dx.doi.org/10.17504/protocols.io.5qpvod95xg4o/v1), resulting in the vagal complex (from brainstem to abdomen) glued to a series of acrylic boards, each 3 cm wide and up to 9 cm long. The nerve on each acrylic board is termed a “sample”; the separation of the nerve into samples is described in the CT protocol (dx.doi.org/10.17504/protocols.io.3byl46w72go5/v1).
Section 1: Loading the Samples
Power on the SCANCO µCT 100 microCT scanner and initiate the SCANCO application on the connected computer.
Load two samples (back-to-back) into one sample holder tube.
Securely position a 34 mm × 110 mm tube on the scanner’s loading dock.
Snap the nerve samples into place, one on each side of the custom 3D-printed holder. If needed use small drops of Gorilla® Micro Precise Super Glue to secure in place. Refer to the engraved numbers on the cap to document the position of each sample.
Gently insert the custom 3D-printed holder (with attached samples) into the tube, ensuring that the cap’s edge is aligned precisely with the dotted line markers on the tube wall.
Verify that the cap’s edge aligns with the x-axis of the coordinate system.
Repeat if multiple tubes require imaging. We recommend scanning in batches of two tubes (i.e., four samples) to ensure the total sample exposure duration stays within ~28:00:00 to avoid severe dehydration.
[Critical] Open the SCANCO Medical AG Sample Registration (Version 1.2.9.0) software on the scanner computer and input the sample name in the format: “subject-sample 1 + sample 2”. For example, if CL1 and CR1 samples from subject SR004 are loaded into positions 1 and 2 respectively, designate the scan as “SR004-CL1+CR1.”
Note
Note: File and folder names inputted in this section are for internal use only. Subsequent renaming will ensure that these folder and file names comply with SPARC Data Structure.
Make note of the unique “Scan Number” generated by the database in a sample metadata spreadsheet (where each sample has a row).
Section 2: Scanning the Samples
Launch the SCANCO Medical AG ScanProgram (Version 7.9.9.9) on the scanner computer.
Load all sample tubes onto the scanning carousel and initiate the “Check/Refresh” process. The system will verify the number of tubes on the carousel, and the loaded tubes should be accurately displayed in their respective positions.
Follow these steps to set up a scan for the sample(s) in one tube:
[Critical] Select the designated tube position and allocate the appropriate “Scan Number” to the tube. Ensure samples in the tube match with the name of the dataset in the software.
[Critical] Select the scanning control file with the following parameters (ver. REVA 1): voltage = 55 kV, current = 145 mA, integration time = 500 ms, 35.2 mm FOV, 0.5 mm aluminum filter. The resulting scan will have isotropic pixels of 11.4 microns.
Click “Scout View” to generate a preliminary, low-quality scan. Verify that the entire sample is within the field of view and all samples are secured on the holder.
Click the “Reference Line” tool to define the scanning region in the z-direction within the scout view panel. Holding the shift key during line placement allows for consecutive scans. Ensure to include both top and bottom edges of the acrylic grid.
Upon completion, click “Add Scan” to add the scan to the queue.
If more tubes require imaging, proceed to the next sample in the “Carousel Position” and replicate the preceding steps.
[Optional] To quickly check stain penetration, consider generating a preview scan by selecting a small region of the nerve and/or running a low-resolution scan on the whole nerve. Use the reference line tool without holding the shift key. Standard protocol is not to re-stain (given the resulting impact on tissue quality for histology), therefore we don’t acquire a preview scan.
After queuing all scans, access the “Task List” and perform a comprehensive check of all parameters and metadata.
Select the task at the top of the list and click “Interact Tasks” to initiate the scanning process for all tubes in order (~14:00:00 per tube).
Section 3: End of Scan
Upon completion of the scanning process, ensure the X-ray is turned off.
Safely remove the tube from the machine. Confirm accurate recording of metadata in the sample metadata spreadsheet, including scan number, sample position, and date of scan.
Remove the nerve sample(s) from the tube (pull to release from small drops of glue, if applicable) and cover them in cheesecloth or gauze soaked with 1X phosphate-buffered saline (PBS) to prevent dehydration.
Once all scans for a single cadaver are complete, immerse the nerve (with its attached grids) in 10% neutral buffered formalin (NBF) in a polypropylene container. Use ~950 mL of 10% NBF per cadaver for ~15 samples (i.e., ~15 9 cm-long acrylic boards).
Section 4: Data Evaluation and Export
Launch the SCANCO Medical AG Evaluation (Version 1.2.99.99) software on the server storage computer. Select the “Task” tab from the top ribbon bar and click “Select script.” Click on “Export to DICOM” and select the task. This tool will export the reconstructed image slices into DICOM format with 16-bit depth and raw intensity.
Confirm the correct field of view (3072 × 3072 native resolution by default) and click “Start task.”
If multiple scans need to be converted, close the “Job Queue” pop-up and repeat steps above. Scans that have been evaluated will show a gear sign in the “Evaluation” column in the database.
After all scans have been successfully evaluated, launch the SCANCO Medical AG Data Manager (Version 1.9.99.99) on the server storage computer.
Use checkboxes on the left to select all scans that need to be exported. Confirm the slice number and metadata are correct before exporting.
In the “Selected Measurement” section, select “IMA” and check only “DCM” from the options. Change the drop-down lists on the right to “Copy To” and “Export To.” Confirm the total size of the data below to ensure there is enough disk space on the external hard drive.
Click the “Start” button and select the desired directory where all DICOM images will be saved.
Acknowledgements
The authors thank the donors and staff of the Case Western Reserve University Anatomical Gift Program. Without the selfless donations of the donors and the tireless efforts of the staff of this program, the methods described in this protocol and the insights and advancements that result from studies conducted according to this protocol would not be possible.