Jan 08, 2026
Protocol for Using the Automated M3 and M5 HTX MALDI Matrix Sprayers for Mass Spec Imaging Sample Preparation
- 1University of Edinburgh


Protocol Citation: Shazia Khan 2026. Protocol for Using the Automated M3 and M5 HTX MALDI Matrix Sprayers for Mass Spec Imaging Sample Preparation. protocols.io https://dx.doi.org/10.17504/protocols.io.14egn6dpml5d/v1
License: This is an open access protocol distributed under the terms of the Creative Commons Attribution License, which permits unrestricted use, distribution, and reproduction in any medium, provided the original author and source are credited
Protocol status: Working
We use this protocol and it's working
Created: October 09, 2024
Last Modified: January 08, 2026
Protocol Integer ID: 109427
Keywords: MALDI, mass spectrometry imaging, MSI, matrix application, automated matrix sprayer, HTX TM-Sprayer, M3 TM-Sprayer, M5 TM-Sprayer, tissue sample preparation, matrix deposition, tissue imaging, spatial metabolomics, spatial lipidomics, matrix spray, matrix sprayers for maldi mass spectrometry imaging, m5 htx maldi matrix sprayer, mass spec imaging sample preparation, mass spectrometry core facility environment, maldi mass spectrometry imaging, sprayer m3, free matrix deposition, controlled matrix coating, reproducible msi data, matrix coating, sample preparation, consistent spray quality, msi, standardised operation of the htx tm, automated m3, contamination, m5
Disclaimer
This protocol is intended for research use by trained users only. The authors and facility accept no liability for misuse or equipment damage. Users must comply with institutional safety procedures and manufacturer recommendations and validate the method for their specific samples and applications.
Some images and operational steps in this protocol are reproduced / adapted from the HTX TM-Sprayer User Manual (HTX Technologies, LLC). This protocol is not an official HTX document and has not been reviewed or endorsed by HTX Technologies, LLC. All trademarks and copyrights belong to their respective owners.
Abstract
This protocol describes the standardised operation of the HTX TM-Sprayer M3 and M5 automated matrix sprayers for MALDI mass spectrometry imaging (MSI) sample preparation in a mass spectrometry core facility environment. It provides detailed instructions for instrument setup, system equilibration, matrix application, flushing, shutdown, and routine performance checks to ensure reproducible and contamination-free matrix deposition. When followed correctly, this protocol yields uniform and well-controlled matrix coatings with stable pump back pressure and consistent spray quality, supporting high-quality and reproducible MSI data. It defines acceptance criteria for back pressure stability, environmental logging, and standardised washing sequences to minimise clogging and carryover.
Attachments

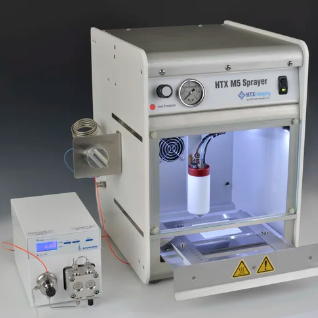
Image Attribution
Image courtesy of HTX Technologies, LLC. HTX M5 Sprayer — HTX Imaging
Guidelines
- This protocol is intended for research use only and must be performed by trained and authorised users.
- Users must be familiar with the HTX TM-Sprayer M3/M5 User Manual and have completed facility-specific training prior to independent operation.
- Always follow institutional risk assessments, COSHH regulations, and local safety procedures when handling solvents, matrices, and compressed gases.
- Maintain accurate logbook records of system equilibration, pump back pressure, environmental conditions, and matrix usage for each spraying session.
Materials
Consumables and chemicals:
Matrix solution ~6 mL – depends on protocol
MeOH:H2O 1:1 (500 mL) for solvent flow line
Nitrogen Gas flow at pressure 10 psi
Sample slide for spray
Solvents for washing lines:
10 mL of 5% Aq. Ammonium Hydroxide.
10 mL of 1% Trifluoroacetic Acid (TFA) in ACN
(5% Ammonium Hydroxide in water preparation: 25-30% NH4OH (aq) solution 1 in 5 dilutions
e. g. 100mL 25% NH4OH + 400mL H2O (HPLC Grade) = 500mL 5% NH4OH
1% TFA in ACN prep: 1 mL in 99mL ACN (HPLC Grade))
Safety warnings
- Organic solvents (e.g. methanol, acetonitrile) and reagents and matrices (e.g. DAN, TFA, ammonium hydroxide) are hazardous and must be handled with appropriate PPE, including lab coat, and gloves.
- TFA and ammonium hydroxide are corrosive. Avoid skin contact and inhalation, and dispose of waste according to institutional chemical waste procedures.
- Nitrogen flow must not be adjusted beyond recommended limits. Report any irregular pressure behaviour immediately.
Ethics statement
This protocol describes the operation of automated MALDI matrix sprayers for mass spectrometry imaging sample preparation and does not itself involve live animal experimentation. Any tissue samples derived from animal studies must be obtained under prior approval from the appropriate Institutional Animal Care and Use Committee (IACUC) or equivalent institutional and national ethics committees. Users are responsible for ensuring that all samples analysed using this protocol comply with relevant ethical approvals, regulations, and permit requirements in their institution and country.
Before start
- Ensure the fume cupboard is operational and airflow is active before starting the solvent pump or spraying procedure.
- Confirm the nitrogen supply (Corona N₂ generator) is functioning correctly and that system pressure is set to 10 psi.
- Verify that solvent and waste bottles are correctly connected, adequately filled, and not over capacity.
- Check that the TM-Sprayer exhaust fan is operational. Do not operate the system if active venting is not functioning.
- Confirm pump back pressure stabilises within the defined acceptance ranges at each flow rate before proceeding with matrix application.
Instrumentations:
M3 HTX TM-Sprayer with Pump
M5 HTX TM-Sprayer with Pump
- M3 HTX TM-Sprayer‱ (HTX Technologies, LLC, USA)
- M5 HTX TM-Sprayer‱ (HTX Technologies, LLC, USA)
- Corona N2 Generator
Consumables and chemicals:
- Matrix solution ~6 mL – depends on protocol
- MeOH:H2O 1:1 (500 mL) for solvent flow line
- Nitrogen Gas flow at pressure 10 psi
- Sample slide for spray
Solvents for washing lines:
10 mL of 5% Aq. Ammonium Hydroxide.
10 mL of 1% Trifluoroacetic Acid (TFA) in ACN
5% Ammonium Hydroxide in water preparation: 25-30% NH4OH (aq) solution 1 in 5 dilutions e. g. 100mL 25% NH4OH + 400mL H2O (HPLC Grade) = 500mL 5% NH4OH
1% TFA in ACN preparation: 1 mL in 99mL ACN (HPLC Grade))
Set up of Sprayer to equilibrate:
45m
- Connect laptop with instrument using a USB comm cable
- Switch on HTX TM-Sprayer‱, laptop and Corona N2 generator at the plug
- Check N2 generator lights are green (if light is Amber or Red then don’t use the sprayer and report to MSI lab manager/responsible person)
- Turn on fume cupboard air flow and light
- Check the solvent bottle has enough solvent (50% MeOH)
- Check waste bottle is not full (if full, discard waste solvent into appropriate waste container)
- Turn on Nitrogen flow by toggle valve bracket on wall beside the fuming hood - Nitrogen for the system is supplied from the Corona N2 Generator
- Adjust nitrogen pressure to 10 psi (70kPa) using regulator at back of the system in M3 and at front of M5.
- Turn on TM-Sprayer unit and pump should be already on @ 0.01 mL/min flow in sprayer mode
IMPORTANT: Check that exhaust fan on TM Sprayer is operational. Fume hood is turn on. Do not start solvent pump if proper active venting is not functioning.
Before putting sample slide to dry in vacuum desiccator check the stability of the instrument at
different flow rates in sprayer mode:
15m
- Set the flow rate 500 uL leave for 10 min to stabilise then observe the back pressure fluctuations and record it in the M3 / M5 spayer's log book.
- Pump back pressure should be within range 43-47 MPa (if pressure jump randomly a lot or ±5 and does not stabilise on additional 10 min flow then don’t use the sprayer and report to MSI lab manager/responsible person and also note down in the log book)
- If pump back pressure is stable at 500ul/min then check further at 200 ul/min (34-37 MPa), 100 ul/min (31-33 MPa) and 10 uL/min (28-29 MPa) and record in log book as below chart.
- Also record which matrix you are using with flow rate and back pressure on the log book along with humidity and temp of the fume hood.
| A | B | C | D | E | |
| Date | User | Solvent flow | M3/M5 Pump back Pressure | Fume hood humidity & Temp | |
| 500ul/min | |||||
| 200ul/min | |||||
| 100ul/min | |||||
| 10ul/min | |||||
| Matrix + flow rate |
Table S1 - Record of TM-Sprayer (M3/M5) pump back pressure stability at different solvent flow rates prior to matrix application. This log must be completed for each spraying session and entered in the M3/M5 sprayer logbook.
- Set valve to LOAD position and flush loop with at least 6mL MeOH:H2O 50:50 using 10 mL syringe.
In LOAD position - the flow from pump goes to nozzle and by-passes the loop
In SPRAY position - the flow from pump goes to nozzle through the loop
Double click on the TMSP icon to launch the sprayer application.
Nozzle will initialise positions and temperature display will indicate ambient temperature
- Select the sprayer method if already there and let spray equilibrate at set temperature and flow rate for at least 20-30 min
- In case of new method click on add method on the top right-hand side and add spray method details or select a method and then click on copy and add selected method to make a copy and then amend the method. Once method edit click on save methods otherwise method will not save automatically.
30m
Matrix Application (sample preparation):
30m
- Prepare Matrix solution according to protocol – Make sure matrix is completely dissolved by sonicating for 5-15 min otherwise it will block the flow line which increase back pressure.
- Dry MALDI plate/slide with affixed sample(s) under vacuum desiccator (15-30 min depend on protocol)
- TM sprayer control software screen should display:
- The red striped area in the centre represents the available spray area.
- Begin on the Sample Tab at the far left of the screen select the type of plate from drop down menu. Once selected, the red striped area will also automatically update.
Note: The Sample Area is defined by the X Range and Y Range of the sample.
- If sample is significantly differently sized than manually set the lower and upper value of the X and Y ranges to match the coordinates of the edges of the sample.
- Adjust the overspray margins from 0 to 10 mm, a default 10 mm overspray is applied in all four directions
- Select a saved method or create a new method (right side tabs) include all the parameters related to
- spray conditions, author, date created, and user comment
- The selected method is always displayed in the green box under the Sample Tab.
- To select a different method, click in the far most left column in the methods menu at the bottom of the screen as shown above.
Note: If you click anywhere other than the first column on a different method, it WILL NOT change the current method.
- The Cycle Tab on left of the screen provides matrix usage data, timers and reading of the actual temperature of the spray nozzle as well as starts, pauses, aborts and confirms completion of a Cycle.
- To spray matrix switch valve to LOAD position manually on TM Sprayer unit.
- Load matrix in loop with syringe. Adjust Matrix Volume in Cycle tab if different than the full loop volume value.
For full loop 20% overfill is recommended. i.e.: Use 6 mL syringe to fill 5 mL loop
- Check that flow rate, back pressure and temperature are correct and stable
- Review sample position and define spraying area in TM-Sprayer software
- Select method and press START in the Cycle tab. Option changes to CONTINUE.
- This will communicate the method temperature to the unit, and activate the Status tab dialog prompts. The Spray Nozzle Temp will be displayed in red until it reaches the temperature specified by the selected method when it will turn green.
- When prompted, switch the valve to SPRAY and click CONTINUE.
- Unit will delay start to allow full purge of the delay volume between valve and nozzle tip. The cycle will proceed without further input.
- At the end of the Cycle switch valve to LOAD. This action stops the matrix usage preserving the unused matrix inside the loop for next sample.
Note: The interface (Cycle Tab) keeps track of matrix usage and volume left in the loop. If the volume remaining is insufficient for the next Cycle, and error prompt will be displayed.
Before start actual tissue sample slide, visually check for matrix spray quality using dummy plate.
- After spray end, change the nozzle temperature to 25C and keep solvent and gas flow on and wash the lines/loop.
- Set valve to LOAD position and flush loop with at least 6mL MeOH:H2O 50:50 then toggle the valve to the “SPRAY” position and flush loop with remaining 4mL MeOH:H2O 50:50.
IMPORTANT: Keep gas and pump flow on so until nozzle temp reach to 25C so that clean solvent flows to nozzle and prevents matrix residues from crystallizing and clogging the capillary and spray nozzle
30m
Flushing Procedure before shut down sprayer:
35m
- Set the pump flow rate to 0.500mL/min
- Nitrogen does not have to be on during the wash procedure if nozzle temperature is below 30C.
- Check the nature of your matrix before start the rinsing sequence.
Important: Most matrices are acidic (DHB, CHCA, SA, etc...) so start with the Ammonium Hydroxide (basic solution). A few matrices (9-AA, DAN, etc…) are basic, for those switch the rinsing sequence and start with the acetic acid rinse, then ammonium hydroxide solution. Always end with neutral.
5m
Switch the valve back to the “LOAD” position and inject 10 mL of 5% ammonium hydroxide solution into the 5 mL loop. This process rinses the loop entirely and loads the loop with a remaining 5 mL of ammonium hydroxide. Switch the 6-port valve to the “SPRAY” position. Allow to flow for 10 minutes.
10m
Switch the 6-port valve back to the “LOAD” position and Inject 10 mL of 1% TFA into the loop then switch the valve to the “SPRAY” position and allow to flow for 10 minutes.
5m
Switch the valve back to the “LOAD” position and rinse the lines with normal push solvent (50% Methanol) 10 mL then switch the valve to the “SPRAY” position and allow to flow for 2-3 minutes at 0.500mL/min.
10m
Fill the syringe with 50% MeOH and leave the pump flow on @ 10uL/min at SPRAY position.
5m
Shut Down Steps:
15m
- Exit out of TM-Sprayer software
- Turn TM-Sprayer off.
- Turn PC off and Nitrogen supply off if not done before.
- Make sure pump flow set at 10ul/min and valve at SPRAY position.
- Clean sample holder with solvent and water.
- Empty waste bottle if it is full or top up flow solvent if going to finish soon
- Clean all glass wares and dispose vials and gloves appropriately.
15m