Apr 19, 2024
Protocol for Repix: reliable, reusable, versatile chronic Neuropixels implants using minimal components
- Mattias Horan1,
- Daniel Regester1,
- Yoh Isogai1,2
- 1Sainsbury Wellcome Centre for Neural Circuits and Behaviour, University College London;
- 2Allen Institute for Neural Dynamics


Protocol Citation: Mattias Horan, Daniel Regester, Yoh Isogai 2024. Protocol for Repix: reliable, reusable, versatile chronic Neuropixels implants using minimal components. protocols.io https://dx.doi.org/10.17504/protocols.io.4r3l2qm2ql1y/v1
License: This is an open access protocol distributed under the terms of the Creative Commons Attribution License, which permits unrestricted use, distribution, and reproduction in any medium, provided the original author and source are credited
Protocol status: Working
We use this protocol and it's working
Created: March 19, 2024
Last Modified: April 19, 2024
Protocol Integer ID: 96919
Keywords: Neuropixels, chronic implant, retrievable, versatile chronic neuropixels implant, neuropixels probe, neuropixel, neuronexus probe, protocol for repix, using repix, evaluation of repix, repix, chronic implantation system, mice
Abstract
This is the protocol associated with Repix: reliable, reusable, versatile chronic Neuropixels implants using minimal components.
In the main report, we describe the development, deployment, and evaluation of Repix, a chronic implantation system that permits the repeated re-use of the Neuropixels probes and characterized this system for a variety of use cases.
This protocol is appropriate for use in
- Both unrestrained and restrained animals performing a wide variety of behaviors as decision-making, social behaviors, foraging, and sleep
- Mice and rats
- Neuropixels 1.0 or 2.0 (as well as Neuronexus probes)
This protocol describes the assembly, implantation and explantation of probes using Repix.
Attachments

Repix_CAD.zip
7.9MB
Materials
Repix – core parts
| A | B | C | D | |
| Part | Material | Versions | File and location | |
| Cassette | Aluminium | Standard DualProbe prototype | CAD/Cassette/Cassette.step CAD/Cassette/Prototypes/DualProbeParallel.step | |
| Posts | Aluminium | Standard is 11mm in length. Some users have extended this to 13mm. | CAD/ post/post.step | |
| Cover | PLA | Standard Simplified “Box and base” Additional protection and miniaturization | CAD/Cover/Standard/Cover.step CAD/Cover/Simplified/Cover_simplified.step CAD/Cover/BoxBaseCover/Cover_BoxAndBase.step | |
| Headstage holder | PLA | Neuropixels 1.0 Neuropixels 2.0 with cover | CAD/HeadStage Holder/headstage_holder_npx1.step CAD/HeadStage Holder/headstage_holder_cover_20.step | |
| Connector | PLA | Standard Some user preferred a thicker version which requires sanding. There is also an 8mm slot. | CAD/Connector/Connector.step CAD/Connector/Connector_ThickerPlugs.stl CAD/Connector/Connector_8mm.stl | |
| Stereotaxic rod | Stainless steel. Attach connector to this. | 6mm is standard. Though if a different diameter fits your stereotax, it is easy to change the diameter of the connector-slot to match those needs, e.g. the Connector_8mm.stl fits an 8mm stereotaxic rod. | ||
| M1 screws | Stainless steel, M1x3 |
Repix – tools
| A | B | C | D | |
| Part | Use | Supplier | Alternatives | |
| Probe holder | Hold the arm while applying the probe to cassette | Fisso | Noga | |
| Box with graph paper x2 | Align probe | |||
| Light source | Cast a shadow from the probe and connector to the graph paper to check alignment of shanks of the probe | Any flashlight, e.g. use your phone. | ||
| Tweezers | Curved is easiest for holding the M1 screws | Fine Science Tools (e.g. 91117-10) | ||
| Soldering iron | Short the GRN and REF on the probe. Solder to the ground screw. | |||
| Waveform generator | Optional, for testing probe after explantation |
Repix – consumables
| A | B | C | D | |
| Part | Use | Supplier | Alternatives | |
| Blu-Tack | Temporarily hold and cushion probe PCB to the cassette, before applying epoxy | Bostik | ||
| Rapid Epoxy Syringe 24ml | Epoxy probe to cassette | Araldite | Gorilla Epoxy 25 ml | |
| Weighing boats | For mixing epoxy | |||
| Blunt needle and syringe | For applying epoxy, e.g. 30G | |||
| DiI | Fluorescence for shank track tracing, if using | 1 mM in isopropanol, Invitrogen | ||
| Vaseline | Ensure posts don’t stick on explantation | |||
| Sandpaper | If needed to sand connector teeth, depending on exact 3D print and how snug the connector sits in the holes of the cassette. | |||
| Silver or stainless steel wire | For grounding and e.g. for shorting the GRN and REF: optional depending on experimental needs. | World precision instruments | ||
| Headplate | Optional | |||
| Tergazyme | 1%, see standard protocol for cleaning Neuropixels | Alconox | ||
| Dowsil cleaning solvent | For cleaning probe, optional | DOWSIL DS-2025 Silicone Cleaning Solvent | ||
| PBS | For cleaning probe |
Surgery – tools
| A | B | C | D | |
| Part | Use | Supplier | Alternatives | |
| Scissors | Some users prefer making their incision with scissors | Fine Science Tools | ||
| Scalpel | Making incisions | |||
| Bone scraper | Roughen skull for cementing | Fine Science Tools | ||
| Stereotaxic frame, incl arms | Precision targeting | Kopf Instruments | ||
| Micro manipulator | Slowly move the probe into the brain | Sensapex | Luigs-Neumann micromanipulator | |
| Thermometer, heating pad, and other measures for the anesthesia | Maintaining body temperature | Harvard Apparatus |
Surgery – consumables
| A | B | C | D | |
| Part | Use | Supplier | Alternatives | |
| Drugs | In accordance with local guidelines and rules, for anaesthesia, analgesia. Consider dexamethasone as anti-inflammatory. | |||
| Hibiscrub | Sterilization | |||
| Puralube | Eye lubricant | |||
| Phosphoric acid gel | Etching the skull, optional | Enamel Etchant Gel | ||
| Ground screw | 1mm ground screw | ThorLabs | ||
| Drill and drill bits | e.g. 1-mm dental drill, or alterntives, up to users | Meisinger, HP 310 104 001 001 004 | ||
| Sugi tips, Q tips | Absorbent | Questalpha | ||
| Sterile saline and pipette | Irrigate the craniotomy during the prolonged lowering of the probe | |||
| Cyanoacrylate | Skin closure | VetBond, World Precision Instruments | Histoacryl, Braun Medical | |
| Fibrolar | Optional, if risk of bleeding | |||
| Dura-Gel | Artificial dura | Cambridge NeuroTech | 3-4680, Dow Corning | |
| SuperBond | Cementing headplate and feed | C&B SuperBond | Sun Medical | |
| RelyX | Cementing feet and building craniotomy well. | Norland Optical Adhesives #81, Norland Products | ||
| Dental acrylic | Cementing feet, alternative to RelyX | Simplex Rapid, Kemdent | ||
| UV gun | Curing UV cement, e.g. RelyX | |||
| Kwik-cast or Kwik-sil | World Precision Instruments | |||
| Coban band | Wrapping implant | 3M | Surgical tape |
Before start
Download the CAD files and arrange the parts to be manufactured. We used 3D Hubs and in house fabrication facility for aluminum and 3D printed parts.
Overview
This is the protocol associated with Repix: reliable, reusable, versatile chronic Neuropixels implants using minimal components.
In the main report, we describe the development, deployment, and evaluation of Repix, a chronic implantation system that permits the repeated re-use of the Neuropixels probes and characterized this system for a variety of use cases:
“Repix is a reliable system for chronic recording using Neuropixels probes in mice and rats across 14 users and 10 laboratories. The key advantage of Repix is robustness and simplicity. The lightweight system allows implanted animals to express a full range of their natural behaviors. Repix allows the recording of hundreds of neurons across many months, up to a year, with implants across numerous cortical and subcortical brain regions. The probes can be reused repeatedly with stable yield. Finally, we analyzed the users’ learning curve to successfully carry out their chronic electrophysiological experiments. The performance and user-friendliness of the Repix should facilitate a wide uptake of chronic Neuropixels recordings.”
This protocol is appropriate for use in
- Both unrestrained and restrained animals performing a wide variety of behaviors as decision-making, social behaviors, foraging, and sleep
- Mice and rats
- Neuropixels 1.0 or 2.0 (as well as Neuronexus probes)
This protocol describes the assembly, implantation and explantation of probes using Repix.
Introduction
In brief
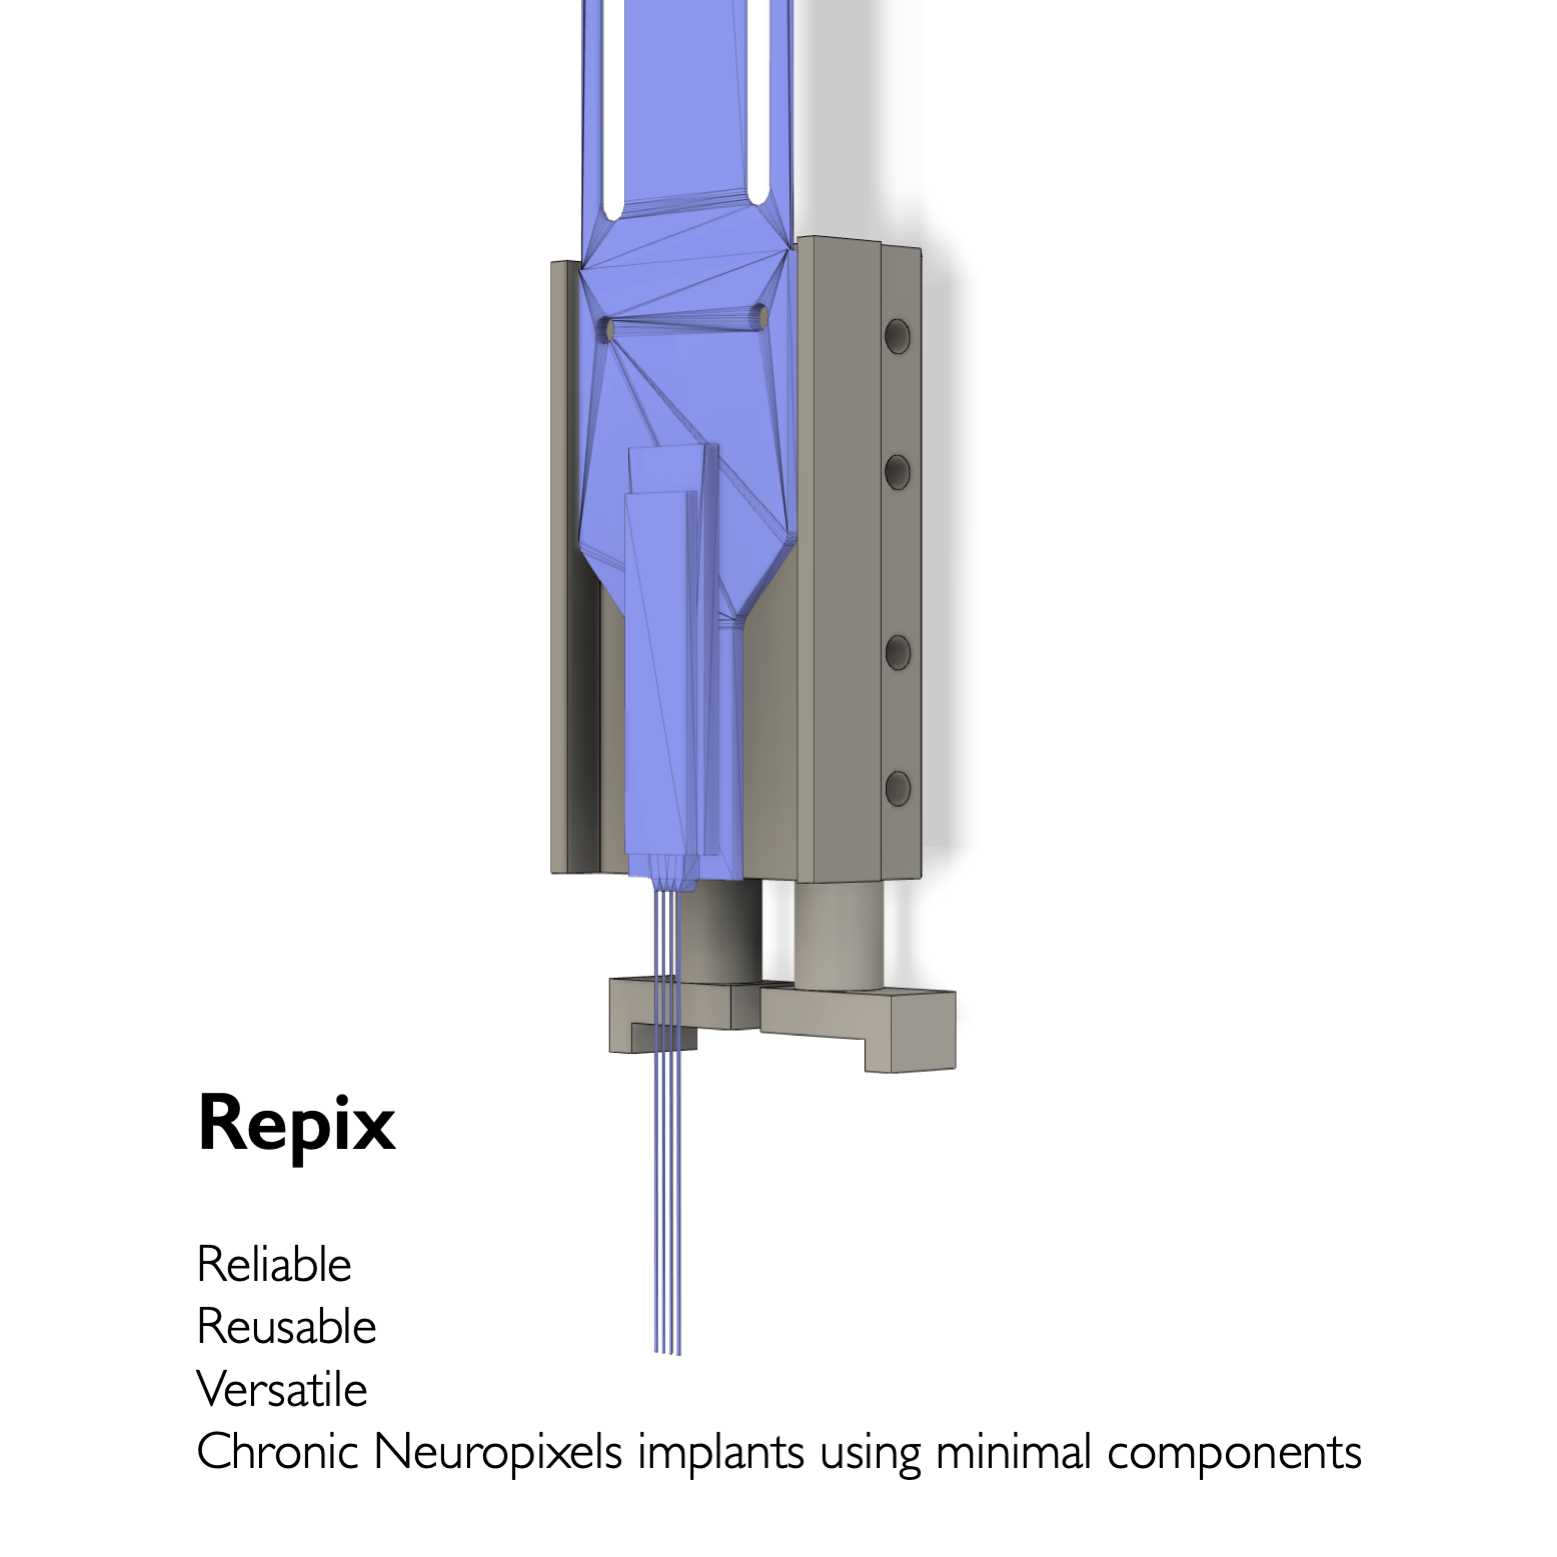
“Repix is designed with just three components: a probe cassette, a pair of posts, and a probe protector cover. We followed the “payload and docking module principle” of explantable probes similar to existing implant systems. This means the probe is permanently mounted to the cassette (payload module), which in turn slots into the posts (docking module), and the two parts are secured by multiple screws.”
There are 4 conceptual parts of this protocol:
- Preparation
- Surgical approach
- Implantation of probe
- Explantation of probe
Chapters
There are 8 critical steps to be completed with care for a successful experiment:
- Prepping the probe on the casette
- Ensure the head is flat
- Headplate + craniotomy
- Lowering the probe to the correct position
- First layer of cement
- Second layer of cement
- Attachment of cover
- Retrieval
Notes and best practices
Finally, we have added notes and best practices throughout. Not all users have kept to each and all of these, so rather than requirements, consider them a list of options to increase your likelihood of success.
General advice
The whole procedure should be practiced with a cadaver and a dummy probe
Note: If dummy probes are not available a finely pulled glass pipette attached to the cassette (if fine enough pipettes seem to be suitably easy enough to break).
Based on the learning curves of beta users, it is advised not to proceed with the procedure with a real probe until at least three successful practice procedures on cadavers. All procedures, including learning procedures, should be performed in accordance with local animal welfare guidelines and laws.
Terminology
Probe
Neuropixels (1.0 or 2.0) or Neuronexus probe
Cassette
Aluminium retrievable body with the probe secured with epoxy glue
Posts
Two aluminium posts held within the cassette which will be cemented to the mouse head
Connector
A 3D printed piece to hold the cassette for implantation/explantation
Stereotaxic rod
A metal rod attached to the connector so that the piece can be held by a stereotaxic arm
Cover
A 3D printed piece to cover the implant
Headstage holder
A 3D printed piece to attach the probe’s headstage
General procedure and deviations
There is lots of space for space flexibility in this protocol, described in notes and best practices.
Generally, there are two categories of deviations that users mainly sorted into:
Single or two-step procedure
Implantations can be done as a single or two-step procedure.
The single procedure is doing the surgery of this protocol in one go.
Alternatively, two-step procedure may be useful when targeting small brain areas where physiological signatures during wake can guide the targeting of the electrode. If using a two-step implantation, there would be a break (e.g. days while training an animal) following Step 3. Then, Step 2 would be repeated before Step 4, and then implantation is finalized.
Examples of two-step procedures:
A)
Initial day: Craniotomy
Subsequent day: Activity guided probe implantation while animal is awake, followed by guide post attachment
B)
Initial day: Craniotomy and guide post attachment
Subsequent day: Probe implantation while the animal is awake
Implant attachment method
There are two common ways to cement the posts:
- Dropping Posts - place the posts fully into the cassette during surgical preparation. Then once the probe is lowered into the brain, let the posts drop onto the skull. Then refasten the posts and cement the feet.
- Stable Posts - – during surgical preparation, the posts should be securely attached to the cassette so that the length of the probe shanks that extends past the post feet corresponds to the insertion depth. Once the probe is inserted, the post feet will be in place near the skull and cement can be built up to reach the feet of the posts.
These options will be split out at step 10 below.
Preparation
Assemble pieces
Equipment and steps for aligning and fixing probe onto the casette
Confirm that all the M1 taps of the cassette are functional using M1 screws.
If good, fill the desired number of M1 taps with M1 screws.
NOTE: There are 12 total taps. Most users use 8 screws to hold the posts. Some use 4. One user has tested with as few as 2 screws (1 per post) without negative incident.
Attach the cassette to the connector and place in a horizontal configuration.
Attach the posts to the cassette.
You have two options
1) DROPPING POSTS: either place the posts fully into the cassette with the plan to let the posts drop onto the skull once the probe is in place or
2) STABLE POSTS: carefully measure the distance that the post feet protrude from the cassette to allow them to be at the correct height once the probe is in place.
See the bifurcation in the surgery description for details.
NOTE: If desirable, this step can also be performed after the probe has been attached.
a) Place the stereotaxic rod attached to the cassette on an adjustable manipulator arm (Fisso) or a similar clamp.
b) Insert the posts into the bottom of the cassette and tighten into place using the screws.
NOTE: A bit of Vaseline on the post can prevent sticking.
c) To ensure that the posts move freely within the cassette, which will be important for explantation, consider doing the following small step: tighten the screws around the posts and check using tweezers that when you loosen the screws the posts come out easily.
IMPORTANT: making sure the posts run smoothly through the cassette holes is important for later retrieval. If not, use a guide pole to go up and down and smoothen the track, or try Vaseline.
d) If you plan to drop the posts onto the skull, release all screws, and tighten the bottom 2 side screws as lightly as possible such that they hold the posts in place, but are easy to release.
Attach Probe to Cassette
Place the cassette with all pieces attached as above into moveable arm e.g., a Fisso arm (Fig 2)
Place a small piece of Blu-Tack on the cassette
Gently press the probe into place on the cassette
Align the probe correctly in x and y – Use a sheet with a fine grid and a bright lighting source and camera (e.g. a smartphone) to zoom in on the shank of the probe and the cassette edge and to ensure the alignment using the grid lines as a reference.
Once straight, apply epoxy glue to permanently fix the probe in place on the cassette (recommend quick-drying kind)
NOTE: make sure not to overapply the glue. Obviously avoid the shanks.
a) Decant some epoxy into a dish
b) Use a small blunt needle (e.g. gauge 30) to transfer small amounts of epoxy onto the probe and cassette
c) Start by applying epoxy to PCB board of the probe, and carefully coax epoxy to the edge of the cassette (see Fig 1).
d) The Blu-Tack will have lifted the probe ever so slightly off the face of the cassette, and you can let epoxy flow into this gap between the probe and the cassette.
Carefully check that epoxy is fully cured and probe is cemented on the cassette.
At this point, it is much easier to handle the probes securely. Perform additional procedures such as soldering a ground-wire to the GRN pads, to shorting the REF and GRN, depending on your particular experimental needs.
Prepare and assemble ground pins/screws, headplates, Repix covers, and surgical tools in preparation for the implantation step.
Some users opt to apply membrane dyes (e.g., DiI) to the shanks at 1-2 days before the implant, no earlier than 4 hours prior (others do so during surgery, see step 7.4). This can be done using the microscope to drag a droplet of dye across the shanks and air-dry, or by immersing the probe in a beaker of dye.
Check the relative position of probe shanks and Repix posts.
a) If using Dropping Posts:
Make sure that the probe shank length protruding from the base of the posts is longer than the insertion depth. E.g. if going 5 mm deep, place the posts into the cassette such that 6-7 mm of the probe shank is available from the base of the posts. This practice ensures the sufficient travel of the probe into the brain.
NOTE: Use only one screw per post when fastening the posts at this stage, and tighten the screw very lightly. At a later stage these screws will need to be undone while the probe is exposed, and the lighter the screws are done the less force will need to be applied to remove them.
NOTE: Ensure the travel of the posts within the cassette is smooth and not impacted by any loose debris within the holes of the cassette due to the machining process. If the posts do not fall naturally out of the cassette this will be an issue at a later point when the posts have to be retracted for cementing.
b) If using Stable Posts:
Make sure that the probe shank length protruding from the base of the posts is longer than the insertion depth, but not only by a few mm.
Craniotomy, ground screw and headplate attachment
Make sure pre-surgery to handle the animals, to acclimate them for the handling required for the administration of analgesics (e.g. restraint for subcutaneous analgesics or unmedicated jelly that post-operatively can be medicated jelly)
Surgery!
Put the animal under anaesthesia and peri-operative analgesia in accordance with local animal regulations
NOTE: Peri and post-operative dexamethasone treatment have been shown to increase yield and stability in amygdala recordings in rats (0.2 mg/kg at day 2 and day 5 post-surgery).
Make incision
Flat skull the animal
Find and mark target
Etch the skull
Add ground pin/screw and additional support screws, if using (particularly important in rats)
Perform an appropriate craniotomy (Fig. 2). The size will vary depending on target and probe type.
Apply a RelyX-cement wall around the perimeter of the craniotomy, 1-3 mm tall, depending on target area, skull geometry, and what is surgically and practically feasible. This will help protect the shank when it is later cemented to the head. This is a strongly recommended step and will make cementing much easier.
Attach headplate, if using, with dental Super Bond.
NOTE: the order of headplate placement and craniotomy might be dependent on each target area and researchers’ needs.
NOTE: Make sure the headplate is level. This will make explantation much easier.
Pictures of craniotomy and protection of insertion location with UV-cured cement
Probe implantation
Prepare the location that the implant will be fastened to.
a) If using a one-step implantation: if fastening to an exposed skull, ensure that connective tissue is removed and the surface of the skull lightly roughened.
b) If using a two-step implantation: Using a bone scraper or blunt drill bit, roughen the surface of the Super Bond cement and head plate on which the guide posts will be attached. For example, if securing to an existing head plate, ensure the head plate is clean and the surface of the cement on the head plate is roughened.
Flattening the head and inserting probe during awake headfixation (two-step implantation)
Flatten the head.
An example is shown in Fig 3 during an awake 2-step implantation, or use an appropriate method on the stereotaxic frame, if performing the implant under anesthesia.
Some users opt to apply membrane dyes (e.g., DiI) to the shanks at this point (otherwise see step 1.9). This can be done using the microscope to drag a droplet of dye across the shanks and air-dry, or by immersing the probe in a beaker of dye.
Perform a durotomy, if needed.
NOTE: It is possible to sharpen the shanks of the probes, which in many targets of the mouse will alleviate the need for a durotomy.
Lower the probe into the brain using a stereotaxic frame or manipulator arm slowly.
NOTE: No faster than 20 um/s is standard practice (see: https://www.nature.com/articles/s41598-018-36816-z).
Attach Repix
If using Dropping Posts: Do the following substeps
----- Otherwise go to 11 -----
Once the probe is at the desired depth, the posts must be released from the cassette such that they lower and touch the surface onto which they will be cemented. To do this, undo the 2 screws that are holding the posts in place, and if needed give a gentle pull on the posts using a set of fine-tip tweezers.
NOTE: This is a sensitive step, and great care must be taken to gently pull the posts from the cassette. While the probe is fastened to the cassette, the shank is subject to forces from the brain. A knock on the cassette could result in shank breakage.
NOTE: Once the posts have been pulled down the base should be in contact with the skull or headplate.
(Optional but recommended) Once the posts are in place, re-tighten the screws lightly – this is recommended if using Super Bond which a user experienced can contract during drying and shift the posts a little. If the posts shift they can cause increased contact with the cassette, and this generates more friction upon attempted retrieval. This could add tension within the system and could lead to unsuccessful retrieval.
If using Fixed Posts: Do the following substeps
----- Otherwise go to 10 -----
If the cassette and posts are aligned correctly during surgical implantation, the probe can be inserted and cemented without releasing the posts. Once the probe is inserted to the desired depth, the post feet should be less than 2mm from the skull surface.
NOTE: for the stable-post method to work, the probe/cassette and posts must be aligned so that the correct amount of probe shank is exposed for entry into the brain. It is important to take into account any insertion angle and skull thickness and add that to actual insertion depth.
With the posts once again lightly held in place by the screws, you can now apply the initial cement layer.
Option 1: Use Super Bond.
To do this it is advised to use a needle with a syringe, or similar, for finer control of cement placement.
i) Prep a 1ml syringe with an 18G or larger blunt needle on the end
ii) Mix 1.5g of the cement kit. The moment the catalyst is added it is important to work quickly while the cement is of low viscosity.
iii) Load the cement mix into the syringe
Option 2: use RelyX with the small-tipped attachment.
Do this alongside the UV curing lamp for a quickly setting solution.
Proceed with the below steps, regardless of the type of cement
- Approaching from the back of the implant (away from the probe shank) apply small drops of cement on the surface where the posts meet that surface. Ensure that the cement is in contact with the feet of the posts, as much as possible. The goal here is not to cover them entirely, but to build an initial layer that provides stability.
NOTE: Control two major risk factors during this procedure: A) the cement could run down from where it is placed onto craniotomy and the probe shank. A UV-cement wall (see step 8.8) can be built around the craniotomy to help prevent this. B) the cement could be applied to the cassette resulting in the posts being cemented to the cassette.
- The cement should be hard to the touch before proceeding to the next step. If using Super Bond, wait for it to dry for 10-15 mins.
- Once the cement is dry, fasten all the screws on the cassette onto the posts. Do not overtighten the screws. The goal is to ensure the stability of the system. With the cassette fastened to a cemented set of posts, the system is stable, a knock to the cassette will no longer lead to probe breakage.
Apply a second (can do more, as needed) layer of cement. This layer should wrap over the base of the posts. Ideally, the cement should conceal the base of the posts by the end of this step.
Attach Repix cover and finish implant surgery
Attach cover
The cover is held by kwik-sil, a tough silicone sealant that is also relatively easy to remove. The general approach is to apply many small layers, repeatedly, until all areas are enclosed.
If using the 1.0 cover, the initial placement of the cover is achieved by applying a small amount of kwik-sil to the inner edges of the cover and aligning it to the front of the cassette. Gently place it flush against the cassette, and hold the cover in place for 2-3 minutes whilst the kwik-sil dries.
Once in the cover is in place, use kwik-sil to conceal all visible holes and access to the skull - consider that the mouse will be returned to the home-cage with small debris and bedding, the goal is to not allow any of that debris near the shank. This includes the backside of the probe in between the two posts.
NOTE: Shielding is very important for long-term recordings, to limit risks to damage caused by debris.
Finish surgery!
Once the cover is attached tighten all 8 screws fastening the cassette to the probe as tight as possible, do not be afraid to use a good amount of force here to do so. Loose screws may become looser over time as the animal moves around and introduces vibration.
Now unfasten the screws attaching the cassette to the connector and stereotaxic rod on your manipulator/stereotaxic device. Once screws are loose, gently move the connector upwards.
NOTE: Ensure there is movement of the connector away from the cassette as doing so - microscope should be used if possible.
Solder the ground wire from the probe to the ground pin on the skull.
Once the connector is removed, fasten the flex of the probe to the cassette by bending it 180 degrees and the fastening method of your choice: this can be as simple as some tape, or it can be the headstage holders designed for this purpose.
Congratulations, you're now ready for your ephys experiement.
Good luck.
Probe retrieval
The explantation is essentially the reverse of the final steps of implantation.
IMPORTANT!: For successful explantation, it is essential to re-align of the cassette and the connector, which was parallel implantation. Therefore, the animal’s head needs to be flat relative to the stereotaxic frame. While the flatness of the skull ensures re-alignment, the presence of the implant could make this cumbersome. We list a few strategies for the skull alignment.
Headplate solution:
If the animal has a head plate, and if care has been taken to ensure the headplate is flat during attachment, the simplest option is to position the animal on the stereotaxic frame using the headplate. In turn, the animals head will be flat, and re-alignment of connector and the cassette is ensured.
No headplate solution 1:
The recommended method, if the animal does not have a headplate, is to align the cassette with the connector while carefully adjusting the head-flatness with manipulators. It is often sufficient to change the pitch of the animal by setting the height of the nose in the stereotaxic frame. Adjusting the ear bar height will facilitate this procedure.
No headplate solution 2:
Alternatively, users have reported success by first place the anesthetized animal by the ear bars and attaching the connector to the cassette, and then securing the animal to the anesthetic nose-cone.
Retrieval after euthanasia:
The animal can be euthanized prior to the retrieval, and this method was preferred by some beta testers. This simplifies the positioning of the animal, as there are no longer anesthetic considerations. Users would euthanisize, then explant, and only then perfuse the brain with PFA. A downside, of course, is that this sequence adds time from euthanasia to PFA perfusion (i.e. the duration of the explantation, about 10-15 minutes).
Initial preparations
Put the animal on the stereotaxic frame
Remove shielding and headstage holder to expose the top holes of the cassette, where the connector can attach.
Align the cassette and the connector, see above for best practices.
Insert the connector into the top holes of the cassette.
Once the connector is in place tighten the screws and ensure the animals head is fixed as well, most easily done via the headplate.
NOTE: The animal should not move at all during explantation, any movement can result in failure due to misalignment with the connector that will strain the shanks of the probe. Once both the animal is secure on the stereotaxic frame and the connector is in place, the probe is in a stable position.
Remove kwik-sil, remove cover, unfasten the screws holding the cassette to the posts.
NOTE: Typically done with scalpel, scissors and tweezers.
Explantation
Once the cover is removed explantation can begin. Unfasten all screws attaching the cassette to the posts and then gently move the cassette upwards using the stereotaxic or manipulator arm.
Using a microscope, confirm that an incremental but smooth movement of the probe out of the brain. If there is no visible movement check all cassette screws are loose and inspect if the connector is properly attached to the cassette.
If the artificial dura sticks to the shank it may be possible to apply saline to the area and pull the the shanks through it. If the dura-gel is stuck to the shanks after explantation, A solvent (DOWSIL‱ DS-2025 Silicone Cleaning Solvent) can be used to remove the stuck gel in conjunction with the cleaning protocol.
Cleaning
Clean the probes using a standard probe cleaning procedure.
See the Neuropixels manuel for details, but quoted here for simplicity:
• After in-vivo use, soak the dirty probes in PBS until ready to clean them. Letting the
shank dry out makes the cleaning less effective. Follow these cleaning steps:
• Prepare 1% Tergazyme solution.
• Soak explanted probes in standard PBS (pH 7.4) until cleaning w/ Tergazyme
(to prevent drying out).
• Immerse probes in Tergazyme solution @ RT (12h soaking on shelf).
• Thoroughly rinse with DIW (~5 min under gentle DIW stream); if soaking in DIW
is used, a brief rinse with DIW should be applied at the end.
• Rinse the probes with IPA and let dry in air.
Now, the probe is ready to be reused for your next implantation.
Brief discussion: use, challenges, and points of note
Use cases
See Repix: reliable, reusable, versatile chronic Neuropixels implants using minimal components for details.
Fourteen beta users have used Repix. Combined, they have done 156 implantations over 5 years in both mice and rats. Implanted animals have been included in studies of social interactions in both mice and rats, in foraging, head fixed behaviors, sleep, and much more, and the implants have held up to those experimental challenges. Users report recordings of weeks and months, up to a year.
Half of users reported reusing probes at the time of writing the report.
Good for:
Long-term recordings
Reuse of probes
Mice and rats
Social behaviors
Tested across users and laboratories
Not a good for:
Very small/young mice (weight of implant)
Multi-probe implantations (designs can be supplied but are untested)
Failure modes and challenges
Those fourteen beta users have reported failures during:
Implantation: 5
Data Collection: 13
Explantation: 13
General challenges users have run into:
Tapping of M1 holes (make sure to check from manufacturing!)
M1 screws being tricky to handle (a pair of curved forceps will be your friend)
Breakage of shank while handling the probe.
Shielding, e.g. debris entering
Cementing posts onto cassette.
Alignment during explantation.
Design be easily modified, but iterations can be slower/more costly than 3D printed alternatives, particularly if using an external manufacturing site.
Points of note
If you modify the design, please share with the community.
If you use Repix, please cite paper and protocol.
Protocol references
For alternative and complimentary systems for chronic Neuropixels implantation, see:
Jun, J. J. et al. Fully integrated silicon probes for high-density recording of neural activity. Nature 551, 232–236 (2017).
Steinmetz, N. A. et al. Neuropixels 2.0: A miniaturized high-density probe for stable, long-term brain recordings. Science 372, eabf4588 (2021).
Juavinett, A. L., Bekheet, G. & Churchland, A. K. Chronically implanted Neuropixels probes enable high-yield
recordings in freely moving mice. eLife 8, e47188 (2019).
Luo, T. Z. et al. An approach for long-term, multi-probe Neuropixels recordings in unrestrained rats. eLife 9, e59716 (2020).
van Daal, R. J. J. et al. Implantation of Neuropixels probes for chronic recording of neuronal activity in freely
behaving mice and rats. Nat. Protoc. 16, 3322–3347 (2021).
Bimbard, C. et al. Reusable, flexible, and lightweight chronic implants for Neuropixels probes. 2023.08.03.551752
Preprint at https://doi.org/10.1101/2023.08.03.551752 (2023).
Voroslakos, M. et al. 3D-printed Recoverable Microdrive and Base Plate System for Rodent Electrophysiology. BIO-Protoc. 11, (2021).
Jones, E. A. A. Assembly: Chronic recoverable Neuropixels in mice. (2023). dx.doi.org/10.17504/protocols.io.e6nvwjo87lmk/v2
Melin, M., Churchland, A. K. & Couto, J. Large scale, simultaneous chronic neural recordings from multiple brain areas. Preprint at https://doi.org/10.1101/2023.12.22.572441 (2023).
Ghestem, A. et al. Long-term near-continuous recording with neuropixels probes in healthy and epileptic rats.
2023.02.16.528689 Preprint at https://doi.org/10.1101/2023.02.16.528689 (2023).