Jan 24, 2022
Protocol for CODEX Fixation Steps and Primary Antibody Staining for Induced Pluripotent Stem Cell-Derived Neurons
- Faria Zafar1,
- Alejandra Torres1,
- Laurin Heinrich1,
- Jasmine Singh2,
- Cassandra Hempel2,
- Oliver Braubach2,
- Birgitt Schuele1
- 1Stanford University;
- 2Akoya Biosciences
- Neurodegeneration Method Development CommunityTech. support email: [email protected]


Protocol Citation: Faria Zafar, Alejandra Torres, Laurin Heinrich, Jasmine Singh, Cassandra Hempel, Oliver Braubach, Birgitt Schuele 2022. Protocol for CODEX Fixation Steps and Primary Antibody Staining for Induced Pluripotent Stem Cell-Derived Neurons. protocols.io https://dx.doi.org/10.17504/protocols.io.b3fhqjj6
License: This is an open access protocol distributed under the terms of the Creative Commons Attribution License, which permits unrestricted use, distribution, and reproduction in any medium, provided the original author and source are credited
Protocol status: Working
We use this protocol and it’s working
Created: January 03, 2022
Last Modified: January 24, 2022
Protocol Integer ID: 56521
Keywords: Fixation, CODEX, human iPSC neurons, neuronal cell cultures for codex, use of neuronal cell culture, neuronal cell culture, ipsc neuronal culture, derived neuronal cell culture, induced pluripotent stem cell, codex fixation step, protocol for codex fixation step, staining protocol, protocols for the neuron, cell resolution, overt cell loss, stain cycles of the technology, neuron, human ipsc, stain cycle, primary antibody
Abstract
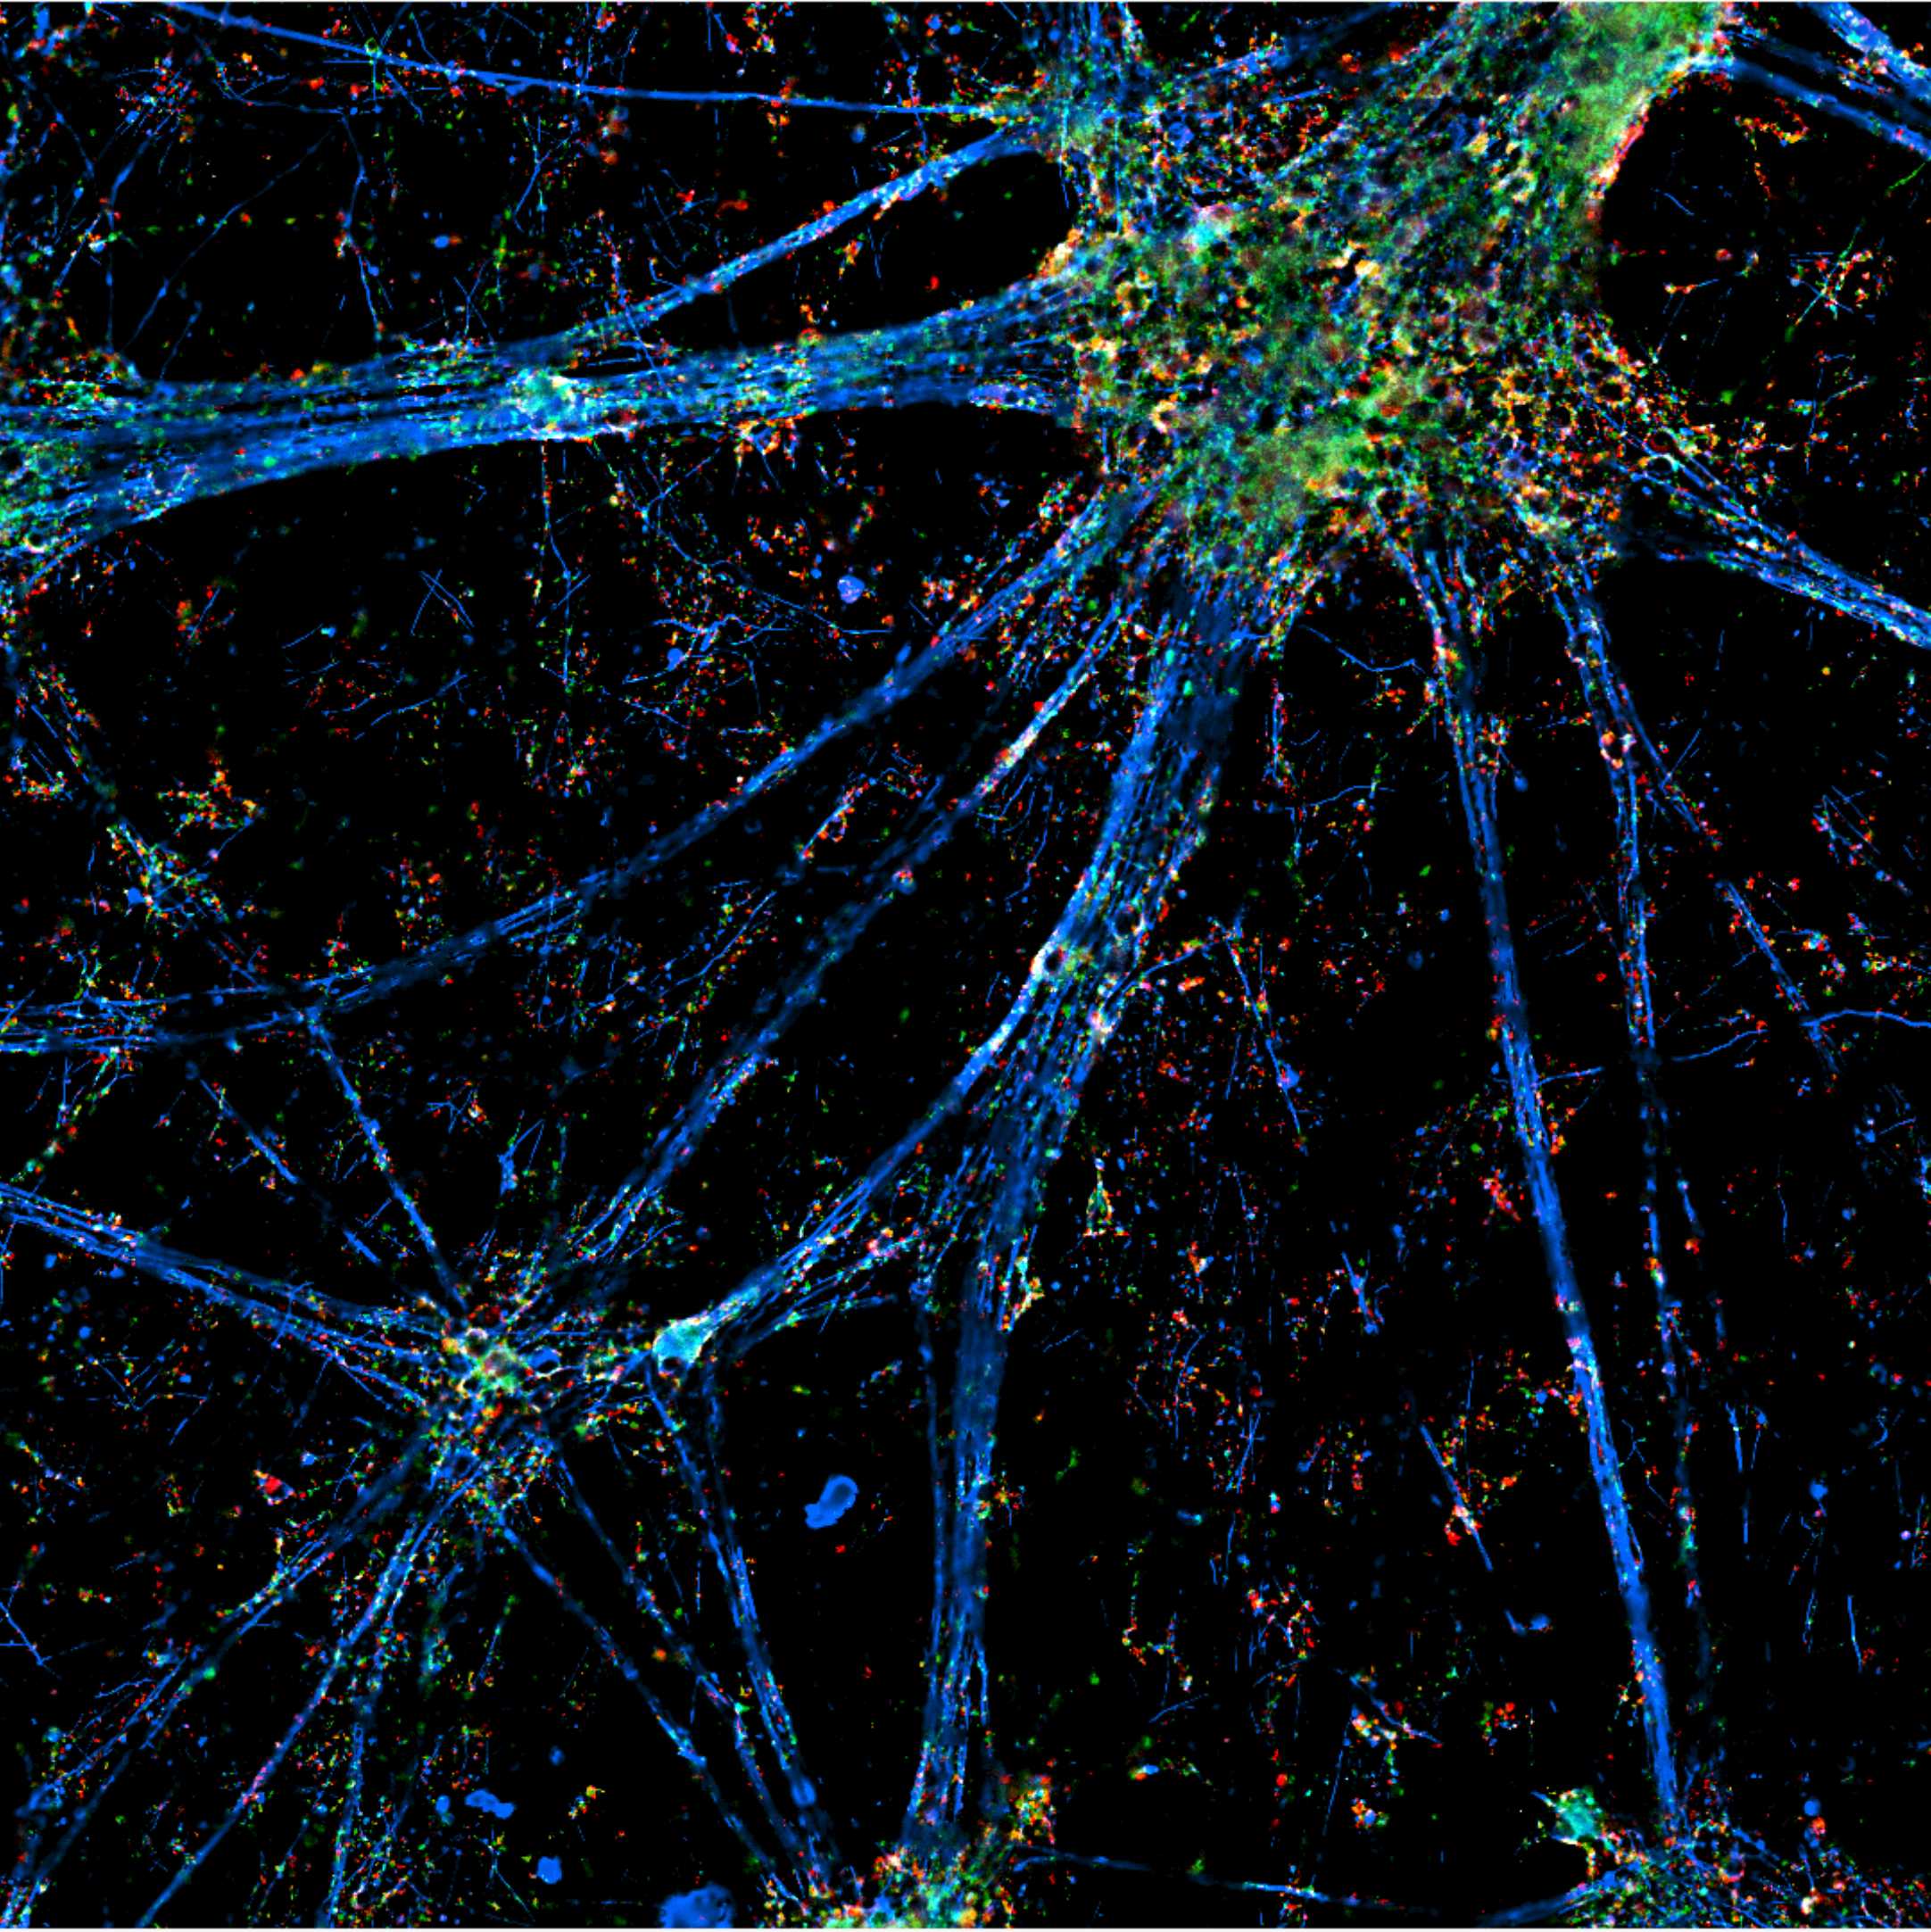
CO-Detection by indEXing (CODEX) is a powerful technique to complement 'omics' technologies for in-depth phenotype analysis. CODEX allows the detection of 40+ targets in situ at single-cell resolution.
This protocol describes the optimization of fixation and primary antibody staining of the human iPSC-derived neuronal cell cultures for CODEX. We show CODEX can be applied to iPSC neuronal cultures and developed fixation and staining protocols for the neurons to sustain the multiple wash-stain cycles of the technology without overt cell loss.
This protocol is adapted for the use of neuronal cell cultures from https://www.akoyabio.com/wp-content/uploads/2021/01/CODEX-User-Manual.pdf
Guidelines
BSL-2 safety guidelines
Materials
Reagent List:
| A | B | C | |
| Item | Vendor | Catalog # | |
| Coverslip | Electron Microscopy Science | 72204-10 | |
| PBS | MP Biomedicals | 091860454 | |
| Paraformaldehyde | Thermo Fisher Scientific | 50-980-495 | |
| Hydration buffer | Akoya Biosciences | 232105 | |
| Drierite bead | W.A. Hammond Drierite Co. | 21001 | |
| Acetone | Millipore-Sigma | AX0120-6 | |
| Staining buffer | Akoya Biosciences | 7000008 | |
| CODEX blocking buffer | Akoya Biosciences | 7000008 | |
| Storage buffer | Akoya Biosciences | 232107 | |
| Methanol | Sigma-Aldrich | 646377 | |
| BS3 (bis(sulfosuccinimidyl)suberate) substrate | Thermo Fisher Scientific | 21580 |
Material lists:
- LED light (DCenta A4 Ultra Bright LED Light Box Tracing Pad 25000Lux): Amazon
- Bent-tip tweezers (Fine Science Tools, Cat # 11251-33)
- 6-well plates
- Micropipette and tips
- 50ml glass beaker
- Kimwipes
- Empty pipette box to prepare humidity chamber
- Paper towel
- ddH2O
- Parafilm
Troubleshooting
Safety warnings
Disposal of biohazard material and chemicals according to institutional guidelines and policies.
Use of human cell lines requires biosafety level 2 laboratory safety conditions.
Before start
Prepare and use biosafety cabinet chemical hood.
A. Pre-staining first fixation (under the chemical hood)
For CODEX® imaging, iPSCs were plated and differentiated into neurons on specific 22x22 mm glass coverslips fitting the frame of the CODEX® instrument. Neurons were cultured on these coverslips in one well of a 6-well plate with 3ml of total media.
On the day of fixation, remove 1.5 mL media from the well.
Add an equal volume (1.5 mL ) of 4% paraformaldehyde (PFA; prepare fresh 4% PFA with PBS from 32% PFA stock) for 00:05:00 at room temperature (RT). The final PFA concentration is 2%.
5m
Remove 2% PFA from the well with a 1000ul pipette tip.
Add 3 mL 4% PFA to the well and incubate for 00:10:00 at RT.
10m
Remove 4% PFA, wash the cells 2 times slowly with 3 mL PBS using a 1000ul pipette tip at RT.
B. Pre-staining second fixation (under the chemical hood)
Prepare a 6-well plate with buffers as follows for further fixation steps and keep at RT:
Prepare one well of a 6well plate with 1-2 cm thick Drierite beads.
After Step 5, take out the sample coverslip from PBS using a bent-tip tweezer and tap dry from the corner with a Kimwipe.
Place the coverslip on top of the Drierite beads with the sample facing up. Close the lid and wait for 00:02:00 .
Note: Make sure the sample is not visibly wet. If the sample coverslip is not completely dry after 2 min, place it in 10 mL of 100% acetone in a 50 mL beaker for 2 minutes, and again lay the coverslip on top of the Drierite beads for 2 minutes, then go to Step 10.
2m
Take the sample coverslip from the Drierite beads with tweezers and place the coverslip in 10 mL of 100% acetone in a 50 mL beaker and incubate for 00:05:00 .
5m
Place the sample coverslip on top of the Drierite beads with cells facing up (acetone evaporation) for 00:02:00 at RT.
2m
Using the previously prepared 6-well plate from step 6, place the coverslip into 1.6% PFA/Hydration Buffer mix at RT for 00:10:00 .
10m
Wash with PBS 3 times00:03:00 each at RT.
3m
Quench the sample on the coverslip for auto-fluorescence by placing them in 5 mL PBS in a separate 6-well plate and exposing them to a broad-spectrum LED light (DCenta A4 Ultra Bright LED Light Box Tracing Pad 25000Lux) at RT for 00:45:00 . Repeat the step with fresh 5 mL PBS for 00:45:00 again.
LED light box setup
1h 30m
Then incubate the coverslip in Hydration Buffer 2 times for 00:03:00 in 6-well plate from Step 6.
3m
C. Primary antibody staining
Note: Prepare Humidity Chamber before staining steps:
An empty pipette tip box with a lid and removable tray can be used as humidity chamber.
Wet a paper towel with ddH2O and place it at the bottom of the pipette box under the tray.
Fill the pipette box with enough ddH2O at the bottom to fully cover the paper towel (approximately 1-2 cm deep).
Rinse and dry the pipette tip tray before placing it back in the box.
Label different positions in the tray if working with multiple sample coverslips:
Cover with the lid.
Before starting the staining, equilibrate the cells on the coverslips with 3 mL Staining Buffer at RT for up to 00:30:00 in a new 6-well plate.
30m
Prepare CODEX® blocking buffer as follows:
| A | B | C | D | E | F | |
| CODEX Reagent | 1 Sample | 2 Samples | 4 Samples | 5 Samples | 6 Samples | |
| Staining Buffer (ul) | 181 | 362 | 724 | 905 | 1086 | |
| N Blocker (ul) | 4.75 | 9.5 | 19 | 23.75 | 28.5 | |
| G Blocker (ul) | 4.75 | 9.5 | 19 | 23.75 | 28.5 | |
| J Blocker (ul) | 4.75 | 9.5 | 19 | 23.75 | 28.5 | |
| S Blocker (ul) | 4.75 | 9.5 | 19 | 23.75 | 28.5 | |
| Total (ul) | 200 | 400 | 800 | 1000 | 1200 |
Important Note: Prepare CODEX® Blocking Buffer just before staining -- no earlier than one hour before. Keep on ice until ready to use.
Prepare primary antibody cocktail solution (depending on primary antibody dilution) with CODEX® blocking buffer, pipette to mix, or vortex gently. Briefly spin down the tube(s).
Example:
Sample #: 1
Primary antibody #: 5
Each antibody dilution: 1/50 (4ul of each antibody for 200ul of the total solution)
Antibody cocktail solution: 20ul antibody mix X 180ul CODEX blocking buffer (from Step 18)
For further details please refer to p.48 (Understanding Antibody dilution) of the Akoya protocol: https://www.akoyabio.com/wp-content/uploads/2021/01/CODEX-User-Manual.pdf
Aspirate up 190 µL of the antibody cocktail with a 200ul pipette tip. Set aside the tip with the pipettor.
Remove sample coverslip from the well-containing Staining Buffer with the tweezer and place the coverslip in the humidity tray chamber.
Quickly dispense the 190uL of the antibody cocktail to the top corner of the sample coverslip. Ensure that the liquid covers the entire tissue.
Be careful not to pipette the solution directly on the tissue, and minimize bubbles!
Place the lid on the humidity chamber.
Incubate the samples in the humidity tray for 03:00:00 at RT.
3h
D. Post-staining fixation
39m
Prepare the following 6-well washing plate (needed after primary antibody incubation):
Take out the sample coverslip from the humidity chamber with tweezer, and place it in the upper left well with Staining Buffer (see Step 25). Lift and immerse sample coverslip 3 times to ensure the removal of the antibody cocktail from both sides of the coverslip.
Incubate for another 00:02:00 .
2m
Place sample coverslip in the second well (middle left, see pic in Step 25) containing Staining Buffer. Incubate for 00:02:00 .
2m
Place the sample coverslip in the well (lower left, see pic Step 25) containing Post-Staining Fixing Solution (1.6% PFA in storage buffer).
Incubate for 00:10:00 at RT.
10m
Place sample coverslip in the first well containing PBS. Lift and immerse the sample coverslip 2-3 times to ensure the Fixing Solution is removed from the top and bottom of the coverslip.
Quickly transfer the sample coverslip to the second well containing PBS. Lift and immerse the sample coverslip 2-3 times. Quickly transfer the sample coverslip to the third well containing PBS for a total of 3 washes.
Place a new 6-well plate on ice. Retrieve methanol from the refrigerator (4°C) and pipette methanol up and down 3 times to equilibrate the serological pipette tip to the cold temperature of methanol. Add 5 mL of cold (~4°C) methanol to one well per sample keeping the 6-well plate on ice.
Remove the sample coverslip from the well containing PBS and place them in the well containing ice-cold methanol.
Incubate on ice for 00:05:00 .
5m
Quickly transfer the sample coverslip from methanol to a newly prepared 6-well plate with 5 mL PBS in all wells at RT.
Note: Methanol dries tissue faster than other buffers. Move quickly to prevent sample damage.
Ensure the coverslip is fully immersed in PBS as methanol drying may cause the coverslip to float. Lift and immerse the sample coverslip 2-3 times to ensure methanol is removed from the bottom of the coverslip as well as the top.
Transfer the sample coverslip to the second PBS well. Lift and immerse the sample coverslip 2-3 times.
Transfer the sample coverslip to the third PBS well for a total of 3 washes. Lift and immerse the sample coverslip 2-3 times.
Prepare final fixative by adding 20 µL of BS3 (final fixative, thawed at RT) to 1000 µL of PBS. Mix gently by pipetting up and down.
Note: Prepare fresh before each experiment.
Remove the sample coverslip from Step 41 and place it on the tray of the humidity chamber.
Add 200 µL of Final Fixative Solution to the top corner of the sample coverslip. Cover the entire section with reagent and remove all bubbles, if any, from the coverslip. Do not pipette the solution directly onto the tissue.
Place lid on humidity chamber and incubate for 00:20:00 at RT.
20m
Remove the sample coverslip from the humidity chamber and place it in a new well containing 5 mL PBS.
Lift and immerse the sample coverslip with tweezer 2-3 times to ensure Fixative Solution is removed.
Move the sample coverslip to the second well containing PBS. Lift and immerse the sample coverslip 2-3 times.
Move the sample coverslip to the third well containing PBS for a total of 3 washes. Lift and immerse the sample coverslip 2-3 times.
Label a new 6-well plate and pipette 5 mL of Storage Buffer and place the sample coverslip in the well with the cells facing up.
Seal the plate around the edges with parafilm.
Cells are ready for CODEX® imaging. Stained coverslip can be stored for 7 days at 4C before imaging.