Oct 12, 2020
Protocol 1: Making Agar Plates
Forked from Protocol 1: Making Agar Plates
This protocol is a draft, published without a DOI.
- 1
- 1UCSC
- UCSC BME 22L


Protocol Citation: 2020. Protocol 1: Making Agar Plates. protocols.io https://protocols.io/view/protocol-1-making-agar-plates-bnc9maz6
License: This is an open access protocol distributed under the terms of the Creative Commons Attribution License, which permits unrestricted use, distribution, and reproduction in any medium, provided the original author and source are credited
Protocol status: Working
We use this protocol and it's working
Created: October 12, 2020
Last Modified: October 12, 2020
Protocol Integer ID: 43137
Keywords: agar plates for the crispr experiment, making agar plate, crispr experiment, agar plates this protocol, agar plate, arabinose agar, agar, plate, prelab, experiment
Disclaimer
DISCLAIMER – FOR INFORMATIONAL PURPOSES ONLY; USE AT YOUR OWN RISK
The protocol content here is for informational purposes only and does not constitute legal, medical, clinical, or safety advice, or otherwise; content added to protocols.io is not peer reviewed and may not have undergone a formal approval of any kind. Information presented in this protocol should not substitute for independent professional judgment, advice, diagnosis, or treatment. Any action you take or refrain from taking using or relying upon the information presented here is strictly at your own risk. You agree that neither the Company nor any of the authors, contributors, administrators, or anyone else associated with protocols.io, can be held responsible for your use of the information contained in or linked to this protocol or any of our Sites/Apps and Services.
Abstract
This protocol will assist you in making the agar plates for the CRISPR experiment. As you may have discovered in your prelab, the agar provides the bacteria with the nutrients needed to grow. Once your plates are made you may use an innoculation loop to streak them with bacteria. Over time your bacteria should grow and you will see little spects of colonies formed by your culturing. You will have to be very attentive to your plates for a successful experiment.
TimeLine
Prep:15
Heat agar and water: 5 minutes
Cool: 10 - 30 minutes
Plate: 5 minutess
repeat with LB strep/kan/arabinose agar: 30 minutes
Wait for agar to solidify: 1.5 hours
Flip: 1 minute
Hands on time: 1 hour
Wait time: 1 hour 40 minutes-2 hours
Guidelines
You will be repeating this set twice: first with LB Agar, second with LB Strep/Kan/Arab Agar. The first set of plates will be for the initial bacterial culture. The second set of plates will have the antibiotics necessary for testing te success of the experiment.
Materials
1 - scale
1 - apparatus with boiling water
4 - weigh paper sheets
1- spoon
1- heat resistant glove or cloth (to handle hot agar)
1 - erlynmeyer flask
1- piece of foil
1 - tube LB Agar *for before CRISPR*
1 - tube LB Strep/Kan/Arab Agar *for after CRISPR*
1 - Non-pathogenic E. coli bacteria Freeze Dried Tube (DH5ɑ)
1 - Sterile Water Tube
1 - Innoculation loop (per plate)
150 mL - water
1 - pipette
Petri Plates
1-sharpie
Troubleshooting
Safety warnings
Be very careful when heating and handling LB Agar. Make sure the container lid is ajar when heating LB Agar mixture in the microwave. If the mixture begins to boil up, turn off the heat to let the bubbles settle. Use a heat resistant material to handle the hot flask. It is very hot and is dangerous to touch. Allow the agar to cool down from hot to a bareably warm temperature before handling.
Before start
To prepare for this lab, start by putting on your PPE gear, gathering your materials, and watching this video.00:15:00
Watch this video before boiling the agar.
Add agar and water to erlynmeyer flask. 00:10:00
To caculate the amount of LB media use the following equations:
The above equation will allow you to have a great sense of the amount of Agar needed to prepare the plates. Weigh the correct amount of agar onto your scale. For the amount of water needed for plates, you want to have about 20 mL of water more than you need. This is because when you heat it up in the microwave, some of the liquid may escape. Each plate can take about 10 mL of agar . So if you are trying to make 5 LB plates, you’ll want 1.75 g of agar and roughly 70 mL of water. The weigh paper to create a funnel allowing you to transfer the agar to the 250 mL flask. Place aluminum foil over the opening of the flask and swirl until agar seems well spread out.
Dissolve the solution. 00:02:30
Place the flask in a boiling water bath for thirty second intervals. Use your choice of heat resistance material to handle the hot flask. Swirl it around and check for homogenization. Continue heating until desired consistency is obtained. Refer back to the video if necessary.
Plate agar. 00:15:00
Have plates (aka:petri dishes) ready to pour. Do not open them before. Label plates to distinguish between the regular LB agar plates and the LB strep\kan\arabinose agar plates used for antibiotic resistance testing. Label the time time, date, and order to record growth in your protocols chart. Leave the flask on a heat resistance surface at room temperature for at least 10 minutes. You must make sure you pour the agar when it has cooled down but before the point of solidifying. Pour one plate at a time. You only need to pour the plates until the bottom is evenly covered.
Repeat. 00:30:00
Wash the flask (use hot water if necessary) and repeat with LB Strep/Kan/Arab Agar.
Allow for cooling. 01:30:00
Allow plates to cool for 1.5 hours.
Store upside down.
This can be done in a safe room temperature atmosphere or the refrigerator for 4-24 hours.
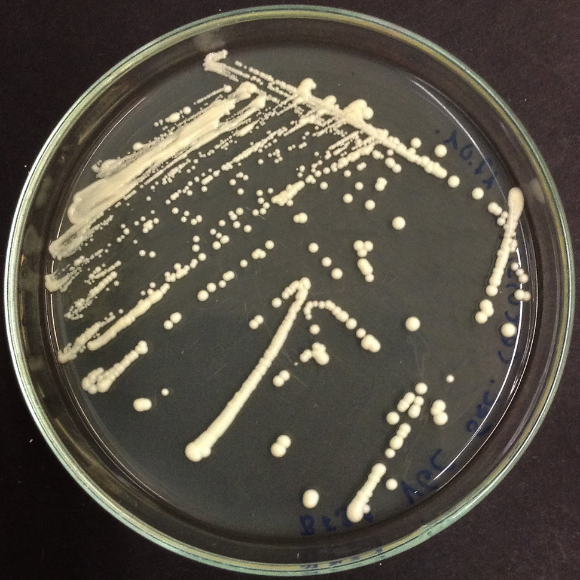
Streak the LB agar plate with E coli. 00:00:00
Add 100 uL of sterile water to Non-pathogenic E. coli bacteria Freeze Dried Tube (DH5ɑ). Use inoculation look to streak 2-3 LB-only plates. Store upside down for 12-48 hour in room temp (preferably a warm room to increase growth rate). Once you have noticed colonies growing in your petri dish you may move onto part 2. If you do not see growth within 3 days, repeat this step with the other unused LB-only plates.