Sep 17, 2025
Version 1
Plate CUT&Tag (Meers Lab version) V.1
- Michael Meers1,
- Brittany Johnson1
- 1Washington University School of Medicine


Protocol Citation: Michael Meers, Brittany Johnson 2025. Plate CUT&Tag (Meers Lab version). protocols.io https://dx.doi.org/10.17504/protocols.io.n2bvjed5wgk5/v1
Manuscript citation:
Protocol Info: Brittany Johnson: plate cut&tag. protocols.io https://protocols.io/view/plate-cut-amp-tag-c3rxym7n
Created: October 19, 2023
Last Modified: June 28, 2024
Protocol Integer ID: 89623
License: This is an open access protocol distributed under the terms of the Creative Commons Attribution License, which permits unrestricted use, distribution, and reproduction in any medium, provided the original author and source are credited
Protocol status: Working
We use this protocol and it's working
Created: September 10, 2025
Last Modified: September 17, 2025
Protocol Integer ID: 226939
Keywords: microplate, throughput processing of sample, only standard lab equipment, direct protocol, throughput processing, meers lab version, protocol, single operator with only standard lab equipment, sample
Funders Acknowledgements:
Michael P. Meers
Grant ID: R00 GM140251
Abstract
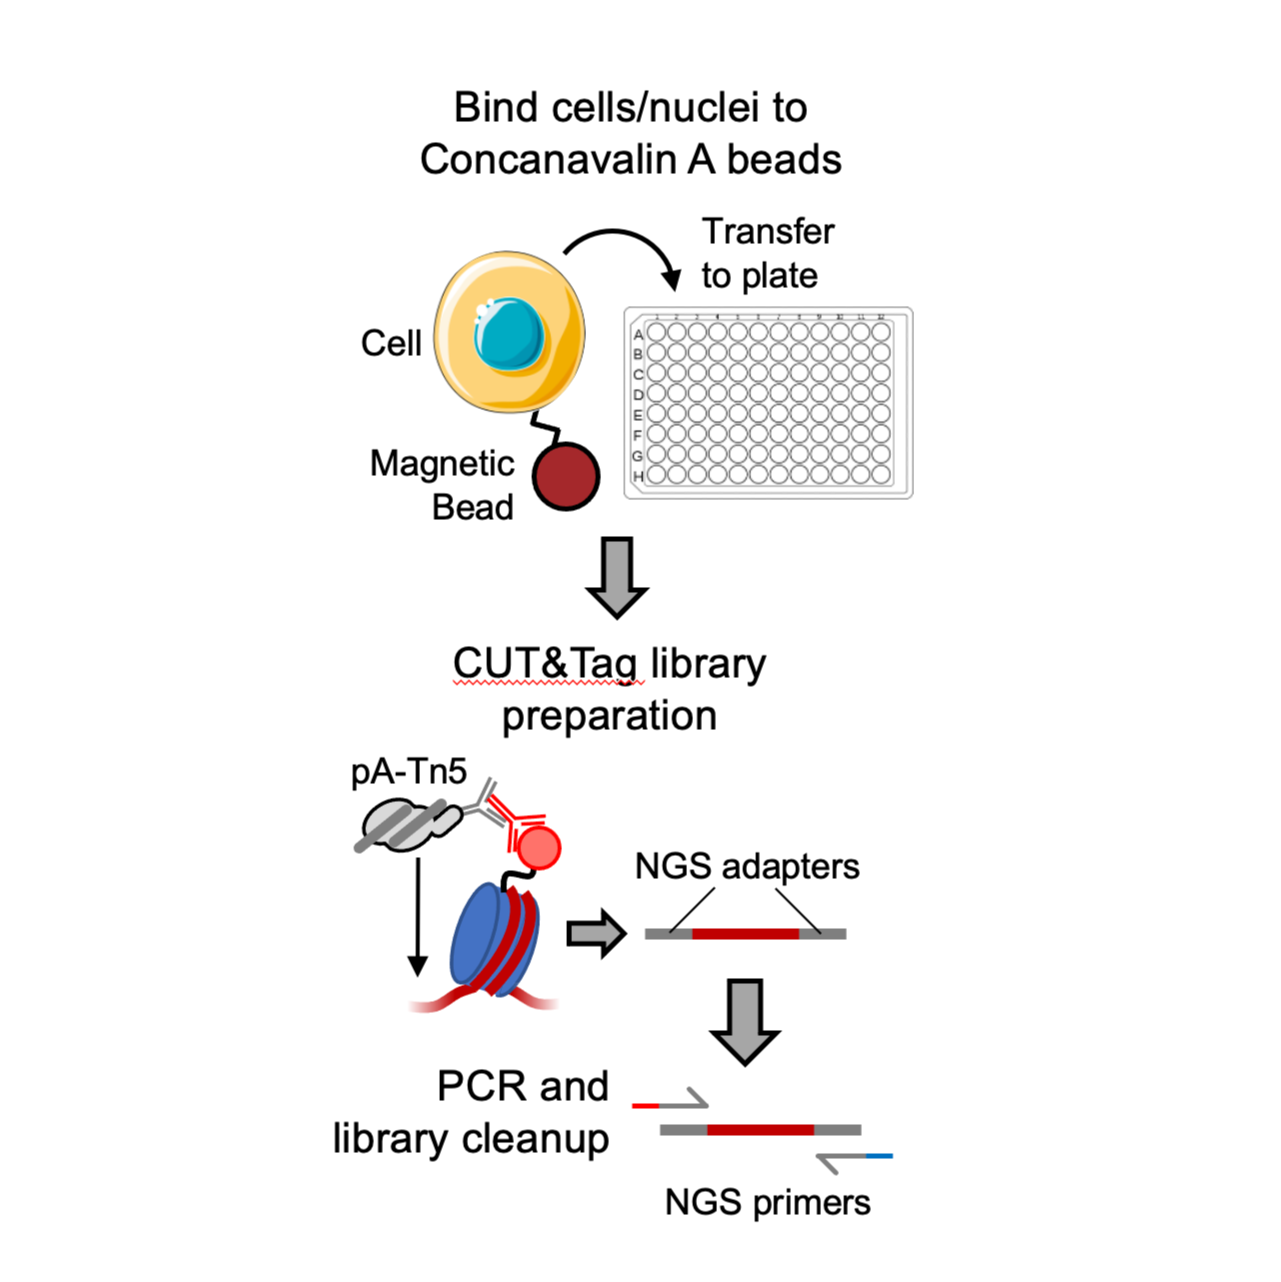
This protocol describes a method for carrying out CUT&Tag-Direct in 96 well microplates for high-throughput processing of samples by a single operator with only standard lab equipment required. It is based on V3 of the CUT&Tag-Direct protocol (dx.doi.org/10.17504/protocols.io.bqwvmxe6).
Image Attribution
protocols.io — Part of SPRINGER NATURE
Guidelines
Nearly all steps in this protocol use multichannel pipettes and reservoirs (e.g. https://www.geneseesci.com/product/olympus-8-channel-reagent-reservoirs/). The key steps for which we typically do not use multichannel pipettes are during primary antibody incubation (Steps 11-12), SDS denaturation (steps 33-34), and PCR master mix addition (step 40), the first because we often use multiple different antibody mixes per plate, the second because the SDS-containing solution becomes viscous and can lead to sample loss in the tip during pipette mixing, and the third to ensure full mixing of the PCR reagents with the template. In theory any of these steps could be accomplished with multichannel pipettes/reservoirs, though the SDS step can be tricky so we don't recommend it for those particular steps.
Materials
Reagent Setup (for 96 samples)
- Binding buffer Mix 1 mL 1M HEPES-KOH pH 7.9, 500 µL 1M KCl, 50 µL 1M CaCl2, 50 µL 1M MnCl2, and bring the final volume to 50 mL with ddH2O. Store the buffer at 4°C for up to several months.
- Wash buffer Mix 1 mL 1M HEPES-NaOH pH 7.5, 1.5 mL 5M NaCl, 12.5 µL 2M spermidine, bring the final volume to 50 mL with ddH2O, and add 1 Roche Complete Protease Inhibitor EDTA-Free tablet. Store the buffer at 4°C for up to 1 week.
- Antibody buffer Mix 5.25 mL wash buffer and 21 µL 0.5M EDTA. (1 µL 0.5M EDTA for every 250 µL wash buffer).
- 300-wash buffer Mix 1 mL 1M HEPES-NaOH pH 7.5, 3 mL 5M NaCl, 12.5 µL 2M spermidine, bring the final volume to 50 mL with ddH2O, and add 1 Roche Complete Protease Inhibitor EDTA-Free tablet. Store the buffer at 4°C for up to 1 week.
- Tagmentation buffer Mix 5.5 mL 300-wash buffer and 55 µL 1M MgCl2 (to 10 mM).
- TAPS wash buffer Mix 7 mL ddH2O and 70 µL 1M TAPS pH 8.5 (to 10 mM).
- 0.1% SDS release solution Mix 1.88 mL TAPS wash buffer and 20 µL 10% SDS solution.
- 80% Ethanol Mix 24 mL ethanol with 6 mL dH2O.
- TE Buffer Mix 2.97 mL ddH2O with 30 µL 1 M Tris-HCl pH 8.0 and 0.6 µL 0.5 M EDTA (10 mM Tris-HCl 0.1 mM EDTA final concentration)
Other materials/reagents/equipment mentioned in these pages:
- Concanavalin-coated magnetic beadsBangs LaboratoriesCatalog #BP531
- Roche Complete Protease Inhibitor EDTA-Free tablets Merck MilliporeSigma (Sigma-Aldrich)Catalog #5056489001
- MilliQ-filtered ddH2O
- 1.5 mL lo-bind tubes (e.g. Genesee 24-282C)
- Magnet stands (e.g. from Sergi Lab supplies)
- Standard, filter/lo-bind, and wide bore/lo-bind Pipette tips (Rainin)
- Eppendorf twin.tec® PCR plate 96 LoBindEppendorfCatalog #0030129512
- P1000 Single-channel pipette (Rainin)
- P200 Single-channel pipette (Rainin)
- P20 Single-channel pipette (Rainin)
- P200 8-channel pipette (Rainin)
- P20 8-channel pipette (Rainin)
- Multichannel reservoirs (e.g. Genesee 28-117)
- Rotator (for rotating plates/tubes)
- Adhesive PCR Plate SealsThermo Fisher ScientificCatalog #AB0558 Plate seals (e.g. Applied Biosystems 4360954)
- Vortex (for gentle vortexing)
- Centrifuge capable of a short pulse spin (<500 xg) or equivalent "pulse spin" to remove liquid from tube sides
- Primary antibody (for CUT&Tag; prepare dilution 1:50–1:100 in antibody buffer)
- Secondary antibody (prepare 1:100 in wash buffer)
- pA-Tn5 pre-loaded adapter complex e.g.
CUTANA™ pAG-Tn5 for CUT&TagEpiCypherCatalog #15-1017
- Thermal cycler with 96 deep well block and heated lid (e.g. BioRad C1000)
- 10 µM uniquely 10 nt barcoded i5 primers AATGATACGGCGACCACCGAGATCTACACNNNNNNNNNNTCGTCGGCAGCGTCAGATG (IDT, 4nmol Ultramer oligo)
- 10 µM uniquely 10 nt barcoded i7 primers CAAGCAGAAGACGGCATACGAGATNNNNNNNNNNGTCTCGTGGGCTCGGAGATG (IDT, 4 nmol Ultramer oligo)
- Premade 96-well primer plate with unique F-R primer mixtures at 5 µM (for primer transfer)
- NEBNext® High-Fidelity 2X PCR Master MixNew England BiolabsCatalog #M0541L
- 10% Triton X-100 (for resuspending beads prior to PCR)
- SPRI beads e.g. HighPrep™ PCR Clean-up SystemMagBio Genomics Inc.Catalog #AC-60005
- 15 mL conical tube (to equilibrate SPRI beads and mix on rotator)
- Additional non lo-bind 96-well PCR plate (for PCR setup)
- 150 µL 80% ethanol (for SPRI wash steps)
- Qubit™ dsDNA HS Assay kitThermo FisherCatalog #Q32851
- Qubit assay tubesThermo Fisher ScientificCatalog #Q32856
- Agilent 4200 TapeStation (or equivalent capillary electrophoresis instrument)
- High Sensitivity D1000 DNA Screen Tape assays KitsAgilent TechnologiesCatalog #5067-5585, 5067-5584
- High Sensitivity D1000 ReagentsAgilent TechnologiesCatalog #5067-5585
- Agilent 96-well sample plate (Agilent 5042-8502)
- Agilent 96-well plate foil seal (Agilent 5067-5054)
- PCR-tube strip caps or other seal that prevents evaporation
Protocol materials
HighPrep™ PCR Clean-up SystemMagBio Genomics Inc.Catalog #AC-60005
Qubit™ dsDNA HS Assay kitThermo FisherCatalog #Q32851
Roche Complete Protease Inhibitor EDTA-Free tablets Merck MilliporeSigma (Sigma-Aldrich)Catalog #5056489001
CUTANA™ pAG-Tn5 for CUT&TagEpiCypherCatalog #15-1017
NEBNext® High-Fidelity 2X PCR Master MixNew England BiolabsCatalog #M0541L
Qubit assay tubesThermo Fisher ScientificCatalog #Q32856
High Sensitivity D1000 DNA Screen Tape assays KitsAgilent TechnologiesCatalog #5067-5585, 5067-5584
Concanavalin-coated magnetic beadsBangs LaboratoriesCatalog #BP531
High Sensitivity D1000 ReagentsAgilent TechnologiesCatalog #5067-5585
Eppendorf twin.tec® PCR plate 96 LoBindEppendorfCatalog #0030129512
Adhesive PCR Plate SealsThermo Fisher ScientificCatalog #AB0558
NEBNext® High-Fidelity 2X PCR Master MixNew England BiolabsCatalog #M0541
Safety warnings
Proceed to nuclei binding quickly to avoid beads drying out.
- Use one set of tips for the same primary antibody to avoid cross-contamination when removing supernatant and adding antibody.
- Avoid touching beads when adding secondary antibody.
- When removing liquid from tube sides, use a short pulse spin (<500 xg) or equivalent to collect liquid before transfer.
- To keep beads resuspended during column-wise washes, move plate so most recent column hangs off the edge of the magnet while removing TAPS wash from the next column.
- After SPRI cleanup, avoid transferring beads when moving completed library; transfer only the cleared supernatant (e.g., 25 µL) to a fresh plate.
- Allow plate to air dry for ~2 min after ethanol washes to avoid overdrying or residual ethanol interfering with downstream steps.
Before start
This protocol is optimized for cryopreserved native or lightly crosslinked nuclei prepared as described in CUT&Tag-direct with CUTAC V.3 (dx.doi.org/10.17504/protocols.io.bqwvmxe6), though in principle permeabilized whole cells and/or fresh material could be used. Before starting, thaw nuclei on ice for ~20 mins.
Reagent Setup (for 96 samples)
15m
Binding buffer Mix 1 mL 1M HEPES-KOH pH 7.9, 500 µL 1M KCl, 50 µL 1M CaCl2, 50 µL 1M
MnCl2, and bring the nal volume to 50 mL with dH2O. Store the buffer at 4°C for up to several
months.
Wash buffer Mix 1 mL 1M HEPES-NaOH pH 7.5, 1.5 mL 5M NaCl, 12.5 µL 2M spermidine, bring
the nal volume to 50 mL with dH2O, and add 1 Roche Complete Protease Inhibitor EDTA-Free
tablet. Store the buffer at 4°C for up to 1 week.
Antibody buffer Mix 5.25 mL wash buffer and 21 µL 0.5M EDTA. (1 µL 0.5M EDTA for every 250
µL wash buffer).
300-wash buffer Mix 1 mL 1M HEPES-NaOH pH 7.5, 3 mL 5M NaCl, 12.5 µL 2M spermidine,
bring the nal volume to 50 mL with dH2O, and add 1 Roche Complete Protease Inhibitor EDTA-
Free tablet. Store the buffer at 4°C for up to 1 week.
Tagmentation buffer Mix 5.5 mL 300-wash buffer and 55 µL 1M MgCl2 (to 10 mM).
TAPS wash buffer Mix 7 mL dH2O and 70 µL 1M TAPS pH 8.5 (to 10 mM).
0.1% SDS release solution Mix 1.88 mL Taps wash buffer and 20 µL 1% SDS solution.
80% Ethanol Mix 24 mL ethanol with 6 mL dH2O.
TE Buffer Mix 2.97 mL ddH2O with 30 µL 1 M Tris-HCl pH 8.0 and 0.6 µL 0.5 M EDTA (10 mM Tris-HCl 0.1 mM EDTA final concentration)
Prepare Concanavalin A-coated beads
5m
Resuspend and withdraw 5 µL of the ConA bead slurry for each sample of 25,000 to 100,000 nuclei. Transfer a maximum of 60 µL of beads to 1 mL binding buffer in a lo-bind 1.5 mL tube. For 96 samples (total of 480 µL beads), transfer 60 µL beads to 8 different 1.5 mL lo-bind tubes with 1 mL binding buffer.
2m
Mix by pipetting. Place the tube on a magnet stand to clear (00:01:00 ).
1m
Withdraw the supernatant completely, and remove the tube from the magnet stand. Add 1 mL binding buffer and mix by pipetting up and down or flicking.
1m
Place on the magnet stand to clear, remove and discard the supernatant. Resuspend in 60 µL binding buffer (equal volume).
1m
Proceed to nuclei binding quickly to avoid beads drying out
Bind nuclei to ConA beads
25m
Thaw nuclei On ice (thaw before resuspending beads in 60 µL binding buffer).
Transfer 25,000-100,000 nuclei per sample into a 1.5 mL lo-bind tube and mix with 5 µL ConA beads per 25,000-100,000 nuclei. Place on Rotator and rotate at Room temperature for 00:10:00 .
Note
Transfer nuclei using wide-bore pipette tips to avoid shearing nuclei.
10m
Resuspend any beads that have crashed out of solution by tube inversion.
After a quick spin (<500 xg or enough to remove the liquid from the sides of the tubes), transfer 25,000-100,000 nuclei to each well of a 96-well lo-bind plate using a single-channel pipette.
13m
Place the tubes on the magnet stand to clear.
2m
Bind primary antibody
20m
For each CUT&Tag sample, mix the primary antibody 1:50-1:100 with antibody buffer.
1m
Remove the supernatant from the plate 1 column at a time using a 8-channel pipette, adding 50 µL of the respective primary antibody dilution to each well individually after each column removal.
Note
It is helpful to perform this step individually by well with single-channel pipettes in cases where multiple different antibodies are used in the same plate. For cases in which the same antibody is used for the entire column or the entire plate, a multichannel pipette and reservoirs can be used.
15m
Seal plate around the edges and between wells. Resuspend beads with gentle vortexing. Pulse spin the plate (<500 xg or enough to remove the liquid from the sides of the tubes).
Note
Generally all mixing steps from here up to SDS release (step 35) are performed via gentle vortexing followed by pulse spin rather than via pipette mixing.
4m
Place on rotator at 4 °C Overnight .
Note
This is a good pause point.
Bind secondary antibody
1h 7m
Place plate on the magnet stand to clear. Using multichannel pipette, remove and discard supernatant, using one set of tips for same primary antibody.
Note
For steps in which supernatant is discarded, the same tips can be re-used for wells containing the same antibody in order to reduce plastic waste.
2m
Mix the secondary antibody 1:100 in wash buffer. Making 400 - 500 µL extra so that there is enough in multichannel reservoir for all samples.
1m
Using the same set of tips, add 100 µL secondary antibody, avoiding touching beads in between secondary antibody additions.
Note
For steps in which reagents are added, tips can also be re-used between dispenses if the antibody mix is carefully expelled on the side of the well without contacting the sidewall or beads.
1m
Use 96 well plate seal to seal plate.
Note
Use a plate sealing tool (or the edge of a lab marker) to be sure that the seal is secure around the edges of the plate and between wells.
2m
Resuspend beads with gentle vortexing. Pulse spin the plate (<500 xg or enough to remove the liquid from the sides of the tubes).
1m
Place on Rotator and rotate at Room temperature for 01:00:00 .
1h
Bind pA-Tn5 adaptor complex
1h 12m
After a quick spin (<500 x g or just enough to remove the liquid from the sides of the tube), place the tubes on the magnet stand to clear. Remove and discard the supernatant, using a multichannel pipette and the same set of tips for the same secondary antibody.
3m
Take off magnet stand, and using 1 set of tips, add 150 µL wash buffer directly on the beads. Put back on the magnet stand and repeat for a total of two washes.
3m
Mix pAG-Tn5 pre-loaded adapter complex in 300-wash buffer following the manufacturer's instructions for the dilution ratio (100 µL per sample, making 400-500 µL extra).
1m
Place plate on the magnet stand and remove second wash. Pipette in 100 µL per sample of the pA-Tn5 mix using 1 set of tips.
3m
Seal plate around the edges and between wells. Resuspend beads with gentle vortexing. Pulse spin the plate (<500 x g or enough to remove the liquid from the sides of the tubes).
2m
Place on Rotator and rotate at Room temperature for 01:00:00 .
1h
CUT&Tag Tagmentation and particle release
2h 45m
After a quick spin (<500 x g or just enough to remove the liquid from the sides of the tube), place the tubes on the magnet stand to clear. Remove and discard the supernatant, using and multichannel pipette and the same set of tips.
3m
Take off magnet stand, and using 1 set of tips, add 150 µL 300-wash buffer directly on the beads. Put back on the magnet stand and repeat for a total of two washes.
3m
Put plate on the magnet stand and remove second wash using 1 set of tips. Pipette in 50 µL per sample of tagmentation buffer using 1 set of tips.
2m
Seal plate around the edges and between wells. Resuspend beads with gentle vortexing. Pulse spin the plate (<500 x g or enough to remove the liquid from the sides of the tubes).
2m
Incubate at 37 °C for 01:00:00 in a PCR cycler with a 50˚C heated lid. Hold at 8 °C .
1h
Place tubes on a magnet stand and remove and discard the supernatant from the whole plate using a multichannel pipette and 1 set of tips.
2m
Take off magnet stand, and using 1 set of tips, add 50 µL TAPS wash buffer directly on the beads.
1m
Put back on the magnet stand and remove the supernatant from the plate 1 column at a time. Take off magnet, resuspend the beads in 16 µL of 0.1% SDS release solution individually via pipette mixing with lo-bind filter tips after each column removal.
Note
To keep beads resuspended, move plate so most recent column hangs off the edge of the magnet while removing TAPS wash from next column.
Note
It is highly recommended that this step be carried out individually for each well to ensure proper mixing and to avoid loss of beads in the pipette tip.
30m
Seal plate around the edges and between wells. After a quick spin, incubate at 58 °C for 01:00:00 in a PCR cycler with a 105˚C heated lid to release pA-Tn5 from the tagmented DNA. Place at 4°C Overnight .
Note
This is a good pause point.
1h 2m
PCR
1h
To a different 96-well plate, add 2.1 µL of 10 micromolar (µM) Universal or barcoded i5 primer + 2.1 µL of 10 micromolar (µM) uniquely barcoded i7 primers to generate a premade primer plate, using a different barcode for each sample as schematized below:
| i7_1 | i7_2 | i7_3 | ... | i7_12 | |
| i5_1/i7_1 | i5_1/i7_2 | i5_1/i7_3 | ... | i5_1/i7_12 | |
| i5_2/i7_1 | i5_2/i7_2 | i5_2/i7_3 | ... | i5_2/i7_12 | |
| i5_3/i7_1 | i5_3/i7_2 | i5_3/i7_3 | ... | i5_3/i7_12 | |
| ... | ... | ... | ... | ... | |
| i5_8/i7_1 | i5_8/i7_2 | i5_8/i7_3 | ... | i5_8/i7_12 |
Truncated representation of 96 well primer plate containing a unique combination of i5_1-8 and i7_1-12 primers in each well.
15m
Using a multichannel pipette, resuspend the beads in the sample plate with 5 µL of 10 % volume Triton X-100 via pipette mixing.
Note
Pipette mix thoroughly but carefully to avoid introducing many bubbles into the mixture.
3m
Transfer 4 µL of primer mix from premade primer plate to samples using multichannel pipette.
2m
Add 25 µL NEBNext® High-Fidelity 2X PCR Master MixNew England BiolabsCatalog #M0541 individually to each well, pipette mix in between each addition.
Note
We often perform this step individually by well as described here to ensure thorough mixing, but it can be performed via multichannel pipette without too much trouble.
Note
Once mixed, the plate should be placed On ice until the start of PCR.
10m
Seal plate around the edges and between wells, and perform a quick spin.
Note
Place the plate either On ice or immediately in the thermal cycler and proceed with the PCR.
Begin the cycling program with a heated lid on the thermal cycler: Cycle 1: 58 °C for 5 min (gap filling); Cycle 2: 72 °C for 5 min (gap filling); Cycle 3: 98 °C for 30 sec; Cycle 4: 98 °C for 15 sec; Cycle 5: 60 °C for 15 sec; Repeat Cycles 4-5 11 times; 72 °C for 1 min and hold at 8 °C .
30m
After starting PCR program, equilibrate SPRI beads to room temperature by transferring the amount needed into a 15 mL conical tube and rocking on rotator to warm at Room temperature (55 µL per sample, ~5.8 mL for 96 samples + 400-500 µL extra for multichannel reservoir).
Post-PCR Clean-up
32m
After the PCR program ends, remove the plate from the thermal cycler and add 55 µL of SPRI beads to each well using multichannel pipette. Mix by pipetting up and down.
5m
Let sit at room temperature for 00:05:00 .
5m
Place on the magnet stand for 00:02:00 to allow the solution to clear.
2m
Remove and discard the supernatant.
1m
Using 1 set of tips, keep the plate on the magnet stand and add 150 µL 80% ethanol.
2m
Completely remove and discard the supernatant.
1m
Repeat Steps 48 and 49.
3m
Perform a quick spin and remove the remaining supernatant with a 20 µL multichannel pipette.
2m
Allow plate to air dry for 00:02:00 .
2m
Remove from the magnet stand. Using multichannel pipette, resuspend beads in 28 µL TE Buffer. Let sit for 00:05:00 .
5m
Place on the magnet stand for 00:02:00 to allow the solution to clear.
2m
Transfer 25 µL completed library to a fresh plate, avoiding transfer of beads.
2m
Qubit quantification of DNA libraries
30m
Using Qubit 1x dsDNA HS Assay kit, prepare 98 assay tubes by adding 198 µL 1x dsDNA to 96 tubes (samples) and 190 µL 1x dsDNA to 2 tubes (standards).
10m
Add 10 µL of standards S1 and S2 to the standard tubes and add 2 µL of each sample to the respective sample tubes. Vortex well to mix.
5m
Take readings on Qubit machine to determine the concentration of libraries.
15m
TapeStation analysis
1h 50m
Prepare Agilent 96-well sample plate by adding 2 µL High Sensitivity D1000 Sample Buffer and 2 µL sample to each well. Seal plate with Agilent 96-well plate foil seal. Vortex to mix well and perform a quick spin to ensure that no liquid is on the side of the wells and there are no bubbles.
15m
Run TapeStation (~90 min for 96 samples).
1h 30m
Seal plate with PCR-tube strip caps or seal that prevents evaporation. Store DNA libraries at 4 °C.
5m
Protocol references
- Steven Henikoff, Jorja Henikoff, Kami Ahmad. CUT&Tag-direct with CUTAC V.3. DOI: dx.doi.org/10.17504/protocols.io.bqwvmxe6