Jun 17, 2025
Version 2
PECO eDNA field sampling protocol V.2
- 1McGill University;
- 2Hakai Institute
- Hakai Genomics



Protocol Citation: Jennifer Sunday, Matt Lemay, Sue Velazquez, Margot hessing-lewis 2025. PECO eDNA field sampling protocol . protocols.io https://dx.doi.org/10.17504/protocols.io.ewov19d5olr2/v2Version created by Jennifer Sunday
License: This is an open access protocol distributed under the terms of the Creative Commons Attribution License, which permits unrestricted use, distribution, and reproduction in any medium, provided the original author and source are credited
Protocol status: Working
We use this protocol and it's working
Created: June 17, 2025
Last Modified: June 17, 2025
Protocol Integer ID: 220410
Keywords: environmental DNA, eDNA, network, kit, seagrass, marine, nearshore, metabarcoding, fish, peco edna field, pacific edna coastal observatory, sampling protocol, information on water sample collection, water sample collection, ocean biomolecular observation network, sampling technique, protocol, sample, filtration, central facility for further processing, material cleaning between sample, field, part of the un ocean decade
Funders Acknowledgements:
Hakai Institute
Disclaimer
DISCLAIMER – FOR INFORMATIONAL PURPOSES ONLY; USE AT YOUR OWN RISK
The protocol content here is for informational purposes only and does not constitute legal, medical, clinical, or safety advice, or otherwise; content added to protocols.io is not peer reviewed and may not have undergone a formal approval of any kind. Information presented in this protocol should not substitute for independent professional judgment, advice, diagnosis, or treatment. Any action you take or refrain from taking using or relying upon the information presented here is strictly at your own risk. You agree that neither the Company nor any of the authors, contributors, administrators, or anyone else associated with protocols.io, can be held responsible for your use of the information contained in or linked to this protocol or any of our Sites/Apps and Services.
Abstract
This protocol summarizes field sampling techniques used by a network of partners that contribute to the Pacific eDNA Coastal Observatory. It includes information on water sample collection, filtration, preservation, and material cleaning between samples. Samples are shipped to a central facility for further processing. The Pacific eDNA Coastal Observatory is part of the UN Ocean Decade and the Ocean Biomolecular Observation Network.
Attachments
Guidelines
- Two or more people are required to do this protocol.
- There are four parts to sampling: collection, filtration, preservation, and bleach cleaning.
- The processing of 5 samples per site should take about 1- 3 hours once you are good at it, but the first time might take longer (e.g. plan for 2-4 hours the first time).
- Samples should be filtered within 2 hours of seawater collection, and stored in the dark on ice during any storage time (unless immediately filtering). Note: Some groups have required longer storage time, and this is noted.
- At all stages, please be aware of the possibility of sample contamination. Our PCR metabarcoding amplifies even the tiniest concentration of any fish DNA. Wear gloves at all times throughout the process, change gloves any time they come into contact with anything outside of the provided kit e.g. your face or body, the ground etc.
Materials
Materials you will need to supply
- Pole for pole sampler (6’ of 1” PVC prefered, or a broom handle with duck tape)
- 5L of clean water for every site visited. For every site, 1L needed for negative control, plus 4L for cleaning. If 5 sites are visited, 25L are needed.
- 750ml of regular household bleach (Clorox brand regular strength or equivalent)
- Cooler
- Ice in cooler if storing bottles for more than 20 minutes
- possibly some extra clean gloves and paper towels if kit supplies run low
Rinse and Control water
Ideally this would be deionized water from a research lab, poured directly into the Control sample Nalgene bottle. However, this could also be distilled water from a grocery store. If transporting water in any of your own containers, the container itself needs to be bleached and thoroughly rinsed before use. The project will still work if the water isn’t fully sterile or salt-free, but the key is: water that does not have fish DNA in
it. Consider this order of priority depending on what is available to you:
- Deionized, distilled water directly from lab source into the control Nalgene bottle prior to each field visit, and used to rinse materials after bleaching at a lab sink
- Distilled water from grocery store, avoiding water that contains additional minerals, transported in the original bottle (eg. 7 x 4L bottles)
- Deionized, distilled water from a lab, transported in a container that has been bleached (10% bleach for 20 minutes) and thoroughly rinsed 3 times
Materials provided inside the PECO sampling kit (N = number of sites for your kit)
● Pole sampler end-piece in large Ziploc bag
● 5 x 1.5 L Nalgene Bottles (sterile, bagged)
● 5N Sterivex filters with end caps in individual Whirl-paks (bagged)
● 5N syringes (3ml) with Longmire’s buffer + end cap in individual Whirl-paks (bagged)
● 2N Acrodisc filters (bagged with buffer syringes)
● 2L (1/2 gal) pressure sprayer/pump with tubing and HEPA air filter
● N Bulkhead Caps with tubing and fittings (new in 2024)
● Clipboard and pencil
● N large syringes (60ml, sterile, packaged)
● Bag/box of nitrile gloves (small, medium or large)
● 1 L plastic graduated beaker/jug
● Foam stand for 1.5 L bottle
● 5 cable ties
● Bag of blue wipe towels
● 2N bench coats in a Ziplock bags
Safety warnings
WHMIS guidelines for bleach disposal is to check with local municipal regulations. In Vancouver, for example, it is okay to put down the sink, but recommended that it first be used for other cleaning first, which helps to denature it. Some septic systems and natural environments are sensitive to bleach. If you are unsure, please pack out the bleach until you are in a sewage system that can handle the addition, and/or use the bleach for cleaning.
Before start
- Check Materials for list of materials you need to have ready, including control water, a pole, and a cooler.
- Read guidelines as a reminder of site selection and tide characteristics for timing. If samples will not be filtered immediately, prepare a cooler of ice for cold & dark storage
- We ask that you collect eDNA from field sites before any beach seining or other activities that involve adding gear or people into the water.
- Plan your collection dates for a tide in which the habitat will be accessible and water surface will be 1-3 m above bottom at the collection sites.
- If your transit time between sites and your home base is >2hrs, plan to bring the filtration kit to the field so that you can filter within 2 hours of seawater collection.
- Avoid ‘fishy’ field clothes, boots, coolers, or tables, and always use the pole sampler to reach away from your body.
- If possible please bring a device for assaying temperature and salinity at your site.
Day-of preparation
Print and pack datasheets.  PECO - field datasheet.pdf91.7KB
 PECO - field datasheet.pdf91.7KB
 Without removing them from their bags, find a bag of 5 unused sterivex filters labeled “PECOe-xxx” or "PECOe-XXXX". These will be the 5 sample names for your next site.
Label your 5 Nalgene bottles, from 1-4 and C for control. When relabelling these after cleaning (e.g. secondary sites), scramble which bottle you use as the control.
With clean gloves and and in a clean space, fill the control bottle with "control water" (see description in Materials), label this as the control, and place it back into its clean ZipLoc bag. Bring the control bottle into the field with you as the negative control.
Seawater Collection Stage
Exact locations of water samples, as well as precise transect lines, are expected to vary from year to year. Each sample should be taken at least 10 m apart (aka 10-13 large steps) within the habitat of interest; water can be accessed by wading from shore or by boat. The sample location surface should be 1-3m above the bottom at the time of sampling.
Fig. 1. Example of sampling scheme at a single site, showing spatial orientation of eDNA
samples relative to land and seagrass bed (a). Schematic for optional paired beach seines
shown in (b).
Advance to collection location and visually inspect the habitat and check that water depth is between 1-3m.
Have one person hold the pole while the other person, wearing a clean set of gloves, remove a bottle from the sterile Ziploc bag, mount the bottle, tighten the hose clamp around the bottle. As you approach the sampling location, carefully remove the lid touching only the outside. Note: gloves at this stage are going to get seawater on them, and might also be used to hold the pole and twist the clamps. This is okay - the gloves are one step to keep your skin from the samples, but also just be sure not to put your gloved hands inside the bottle or caps.
Fig. 2 Attaching the Nalgene for a wading-access sample.
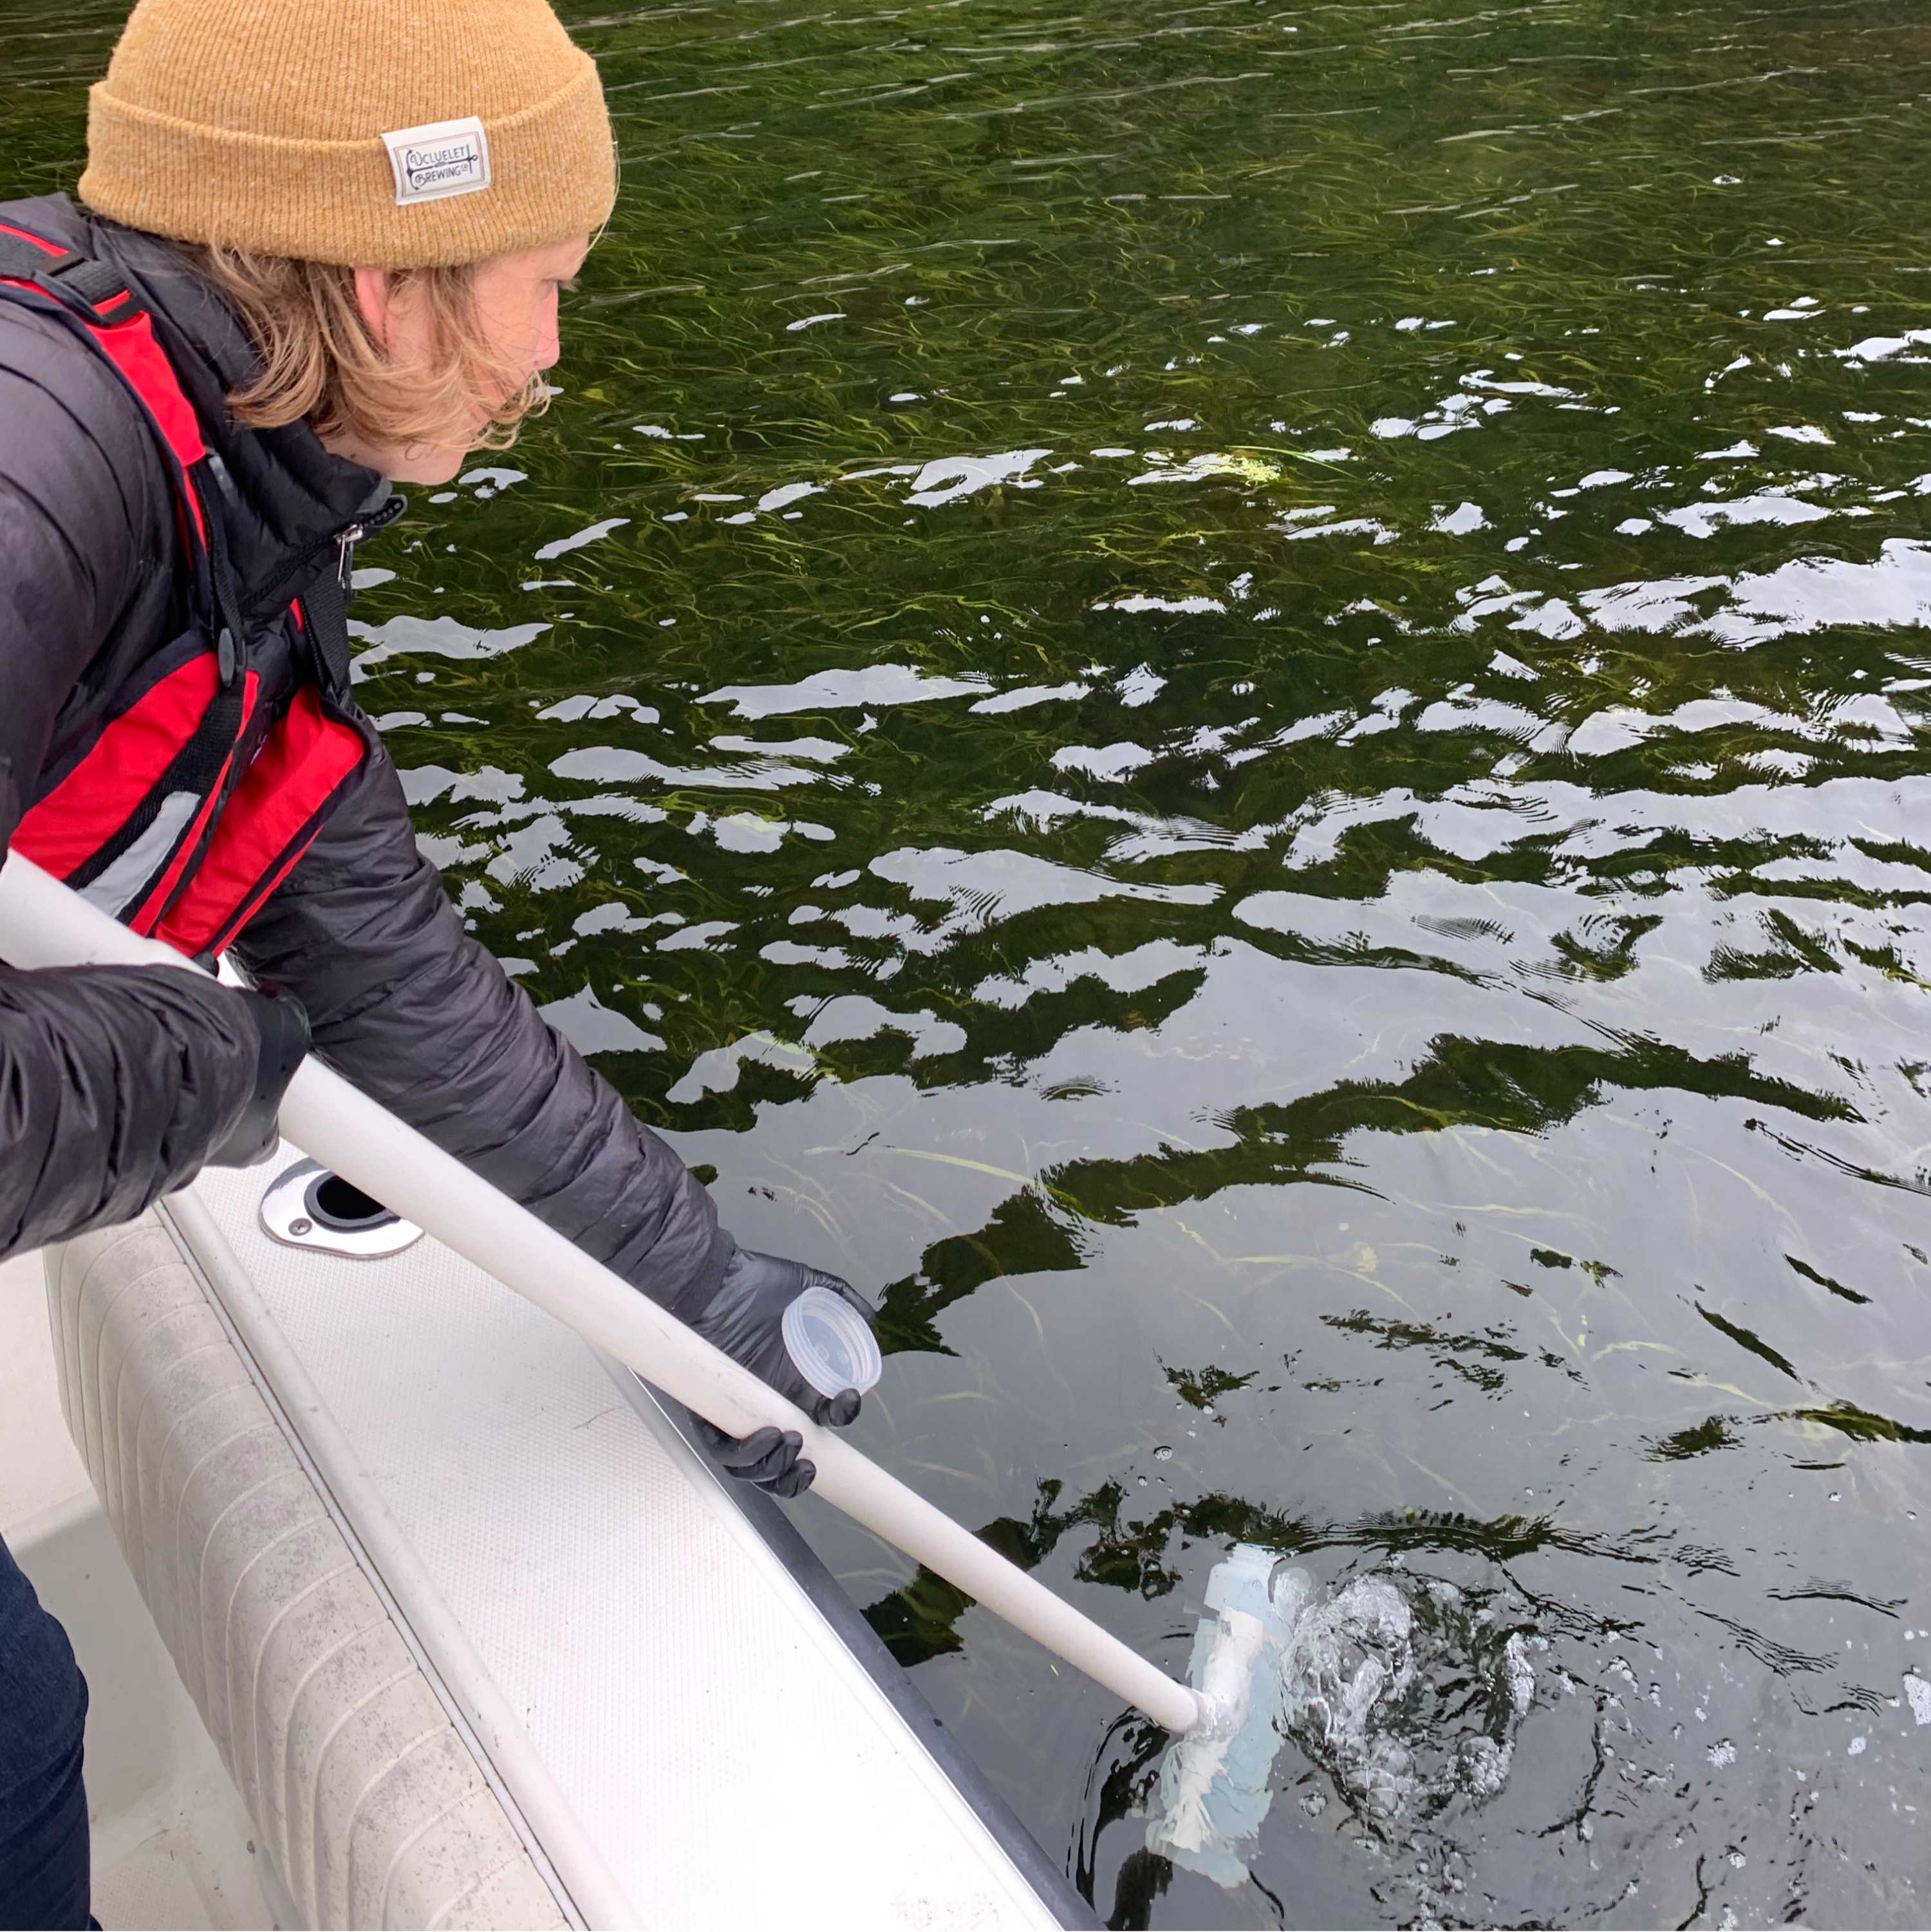
Have the person holding the pole plunge the Nalgene bottle in the water upside-down away from the boat or body, aiming for the bottle opening to be 30cm below the surface, and turn it right-side-up. Bubbles should emerge as water fills the bottle. Bring the filled bottle to the surface; and gently decant field water over the lid and back into field. This is a rinse.
Repeat for three total rinses of the bottle and lid with collection-site water.
Fig. 3. Sampling seawater from a boat. Bottle has just been rotated to release bubbles.
Take the true sample in the same way, aiming to collect water 30cm below the surface. Shake out a small amount of water to allow for some air headspace at the top.
Have person holding the lid cap the bottle immediately after retrieval, tighten the lid, remove it from the pole, and place it in a Ziploc in the cooler with the lid closed tight.
Note the time and location from which the samples were collected on the eDNA Sampling Data Sheet.
Repeat for a total of 4 water samples at the collection site, separated by ~10m.
Remove bottle with control water from Ziplock bag, open the lid, hold the control bottle open for ~5 seconds at your sampling site, gently moving the bottle in the air, cap the lid and replace to Ziploc in the cooler.
Before leaving the sampled site, fill in site-level characteristics on the data sheet. Note seagrass characteristics, estimate the size of the seagrass bed, canopy height, the patchiness, cover and density of the seagrass. Note the weather, tide status, and take a decimal latitude and longitude of your location. If possible take a photo of the site and one of the crew.
If possible, take a salinity and temperature reading at 30cm below surface.
Filtration Stage
This can be done on the shore near the sample site or in the lab. Be sure to move away
from any possible sources of contamination. Indoors is preferred. Set up your work station to have the pump on the left, then styrofoam holder for the sample bottle, then large beaker on the right (see Fig. 5 below). The filtration will take more than an hour, so keep your samples either in a cooler or in a fridge (cool and dark).
Sterility: Big picture is, the water will pass through the tubes and into the filter, so it is most important to keep anything that contacts that water clean. The most vulnerable is the tube of the bulkhead cap that goes into the sample. Do not touch this, and don't remove it from the ziplock bag until you are ready with clean gloves (step 21). After that, it is mostly the ends of the tubes that are important, so be careful not to touch the ends.
Fig. 4. The bulkhead cap with parts highlighted in red that are most important not to touch. Do not remove from ziplock until ready. There will be one of these for every site, so they only need to be used once, labelled as used, and returned for sterilization at Hakai.
Find one of the bulkhead caps in a ziplock bag and keep it at hand but inside the bag. This will be used for one full site (1 control and 4 samples) and the tubing should stay clean until ready.
Remove the control water Nalgene bottle from where the samples are being stored. Have a partner remove the lid just as you do the next step, or if you are alone, remove the lid of the sample and leave it on top before you go to the next step.
Wearing clean gloves, remove the sterile bulkhead cap and hose assembly from the zip-lock bag. Let the hose tangle its way into bottle without touching it. CAUTION: Do NOT touch the hose that will go into the sample bottle.
Screw the bulkhead cap into place - this can be done by turning the sample bottle instead of the cap so that the tubes don't fling around. Place the bottle in the pink foam stand for stability.
Connect the hose on the bulkhead cap to the HEPA air filter attached to the pump/water
sprayer hose and clamp/cinch in place using the small white hose clamp.
Fig. 5. Filtration set-up in tote, with control water sample attached. But: don’t add the Sterivex filter until you have pumped out ~100ml of sample a few steps below. Since our totes are usually deep totes, it is easier to set up on the bench top rather than in the tote as pictured.
Rinse tubes with sample water (Before adding the Sterivex): pump the plunger on the bottle a few times to allow water to pass through the hose into the plastic beaker. Allow about 100 ml to flow through and then press the white plastic tubing clamp on the hose to stop the flow of water. Once the hose clamp is set, discard this water.
Locate the ziplock with Sterivex filters for this site. Open the Whirl-pak bag, but while the filter is still in the bag, shimmy it up to the top, untwist the end cap, and let it fall into the bag for later. It is possible to do this while keeping the filter still mostly in the Whirl-pak for extra security. Attach the filter to the Luer lock at the downstream-end of your pump set up. Once it is on, remove the cap at the other end of the filter and let it fall into the Whirlpak bag, set the bag aside, and set the filter to drain into the beaker.
Fig. 6 Components of Sterivex filter in Whirl-Pak. From 2024 onwards, the end cap is more of a push cap than a twist - see Fig. 7.
Fig. 7. Sterivex push-style end plug used since 2024.
8.Release the hose clamp, add more pressure to the bottle and lock the pressure to let sample water flow through the filter. If there is no locking mechanism on the handle of the water/pressure sprayer, use the black spring clamp to hold down the handle lever.
Fig. 8. Example pumps/water sprayers. Right panel shows spring clamp holding down spray lever.
Record the Sample ID and time of day on the data sheet. Be sure to indicate if it is a “Control” sample (YES/NO).
Filter 500- 1000 ml of water and close the white plastic clamp on the hose to stop the flow of water. Stopping point: If you feel strong resistance, and the water is just slowly coming out drop by drop, that is a sign to stop. We are aiming for 1000 ml of filtered water, but anything above 500ml we can still use in our analysis, and estuarine sites are known to have higher turbidity so many teams have been stopping at 500ml. Note the volume filtered on the data sheet.
9Find the large 60ml syringe and set it full of air, to not touch the tip to anything - best to keep it facing into its bag until ready. Remove the Sterivex filter and attach to the sterile 60 ml syringe full of air (Fig. 11). Point the syringe down and depress the plunger slowly over the beaker until all the water is removed from the filter. If liquid is still in the Sterivex, remove the plunger from the Sterivex, reset the syringe with air, and reattach to push it through again. You can hold the outside of the Sterivex as long as you do not touch the tips.
Fig 10. Sterivex and syringe (attached)
Nose the the Sterivex back into its Whirl-pak bag and attach the end cap to the bottom. This can be done while it is still attached to the air syringe for more leverage. Then remove air syringe and nose it back into its bag.
Preservation Stage
Locate the 3 ml syringe of buffer solution in another Whirl-pak bag labeled ‘buffer’. PLEASE NOTE that if the buffer has come out of solution (ie. resembles liquid soap; opaque), warm the syringe in your hand until the buffer solution turns clear. Also locate an a Acrodisk filters and keep it at hand.
While holding the buffer syringe upright, remove the end cap from the syringe, peel
back the top of the Acrodisc filter packet and attach/screw the filter on to the end of the
syringe.
Fig. 10. Buffer solution in pre-filled syringe with Acrodisk filter.
Immediately after taking the Acrodisc out of the packet, attach it to the inlet side of the Sterivex filter. While holding the Sterivex filter upright, push slowly down the plunger on the buffer syringe until the white porous material inside the filter housing is covered, but watch that the cap at the bottom of the Sterivex stays on. It is possible to do this while keeping the Sterivex inside the Whirl-Pak bag for extra sterility.
Fig. 11. Filling Sterivex with filtered buffer solution. LHS: Sterivex attached to Acrodisc and buffer solution syringe ready for depression. RHS: Depressed plunger on buffer solution into Sterivex filter.
Screw the remaining cap on to the female end (inlet end) of the Sterivex filter - be sure to only attach them FINGER TIGHT (don’t tighten with force). Gently shake to ensure the entire filter surface (white) has been in coated in buffer solution.
Fig. 12. Sterivex filter with buffer and both end caps. Note: after 2024 end cap is push-on as shown in Fig. 7.
Next Sample Set Up
To set up filtration for the next sample, first release the pressure in the hosing by opening
the valve on the pump/sprayer. In case all of the pressure has not been removed from
the tubing, unscrew the bulkhead cap SLOWLY at first.
While one person slowly unscrews the bulkhead cap (turn the bottle, not the cap), the other person can uncap the next sample. (Or, if there is only one person, unscrew the lid of the new sample before unscrewing the bulkhead cap, so the transfer can be done in one motion)
Carefully remove the bulkhead cap and slowly pull it upwards until the inner tubing clears the bottle (be careful not to touch other surfaces with the tubing). Place the next sample bottle under the bulkhead cap while being careful not to touch the inner tubing, and screw on the cap (turn the bottle not the cap).
Place the bottle in the pink foam stand. Repeat the Filtration, Preservation, and Next Sample Set Up steps for all four of the seawater samples.
Take down
Place all 5 samples (in individual Whirlpak bags) in a larger Ziploc bag and store in the fridge/dark until you are ready to ship.
To lightly rinse the pump, connect the Control water bottle back to the bulkhead cap and pump all remaining water through with no filter.
Remove the bulkhead cap, and place the bulkhead cap and the large syringe in a used ziplock for return to Hakai for bleaching and reuse. Mark these as "used" or set them aside so there is no confusion on later days.
Discard all remaining sample and control water from the Nalgene bottles, discard used buffer syringes and Acrodisc filters in garbage.
Bleach Cleaning - since 2024: just bottles and beaker
Wear gloves and protective equipment and conduct bleaching in a space with good
ventilation. Prepare a clean working environment or bench top where lids and parts can be put down between rinses, plan to use one bench coat for this. If available (optional), rinse all bottles with tap water before starting.
Prepare 1 L of 10% bleach solution by adding 100ml of regular-strength Clorox bleach to the Control Nalgene bottle and top up with rinse water (see notes in Materials), filling the 1.5L Nalgene about 2/3 in height. This will be a 10:90 mixture of regular strength Clorox bleach (10%) and water (90%). Close with lid and invert 5 times.
Remove cap of the next bottle (first sample bottle) and place lid on bench coat. Decant bleach solution to the new bottle, replace lid to empty bottle, and set aside in a designated spot. Cap lid of bleach-filled bottle and invert 5 times.
Repeat until all bottles are bleached, and decant bleach solution into plastic beaker.
Remove all 5 lids and place them in the beaker with bleach solution. One by one dip the open end of each bottle into the beaker. Remove lids, shake of access liquid, and return to bottles. Dispose of bleach according to local guidelines (example given in "Warnings" panel).
Fill the first Nalgene to 2/3 full with rinse water (see "Materials" - typically bottled water or deionized water from a lab), cap and invert 5 times. Decant into the next bottle. Repeat until the 5th Nalgene bottle is done and decant to the beaker. Note: If rinse water is easy to access, you can rinse each bottle 3 and lid three times separately. These two decanting and lid-cleaning steps are for partners rinsing with limited bottled water.
Remove all 5 lids and place them in the beaker with the rinse water. One by one dip the open end of each bottle into the beaker. Carefully drain access water, remove lids, shake of access liquid, and return to bottles. Dispose of rest of the rinse water.
Repeat this rinse cycle for 3 full rinse water rinses.
If the next field sampling is more than 1 day away: shake out excess water, and allow the bottles, lids, and beaker to dry with a sterile bench pad lain over top (provided in kit). Once dry, place lids on Nalgenes and place each item in a clean Ziploc bag for the next field day.
If the next collection day is the following day, put wet-but-sterile lids on wet-but-sterile
Nalgenes and place in clean Ziploc bags.
Protocol references
Much of this protocol was developed based on the Integrated Coastal Observatory (ICO) eDNA protocol.
Acknowledgements
We are grateful to Ben Millard-Martin at Hakai Institute for original development of pump-assembly. We are grateful to partners of PECO for feedback as we further developed this protocol.