Jul 21, 2025
- Elin Vinsland1,
- Camiel Mannens2,
- Jokubas Janusauskas1,
- David Fernández-García1
- 1Karolinska Institutet;
- 2KU Leuven


Protocol Citation: Elin Vinsland, Camiel Mannens, Jokubas Janusauskas, David Fernández-García 2025. OTTR. protocols.io https://dx.doi.org/10.17504/protocols.io.8epv5op9jg1b/v1
License: This is an open access protocol distributed under the terms of the Creative Commons Attribution License, which permits unrestricted use, distribution, and reproduction in any medium, provided the original author and source are credited
Protocol status: Working
The protocol has been used with human glioblastoma and fetal cortex tissue samples.
Created: May 07, 2025
Last Modified: July 21, 2025
Protocol Integer ID: 217829
Keywords: ottr, organotypic, organotypic slices, live imaging, spatial transcriptomics, cryosectioning, Xenium, glioblastoma, GBM, fetal cortex, ottr organotypic timelapse recording with transcriptomic readout, multiplexed in situ spatial transcriptomic, labelled organotypic slice culture, ottr organotypic timelapse recording, organotypic slice culture, transcriptomic readout, situ spatial transcriptomic, long live imaging, acute glioblastoma, fetal cortex sample, thick organotypic slice, embedded sample, imaging
Funders Acknowledgements:
Torsten Söderberg Foundation
Grant ID: 2018.0172
Knut and Alice Wallenberg foundation
Grant ID: 2018.0220
Erling-Persson Foundation
Grant ID: 2023.0340
Swedish Research Council
Grant ID: 2022-01248
Abstract
Organotypic Timelapse recording with Transcriptomic Readout (OTTR) integrates week-long live imaging of sparsely labelled organotypic slice cultures with highly multiplexed in situ spatial transcriptomics. The protocol herein outlines all steps involved in carrying out OTTR, from sample collection to cryosectioning of gelatin-embedded samples.
In short, acute glioblastoma or fetal cortex samples are:
- Washed, processed and vibratome-sectioned into 300 um-thick organotypic slices.
- Sparsely labeled with a lentiviral construct, plated onto an insert and cultured for ~3 days.
- Live imaged for an additional week after marker is expressed.
- Formaldehyde-fixed, embedded in gelatin and cryosectioned.
Materials
DMEM, high glucose, no glutamineThermo FisherCatalog #11960044
MEM, no glutamine, no phenol redThermo FisherCatalog #51200038
HEPES (1 M)Thermo FisherCatalog #15630080
HBSS, calcium, magnesium, no phenol redThermo FisherCatalog #14025092
Antibiotic-Antimycotic (100X)Thermo FisherCatalog #15240062
GlutaMAX™ SupplementThermo FisherCatalog #35050061
N-2 Supplement (100X)Thermo FisherCatalog #17502048
B-27™ Plus Supplement (50X)Thermo FisherCatalog #A3582801
Human Serum, heat inactivated, USA origin, sterile-filteredMerck MilliporeSigma (Sigma-Aldrich)Catalog #H5667
UltraPure™ Low Melting Point AgaroseThermo FisherCatalog #16520050
Hibernate™-E MediumThermo FisherCatalog #A1247601
eBioscience™ 1X RBC Lysis BufferThermo FisherCatalog #00-4333-57
Phosphate buffered saline, pH 7.4, liquid, sterile-filtered, suitable for cell cultureMerck MilliporeSigma (Sigma-Aldrich)Catalog #P4474
PBS - Phosphate-Buffered Saline (10X) pH 7.4, RNase-freeThermo FisherCatalog #AM9625
Pierce™ 16% Formaldehyde (w/v), Methanol-freeThermo FisherCatalog #28908
Gelatin from porcine skinMerck MilliporeSigma (Sigma-Aldrich)Catalog #G1890
SDS Tissue-Tek® Sakura FinetekCatalog #4583
Protocol materials
Tissue processing medium
Tissue embedding medium
Slice maintenance medium
Slice washing medium
Gelatin embedding medium
HEPES (1 M)Thermo FisherCatalog #15630080
GlutaMAX™ SupplementThermo FisherCatalog #35050061
N-2 Supplement (100X)Thermo FisherCatalog #17502048
B-27™ Plus Supplement (50X)Thermo FisherCatalog #A3582801
eBioscience™ 1X RBC Lysis BufferThermo FisherCatalog #00-4333-57
Gelatin from porcine skinMerck MilliporeSigma (Sigma-Aldrich)Catalog #G1890
HBSS, calcium, magnesium, no phenol redThermo FisherCatalog #14025092
DMEM, high glucose, no glutamineThermo FisherCatalog #11960044
PBS - Phosphate-Buffered Saline (10X) pH 7.4, RNase-freeThermo FisherCatalog #AM9625
Pierce™ 16% Formaldehyde (w/v), Methanol-freeThermo FisherCatalog #28908
Antibiotic-Antimycotic (100X)Thermo FisherCatalog #15240062
Human Serum, heat inactivated, USA origin, sterile-filteredMerck MilliporeSigma (Sigma-Aldrich)Catalog #H5667
Phosphate buffered saline, pH 7.4, liquid, sterile-filtered, suitable for cell cultureMerck MilliporeSigma (Sigma-Aldrich)Catalog #P4474
Hibernate™-E MediumThermo FisherCatalog #A1247601
SDS Tissue-Tek® Sakura FinetekCatalog #4583
UltraPure™ Low Melting Point AgaroseThermo FisherCatalog #16520050
MEM, no glutamine, no phenol redThermo FisherCatalog #51200038
Safety warnings
Follow the chemical safety, biosafety and waste disposal guidelines from your institution/country. This protocol involves the usage of hazardous volatile chemicals (formaldehyde), biohazardous genetically modified microorganisms (recombinant lentivirus), and sharps (vibratome, cryostat).
Non-tested human samples also comprise a risk of infection with human pathogens.
Ethics statement
Following, adapting or otherwise employing the protocol herein in conjunction with animal (including human) samples must be preceded by obtaining ethics approval by a competent body.
During the optimization of this protocol, as well as the final experiments from the study it pertains to, samples of human origin were used. Donor sources and corresponding ethical approval are as follows:
Fetal cortex samples
Human prenatal samples were collected from elective medical abortions at the Department of Gynecology, Danderyd Hospital and Karolinska Huddinge Hospital, Addenbrooke’s Hospital in Cambridge, and the Human Developmental Brain Resource following oral and written informed consent by the patient.
In Sweden, the use of abortion material was approved by the Swedish Ethical Review Authority and the National Board of Health and Welfare (DNR2020-02074).
In the UK, approval was obtained from the National Research Ethics Committee East of England, Cambridge Central, and from the North East – Newcastle & North Tyneside 1 Research Ethics Committee (Local Research Ethics Committee, 96/085; DNR2019-04595).
Glioblastoma samples
Human glioblastoma samples were collected from the Karolinska Hospital with informed consent from the patients and with ethical approval from the Swedish Ethical Review Authority (2020-03505). The use of samples was approved by the Swedish Ethical Review Authority (2020-02096).
Before start
Familiarize yourself with your institution and country's chemical safety, biosafety and waste disposal guidelines, as well as the risks posited by this protocol. We recommend drafting a risk assessment document and training all personnel accordingly.
Ensure that all the listed reagents/equipment are available to you and prepare the media/tools in advance, as acute sample collection might be rescheduled or delayed and you must proceed swiftly.
[BSL-1] Preparation
2h 30m
If a perforated spoon is not available and/or the preferred method for capturing vibratome slices, an alternative is to craft a suction tool as follows:
5m
Heat up a glass Pasteur/transfer pipette head atop a Bunsen burner until soft.
Safety information
Follow the safety guidelines for handling Bunsen burners: Do not wear flammable protective equipment, especially gloves; wear heat-resistant gloves, if possible; etc.
2m
Using a set of pliers, cut out the conical section; keep the cylindrical part. Alternatively, saw off the conical section before heating up the pipette head.
1m
Using flat pliers, squeeze the end of the cylinder until oblong. Afterwards, curve it upwards until the whole piece adopts a "hockey stick" shape.
1m
Attach a pipette bulb to the end of the contraption.
1m
Ensure that all necessary media are prepared beforehand, as per the steps below. Carry out the procedures under sterile conditions, i.e. within a class II biosafety cabinet.
Note
To minimise the amount of thawing steps that frozen reagents are subject to, we recommend aliquoting them upon arrival. Use suggested volumes in Table 1 and Table 3 accordingly.
35m
Make Tissue processing medium by thawing all frozen reagents On ice . Mix as per Table 1.
| Reagent | Stock | Final | Volume (for 250 mL) | |
| Anti-Anti | 100 X | 1 X | 2.5 mL | |
| GlutaMAX | 100 X | 1 X | 2.5 mL | |
| DMEM (high glucose, no glutamine) | 1 X | 242.5 mL | ||
| HEPES | 1 M | 10 mM | 2.5 mL |
Table 1. Tissue processing medium composition and suggested volumes.
15m
Make Tissue embedding medium by mixing Tissue processing medium and agarose (low melting point) as per Table 2.
| Reagent | Stock | Final | Volume (for 20 mL) | |
| Agarose (low melting point) | 100% | 1%-3% | 0.2-0.6 g | |
| Tissue processing medium | 1 X | 0.99-0.98 X | ~ 20 mL |
Table 2. Tissue embedding medium composition and suggested volumes.
Note
Final agarose percentage chosen varies depending on tissue consistency: Use 2 Mass Percent normally and 1 Mass Percent for very soft tissue samples.
5m
Make Slice washing medium by thawing all frozen reagentsOn ice . Mix as per Table 3.
| Reagent | Stock | Final | Volume (for 20 mL) | |
| Anti-anti | 100 X | 1 X | 200 uL | |
| GlutaMAX | 100 X | 1 X | 200 uL | |
| MEM (no glutamine, phenol red) | 1 X | - | 19.60 mL |
Table 3. Slice washing medium composition and suggested volumes.
5m
Make Slice maintenance medium by thawing all frozen reagents On ice . Mix as per Table 4.
| Reagent | Stock | Final | Volume (for 20 mL) | |
| Anti-anti | 100 X | 1 X | 200 uL | |
| GlutaMAX | 100 X | 1 X | 200 uL | |
| N2 supplement | 100 X | 1 X | 200 uL | |
| B27 supplement | 50 X | 1 X | 400 uL | |
| HEPES | 1 M | 10 mM | 200 uL | |
| MEM (no glutamine, phenol red) | 1 X | 12.54 mL | ||
| D-glucose | 33% | - | 260 uL | |
| HBSS (calcium, magnesium, no phenol red) | 5 mL | |||
| Human serum (heat inactivated, USA origin, sterile filtered) | 1 mL |
Table 4. Slice maintenance medium composition and suggested volumes.
15m
Irradiate stainless steel tools (scalpel, blade, etc.) and vibratome bay under a UV lamp for00:30:00 . Do so within a class II biosafety cabinet.
30m
If carbagen access is unavailable next to the vibratome, bubble Tissue processing medium with carbagen for 00:20:00 On ice .
20m
Prepare the working area for the initial sample processing:
5m
Equilibrate air flow in a class II biosafety cabinet habilitated for handling primary human tissue samples.
4m
Introduce a small styrofoam box filled with ice into the laminar flow hood.
1m
Pre-warm theTissue embedding medium by briefly microwaving it until liquid, then keep it at37 °C in a water bath close to the hood.
5m
[BSL-2] Cleaning and agarose embedding
1h 7m
Collect Embryonic cortex / GBM sample from the chosen source and keep in pre-chilled Hibernate-E medium during transfer.
Safety information
Ensure that the adequate guidelines are followed during tissue transfer, e.g. usage of a sealed tube within a closed styrofoam box labeled with biological hazard pictograms, protective gear, etc.
15m
Place the Embryonic cortex / GBM sample in a 5 cm-diameter Petri dish with carbonated ice-cold Tissue processing medium on the container
Wash the tissue twice with Tissue processing medium until no traces of blood are left.
2m
Use a scalpel and sterile forceps to remove necrotic areas and blood vessels from the sample. The remaining (viable) tissue should appear elastic and pink.
Safety information
If possible, wear puncture-resistant gloves under the single/double laboratory gloves throughout all steps involving sharp tools.
15m
Optionally, lyse remaining red blood cells as follows:
15m
Incubate the sample with 1X RBC lysis buffer for 00:10:00 atRoom temperature .
10m
Wash the sample twice withTissue processing medium .
2m
Pour 5-7 mL of pre-warmed Tissue embedding medium in a cryostat plastic embedding mould with an automatic pipettor. Do not introduce any bubbles.
1m
Chill the mould withTissue embedding medium On ice for00:01:00 . If it gelates completely, repeat from .
1m
Embed 2-3 tissue strips from :
1m
Use forceps to transfer the tissue strips to the mould.
To prevent the tissue strips from floating, sink them to the center and gently swirl them to elute theTissue processing medium sitting at the interface.
Ensure that the tissue stripes are aligned vertically and well spaced to facilitate vibratome sectioning.
Transfer the embedded tissue to the premises where the vibratome lies. Wrap the mould in parafilm or otherwise transport it within a sealed sterile bag.
5m
[BSL-2] Vibratome sectioning
1h 50m
Mount the agarose block containing the sample:
Assemble the vibratome bay and place a piece of sticky tape on the block platform.
1m
Cut open the agarose block and trim excess gelated Tissue embedding medium from all sides.
Safety information
Take all necessary precautions to avoid skin injuries during this step. Wear puncture/cut-resistant gloves, if possible, and firmly hold the block to prevent it slipping away.
1m
Glue the agarose block to the tape and let it dry for00:10:00 at Room temperature .
10m
In the meantime, set up the following:
5m
Fill the vibratome bay with pre-chilled carbonated Tissue processing medium . If a carbagen outlet is available nearby, keep on bubbling the medium.
Surround the vibratome bay with ice to cool down theTissue processing medium .
Add 500 µL of Tissue processing medium to every well in 1-2 12-well tissue/cell culture plate(s). Keep them in a styrofoam box filled with ice nearby.
1m
When the agarose block is fully adhered to the platform, fill the vibratome bay with Tissue processing medium until the block is fully covered.
1m
Section 300 um thick slices at a speed of 0.2 mm/s; adjust depending on stiffness.
1h 30m
Collect every slice with a perforated spatula or the suction tool ( ). Wiggle it or suck liquid in and out until the slice detaches from the agarose.
Temporarily store the slices in the 12-well tissue/cell culture plate(s) to the side ( ).
Upon completion, thoroughly disinfect the vibratome bay with 70% ethanol and proceed to the cell culture room. After the protocol's completion, sterilize the bay with UV before the next usage.
1m
[BSL-2] Culturing
2d 17h 22m
Pre-warm Slice maintenance medium to 37 °C in a water bath.
Wash slices twice for 00:10:00 atRoom temperature , once in Slice washing medium and another in pre-warmed Slice maintenance medium . Perform the washes in a rocker.
10m
Transfer lentivirus on dry ice and thaw slowly On ice before usage.
10m
Dilute lentivirus in Slice maintenance medium to a final titre of 4000000 Genome copies per ml for glioblastoma slices or 40000000 Genome copies per ml -70000000 Genome copies per ml for fetal cortex. Pipette up and down carefully.
Safety information
Take all necessary precautions when handling lentiviruses. We recommend double glove usage, as well as employing a class II biosafety cabinet connected to the building's ventilation system.
5m
For each well in the 12-well plate (one at a time), replace all medium with 500 µL of virus-spiked medium per well.
1m
IncubateOvernight in a hypoxic incubator.
16h
The following day, pre-warm Slice washing medium and Slice maintenance medium to 37 °C in a water bath.
Remove virus-spiked medium from each well and perform a quick rinse with1 mL of Slice washing medium .
1m
Wash twice with 1 mL of Slice washing medium for 00:10:00 atRoom temperature while rocking.
10m
Wash twice with 1 mL ofSlice maintenance medium diluted 1/10 in MEM while rocking.
20m
In the meantime, add 1 mL ofSlice maintenance medium to any desired number of wells in 6-well tissue/cell culture plates.
5m
Using sterile forceps, lower a PTFE-membrane insert into every well. Keep the plates in the incubator until all washes are completed, or proceed immediately if prepared afterwards.
Note
To minimize the risk of bubbles accumulating under the insert's membrane, tilt the plate while depositing the insert and do so slowly and at an angle, so that the medium seeps into the membrane sideways.
5m
Retrieve the plates and, for every insert, carefully deposit a single slice in the middle of it with a sterile perforated spoon or suction tool.
15m
Remove excess medium around the plated tissue until it looks dry. Avoid touching the slice.
Change Slice maintenance medium the day after plating, then every 48 hours.
Incubate for48:00:00 in a hypoxic incubator until fluorescent signal is apparent, then transfer to a newly equilibrated 6-well plate with glass bottom.
2d
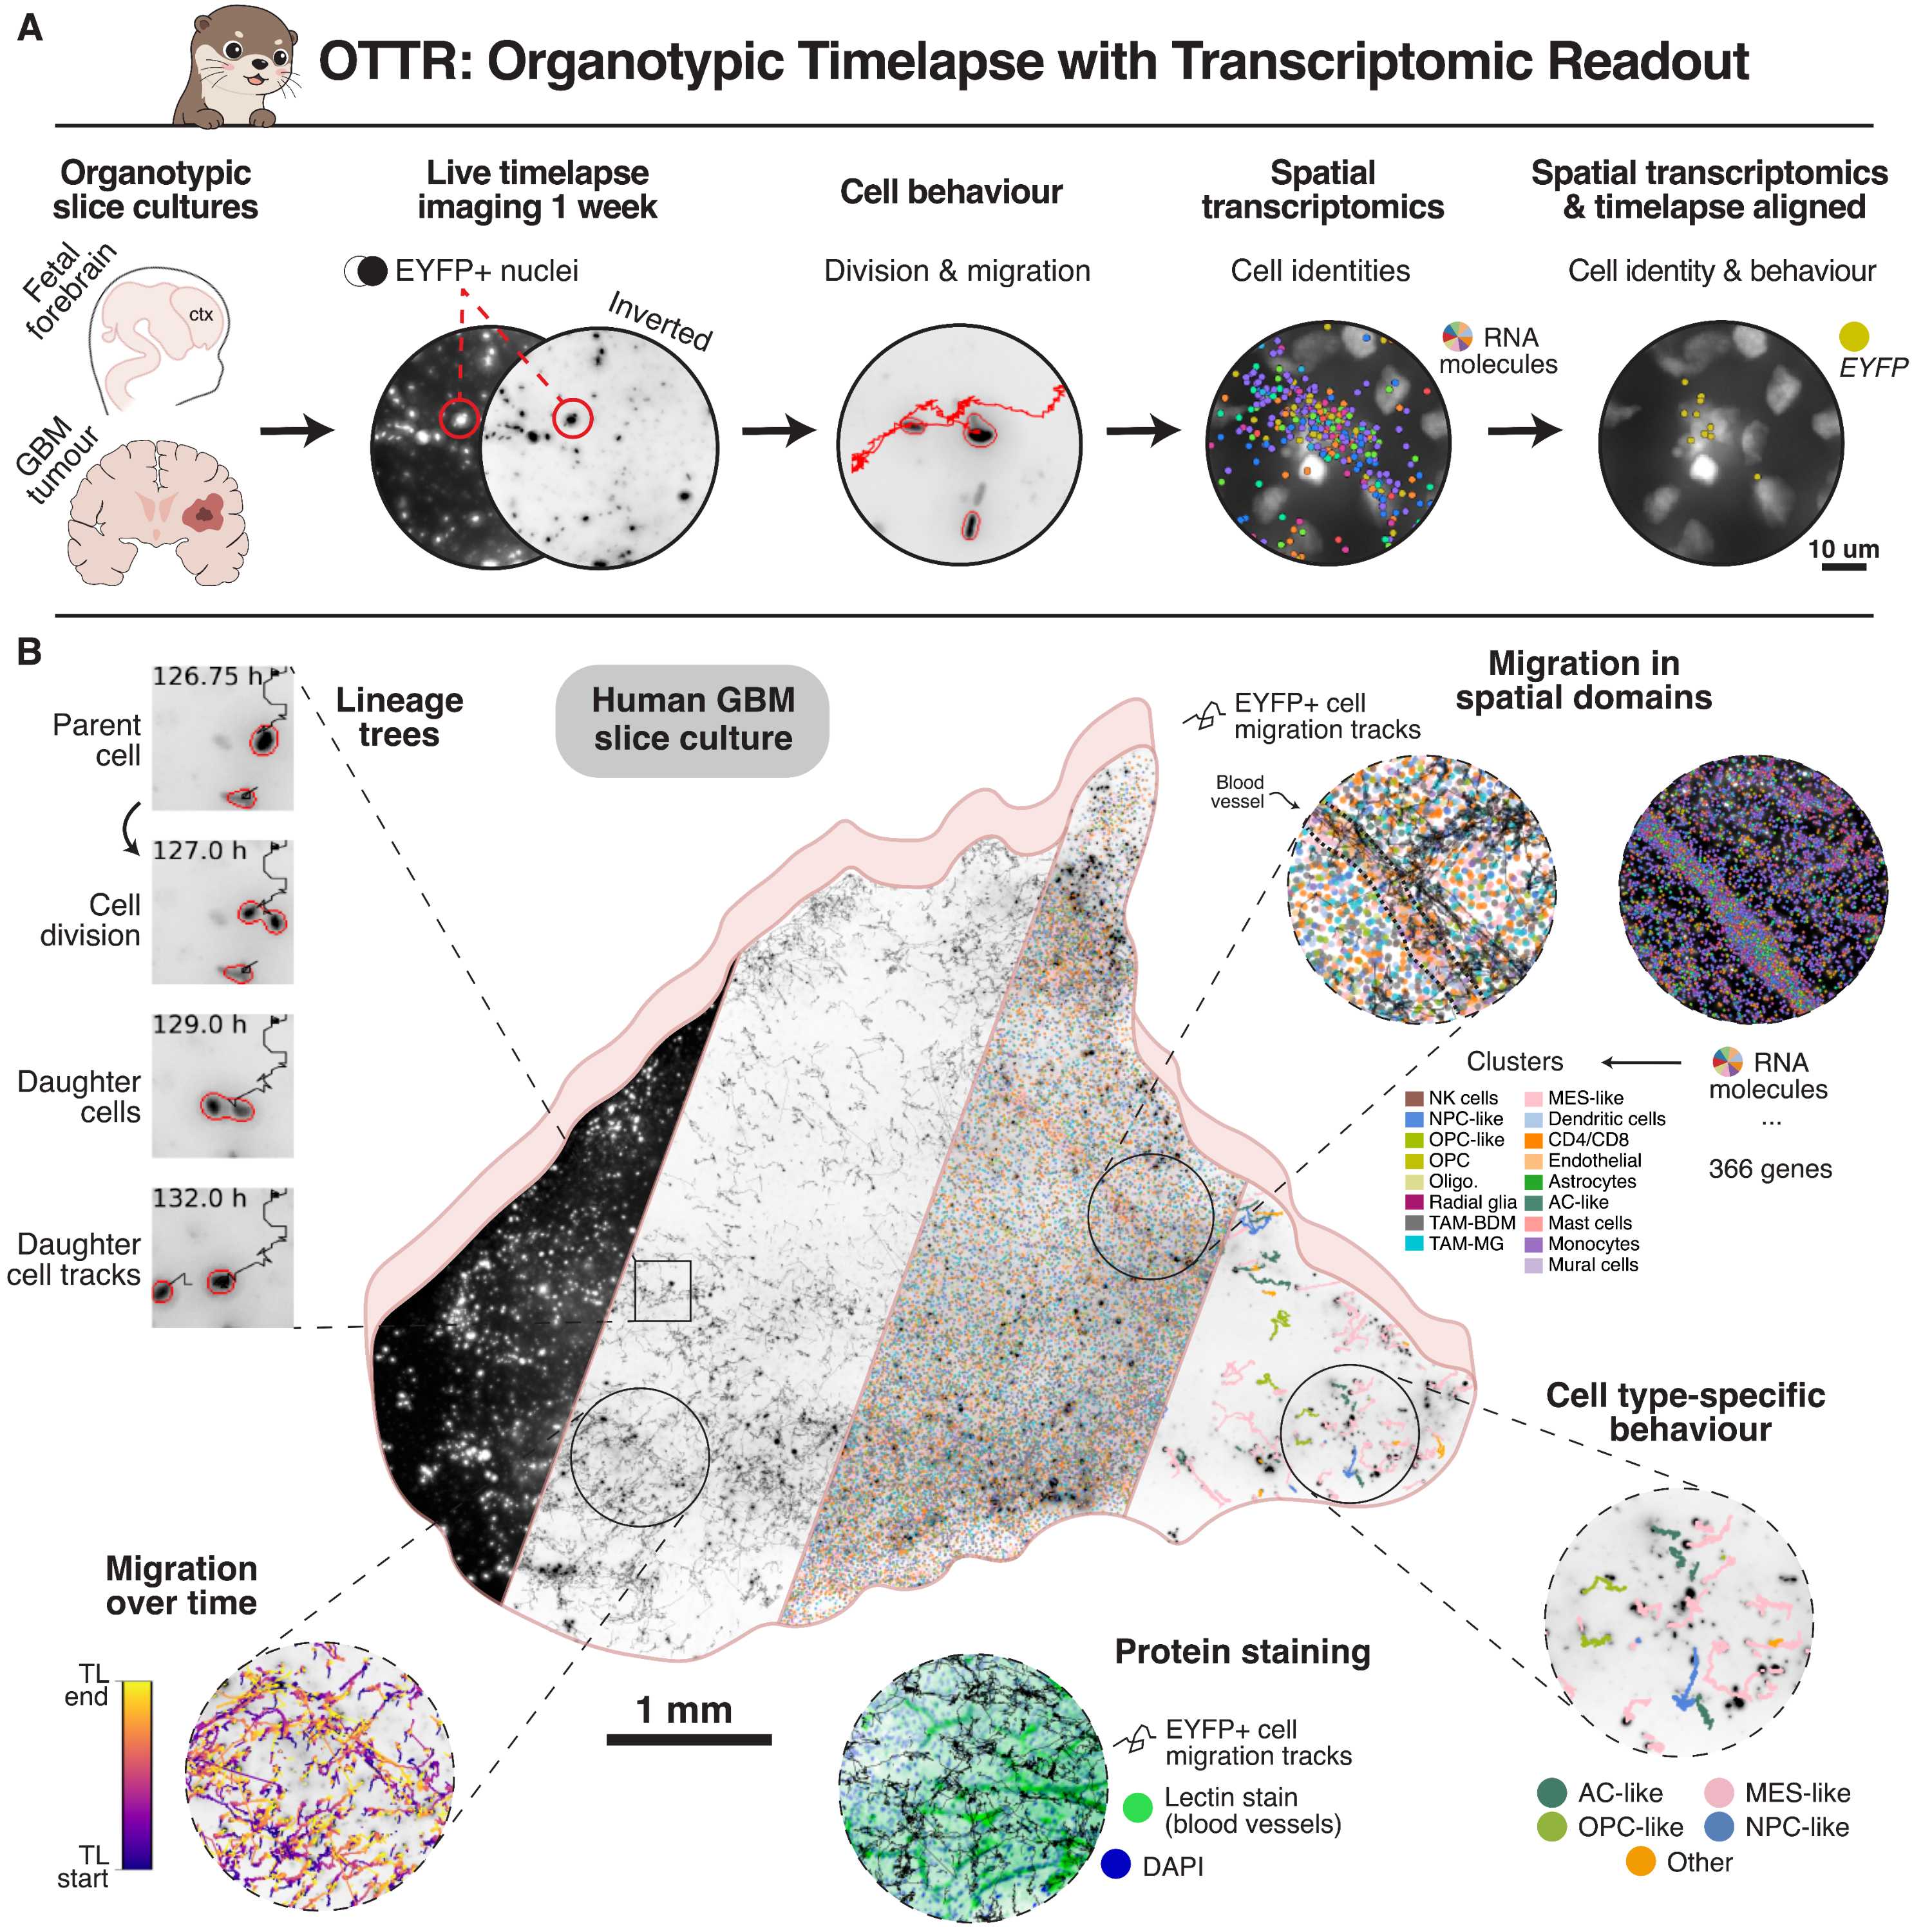
[BSL-2] Live imaging
1w
Assemble the glass bottom 6-well plate bearing a lentivirally transduced slice onto the microscope chamber and proceed with live imaging as per the detailed protocol in the article.
[BSL-2] Tissue fixation
45m
Fix the slices immediately after the timelapse imaging has been completed:
Safety information
Perform tissue fixation within a fume hood connected to the exhaust ventilation system, to prevent formaldehyde inhalation.
Briefly wash the slices with 1X PBS to remove leftover medium.
Note
To avoid tissue damage and disruption during washing, we recommend adding most of the solution below the culture insert membrane, with only minimal volume placed atop the membrane, in this and all subsequent steps of sample preparation for embedding.
5m
Fix the slices with 4% formaldehyde in 1X PBS for 00:15:00 at Room temperature .
15m
Wash the slices with 1X PBS at least five times for 00:05:00 each.
25m
[BSL-1] Tissue embedding
21h 12m
Cryoprotect the slices before freezing:
Incubate the slices with 15% sucrose in 1X PBS for at least 02:00:00 at 4 °C .
2h
Replace the 15% sucrose solution with 30% sucrose in 1X PBS and incubate Overnight at 4 °C .
16h
Embed the slices for cryosectioning, as per Figure 1:
Figure 1. Overview of the resection protocol, including: a) Sample embedding in 12% gelatin; b) gelatin cap preparation; c) stage trimming; and d) sample protection, re-embedding and assembly onto the stage.
Make Gelatin embedding medium by dissolving gelatin and sucrose in 1X PBS (Table 5).
| Reagent | Stock | Final | |
| Type A gelatin from porcine skin | 100% | 12% (w/v) | |
| Sucrose | 100% | 30% (w/v) | |
| PBS | 1X | 1X |
Table 5. Gelatin embedding medium.
Note
Heating the solution to >50°C will be required for the gelatin to melt and dissolve, after which the solution should be allowed to cool down slightly. We recommend using the embedding medium at ~37°C to ensure it solidifies quickly when applied in the subsequent steps.
1m
As a reference, the following images illustrate their corresponding substep with food dye-colored Gelatin embedding medium , including the tissue itself (Figure 1). Colors are merely indicative, and any implementation should use the media recipe of Table 4 with no modifications.
Figure 1. Red-colored gelatin simulating a fixed tissue slice cultured on an insert, immediately after retrieval and fixation.
Embed the slices (red, Figure 2) in Gelatin embedding medium . Incubating the submerged tissue slices for 00:30:00 at 37 °C improves tissue adhesion to gelatin, making downstream cryosectioning easier. Allow the gelatin to solidify for 00:30:00 at 4 °C .
Figure 2. Embedding of fixed tissue with gelatin.
1h
In the meantime, prepare a gelatin stage by applying Gelatin embedding medium to a cryostat specimen chuck. Allow the gelatin to solidify for 00:30:00 at 4 °C before freezing on dry ice (Figure 3).
Figure 3. Casting and freezing a gelatin stage.
Mount the chuck in the cryostat, mark its orientation for future reference, and cut to make a flat surface (Figure 4).
Figure 4. Left) Marking the orientation of the cryostat chuck for downstream alignment; Right) thawed stage after cryosectioning.
30m
Prepare a thin gelatin spacer by casting Gelatin embedding medium between two parallel flat surfaces (such as two microscope slides; Figure 5). Allow the gelatin to solidify for 00:30:00 at 4 °C . The purpose of the spacer is to act as a protective layer for the otherwise exposed tissue slice.
Figure 5. Pouring gelatin into an improvised microscope slide mould.
Cast the spacer (Figure 6) with the aid of an additional microscope slide.
Figure 6. Casting the gelatin spacer by pressing the ensemble with an additional slide.
Retrieve the solidified spacer (Figure 7) by detaching the top slide used for casting.
Figure 7. Disassembling the slide mould.
30m
Remove the membrane from the culturing insert by making shallow incisions (Figure 8) and peeling the membrane away (Figure 9). Proceed slowly to ensure the integrity of the lowermost layer of cells in the slice.
Figure 8. Cutting out a "window" of membrane surrounding the tissue with a scalpel.
Figure 9. Peeling away the membrane with tweezers.
Note
To reduce friction, and thereby the risk of damaging the tissue slices, we recommend applying 30% sucrose solution in 1X PBS when peeling the membrane or placing the tissue on gelatin in the subsequent steps. Excess solution can later be carefully removed with tissue paper.
5m
Excise the embedded tissue slices from the culturing insert (Figure 10).
Figure 10. Excising the tissue-bearing gelatin block with a scalpel.
1m
Place the embedded tissue slice on the gelatin spacer from , with the tissue facing the spacer. Apply a drop of sucrose solution beforehand at the interface and remove the excess with a paper tissue.
Figure 11. Stacking the tissue block onto the protective spacer and trimming the excess gelatin.
5m
Embed the tissue slice together with the spacer in Gelatin embedding medium between to parallel flat surfaces (such as two microscope slides; Figure 7). Allow the gelatin to solidify for 00:30:00 at 4 °C .
Figure 12. Re-embedding the tissue-spacer block within a taller slide mould.
30m
Place the re-embedded tissue slice ( ) onto the flat gelatin stage ( ), as per Figure 13. Apply a drop of sucrose solution at the interface beforehand and remove the excess liquids with a paper tissue.
Figure 13. Stacking the re-embedded ensemble onto the trimmed gelatin stage.
Apply Gelatin embedding medium to bind the re-embedded tissue sample with the stage (Figure 12). Allow the gelatin to solidify for 00:30:00 at 4 °C before freezing on dry ice.
Figure 14. Covering the re-embedded ensemble with gelatin to attach it to the stage.
30m
[BSL-1] Cryosectioning
2h 30m
Use the markings made in to find the correct orientation of the cryostat chuck, ensuring good sample alignment with the blade.
Allow the sample to equilibrate to the desired temperature. We recommend colder temperature settings to ensure smoother handling of cryosections, as gelatin will be stickier than O.C.T. (in our experience, temperatures of around -24 °C works best).
Note
For the same stickiness reason, we recommend not using anti-roll glass plates when cryosectioning, as sections may occasionally stick to them. We instead use a paint brush to guide the sections when cutting.
30m
Capture the section of desired thickness on a pre-warmed glass. We recommend using a hot plate to briefly warm-up the slides just before capturing the tissue for better adhesion.
Note
While pre-warming is not strictly necessary, we have found that using warm slides makes the section handling easier without any noticeable trade-offs in RNA quality, tissue integrity, etc.
2h
Acknowledgements
- Razieh Karamzadeh: Designing the reporter lentivirus.
- Wei Li: Aiding in the photographic documentation of this protocol.
And all donors, agencies and individuals otherwise involved in the production of the study this protocol is part of.