May 07, 2026
Version 4
Nuclei Prep from Frozen Mouse Brain Tissues with Optional Debris Removals Methods for single nuclei RNA-seq V.4
Version 1 is forked from Nuclei Prep from Frozen Mouse Brain Tissues with Optional Sucrose Column for single nuclei RNA-seq
- Greggory A Perry1,
- Paul Gabriel1,
- Diane Luo1,
- Jessica Grassmann1,
- William F Flynn1,
- Elise T Courtois1,
- Paul Robson2,
- Sandra L Daigle2
- 1Single Cell Biology Lab, The Jackson Laboratory, USA;
- 2The Jackson Laboratory for Genomic Medicine
- JAX Single Cell BiologyTech. support email: [email protected]


External link: https://www.jax.org/
Protocol Citation: Greggory A Perry, Paul Gabriel, Diane Luo, Jessica Grassmann, William F Flynn, Elise T Courtois, Paul Robson, Sandra L Daigle 2026. Nuclei Prep from Frozen Mouse Brain Tissues with Optional Debris Removals Methods for single nuclei RNA-seq. protocols.io https://dx.doi.org/10.17504/protocols.io.8epv5ypp6l1b/v4Version created by Greggory A A Perry
Manuscript citation:
Greggory A Perry, Sandra L Daigle, Paul Gabriel,
Diane Luo, Jessica Grassman, William F Flynn,
Elise T Courtois, Paul Robson, Nuclei Prep from Frozen Mouse Brain Tissues with Optional Sucrose Column for single nuclei RNA-seq, 2022, dx.doi.org/10.17504/protocols.io.81wgb657ylpk/v1
License: This is an open access protocol distributed under the terms of the Creative Commons Attribution License, which permits unrestricted use, distribution, and reproduction in any medium, provided the original author and source are credited
Protocol status: Working
We use this protocol and it's working
Created: May 07, 2026
Last Modified: May 07, 2026
Protocol Integer ID: 316462
Keywords: nuclei, frozen, brain, single nuclei RNAseq, 10x genomics, luna, Syto Select RNA, hoechst, nuclei prep from frozen mouse brain tissue, frozen mouse brain tissue, downstream snrnaseq ht assay, optional sucrose column for single nuclei rna, snrnaseq st assay, assays from human glioblastoma, frozen mouse prefrontal cortex, single nuclei rna, nuclei prep, ht assay, human glioblastoma, rna, frozen mouse, single nuclei, old mice on different diet, frozen tissue, striatum tissue, optional debris removals methods for single nuclei rna, 10x genomic
Disclaimer
This protocol has only been tested on a limited number of tissues which includes human and mouse brain frozen tissue. Before using this protocol in production on your tissue of interest, run a pilot experiment to determine optimal dissociation of your tissue.
Abstract
This SOP aims to extract nuclei from unfixed snap-frozen mouse prefrontal cortex, hippocampus, and Striatum tissues (~3-15mg). It was optimized and tested on mice ranging in age groups from 3, 6, 14, and 15-month-old mice on different diets, including high-fat (45%) and regular chow (6%). Other differences included sex, strain, and genotype. These preps resulted in a minimum of debris for downstream snRNAseq HT assays on the 10X Genomics chromium X controller (HT, High Throughput chips).
This protocol was also used to perform snRNAseq assays from human glioblastoma snap frozen tissues. Follow BSL-2 guidelines when working with human tissues. These preps resulted in a minimum of debris for downstream snRNAseq ST assays on the 10X Genomics chromium X controller (ST, Standard Throughput chips).
This protocol enables to process up to 8 samples simultaneously.
Guidelines
A. Use wide-bore pipette tips to avoid damage when handling tissue or nuclei, and pipette slowly.
B. Keep tissue on dry ice until ready to start gentleMACS.
C. Miltenyi gentleMACS Recommendations.
Tissue 1-4 mg - 4C_nuclei_1
Tissue 5-7 mg - cus_4C_nuclei_5
Tissue 7-15 mg - cus_4C_nuclei_10
The "cus" protocols are custom SOP from Miltenyi. It adds 5 or 10 minutes of mixing at 20 RPM after the Miltenyi 5-minute disassociation SOP 4C_nuclei.
* Optimization may be needed depending on tissue type, size, and condition. Not all tissues will need a longer lysis time regardless of size. Please feel free to reach out and ask us about your tissue type. We may have some insight that could save you time.
D. We have found that the Miltenyi Anti-Nucleus beads not only provide a cleaner final suspension, but also maximize the targeted nuclei by eliminating "Viable" cells from the suspension. Our data also show that this greatly improves sequencing data quality. This method is recommended.
D. "To sucrose" or "not to sucrose".
If the initial sample size is < 5 mg, it is recommended to wash nuclei without using a sucrose gradient (Step 3). If the initial sample size is > 5 mg, it is recommended to purify nuclei using a sucrose gradient (Step 2).
E. Sucrose column recommendations.
After the sucrose cleanup, a tissue less than 3-5 mg may have a very low nuclei yield. It is recommended to test this first on a representative sample to avoid losing precious samples.
Hoechst/Syto RNA Select Staining Guidelines
1. Extracellular debris should be minimal after the nuclei have been passed through the sucrose column.
2. Extracellular debris will be present in a much greater quantity if a sucrose column is not used. Debris can interfere with downstream 10x operations by introducing clogs and background ambient RNA.
3. Nuclei should be intact, with minimal blebbing and clumping. Nuclei blebbing will make them more prone to clumping, which can cause clogs during loading of the 10x chip.
4. The Hoechst and Syto Select staining should be uniform throughout the nuclei, but the Syto staining usually has more variation.
If working with human tissue, follow all institutional rules and guidelines.
Materials
Nuclei isolation with Miltenyi Anti-Nucleus Bead Clean-up
Miltenyi Nuclei Extraction Buffer: 130-128-024 (Miltenyi)
Miltenyi C Tubes: 130-093-237 (Miltenyi)
Miltenyi LS Column – 130-042-401 (Miltenyi)
MACS BSA Stock Solution: 130-091-376 (Miltenyi)
QuadroMACS Separator: 130-090-976 (Miltenyi)
MultiStand: 130-042-303 (Miltenyi)
Fisher Scientific DPBS: 14190144 (Thermo Fisher Scientific)
Millipore Sigma ROCHE Protector RNase Inhibitor: 3335399001 (Millipore)
Thomas Scientific Eppendorf™ DNA LoBind1.5 mL Microcentrifuge Tubes: 13-698-791 (Thomas Scientific)
Fisher Scientific Lobind Eppendorf 2.0mL tubes: 13-698-792 (Thermo Fisher Scientific)
pluriSelect -BOApluriStrainer Mini 100 µm: 43-10100-50 (pluriSelect)
pluriSelect -BOApluriStrainer Mini 40 µm: 43-10040-50 (pluriSelect)
Nuclei isolation with Sucrose or no Cleanup
Miltenyi Nuclei Extraction Buffer: 130-128-024 (Miltenyi)
Miltenyi C Tubes: 130-093-237 (Miltenyi)
MACS BSA Stock Solution: 130-091-376 (Miltenyi)
Fisher Scientific DPBS: 14190144 (Thermo Fisher Scientific)
Millipore Sigma ROCHE Protector RNase Inhibitor: 3335399001 (Millipore)
Thomas Scientific Eppendorf™ DNA LoBind1.5 mL Microcentrifuge Tubes: 13-698-791 (Thomas Scientific)
Fisher Scientific Lobind Eppendorf 2.0mL tubes: 13-698-792 (Thermo Fisher Scientific)
pluriSelect -BOApluriStrainer Mini 100 µm: 43-10100-50 (pluriSelect)
pluriSelect -BOApluriStrainer Mini 40 µm: 43-10040-50 (pluriSelect)
Cell Counting
Acridine, Orange/Propidium Iodide Stain: F23001(New England BioGroup, LLC)
Luna Slides:
Ultra-low Fluorescent Slides: Fluorescent and Brightfield Mode - Choose appropriate size)(New England BioGroup, LLC)
Countess II FL Slides:
Countess™ Cell Counting Chamber Slides: C10312(Thermo Fisher Scientific)
Cellometer K2 Slides:
Cellometer SD100 Counting Chamber (Nexcelom Bioscience)
Staining
PBS: 14190-144(Gibco)
BSA: 130-091-376 (Miltenyi)
Syto RNAselect stain: S32703 (Fisher)
Invitrogen Hoechst 33342, Trih: H3570 (Thermo Fisher Scientific)
Safety warnings
The Miltenyi gentleMACS should equilibrate at 4°C for 24 hours before use (cold room or glass-door fridge) and should not be used for 24 hours after being moved back to room temperature (it can remain at 4°C). Miltenyi also offers cooling sleeves, which we now use.
Ethics statement
Users are responsible for ensuring that all activities align with their local IACUC and IRB approvals and ethical safety standards before beginning, following this protocol.
Before start
A. Pre-cool centrifuge, buffers, and consumables with sample contact (e.g., gentleMACS C Tube and Strainers) at 4 °C.
B. Per extraction, add 0.2U/ul RNase inhibitor to one 1.6 ml aliquot of Miltenyi Nuclei Extraction Buffer (8µl of 40U/uL RNase inhibitor) and keep on ice.
C. Per extraction, add 1 mM DTT to one 750 µl aliquot of Sucrose Solution (0.58µl 1.3M DTT) in a 2 ml tube and keep on ice.
D. Per extraction, prepare an appropriate volume of Nuclei Suspension Buffer per sample.
Procedure- gentleMAC
Miltenyi gentleMACS Procedure for Tissue Lysis and nuclei extraction
Please see the Guidelines & Warnings section before beginning. This protocol was optimized to process up to 8 samples simultaneously. Some practice is required to process 8 samples at once. Work fast but cautiously.
Add 1250 µL ice-cold Nuclei Extraction Buffer On ice to each pre-cooled gentleMACS C Tube.
Transfer frozen tissue piece(s) into the gentleMACS C Tube containing lysis buffer and directly proceed with the following steps until samples are dissociated.
Note: Do not let frozen samples thaw before dissociation, as endogenous RNase might degrade RNA.
Close gentleMACS C Tube and place it on the gentleMACS Dissociator.
Be sure the cap is closed completely.
Equipment
gentleMACS
NAME
gentleMACS™ Octo Dissociator with Heaters
TYPE
Miltenyi Biotec
BRAND
130-096-427
SKU
LINK
Run gentleMACS Program based on tissue size on the gentleMACS Dissociator at 4 °C .
See note C under Guidelines & Warnings.
A quick spin in a swinging bucket at 500 x g, 4°C for 10-15 sec may be necessary.
Pipette mix with wide bore tip and filter through pre-wet 70µm or 100µm filter into a cold 2mL tube.
- Pre-wet filter with Nuclei Extraction Buffer.
- Add 250 µL Nuclei Extraction Buffer to rinse the filter.
- Spin in a benchtop centrifuge for 5-10 seconds to remove foam if necessary.
Spin down nuclei, 500 x g, 4°C, 00:05:00 in a swinging bucket.
5m
Remove supernatant and resuspend nuclei in 500 µL Nuclei Suspension Buffer
If the pellet is loose, leave 50 µL Nuclei Extraction Buffer in the tube.
See the Guidelines & Warning section D to decide to proceed to step 2 (Miltenyi Anti-Nucleus Bead Clean Up), step 3 (sucrose column), or step 4 (no sucrose column) next before proceeding to this step.
Miltenyi Anti-Nucleus Bead Clean up
10m
Debris removal from nuclei with Miltenyi Anti-Nucleus Beads
Centrifuge
- Spin down the nuclei in lysis buffer in a swinging bucket rotor 500 x g, 4°C, 00:05:00
- Remove the supernatant, resuspend in 450 µL Nuclei Separation Buffer
- Mix with a wide-bore pipette 15-20 times, and pass nuclei through a pre-wetted 40 µm Filter into a new 2 mL tube.
5m
Count Nuclei using a stain to determine the number and viability.
- Diluting the nuclei 1:1 for this count can lead to a more accurate count, i.e., 4.5µL lysate, 4.5µL Nuclei Separation Buffer, 1µL AOPI (total 9µL)
- When using this clean-up method, it is not critical that viability be below 5% at this step; in fact, it can improve the integrity of the nuclei for downstream processes if it is between 15-30%, ensuring the nuclei are not overlysed.
Miltenyi Anti-Nucleus Microbead Incubation
- Distribute 106 nuclei from each sample into separate 5 mL tubes. Adjust the volume of each tube to 450 µL Nuclei Separation Buffer with RNase Inhibitor if the total volume in the tube is below 450 µL
- Add 50 µL Miltenyi Anti-Nucleus Microbeads per 106 nuclei; mix by vortexing at speed 3 for 5 seconds.
- Incubate at 4°C (not on ice) for 15 minutes. Start a timer. Do not exceed 15 minutes; non-specific binding to debris may occur.
- You can take the % viable into account and add more than 10^6, depending on the viability. i.e., If the viability is 30%, you can add 1.3 million nuclei instead of 1 million if the number of nuclei to be returned is critical.
LS Column Loading and washing
- Place Miltenyi LS columns on the magnetic stand with 15 mL tubes underneath to catch waste.
- When the timer has 3 minutes left, add 3 mL Nuclei Separation Buffer without RNase Inhibitor to each LS column. Using NSB without RNase inhibitor in this step is optional; it can save on reagents.
- Remove samples from 4 °C and add an additional 2 mL Nuclei Separation Buffer with RNase Inhibitor and mix by vortexing at speed 3 for 5 seconds.
- Add the samples to the labeled LS columns.
- Wash the LS column 2-3X with 1 mL Nuclei Separation Buffer with RNase Inhibitor. Rinse the sidewalls to ensure all nuclei are washed to the magnet.
- Remove the LS Column from the magnet and place it in the collection rack with a 2 mL tube nested inside a5 mL or15 mL tube (We had a special rack 3D-printed to fit 2 mL tubes).
- Elute the column with 1 mL Nuclei Separation Buffer with RNase Inhibitor directly in the center of the column to avoid washing debris from the sides through the column.
- Count Nuclei using a stain to determine the number and viability. The Viability should be zero or very close to zero.
Final Suspension
- Use the previous count to estimate the volume of suspension buffer needed depending on your downstream needs.
- Centrifuge at500 x g, 00:05:00 at 4 °C .
- Remove Supernatant, leaving behind up to30 µL to avoid loss, and add the appropriate volume of Nuclei Suspension Buffer.
- Mix 15-20 times with a wide-bore pipette and pass through a pre-wet 40 µm Filter
- Count Nuclei using a stain to determine the number and viability.
5m
Sucrose Column
Debris removal from nuclei with Sucrose Column Purification
In a 2mL microcentrifuge tube with 750 µL Sucrose Buffer , layer 500 µL Sample on top, forming two layers.
Spindown, 16000 x g, 4°C, 00:15:00 in a fixed angle rotor.
15m
After centrifugation, purified nuclei should be visible as a pellet on the bottom of the tube, and white matter/debris should float midway in the 2 ml tube.
Carefully pour off and blot the tube or aspirate the debris with the supernatant. Remove as much supernatant as possible without disturbing the nuclei pellet.
Resuspend the nuclei pellet in 50-150µl Nuclei Suspension Buffer and let sit on ice without pipetting for 3-5 minutes to loosen the pellet.
Pre-wet 40μm filter with Nuclei Suspension Buffer.
Gently pipette mix 10-15x with wide bore tip and filter through pre-wet 40μm filter into new cold 1.5mL tube.
Be careful not to wash down sucrose waste from the tube walls.
Proceed to Step 4 and 5.
Wash without Sucrose Column
Debris removal from nuclei without the use of a sucrose column
Add 500 µL Nuclei Suspension Buffer and gently pipet mix 5-10x using wide bore tip to suspend nuclei.
Centrifuge in a swinging bucket 350 x g, 4°C, 00:05:00 .
5m
Remove supernatant, being careful not to disturb the nuclei pellet.
Repeat Steps 3.1 - 3.3 for a total of 2 washes.
Resuspend the nuclei pellet in 50-150µl Nuclei Suspension Buffer and let sit on ice without pipetting for 3-5 minutes to loosen the pellet.
Pre-wet 40μm filter with Nuclei Suspension Buffer.
Gently pipette mix 10-15x with wide bore tip and filter through a pre-wet 40μm filter into new cold 1.5mL tube.
Proceed to step 4 and 5.
Nuclei counting
Nuclei counting with Trypan Blue / AOPI stain
Obtain nuclei in suspension buffer from steps 2 or 3.
Proceed to Step 4.1 if using Luna FX7 cell counter and AOPI stain to count nuclei.
Proceed to Step 4.2 if using Countess FL II cell counter and Trypan Blue stain to count nuclei.
Proceed to Step 4.3 if using Nexcelom Cellometer K2 and AOPI stain to count nuclei.
Note: Trypan Blue staining is useful to visualize debris and nuclei qualitatively. The counts using Trypan include both nuclei and debris. AOPI is used to count only nuclei. By comparing Trypan and AOPI counts, one can quantitatively asses the amount of debris present in samples preps.
Nuclei counting with LunaFX7
A. Add 1uL AOPI stain and 9uL suspended nuclei to a .5 ml microcentrifuge tube or PCR strip tube and mix gently by pipetting 5x.
Examples:
1ul AOPI/9ul sample
1ul AOPI/4.5ul sample/4.5 ul suspension buffer
B. Turn on Luna FX7 cell counter.
Select "fluorescence cell counting" and "cell lines & primary cells" with the touch screen menu.
C. Select the settings tab and choose the correct slide and wells being counted.
D. Load preferred protocol for fluorescence cell counting.
E. Load preferred protocol for fluorescence cell counting.
F. Select Count, insert the slide into the LunaFX7, and pre Count on the right-hand menu.
G. Record desired data after Count is finished using the save and print command, which allows renaming of the sample, or use quick save, which auto-generated a name.
H. Below is an example of Luna FX7 images.
Left image shows "dead" cells or nuclei (red, nuclei stained with PI).Right image shows the brightfield for the same field.
Nuclei counting with Countess FL II
A. Add 6 uL Trypan Blue stain 0.4% and 6 uL nuclei suspension to 0.2 mL PCR strip tube. Mix gently by pipetting 5-10x.
B. Load 10 uL into Countess cell counting chamber slide.
C. Visually assess nuclei sample in slide using bench top microscope, 20x magnification. Note debris present, if any, and overall nuclei shape/integrity.
D. Load slide into Countess FL II. Adjust brightness and focus if necessary. Click "Count".
E. Once counting has been completed, record nuclei concentration, viability, and size. Save data with correct date and sample name.
F. Below is an example of Countess FL II readout showing "dead" cells, or nuclei.
Nuclei counting with Nexcelom Cellometer K2
A. Add 11 uL AOPI stain and 11 uL nuclei suspension to 0.2 mL PCR strip tube. Mix gently by pipetting 5-10x.
B. Load 20 uL into Cellometer SD100 slide.
C. Record nuclei concentration, viability, and size.
Nuclei quality QC: Hoechst and SYTO RNASelect staining of nuclei
Hoechst and SYTO RNASelect staining of nuclei
Keep all stains and dilutions on ice in the dark 4 °C .
Choose 5.1 for Leica DM4 B or 5.2 for PerkinElmer Opera Phenix.
Nuclei QC with Leica DM4 B
Imaging:
Microscope - Leica DM4 B
Camera - Leica DCF7000 GT
Exposure time:
Hoechst - 45 ms, gain 5.5
SYTO RNASelect - 800 ms, gain 3.4
Brightfield - 30 ms, gain 8.8
Magnification - 40X
- The exposure time and gain may need to be adjusted depending on the microscope used.
A. Make a 1:80 dilution of Hoechst stain (1ul into 79ul PBS)
B. Make a 1:500 dilution of SYTO RNASelect stain (1ul into 499ul PBS)
C. Mix well and aliquot 18ul of nuclei suspension into a new microcentrifuge tube. Dilute if needed at this point, but the total volume should be 18ul.
D. Add 1ul 1:80 Hoechst stain and 1ul 1:500 SYTO RNASelect stain to 18ul suspended nuclei and mix gently 5x pipetting. Immediately place the mixture in a light-blocking box and place it at 4°C, 00:20:00 .
Expected results of nuclei put through a sucrose column are shown below.
See guidelines for further details.
0- Hoechst Stain
1- SYTO RNASelect Stain
2- Brightfield
merged - an overlay of all images
20m
Nuclei QC with Opera Phenix confocal microscope with 40x water objective.
A. Dilute SYTO RNASelect stain 1:1000 and dilute Hoechst 1:100 in DPBS. Keep dye dilutions on ice and protected from light.
B. Place a 384-well plate (PerkinElmer CellCarrier Ultra) on ice.
C. Add 20 uL of nuclei suspension to a 0.2 mL strip tube.
D. Add 1 uL each of diluted SYTO RNASelect and Hoechst stains into tube containing nuclei suspension. Pipet mix 5-10x.
E. Transfer contents of strip tube into 384-well plate. Incubate 384-well plate at 4°C, 00:20:00 protected from light.
F. Image 384-well plate using the following parameters, ensuring that no channels are over/underexposed:
Plate Type: 384 PerkinElmer CellCarrier Ultra
Autofocus: Two Peak (Default)
Objective: 40x Water, NA 1.1
Opt. Mode: Confocal
Binning: 2
Channel Selection:
Brightfield
Exposure Time = 200 ms
Power = 100%
SYTO RNA Select
Exposure Time = 100 ms
Power = 50%
HOECHST 33342
Exposure Time = 100 ms
Power = 50%
Layout Selection (Well)
Number of Fields = 49
Overlap = 5%
Layout Selection (Stack)
First Plate = -1.0 um
Number of Planes = 6
Distance = 3.0 um
Last Plane = 14.0 um
Overall Height = 15.0 um
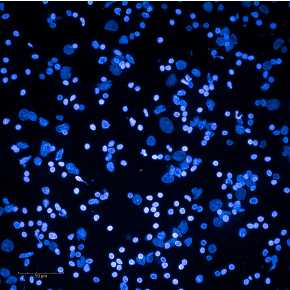
G. Example nuclei QC images are below.
Brightfield + Hoechst + SYTO RNASelect
Hoechst + SYTO RNASelect
SYTO RNASelect
Hoechst
20m
Loading nuclei on 10x Genomics chip
10x Genomics downstream applications
Follow 10x recommendations for your specific needs.
For a 10x standard chip (ST) and High Throughput (HT) chip, calculate the number of nuclei that needs to be loaded for each channel, and according to the experimental design.
Loading examples:
ST - Targeting 6,000 nuclei
- load 12,000 to recover 12,000 taking into account a 50% capture rate.
HT - Targeting 20,000 nuclei
- load 33,300 to recover 20,000 taking into account a 60% capture rate.