May 05, 2025
Version 2
Nanoparticle Tracking Analysis (NTA) Using NanoSight LM10 V.2
- Pedro Fonseca1,2,3,4
- 1INESC-MN;
- 2Instituto Superior Técnico, Universidade de Lisboa;
- 3Unidade Militar Laboratorial de Defesa Biológica e Química, Exército Português;
- 4Instituto Nacional de Saúde Doutor Ricardo Jorge, I.P.
- Advanced Integrated Microsystems Doctoral Program


Protocol Citation: Pedro Fonseca 2025. Nanoparticle Tracking Analysis (NTA) Using NanoSight LM10. protocols.io https://dx.doi.org/10.17504/protocols.io.bp2l636nzlqe/v2Version created by Pedro Fonseca
License: This is an open access protocol distributed under the terms of the Creative Commons Attribution License, which permits unrestricted use, distribution, and reproduction in any medium, provided the original author and source are credited
Protocol status: Working
We use this protocol and it's working
Created: May 05, 2025
Last Modified: May 05, 2025
Protocol Integer ID: 217737
Keywords: Nanoparticle Tracking Analysis, NanoSight LM10, NTA, Particle Size Distribution, Nanoparticles, Laser Microscopy, nanoparticle tracking analysis, nanosight lm10 device for nanoparticle, using nanosight lm10, nanosight lm10 device, analyzing nanoparticle, nanosight lm10 this protocol, nanoparticle, tracking analysis, concentration measurement
Disclaimer
DISCLAIMER – FOR INFORMATIONAL PURPOSES ONLY; USE AT YOUR OWN RISK
The protocol content here is for informational purposes only and does not constitute legal, medical, clinical, or safety advice, or otherwise; content added to protocols.io is not peer reviewed and may not have undergone a formal approval of any kind. Information presented in this protocol should not substitute for independent professional judgment, advice, diagnosis, or treatment. Any action you take or refrain from taking using or relying upon the information presented here is strictly at your own risk. You agree that neither the Company nor any of the authors, contributors, administrators, or anyone else associated with protocols.io, can be held responsible for your use of the information contained in or linked to this protocol or any of our Sites/Apps and Services.
Abstract
This protocol describes a step-by-step method for preparing, loading, and analyzing nanoparticle-containing samples using the NanoSight LM10 device for nanoparticle tracking analysis (NTA). Emphasis is placed on safe device assembly, optimized sample preparation, and correct software settings to ensure reliable size distribution and concentration measurements. Proper handling techniques to prevent instrument damage and achieve high-quality imaging are also detailed.
Guidelines
- Use aqueous solvents compatible with the standard LM10 configuration. For non-aqueous media, contact the manufacturer.
- Avoid bubbles by de-gassing samples when necessary to maintain imaging quality.
- Remove large aggregates (>10 µm) via centrifugation or filtration to prevent clogs and light scatter interference.
- Dilute samples to a particle concentration of 108–109 particles/mL for optimal visualization.
- Observe around 10–100 particles in the field of view for accurate measurement.
Safety warnings
- Device Integrity: Ensure the 'O'-ring is properly sealed before sample injection. Leakage can result in irreparable damage to the laser.
- Pressure Control: Inject samples slowly to avoid pressure build-up that could bypass seals or damage the optical window.
- Microscope Safety: Exercise caution when adjusting the microscope stage to avoid contact between the objective and the LM10 window.
Before start
- Turn off and unplug the NanoSight LM10 before cleaning or assembling.
- Prepare all reagents and ensure syringes and beakers are clean and particle-free.
- Degas samples when applicable.
- Verify that all software (NTA 2.1) is installed and functioning on the connected computer.
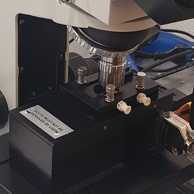
Assembling the LM10 Viewing Unit
Remove visible dirt/dust from the viewing unit. Clean the 'O'-ring and its channel.
Clean the top plate and embedded glass with DI water and dust-free wipes. Dry with compressed air.
Place 'O'-ring properly in the channel.
Align top plate gently over the embedded glass.
Insert four screws and tighten alternately in diagonal pairs. Avoid overtightening.
Reattach the power lead.
Sample Injection
Ensure laser is OFF. Place unit on microscope stage.
Position a beaker under the right Luer fitting.
Fill 5-10 mL syringe with sample solvent; push a drop out to avoid bubbles.
Insert syringe into the left Luer fitting and flush chamber (holds ~0.5 mL). Check for leaks.
Fill new 1 mL syringe with the nanoparticle sample.
Inject sample slowly until drops exit right Luer fitting.
Remove bubbles by withdrawing/re-injecting slowly if needed.
Rinse chamber with DI water or solvent before new samples.
Microscope Adjustment
Turn on computer and launch NTA 2.1 software.
Turn on the laser using the switch on the laser module.
Turn on the microscope using the switch on the left side of the microscope stand.
In the "Capture" tab of the NTA 2.1 software, on the top left area of the screen, press "Start camera".
Push upper left lever to divert view to oculars.
Adjust stage position and microscope height to focus particles.
Use alignment stickers for coarse positioning; adjust x/y knobs for fine focus.
Locate the imaging zone just downstream from the flare spot.
Image Viewing and Capture
Pull out left lever to switch view to the camera.
Adjust "Camera level".
Note: Camera level controls image brightness via shutter speed and gain. The shutter sets how long light is collected; dim particles (e.g., small or low refractive index) require longer shutter times. Gain boosts camera sensitivity to detect faint particles. When analyzing unfamiliar samples, briefly set gain to maximum to check for small particles, then lower it to the minimum needed to keep them visible. Recommended camera level: 10–13.
Under the "Standard measurements" tab, on the bottom of the screen, set: Number of captures = 5; Capture duration = 60s.
Note: Capture Duration sets video length and affects the number of particles analyzed, influencing the accuracy of the particle size distribution. Duration depends on particle size and concentration. Choose a duration that yields reproducible results. For monodisperse samples with >50–100 particles/frame (>10⁹ particles/mL), 10 seconds may suffice. Generally, 30–90 seconds is adequate for properly diluted samples (10⁸–10⁹ particles/mL). For low concentrations (<10 particles in view), use up to 215 seconds. Keep in mind that longer videos produce large files (≈300 MB per 10 s).
Click "Create and run script"; enter your ID in "Operator name" and the sample name in "Sample Description" and press "OK". Video capture will start. Add more sample when prompted.
Note: When introducing more sample, make sure no more than 3 or 4 drops fall from the Luer fitting on the right side of the top plate of the device.
Analysis and Export
Locate the "Process" tab on the top left of the screen. Adjust "Screen Gain" (set to 10.0) and "Detection Threshold" (set to 7) under the "Process" tab. Press OK.
Note: Screen Gain adjusts only on-screen brightness (not detection) and helps visualize dim particles during threshold setting. Detection Threshold sets the minimum grey scale for a particle to be tracked; correctly identified particles are marked with a red cross.
Wait for script to complete; press OK on prompt.
In "Export Settings", check "Include PDF" and any desired formats. Click "Export". Files save to "Documents/Nanovideos/YYYY-MM-DD" folder.