Jan 05, 2026
Molecular monitoring of biofouling communities using settlement panels and diagnostic assays
- Jack Longsden1,2,
- Jordan P Cuff1,
- Heather Sugden1
- 1Newcastle University;
- 2British Antarctic Survey
- Foraging Ecology Research Group


Protocol Citation: Jack Longsden, Jordan P Cuff, Heather Sugden 2026. Molecular monitoring of biofouling communities using settlement panels and diagnostic assays. protocols.io https://dx.doi.org/10.17504/protocols.io.36wgqpm8kvk5/v1
License: This is an open access protocol distributed under the terms of the Creative Commons Attribution License, which permits unrestricted use, distribution, and reproduction in any medium, provided the original author and source are credited
Protocol status: Working
We use this protocol and it's working
Created: September 23, 2025
Last Modified: January 05, 2026
Protocol Integer ID: 228018
Keywords: biomonitoring, community ecology, extracting dna, molecular analysis, dna extraction, Invasive species, monitoring marine invasive species, biofouling community, detection of sessile marine, invasive species within coastal location, marine invasive species, molecular monitoring, invasive species, diagnostic assays this protocol, using settlement panel, sessile marine, coastal location, throughput method for the early detection, marina, diagnostic assay, settlement panel, harbour
Funders Acknowledgements:
European Union
Grant ID: LIFE Water Disturbance Environmental Restoration (WADER)
Abstract
This protocol outlines the preparation, deployment, monitoring, and analysis of settlement panel units for detecting and monitoring marine invasive species. The materials and methods detailed provide a cost-effective, sensitive, and high-throughput method for the early detection of marine invasive species. This approach lends itself to the detection of sessile marine invasive species within coastal locations, particularly harbours and marinas.
Materials
Materials for data collection unit construction (per unit)
- UPVC sheets, cut to 14 × 14 × 1 cm — 5 panels (suppliers may pre-cut)
- Sandpaper (coarse)
- Drill + 5 mm drill bit (multipurpose or for plastic)
- Zip ties: 13 (10 for joins + 3 for attachment) + spares
- Rope/mooring line (see step 9 for length)
- Weight (e.g. house brick)
- Measuring tape, permanent marker, scissors
- PPE: safety glasses, gloves
Materials for monitoring and sample collection (per monitoring visit)
- Digital camera (set to high resolution)
- Scale card and ruler
- Clear plastic sample bags (pre-labelled)
- Icebox with ice packs
- PPE: gloves, sturdy footwear, lifejacket
- Replacement cable ties and settlement panels.
- Field notebook or data sheet
For DNA extraction:
- Dissection tools (e.g., scalpel, scissors and Petri dishes)
- Hardened carbon steel ball bearings
- 2.2 mL deep well plates for initial lysis
- Deep-well 96-well plates
- Plate seals for long-term storage
For DNA amplification and subsequent steps:
- Tagged PCR primers
- 2X hot-start Taq polymerase master mix
- Molecular grade water
- 96-well PCR plates
- Mineral oil
- 1X SPRI beads
Buffers and reagents:
- Sodium chloride
- Tris-HCl
- EDTA
- GITC
- Nuclease-free water
- SDS
- PEG
- Tris-HCl
- 100 % ethanol
- Papain
Equipment:
- -20 °C freezer
- Geno/Grinder 2010 or similar bead beater for homogenisation
- Thermocycler
- Magnetic stand (for plates and tubes)
- Centrifuge
- Microcentrifuge
- Vortex
- Pipettes (preferably including multichannel, ideally including 96-well)
Safety warnings
Check safety guidelines for individual reagents before commencing work. Some reagents will be toxic, corrosive or otherwise present health and safety risks. Appropriate personal protective equipment should be used at all times, not only for personal safety but also reduction of contamination risk.
Ethics statement
Check national and institutional policies for research involving your study system. Follow best practice guidelines and stay up to date with the latest developments in policy. Only disturb as many organisms as is necessary, and always do so as humanely as possible with any necessary permits in place and valid throughout the study.
Panel construction and preparation
24m 30s
Purpose: Construct and deploy a 5-panel UPVC settlement panel unit to hang at 1 m depth.
Construction
Material preparation and unit assembly. Best to be conducted in a workspace prior to site visits.
Prepare materials and workspace. Wear PPE. Lay out UPVC panels and tools.
1m
Cut panels. Ensure each panel is 14 × 14 × 1cm. If using supplier-cut panels, verify dimensions.
1m
Roughen surfaces. Lightly abrade one face of each panel with sandpaper to increase the surface area for settlement 00:00:30 .
30s
Deburr edges. Using sandpaper, remove sharp edges present after cutting and sanding.
1m
Drill holes. Drill a 5 mm hole 5 mm in from each corner of every panel.
1m
Arrange panels. Place the five panels with sanded surfaces facing out into a pentagonal formation so that adjoining edges meet.
1m
Join panels. At each panel-to-panel corner, pass cable ties through the aligned corner holes and tighten. Use two ties per panel (total 10 cable ties) for secure joining. Trim excess tails.
3m
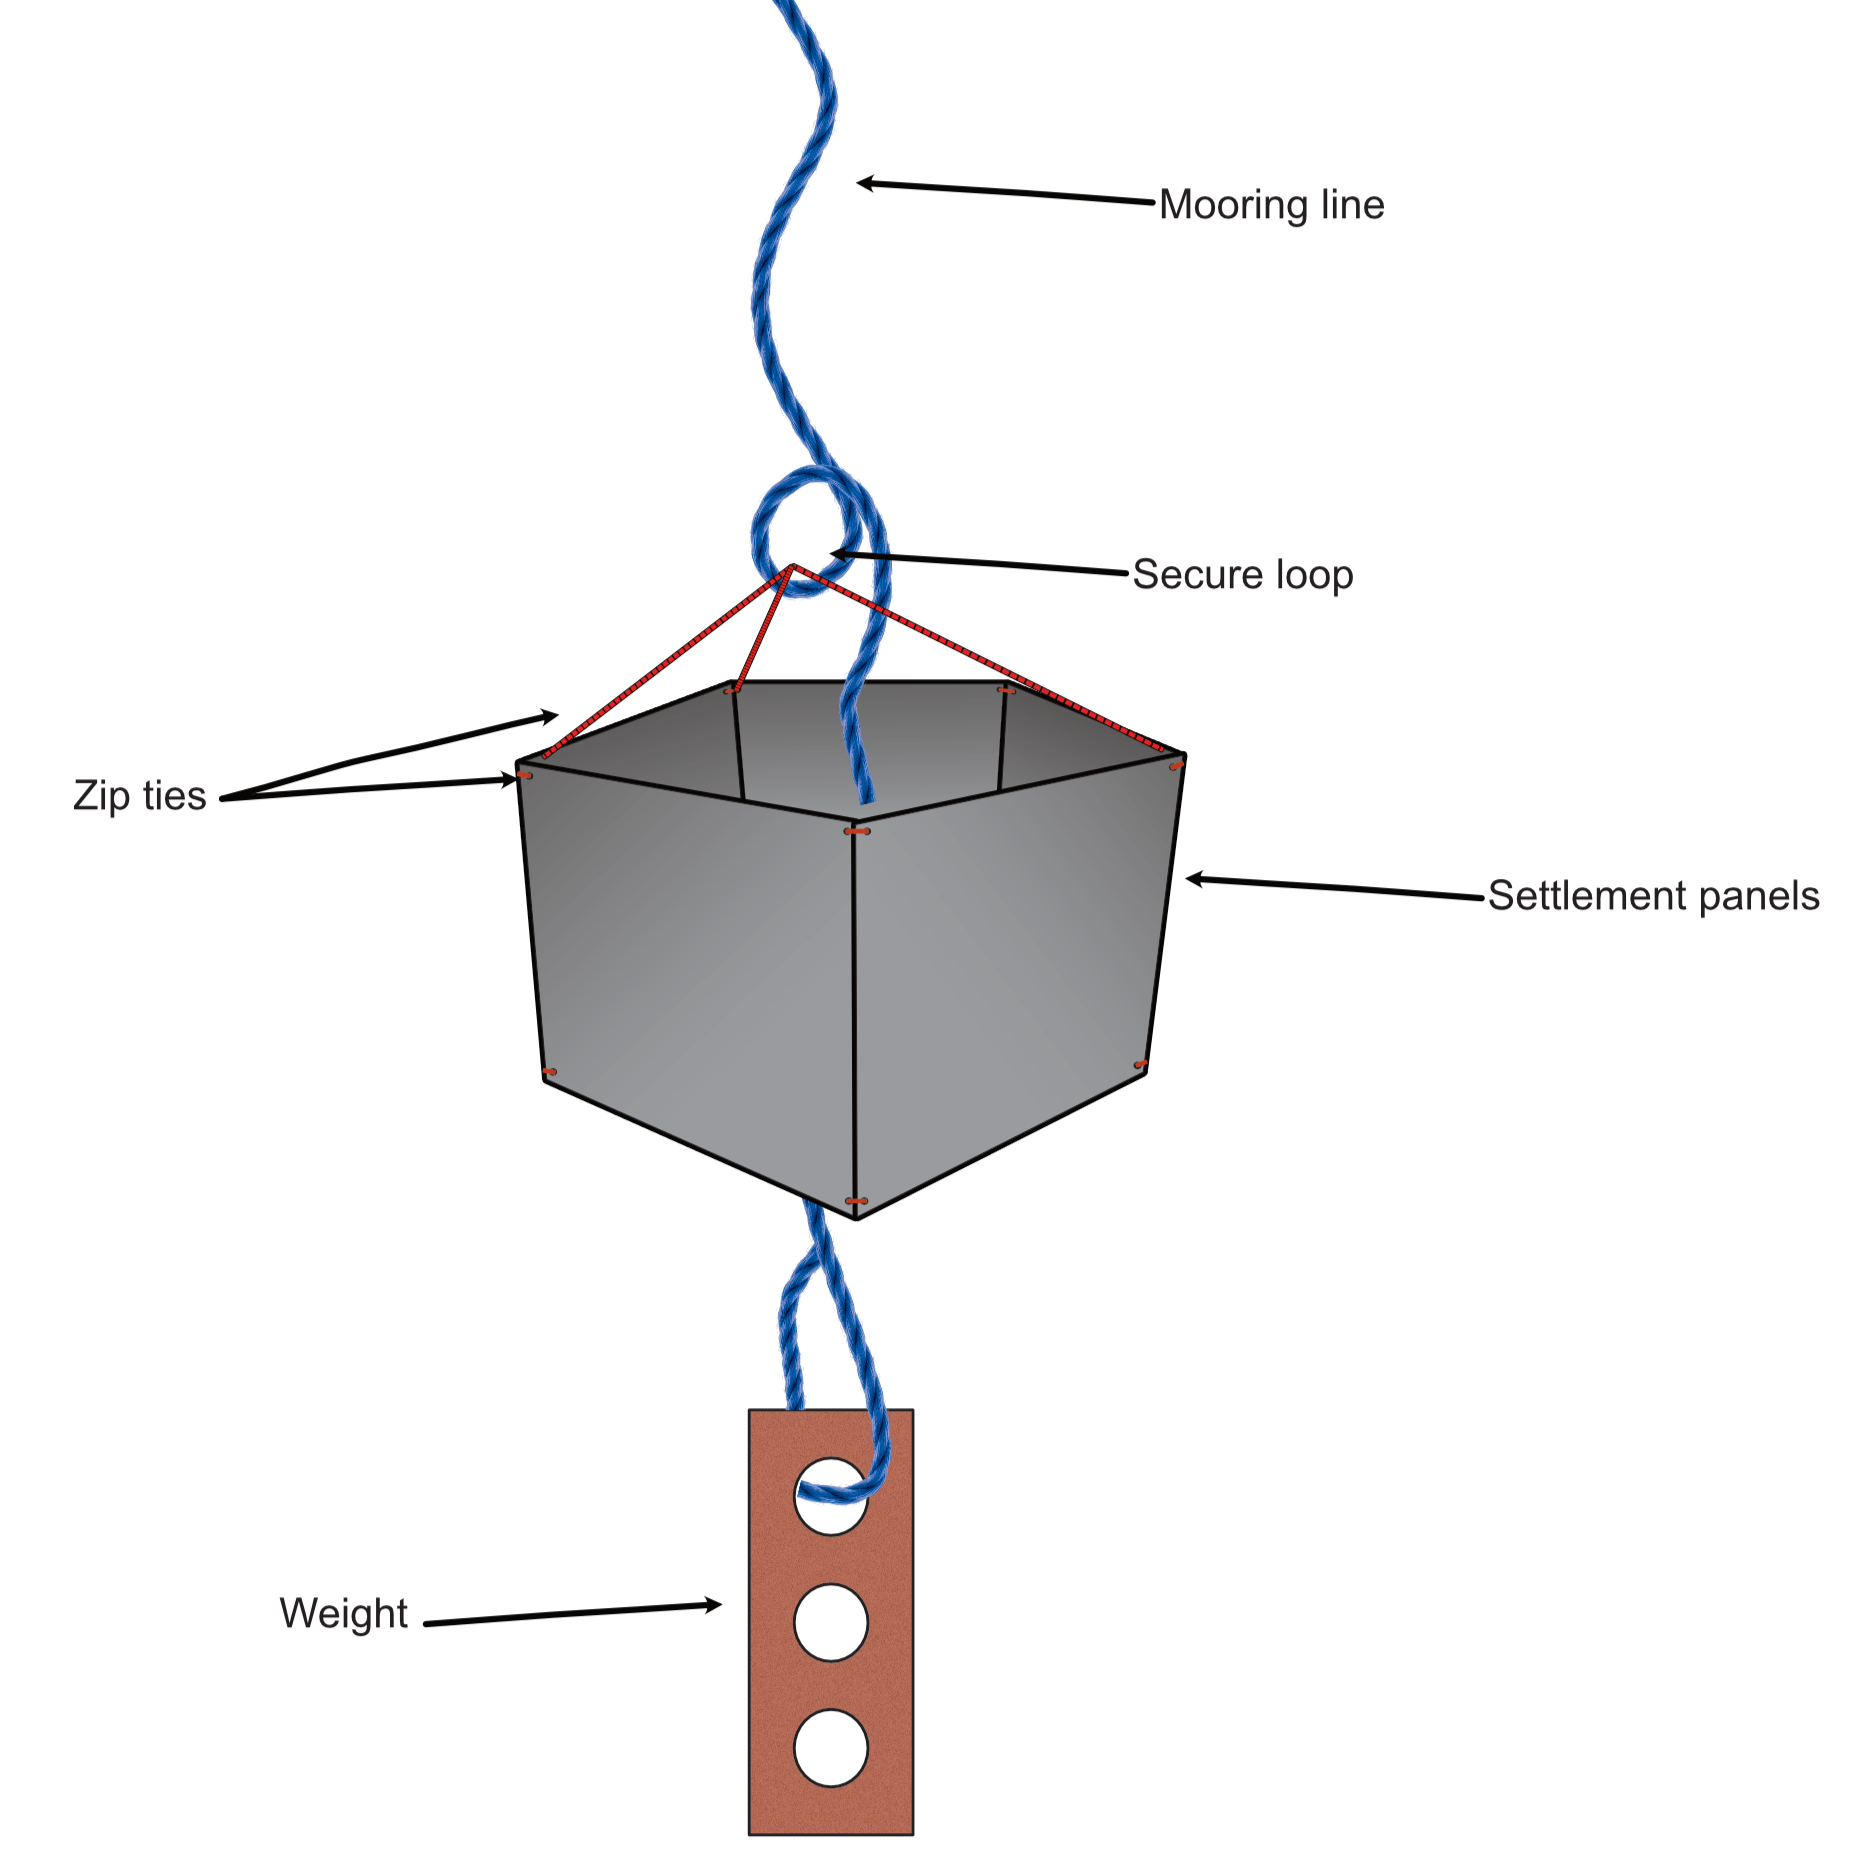
Create top attachment loops. Choose three corner joins on the top side of the pentagon (spaced roughly evenly). Thread one cable tie through each selected corner (use 3 additional zip ties). Leave the cable ties unattached for connection to the mooring line.
1m
Prepare mooring line length. Measure the vertical distance from the planned tie-on point to the water surface (call this D). Calculate total rope length as D + 3.0 m (allows room for knotting and the weight). On the rope, from the tie-on end, mark:
- the water surface position at D from the tie-on end;
- the unit position at D + 1.0 m (this is where the unit should hang, i.e., 1m depth);
- weight position at D + 1.5 m (where the weight will be attached, excess line to secure weight).
5m
Tie a loop at the unit position. At the mark for D + 1.0 m, tie a bowline (or equivalent secure loop) in the rope.
2m
Attach the unit to the rope. Pass the three zip ties from the unit through the bowline loop and secure (close the cable ties so the unit is held by the rope loop). Ensure the unit hangs level.
2m
Attach weight. At the free (lower) end of the rope, securely attach the weight (house brick in a bag or other secure method) by splicing or firm knotting.
5m
Mark/identify one panel per unit for use as a "one-month panel" (discussed further in the monitoring and sample retrieval section).
Final checks. Lower the unit (or simulate) to confirm the top of the unit sits 1.0 m below the water surface. Confirm all cable ties are tight and trimmed, knots are secure, and the assembly hangs freely.
1m
Notes & tips - Prepare extra rope, panels and spare units for field repairs.
Diagram of the complete unit.
5-panel UPVC settlement panel unit.
Panel deployment
24m
Purpose: Deploy constructed settlement panel units safely and consistently at selected field sites.
Site selection
Select suitable sites where substrate for biofouling growth and tie-on locations are available
(e.g., marinas, bridges, pontoons).
Note
Deployment of units from pontoons is preferable to ensure a constant water depth is maintained at all times.
5m
Avoid areas with excessive hydrodynamic activity or wave action, which may damage or dislodge units.
1m
Consult stakeholders (e.g., harbourmasters, site managers) to ensure deployment does
not interfere with site operations and to maintain/build relationships.
5m
Safety preparations
Wear suitable PPE, including gloves, sturdy footwear, and lifejackets if working
near water.
1m
Follow institutional fieldwork safety guidelines (e.g., buddy system, risk
assessments).
1m
Replication strategy
- Deploy five units per site to allow replication.
- Within each site, choose tie-on points that minimise the risk of disturbance and avoid operational interference.
Deployment Method
Identify a secure tie-on point such as a cleat or structural hole beneath a pontoon. Always maintain three points of contact with the structure.
Note
If working under pontoons, lying flat may reduce the risk of slips or falls.
2m
Attach the mooring line of the unit securely to the tie-on point using a strong knot (e.g., bowline). If unsure, reinforce with additional knots or zip ties.
5m
Once the mooring line is secured, slowly lower the unit into the water, weight first, ensuring it hangs freely.
1m
Confirm the unit is suspended at 1 m depth (adjust rope length if necessary).
1m
Final Checks
Check all knots are secure and the weight is fixed.
1m
Label and record. Mark the unit with a unique ID, and record the deployment date, GPS/position, and any observations for future retrieval or maintenance in the field notebook.
1m
Notes & Tips
- Deployment from pontoons is preferred, as they rise and fall with tides, so units consistently remain at 1 m depth.
- Carry spare rope, cable ties, and a spare unit in case of field repairs or losses.
- Always maintain clear communication with site stakeholders and follow local safety regulations.
Monitoring and sample retrieval
21m
Purpose: Provide clear and consistent methods for monitoring settlement panel units and retrieving samples for visual and eDNA analysis.
Maintain consistent timing of monitoring visits (e.g., monthly intervals) to ensure comparability across the study period.
Follow the safety preparations discussed in the panel deployment.
Unit retrieval for monitoring
At each monitoring visit, carefully lift each fouling panel unit from the water.
Note
Ensure lifting procedures are followed and three contact points are maintained when bending to retrieve units.
1m
Place the unit on a flat surface with good natural light.
1m
Photography
Photograph all five panels of each unit.
5m
Take images in natural light at two distances: 15 cm and 30 cm from the panel surface. Include a scale card or ruler in each image.
1m
Ensure images are sharp, evenly lit, and labelled in accordance with unit ID, date, and location.
2m
Sample/Panel retrieval
Each unit contains five panels: four continuous panels and one one-month panel.
Continuous panels:
- Starting from Monitoring Visit 2, remove one continuous panel per visit.
- Do not remove any continuous panels during Monitoring Visit 1.
One-month panels:
- At each monitoring visit (starting from Visit 1), remove the designated one-month panel.
- Replace it immediately with a new, clean panel.
Panel removal and replacement
- Cut the zip ties securing the panel.
- Place the panel into the designated and labelled clear plastic bag. (labelled with site/location, unit ID, panel type (continuous or one-month), and date)
- Place labelled bags into an icebox with ice packs.
- Attach a replacement panel with zip ties to the unit if a one-month panel has been removed. If a continuous panel has been removed at its designated time point, secure the two adjacent panels together to reform the unit.
Note
Following the second monitoring visit, the number of panels on the unit will decrease by one at each monitoring visit (e.g., monitoring visit 1 = pentagon, monitoring visit 2 = square, monitoring visit 3 = triangle, monitoring visit 4 = panels back to back, monitoring visit 5 = removal of the unit).
10m
Storage - Store all removed panels at –20 °C until required for eDNA analysis.
1m
Notes & tips
- Handle panels carefully to avoid scraping or damaging biofouling.
- Handle panels from the back (the non-target side) and clean hands before and between panels to prevent cross-contamination.
- Check photographs in the field before progressing to ensure clarity and completeness of each image.
- See forthcoming publications for further details on image analysis and detailed methodology.
Sample preparation
1d 2h 38m
Purpose: To prepare biofouling samples collected on the settlement units for DNA extraction.
Pre-designate five locations to be scraped and biofouling removed on each panel. Select points in the centre, left of centre, right of centre, above centre, and below centre. This will prevent bias towards heavily fouled areas of panels.
Example scrape locations.
Using a sterile scalpel and forceps, prepare each sample for molecular analysis by scraping the panel twice across a distance of 5 cm at each of the five pre-designated locations. Place all the scraped biofouling material from the panel into a microcentrifuge tube and label it with the panel information.
Note
Between each sample, thoroughly decontaminate dissection tools and any surfaces used (e.g., Petri dish) with Chemgene (or a similar DNA-degrading disinfectant), rinsing with molecular biology-grade water and 100 % ethanol, and wiping dry with sterile tissue.
1d
Add 100 µL TNES lysis buffer to each well of a 96-well plate.
Note
For the TNES buffer, follow the recipe provided by BOMB-Bio (100 millimolar (mM) Tris-HCl, 52 millimolar (mM) NaCl, 10 millimolar (mM) EDTA, 10 Mass / % volume SDS).
5m
Transfer individual samples into 96-well plates (ideally deep-well, e.g., 2.2 mL, with fixable lids for grinding/washing). Consider the distribution of experimental controls ahead of subsequent steps to streamline downstream liquid handling.
Note
If pausing before proceeding to homogenisation and lysis, seal the 96-well plate and store it at -20 °C until ready. When subsequently defrosting it, check that the TNES does not precipitate. If it does, gently warm the plate to 50-60 °C .
25m
The DNA extraction protocol is largely adapted from the BOMB-Bio tissue nucleic acid extraction protocol. See their documentation for additional details.
Citation
LINK
Add one 3 mm hardened carbon steel bead to each well.
Note
Beads are usually shipped coated in manufacturing oil (especially the carbon steel beads). To remove this, place beads in a borosilicate glass beaker or Duran bottle with plastic pouring lip and lid removed then bake for at least 12 hours at 250 °C.
5m
Grind the samples in a tissue grinder/homogeniser/lyser at 1750 rpm, Room temperature , 00:01:00 .
1m
Add 10 µL 20 mg/mL papain to each well.
2m
Incubate overnight (~16:00:00 ) at 37 °C or 02:00:00 at 56 °C .
2h
DNA extraction
1h 29m
Purpose: Extract DNA from the samples prepared in the previous section (steps 16-25) to be tested against species-specific primers.
Centrifuge the plate at 2000 x g, Room temperature, 00:02:00 .
2m
To a new plate, or to individual tubes (depending on the compatibility of plasticware and magnetic tube/plate racks), add 60 µL of the lysate from STEP 10, 120 µL of 1.5X GITC buffer, 120 µL of 1 mg/mL SeraMag Speed Beads in TE (10 millimolar (mM) Tris and 1 millimolar (mM) EDTA) and 240 µL isopropanol. Mix by pipetting or vortexing 1500 rpm, Room temperature , 00:01:00 .
Note
For the 1.5X GITC buffer, follow the recipe provided by BOMB-Bio (6 Molarity (M) GITC, 75 millimolar (mM) Tris-HCl, 3 % volume sarkosyl, 30 millimolar (mM) EDTA, 0.15 % volume antifoam).
Note
When working with magnetic bead solutions, ensure they are at room temperature and fully mixed, with no residue at the bottom of the container.
20m
Incubate at Room temperature for 00:05:00 .
5m
Place on a magnetic stand for 00:05:00 .
5m
Remove all but 5 µL of the mixture from each well via pipette without disturbing the beads, which should be settled on the magnet.
Note
We recommend leaving 5 µL behind simply to avoid pipetting the beads themselves, but this can be avoided with care and experience.
5m
Add 400 µL isopropanol to each well.
5m
Remove the isopropanol entirely and discard it.
5m
Add 400 µL 80 % volume ethanol to each well.
5m
Remove the ethanol entirely and discard it.
5m
Add a further 400 µL 80 % volume ethanol to each well.
5m
Remove the ethanol as completely as possible by pipetting and discard it. Allow the beads to air-dry until the aggregation of magnetic beads transitions from 'glossy' (shiny reflection of light) to 'matte' (dull dark brown mass), but not so long that it dries completely (i.e., begins to turn a rusty red and shows cracks).
10m
Add 105 µL molecular grade water to each well, shake at 1500 rpm, Room temperature , 00:01:00 and incubate at Room temperature for 00:05:00 .
10m
Place on a magnetic stand for 00:05:00 .
5m
Remove 100 µL of the supernatant and place it into a new tube. This will be the sample used for PCR.
2m
Store the eluted DNA at -20 °C until ready for subsequent steps.
PCR
3h 39m
Purpose: Test extracted DNA against species-specific primers for target invasive species.
Decide how samples will be distributed across plates (but don't distribute the DNA yet). Consider including a negative control in each row and column to detect any contaminants in each forward and reverse primer if using tagged primers (only necessary if sequencing downstream). Among these wells, include any DNA extraction negative controls. Include positive controls (extracted DNA from species known to amplify with the primers), perhaps one adjacent to negative controls and the other adjacent only to samples (but both on separate rows and columns). If sequencing downstream, include blank controls (ideally wells into which no reagents or at least no primers are added), perhaps one adjacent to negative controls and the other adjacent only to samples (but both on separate rows and columns).
If using multiple PCR primer pairs, familiarise yourself with the annealing temperatures for each and prepare separate PCR plates for each. For optimal accuracy, consider running replicates of each reaction (e.g., triplicates).
Our recommended PCR plate layout, which could be adopted here for streamlining downstream. Created in BioRender. Cuff, J. (2025) https://BioRender.com/yjynd1m
Prepare enough PCR mastermix for each sample.
For a full plate, the below values will usually suffice (with some overage to account for pipetting error), but check your specific Taq polymerase mix for any differences:
| A | B | |
| Reagent | Volume (μL) | |
| Molecular grade water (DNase free) | 905.28 | |
| 2X hot-start PCR mastermix | 1104 |
Note
These values are for 20 µL reaction volumes, which have been demonstrated to be effective for diagnostic PCR and community metabarcoding. Consider running them in triplicate for more accurate results.
10m
For 20 µL reaction volumes, this will subsequently involve adding 10 µL MyFi high-fidelity hot-start Taq polymerase and 8.6 µL molecular grade water to each well, followed by forward and reverse primers at a final reaction concentration of 0.2 micromolar (µM) (e.g., 0.4 µL each of 10 micromolar (µM) primer stock) to each corresponding well. It is possible to do this with a multichannel pipette for ease and speed.
15m
Add 1 µL DNA diluted to 1:20 in nuclease free water to each corresponding sample or positive control well, and 20 µL nuclease free water to each negative control other than extraction negative control(s).
10m
Distribute one drop of mineral oil into each well of the PCR plate(s) (~20 µL ).
Note
This can be achieved by taking a large volume of mineral oil into the pipette tip and then gently depressing the plunger so that a drop forms and falls from the tip into each well.
Mineral oil improves sealing of reactions by preventing evaporation and condensation. By reducing evaporation and thus loss of product, this also reduces potential cross-contamination.
5m
Briefly centrifuge the plate to ensure that the oil is above the PCR mix and everything is at the bottom of each well without air bubbles.
2m
Load the PCR plate into a thermocycler. Ensure that the temperature regime matches the enzyme used (including any heat activation for hot-start Taq) and that the annealing temperature matches the PCR primers used.
Note
Given differences between labs and samples, and inaccuracies in temperature calibration, considering running a temperature gradient PCR with known samples to check the specificity of your PCR primers.
2m
Run your PCR programme.
2h 30m
The samples should now be checked for successful amplification, contamination in negatives and any secondary banding. Gel electrophoresis will achieve this, but digital systems like the Qiagen Qiaxcel will do this faster and generate amplicon-specific DNA concentration data (which is useful for equimolar pooling if sequencing).
25m
Gel electrophoresis
1h 11m
Purpose: Visually identify positive PCR detections of invasive species following species-specific primer use.
Prepare a gel tank containing sufficient borax buffer to submerge the gel.
1m
Prepare a 2 Mass / % volume agarose gel for the samples to go into (detailed in the below substeps).
1m
Prepare a gel mould with sufficient comb tips for the number of samples to be run. Ensure these are spaced out enough to allow the gel to run and separate without running into another well.
1m
Determine a suitable size (and therefore volume) of gel based on the size of the tank available. For a 150 mL gel, weigh 3 g of agarose and add it to 150 mL of 1X borax buffer.
2m
Heat this mixture in a microwave in a conical flask until it begins bubbling.
2m
Mix the solution by gently swirling it and heat again until bubbling. Repeat this as necessary until there are no large lumps of agarose remaining.
Note
It can be beneficial to let the mixture cool for 00:00:30 before proceeding.
1m
Add 3 µL stain (e.g., Gel Red) and mix by swirling.
1m
Pour the mixture into the gel mould and allow to set for 00:25:00 .
25m
Add 2 µL of each sample to a new plate and add 2 µL of 1X DNA dye for visualisation of the products in the gel.
10m
Once set, place the gel into the tank and add 4 µL of DNA gel ladder to each side of the gel in each row, and then 4 µL of dyed PCR product to each other well.
Note
Ensure that the DNA will run in the correct direction when placing the gel in the tank. TIP: it will 'run to the red'.
5m
Once filled, run the gel power pack at 300 V and 120 A for 00:20:00
20m
Visualise the gel under a UV or blue light in a gel dock to confirm amplification and a lack of contamination in negative controls.
Note
Ensure you are not exposed to UV by only using the UV light in a contained dock and/or with appropriate protective equipment.
2m
Interpretation
30m
If the sample detection is positive, the target species of the specific primer used is probably there, as its DNA has been detected in the sample. If a positive detection occurs, further methods of identification (e.g. visual methods using settlement panels or rapid assessment surveys) should be employed to validate results.
30m
Protocol references
Citation
LINK
Acknowledgements
This research was funded by the European Union. Views and opinions expressed are however those of the authors only and do not necessarily reflect those of the European Union or CINEA. Neither the European Union nor the granting authority can be held responsible for them. The LIFE Water Disturbance Environmental Restoration (WADER) project is led by Natural England in collaboration with the Environment Agency, Tweed Forum and Newcastle University in the UK. The project is a £5.8m nature recovery project to reverse the decline of river, coastal and marine habitats on the Northumberland Coast.