Mar 25, 2024
Microplastics in marine environments: protocol for isolating natural biofilms from seawater-incubated particles
Forked from a private protocol
- Meril Massot1,
- elsa gadoin2,
- Andreja Rajkovic2,
- stephanie.bedhomme 1
- 1Centre d'Ecologie Fonctionnelle et Evolutive unit, CNRS, Univ Montpellier, EPHE, IRD, Montpellier, France;
- 2Research Unit Food Microbiology and Food Preservation, Department of Food Technology, Safety and Health, Faculty Bio-Science Engineering, Ghent University, Belgium


Protocol Citation: Meril Massot, elsa gadoin, Andreja Rajkovic, stephanie.bedhomme 2024. Microplastics in marine environments: protocol for isolating natural biofilms from seawater-incubated particles. protocols.io https://dx.doi.org/10.17504/protocols.io.kqdg3pzjel25/v1
License: This is an open access protocol distributed under the terms of the Creative Commons Attribution License, which permits unrestricted use, distribution, and reproduction in any medium, provided the original author and source are credited
Protocol status: Working
We use this protocol and it's working
Created: July 22, 2022
Last Modified: March 25, 2024
Protocol Integer ID: 67320
Keywords: microplastics, marine biofilm, microbial colonization, environmental microbiology, marine plastic pollution, assessing pathogen risks from marine microplastic, microplastics in marine environment, microplastics particles in seawater, microplastic biofilm, marine microplastic, incubating microplastics particle, incubated particles microplastic, microplastics concentration, microplastic pollution, particles microplastic, microplastic, microplastic particle, natural marine biofilm, accurate estimate of microplastics concentration, microparticles in marine environment, natural biofilms from seawater, weathering conditions of microplastic, isolating natural biofilm, biofilm, microbial community, antibiotic resistance genes in biofilm, marine ecosystem, potential impacts on marine ecosystem, trends microbiol, occurring microparticle, assessing pathogen risk, bacteria, plastics from human, contamination, bacterial pathogen, marine environment, detection of faecal bacteria, faecal bacteria, other potential pathogenic bac
Funders Acknowledgements:
ImpTox project, European Union - Horizon 2020 program
Grant ID: 965173
Disclaimer
DISCLAIMER – FOR INFORMATIONAL PURPOSES ONLY; USE AT YOUR OWN RISK
The protocol content here is for informational purposes only and does not constitute legal, medical, clinical, or safety advice, or otherwise; content added to protocols.io is not peer reviewed and may not have undergone a formal approval of any kind. Information presented in this protocol should not substitute for independent professional judgment, advice, diagnosis, or treatment. Any action you take or refrain from taking using or relying upon the information presented here is strictly at your own risk. You agree that neither the Company nor any of the authors, contributors, administrators, or anyone else associated with protocols.io, can be held responsible for your use of the information contained in or linked to this protocol or any of our Sites/Apps and Services.
Abstract
Microplastics, upon which microbial communities arise rapidly, have emerged as a significant source of pollution in the ocean1. Studying these communities is crucial to understand their potential impacts on marine ecosystems, as well as their role as vector for potential pathogens2, 3 , and reservoir for antimicrobial resistance genes4, 5.
The proposed workflow delineates an approach for incubating microplastics particles in seawater, ensuring reproducibility while controlling the origin, incubation duration, and weathering conditions of microplastics. The workflow details the preparation of the incubation device, sample collection, and subsequent laboratory processes to obtain the natural marine biofilms associated with microplastics. Our processing method helps minimize contamination by naturally occurring microparticles in marine environments and allows for an accurate estimate of microplastics concentration by direct counting.
The aim of this publication is to provide a standardized protocol to facilitate comparisons between natural communities associated with microplastic pollution.
References
1. Bowley, J., Baker-Austin, C., Porter, A., Hartnell, R. & Lewis, C. Oceanic Hitchhikers – Assessing Pathogen Risks from Marine Microplastic. Trends Microbiol. 29, 107–116 (2021).
2. Kirstein IV., Kirmizi S., Wichels A., Garin-Fernandez A., Erler R., Löder M., Gerdts G., – Dangerous hitchhikers? Evidence for
potentially pathogenic Vibrio spp. on microplastic particles. Mar Environ Res .120, 1–8 (2016).
3. Pedrotti ML., De Figueiredo Lacerda AL., Petit S., Ghiglione JF., Gorsky G., Vibrio spp and other potential pathogenic bacteria associated to microfibers in the North-Western Mediterranean Sea. PLOS ONE 17:e0275284. (2022).
4. Wu X., Pan J., Li M., Li Y., Bartlam M., Wang Y., Selective enrichment of bacterial pathogens by microplastic biofilm. Water Res 165, 114979. (2019).
5. Liang H., de Haan WP., Cerdà-Domènech M., Méndez J., Lucena F., García-Aljaro C., Sanchez-Vidal A., Ballesté E., Detection of faecal bacteria and antibiotic resistance genes in biofilms attached to plastics from human-impacted coastal areas. Environ Pollut. 319:120983. (2023).
Guidelines
- When working in the lab, always wear a lab coat and disposable gloves
- Clean each working surface with ethanol 70% before starting and between sample processing
- Handle the samples using sterile tweezers, ensuring sterilization between samples using ethanol 70%
Materials
SAMPLE PREPARATION
To prepare microplastics container
- Waterproof superglue designed for plastic (Loctite TM)
- Coloured tapes
- Small Ty-raps (two per bag plus one per group of bags)
+ Scissors, stapler, ruler, pencil, milliQ water, paper towel
To prepare the incubation device
- Rope / Big Ty-Raps (to attach the cage to a support)
- Diving weights ( 4 x 1kg or 2kg depending of local conditions on incubation site)
- Big Ty-raps (two/four per diving weights)
MICROPLASTICS & OTHER COLONIZATION SUPPORT
- Polypropylene based microparticles (manufactured and provided by one of the project partners)
- Polyethylene terephtalate microparticles (manufactured and provided by one of the project partners)
ON-FIELD SETUP
To set the device on site
- A rope to attach the cage
- Sign/Buoy to indicate experimental device
To take the device back to the lab
- Wire cutter
- Cooler
- Ice packs
- 1L sterile glass bottle x3 (marine water sampling)
- Box to store samples in the cooler (empty pipet tip box)
RECOVERING MICROPLASTICS FROM BAGS
(RE-USABLE BETWEEN SAMPLES)
- Razor blade
- Syringe 50 mL
- Syringe 10 mL
- Pipet tip box (x3)
- Two tweezers
- Scissors
- Paper towels
- 70% ethanol
(PER SAMPLE)
- Falcon tube, 50 mL (x3)
- Plastic cup (at least 2)
ISOLATION OF PLANKTONIK BACTERIA FROM SURROUNDING SEAWATERS
- Filter funnel
- Vacuum filtration system (vacuum pump + manifold base)
- 2 mL Eppendorf tube
- Sterile tweezers
Before start
This protocol was developed to investigate natural communities associated with microplastics within the size range of 30 to 50 µm. It involves adapting the mesh size of the bags and the PluriStrainer to match the fraction size of the microplastics under study. When considering including a control material such as glass in the experiment, similar procedure can be used if control particles size range of 30 to 50 µm.
Reconstituted Instant Ocean is used as sterile seawater to process the samples back from the field.
PRE-IMPLEMENTATION
- Obtain information on the number of microparticles per gram of powder or per milliliter of suspension to control the input.
- Prepare 900 mL of sterile seawater per sample
SAMPLE PREPARATION
MICROPLASTIC PARTICLES CONDITIONING
Microplastics are enclosed in nylon mesh bags with a mesh size inferior to microparticule size to ensure their entrapment. Each bag will contain one type of plastic polymer. Three replicates per polymer and per site should be conducted.
MICROPLASTICS CONTAINER PREPARATION 1/2
- Fold a 25 µm mesh-nylon bag in the opposite direction of the stitching to achieve a pyramidal shape
Pyramidal shape avoids any collapsing of the bag in order to provide sufficient space for microorganisms to colonize the surface of microplastics
Inital aspect of mesh-nylon bags
- Glue a horizontal line, 1 cm in height, onto 75% of the total bag width. Position the sealed line at a height of 4 cm from the bottom
Use waterproof superglue designed for plastic materials. Exercise caution to avoid complete sealing until the addition of microplastics.
- Apply glue to the stitches beneath the horizontal line to prevent any unintended dispersal of microplastics
Infusion device to keep microplastics trapped. The green rectangle on the left picture indicates the area not to be glued before adding the particles into the bag.
MICROPLASTIC ADDITION
Consider color-coding the bags to facilitate polymer identification (as shown in the picture above)
ANHYDROUS FORM
- weigh 50 mg of microplastics using an analytical balance
- Transfer the microplastics into the respective bags, through the unsealed part.
SOLUTION
- For microplastics in a solution, pipet 500 µL and transfer directly into the respective bag
MICROPLASTICS CONTAINER PREPARATION 2/2
- Finish to glue the 1 cm-height line in order to seal the fourth side of the bag
- Verify that the fourth side sealed with glue is hermetically closed by applying pressure with a pipet tip
- Fold the bag above the glued section and staple it
- Punch two holes above the glued section in order to insert ty-rap later
- Immerse the bags in sterile milliQ water for 00:05:00 to allow particles with a diameter under 25 µm to pass through the mesh, preventing any site contamination.
- Expose the bags to UV light treatment for 00:30:00 to achieve sterilization
Final aspect of the bags containing microplastics
35m
INCUBATION DEVICE PREPARATION
- Prepare the oyster cage following the manufacturer's instructions
- Attach diving weights to the bottom of the cage using Ty-raps or ropes
The quantity of weights should be adjusted based on the strength of marine currents at each incubation site. The weights should enable the cage to minimize its movements
- Attach two Ty-raps to each bag containing microplastics
- Add an additional Ty-rap around all the Ty-raps within a sample group (e.g., all bags containing the same plastic type for a specific site)
It makes the samples easier to manipulate on-site
- Attach groups of bags on the upper grid of the oyster cage using Ty-raps
Image on the left: Incubation device ready to be installed on in the sea. Image on the right: A photo showing the inside of the incubation device.
ON-FIELD SETUP
INCUBATION
- Securely fasten the oyster cage to an exposed surface, ensuring that the bottom of the bags reaches the appropriate depth
- Allow the microplastics to incubate for the appropriate amount of time
Schematic overview of incubation device on field. The top picture and the bottom picture represent the device containing samples attached to an oyster farm installation and to a buoy offshore, respectively.
MICROPLASTICS AND SURROUNDING SEAWATER COLLECTION
- Remove the oyster cage from water
- Collect the bags in sterile boxes along with surrounding water
Avoid removing bags from water to minimize stress on microorganims
- Collect three separate 1-liter samples of the surrounding water using sterile glass bottles
- Transport the samples to the lab in a cooler with ice packs
- Store the samples at 4 °C until further processing
RECOVERING MICROPLASTICS FROM BAGS
EXTERIOR BAG WASHING
Objective: to prevent planktonic material introduction in collected samples
- Scrap the external surface of the bag using a sterile blade
- Rinse the bag thoroughly with 50 mL of reconstituted Instant Ocean, using a 50 mL syringe to eliminate all external debris
The external face of the bag is scraped to get rid of non-microplastic associated material
PLANKTONIC PARTICLE RELEASING
Objective: Separate all particles smaller than 25 µm from the bag and reduce the number of microorganisms not associated with microplastics.
- Pour 250 mL of Instant Ocean into the bottom of a sterile pipette tip box
- Immerse the bag in the bath
- Move the bag in the bath with 10 back-and-forth movements.
- Transfer the bag to a second 250 mL bath and repeat the back-and-forth movements
- Transfer the bag to a third 250 mL bath and repeat the back-and-forth movements
- Use a 50 mL syringe filled with Instant Ocean to rinse the external surface of the bag, concentrating the microplastics at the bottom.
At each step, avoid placing the bag on a contaminated surface
Bags are immersed in Instant Ocean to remove microorganisms not associated with microplastics and then rinsed from the top to concentrate particles in the lower part of the bag.
BAG CONTENT RESUSPENSION
- Above a sterile 50 mL Falcon tube, make a cut in the bag below the sealed line, approximately 3 cm from the bottom
- Transfer the liquid content of the bag into sterile 50 ml Falcon tube
- Cut the bag vertically down the middle
- Rince each cut segment above the tube using 10 mL of Instant Ocean
Microplastics are resuspended in 50 ml Falcon tubes
RESUSPENSION OF MICROPLASTICS IN STERILE SEAWATER
- Discard the nylon bags
- Plug a Connector Ring on a new 50 mL falcon tube and add a PluriStrainer Mini cell strainer - Mesh Size 20 µm on it
- Pour the microplastic suspension onto the PluriStrainer Mini cell strainer
The microplastics and their associated biofilms are kept on the strainer while planktonic bacteria are eliminated through the mesh
- Invert the PluriStrainer Mini cell strainer and attach it to a new sterile 50 mL Falcon tube.
The microplastics are retained beneath the mesh, inside the Falcon tube
- Rinse the mesh with 6 mL of Instant Ocean to resuspend the microplastics
- Collected microplastics and their associated biofilms are ready for downstream analysis
MICROSCOPICAL EXAMINATION OF MICROPLASTICS AND THEIR ASSOCIATED BIOFILMS
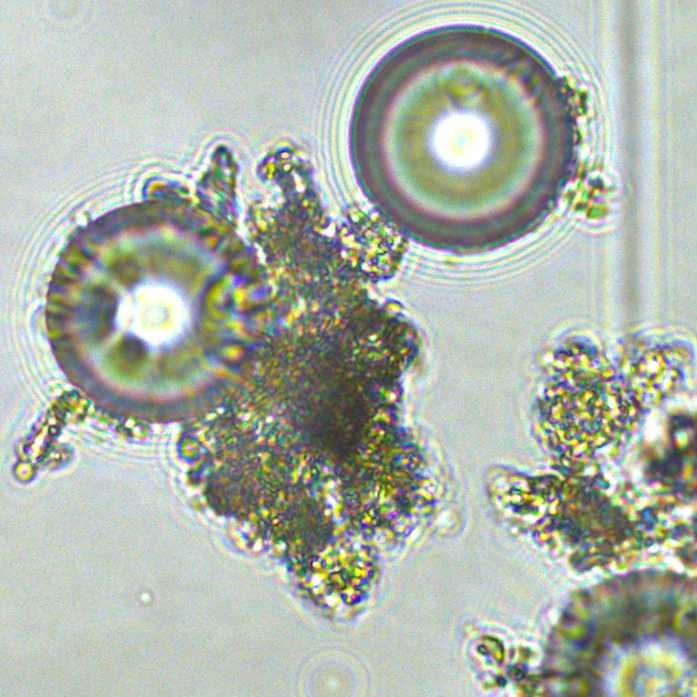
ESTIMATION OF MICROPLASTIC CONCENTRATION & VISUAL CHECKING FOR COLONIZATION
Objective: Quantify a potential leakage of microplastics and obtain an accurate estimate of microplastics concentration for subsequent experiments. Ensure homogenous distribution of microplastics on and around the Malassez grid before commencing the counting process.
- Thoroughly shake the Falcon tube to homogeneize the microplastics resuspension
- Pipet 10 µL of the resuspended microplastics and dispense it onto a Malassez cell. Place a coverslip onto the slide
- Count the total number of microplastics in 10 squares of the Malassez cell at the appropriate objective
- Multiply the count by 10,000 to obtain an estimate of the microplastic concentration per milliliter
- Calculate the mean and standard deviation over 3 independant estimations to obtain the total number of microplastics recovered per milliliter
ISOLATION OF PLANKTONIK BACTERIA FROM SURROUNDING SEAWATERS
Objective: Characterize planktonic bacterial communities composition at incubation site
- Connect a filter funnel to a vacuum source. If available, employ a multi-branch filtration system to simultaneously filter water samples
- Place a 0.2 µm polycarbonate filter membrane on the filter funnel using sterile tweezers
- Filter 1 liter of seawater collected at incubation site
If the membrane becomes clogged, consider filtering 2 x 500 mL of seawater using different membranes.
- With sterile tweezers, transfer the membrane and place it in a 2 mL Eppendorf tube or bead-beating tube for subsequent DNA extraction
- Label the tube and store it at -20°C for later DNA extraction
- Discard the filtered water down the sink