Oct 19, 2021
Version 3
Mercury Sequence and Sample Metadata Prep for Submission Workflow on the Terra Platform V.3
This protocol is a draft, published without a DOI.
- Jill V Hagey1,
- Kevin Libuit2,
- Lingzi Xiaoli1,
- TOAST CDC, OAMD CDC1
- 1Centers for Disease Control and Prevention;
- 2Theiagen Genomics
- TOAST_publicTech. support email: [email protected]


Protocol Citation: Jill V Hagey, Kevin Libuit, Lingzi Xiaoli, TOAST CDC, OAMD CDC 2021. Mercury Sequence and Sample Metadata Prep for Submission Workflow on the Terra Platform. protocols.io https://protocols.io/view/mercury-sequence-and-sample-metadata-prep-for-subm-by8npzveVersion created by Technical Outreach and Assistance for States Team
License: This is an open access protocol distributed under the terms of the Creative Commons Attribution License, which permits unrestricted use, distribution, and reproduction in any medium, provided the original author and source are credited
Protocol status: In development
We are still developing and optimizing this protocol
Created: October 19, 2021
Last Modified: January 20, 2022
Protocol Integer ID: 54254
Keywords: Illumina, Sequencing, MiSeq, iSeq, MiniSeq, NextSeq, NovaSeq, Paired-End, Next Generation Sequencing, NGS, SARS-CoV-2, Covid, Pangolin, Short-Read, Coronavirus, Genomics, Genetics, Virology, Molecular Biology, sequence submission, GISAID, GenBank, SRA, sequencing data, influenza data, accessible genome sequence, terra platform public health laboratory, genomic, metadata sheet, national center for biotechnology information, data for sar, sample metadata prep, consensus sequence assembly, sample metadata, sharing influenza, metadata file, metadata sheets for batch submission, metadata, sequence data, sample metadata prep for submission workflow, national institutes of health, mercury workflow, sample metadata files for sample, mercury sequence, multiple public data repository, biomedical resource, depositing sar, submission to public repository, mercury overview, public health laboratory, breadth of biomedical resource, ncbi sra, public repository, biotechnology information, primary public repository, ncbi, end sequencing run, tit
Disclaimer
The opinions expressed here do not necessarily reflect the opinions of the Centers for Disease Control and Prevention or the institutions with which the authors are affiliated. The protocol content here is under development and is for informational purposes only and does not constitute legal, medical, clinical, or safety advice, or otherwise; content added to protocols.io is not peer reviewed and may not have undergone a formal approval of any kind. Information presented in this protocol should not substitute for independent professional judgment, advice, diagnosis, or treatment. Any action you take or refrain from taking using or relying upon the information presented here is strictly at your own risk. You agree that neither the Company nor any of the authors, contributors, administrators, or anyone else associated with protocols.io, can be held responsible for your use of the information contained in or linked to this protocol or any of our Sites/Apps and Services.
Abstract
Public health laboratories are encouraged to submit sequencing data for SARS-CoV-2 to multiple public data repositories to ensure broad access by the research community and public health institutions for rapid, genomics-driven public health response to disease outbreaks. There are three primary public repositories for depositing SARS-CoV-2 sequencing data:
- Global initiative on sharing all influenza data (GISAID) EpiCov,
- National Center for Biotechnology Information (NCBI) GenBank, and
- NCBI SRA (sequence read archive).
Laboratories are encouraged to submit consensus assemblies to both GISAID and GenBank, as well as submit raw (filtered) sequencing reads to NCBI SRA. NCBI is a division of the National Library of Medicine within the US government's National Institutes of Health and organizes a breadth of biomedical resources including publicly accessible genome sequences, annotations, analyses, and derived data. GISAID was created as a framework for openly sharing influenza (and now SARS-CoV-2) sequence data, while maintaining strict governance over the data use and attribution to sequence submitters.
The Mercury workflows are designed to aid submission to public repositories as explained in Theiagen's YouTube series:
Mercury Overview: https://www.youtube.com/watch?v=h8YASVckOrw
Mercury Tutorial Part 1: https://www.youtube.com/watch?v=nFJT_QEk25s
Mercury Tutorial Part 2: https://www.youtube.com/watch?v=mtBXbbT3vPg
Titan Mercury Workflows: This workflow will take in reads, consensus sequence assemblies, and sample metadata and package all of those inputs into repository submittable files for submission to GISAID and GenBank (SRA coming soon). This protocol first starts with preparing SE (single-end) or PE (paired-end) reads for submission and then moves to prepare all the samples into a batch for bulk submission as you likely have many samples to submit.
Mercury SE/PE Prep - prepares assembly and sample metadata files for samples individually from either single-end or paired-end sequencing runs.
- Will only generate prepped files for assemblies with <5,000 Ns
Mercury Batch - concatenates assemblies (fasta files) and combines metadata sheets for batch submissions
- Will only batch samples with 0 VADR alerts
For technical assistance, please contact: [email protected]
Troubleshooting
Where to Begin
This workflow is intended for users of Titan workflows for SARS-CoV-2 strain characterization on the Terra platform and expects the following protocols have already been completed:
- Terra and Google Cloud Accounts
- Samples uploaded
- Output from the Titan workflow
This protocol is intended only for submitting sequences derived from human clinical specimens.
Note
Please refer to the following documentation for submission criteria and minimum quality control thresholds.
GenBank Submission Criteria: About GenBank Submission (nih.gov)
GISAID Submission Criteria:  Gisaid inclusion criteria.pdf
The Association of Public Health Laboratories (APHL) has also summarized these differences here: Recommendations for SARS-CoV-2 Sequence Data Quality & Reporting.
GISAID Registration
Submitting to GISAID EpiCoV requires registration. To create an account, navigate to the GISAID webpage and follow the steps below to register.
Hover over the 'Registration' tab near the top right corner and click 'Register' in the drop down menu:
GISAID home page. Click 'Register' in the drop down menu
Read the terms of use and then click 'Register' to continue.
GISAID registration overview and terms of use page.
Fill out the information on the registration page, scroll to the bottom to accept the DATABASE ACCESS AGREEMENT, and click 'Register' to continue.
GISAID registration form
You will be notified by email when your account is set up and ready to use. This might take a day or two.
Import Mercury workflows from Dockstore
Importing the Mercury Workflow from Dockstore to the User Workspace
We will first walk through steps to import the Mercury workflow, and at the end there is a video showing the full process. You should already have a workspace created from when you ran the Titan workflow.
The script for the Titan workflow is located in the Dockstore repository and has to be imported into the user Terra Workspace. There are two ways to get to the Workspace page. The first method starts by clicking on the three parallel lines in the top left-hand corner, followed by clicking the 'Library' tab, and finally click the 'Workflows' button.
The library tab on the Terra Platform.
In the 'Workflows' panel, under 'Find Additional Workflows' click on the 'Dockstore' link
The 'Code and Workflows' page in the 'Library' panel.
Alternatively, from within your workspace click on the "Workflows" tab, then click on the blue "+" inside the "Find a workflow" panel.
Terra workflow space
Find a workflow pop up window
On the left side of the Dockstore page, enter 'theiagen/public_health_viral_genomics/' in the search bar. There are three Mercury workflows to choose from:
- Mercury_PE_Prep - preparing sequences from paired-end sequencing runs
- Mercury_SE_Prep - preparing sequences from single-end sequencing runs
- Mercury_Batch - combining sequences and metadata from multiple samples for submission
Select either PE or SE based on your situation. The examples below assume that you have several samples to prep using the Mercury_PE_Prep workflow.
Search results for 'theiagen/public_health_viral_genomics/Mercury_PE_Prep' on the Dockstore page.
Click the 'theiagen/public_health_viral_genomics/Mercury_PE_Prep' link, which will take you to a new page.
The Theiagen Mercury PE Prep workflow page on the Dockstore website.
On the right-hand side of the page under the 'Launch with' window, click the 'Terra' button. It should bring you back to the Terra platform within the 'Import Workflow' page. Since you already have a workspace created, you can simply import it by selecting the workspace from the "Destination Workspace" drop down menu and clicking import.
The Terra 'Import Workflow' page. The Mercury PE Prep workflow code is shown on the left.
After clicking the import button you should be automatically directed to the Mercury workflow panel in the new workspace page that was just created.
Make sure you pick the latest version (or an older stable version you want to use) from the drop down version menu before continuing. The "main" and "dev" versions are under active development and are not stable!
The Mercury workflow panel within the newly created Terra workspace
Here is a video of the whole process:

Using the same method, import the Mercury_Batch workflow, which will be run later in step 7.
Metadata Table Preparation and Upload
Download Terra_Metadata_Formatter.xlsx , which looks like this:
Terra Metadata Formatter
This Excel file has two sheets: User Input and Terra Data Table. Users fill out the User Input sheet and the Terra Data Table sheet will populate with all the information necessary to run the Mercury workflow. After you finish, we will upload the Terra Data Table directly to Terra.
The following fields are in the User Input sheet (blue columns are required and orange are optional):
- Terra entity - this is the same 'root entity' as your data table in Terra (in our example its "entity:sample_id") or the title of column one. So we will type "sample_id" here.
- Submission_ID Prefix - we recommend using the adopted convention of "state-institution-accessionnumber" format. Using this, all samples will have the same prefix containing your state and institution. So for our example it would be GA-CDC-. Don't forget the trailing hyphen!
- Submitter - This is your GISAID user name (what you use to log into the platform). Not your actual name!
- Authors - Who contributed to the sequencing and analysis of this data.
- BioProject - an organizing tool at NCBI that pulls together different kinds of data submitted across multiple NCBI databases. Each BioProject has a unique URL, providing a home page with a title, description, links to lab websites, publications, funding resources associated with a particular project, along with links to the deposited data. A basic data BioProject holds actual sequence data, assemblies, and their associated metadata. BioProjects provide a framework for large-scale research efforts to connect submissions of various types (genome, transcriptome, etc.) and to various data repositories. (BioProject example: PRJNA706724).
Note
If your lab has not yet registered a BioProject , follow Step 3 in the SARS-CoV-2 NCBI submission protocol: SRA, BioSample, and BioProject before proceeding. If your lab does not have an NCBI submission user group established yet, its best to do that now (see step 1 of the above protocol).
- State, Country, Continent, Originating Lab and Originating Lab address are all information about the location of where the sample was taken from.
- Sample Identifier - use the file you downloaded to copy and paste the name of the samples you want to submit.
- Submission ID - you can use the same identifier that you used for the sample internally (this column would be the same as the Sample Identifier column) or if your lab uses secondary decoding then use that scheme here.
Note
The GISAID EpiCoV Public Access repository is based on existing submission processes and data structures for large-scale influenza surveillance (GISAID EpiFlu). As such, submitters to EpiCoV will discover that several of the required metadata submission fields may be problematic. Location, gender and patient age are required fields, and several of them likely constitute personally-identifiable information (which is why they are listed as optional in the Terra Metadata Formatter). While these fields cannot be left blank for submission to GISAID this workflow will simply enter these fields as "unknown" if those fields are left blank in the Formatter. This will allow successful submission.
You can get the submission ID to copy and paste to your excel sheet by unselecting all columns other than the sample_id by clicking the blue "gear" in the far right top of the data table. A pop up window will show up select "none" then click "Done".
Pop up window for selection columns you want to see.
Select all the rows by clicking the top check box at the top of the rows in the far left corner of the data table. A little blue icon with three dots will show up (red arrow). Click it and a drop down menu will appear. Click "Download as a TSV".
Downloading rows as a tsv file
Open the downloaded file and copy just the rows with samples, but NOT THE COLUMN HEADER. This can be directly copied into the "Samples" column of the "User Input" sheet in your Terra Metadata Formatter file.
Copying sample IDs
- Collection Date - use the format YYYY-MM-DD
- Run ID, Sex, Patient Age and Country are all optional sample metadata fields. They can be left blank, just remember to remove the place holder text first. It is ok to have some of this data for some samples and not others.
Once you have this information filled out, check the Terra Data Table sheet to make sure everything is entered correctly. Here is an example with random data.
Some example metadata
Now you are ready to upload your metadata table! First, copy everything in the "Terra Data Table" to your computer's clipboard.
Copy populated information in the "Terra Data Table" sheet
Return to the Terra webpage "Data" tab in your workspace. Click the blue "+" button in the "Tables" tab on the left hand side of the webpage. A pop up window will appear in which you will click the "Text Import" tab. Now paste the contents of the Terra Data Table sheet into the window. Click "Upload" to finish the process. Now you should have extra columns of metadata for each of your samples.
Uploading metadata
As of 5/20/2021, Terra was having some database deadlock issues with data table imports, so you might not see your import data shown right away. As a quick workaround, click on the "DASHBOARD" tab and make SOME edit to your workspace. The easiest way to do this is to click the blue "pencil" icon as if you are going to write a description of your workspace then just click "SAVE".
Click the pencil to edit the workspace description.
Save to cause a refresh of the workspace.
This will trigger a refresh of the workspace metadata, and you should see your metadata if you go back to the "DATA" tab and click on "Sample".
Here is a video showing the steps:

Running the Mercury Prep Workflow
To run the Mercury workflow, click on the 'Workflows' panel within your workspace. It should bring you to the following page:
The workflows panel in the newly created Terra workspace.
Click on the 'Mercury_PE_Prep' tile and it will take you to a new page. Double check that you are using the latest version of the workflow. Or if you want a specific version pick that one.
The Mercury PE Prep workflow page. Check version you are using.
Click the 'Run workflow(s) with inputs defined by data table' option button and then in the 'Select root entity type' pull-down menu, select 'sample' or whichever entity type you specified in the sample table. Click the blue 'select data' button and select the samples you want to run or click the check box at the very top left to select all of them to be run.
Checking the box to have all sample be run through the Mercury PE Prep workflow.
Make sure "Use call caching" is checked and then select the root entity type for the data you wish to analyze (here it's sample).
NOTE: Call caching allows Terra to identify and skip jobs that have been run previously; this option is by default enabled to avoid unnecessary compute costs. More information on Terra call caching, including examples of when you may want to disable this feature, is available through the Terra Support Documentation.
The Mercury PE Prep workflow input panel after defining inputs by the sample data table
The first several rows in the 'Inputs' tab should each have a yellow caution icon. These rows represent variables that have to be provided by the user or were generated by the Titan workflow (this.assembly_fasta). This is the information that we just imported or was generated by the Titan workflow you ran.
For each row, click on the 'Attribute' text box and then click on the corresponding input as follows:
| Variable | Attribute (AKA input) | |
| assembly_method | this.assembly_method | |
| Authors | this.Authors | |
| bioproject_accession | this.bioproject_accession | |
| collecting_lab | this.collecting_lab | |
| collecting_lab_address | this.collecting_lab_address | |
| collection_date | this.collection_date | |
| gidaid_submitter | this.gidaid_submitter | |
| iso_continent | this.iso_continent | |
| iso_state | this.iso_state | |
| read_1 | this.read1_clean | |
| read_2 | this.read2_clean | |
| samplename | this.sample_id | |
| seq_platform | this.seq_platform | |
| sequence | this.assembly_fasta | |
| subLab_address | this.subLab_address | |
| submission_id | this.submission_id | |
| submitting_lab | this.submitting_lab |
Required inputs for the workflow. The ones in bold are different than the normal "this.variable" notation
Note that read_1 and read_2 are the RAW reads that you input into Titan; you might have named these something other than Forward_Read and Reverse_Read. Check the Excel file you used to create your collection. If you added any of the optional metadata then add the following attributes for these columns in the Terra Metadata Formatter.
| Variable | Attribute (AKA input) | |
| gender | this.gender | |
| iso_county | this.iso_county | |
| patient_age | this.patient_age |
Optional inputs to add to the workflow
Adding inputs into input panel
Next, click the output tab and click "use defaults" and it will autofill in the names of the output files according to the sample names. If you forget to do this you won't have easily accessible results!
Setting output names by clicking "use defaults"
Click the 'Save' button on the top right-hand side of the page. The yellow caution icons should disappear. Now that you have saved the workflow the next time you go to run it this will already be done!
You are now ready to run the Mercury PE Prep workflow!
Click on the 'Run Analysis' button to the right of the 'Outputs' tab. A popup window should appear titled 'Confirm launch'. If the 'Run Analysis' button is greyed out, you need to save your recent changes by clicking the 'Save' button.
The 'Confirm launch' popup window
Clicking the 'Launch' button should bring you to the 'Job History' panel where each sample will be queued for the Mercury PE Prep analysis.
The 'Job History' page showing each sample queued for the Mercury PE Prep run.
The status will change from Queued to Submitted to Running. After the workflow has finished, the status column will show up as successful or failed.
Video of entire process:

Understanding the Mercury Prep Output
If data are missing for a sample, it's likely because the consensus assembly included too many ambiguous bases (Ns) and exceeded the threshold for submission to GISAID (>5,000), therefore the Mercury workflow produced no data for the sample. Similarly, the consensus assembly may include too few unambiguous bases, below than the 25,000 bp threshold. This information would be reported in 'assembly_length_unambiguous' column highlighted below.
Output of Mercury PE Prep
If you are not seeing "Number_N" column then click the "gear" icon in top row on the right. Select the "Number_N" then click "Done".
Checking Number_N box to see the output from the Titan workflow
Running the Mercury Batch Workflow
You should have already imported the Mercury_Batch workflow in step 3; if not do that now. The outputs of the Mercury PE Prep or Mercury SE Prep workflow will be used in the Mercury_Batch workflow.
Unlike previous runs of Titan/Mercury, here we will use the root entity type "entity:sample_set". Previously, we worked with a sample data table where each row had information for one sample. If you click on the "DATA" tab under the "TABLES" section you will see there is also a data table that contains sample_set. In a sample set data table, each row represents a set of samples.
sample_set data
Open the workflow to run the Mercury_Batch analysis, select the latest version and click "Run workflow(s) with inputs defined by data table" as before. Select the root entity type as "Sample_Set" NOT "Sample_id".
Selecting sample_set
Since we are using the "Sample_Set," we have to be explicit about which set we want to analyze. To do this click "SELECT DATA," then select the appropriate samples by choosing "Create new set from selected samples" and select the samples that have output. DO NOT INCLUDE SAMPLES THAT HAVE NO OUTPUT; the pipeline will fail since there is no output to process for some samples. A quick way to do this is to select all the samples then sort the rows by "genbank_assembly" by clicking that column header. This will organize all the samples with no output together so have you can easily deselect them, leaving only samples with output selected. You can also use the search bar to sort for particular samples. For example, if you included run_id as part of the metadata you can search for that to easily access samples to select.
Picking Sample to run
NOTE: If you have more than 25 samples, "select all" will only select those samples listed on the first page. You will have to go to the next page to make sure everything you want is selected.
Now we will define the inputs for the Mercury_Batch workflow. This is different than our previous run, so READ CAREFULLY. We have 6 required inputs for this workflow. Fill in the following for each variable:
| Variable | Attribute (AKA input) | |
| genbank_single_submission_fasta | this.samples.genbank_assembly | |
| genbank_single_submission_meta | this.samples.genbank_metadata | |
| gisaid_single_submission_fasta | this.samples.gisaid_assembly | |
| gisaid_single_submission_meta | this.samples.gisaid_metadata | |
| samplename | this.samples.sample_id | |
| vadr_num_alerts | this.samples.vadr_num_alerts |
Required inputs for the Mercury_Batch workflow
This notation is a bit confusing so we will break it down. Here "this." represents the "sample_set", so for the first row we are telling the computer that for "this" (sample_set) there is a "genbank_assembly" element for each sample in the set and that should be the input here. Make sure you write this.samples.xxxx NOT this.sample.xxxx
At the end it should look like this:
Mercury batch workflow inputs
We are inputting the number of VADR alerts to this workflow to exclude samples with VADR alerts to expedite the sharing of hassle free submission. If wanted, you can change the threshold of the number of VADR alerts by changing the optional parameter "vadr_threshold".
Like we did before, go to the "OUTPUTS" tab and choose "Use defaults". Click "SAVE" then "RUN ANALYSIS". Once we have a successful run we can have a look at the outputs.
Setting up outputs
If your "RUN ANALYSIS" button is greyed out, like it is in the image, you need to save the workflow first.
Video of the whole process:

Understanding the Mercury Batch Output
First, check that there were no failures in your run by clicking on the "JOB HISTORY" tab and selecting the run. You should see something like this:
Status "Succeeded"
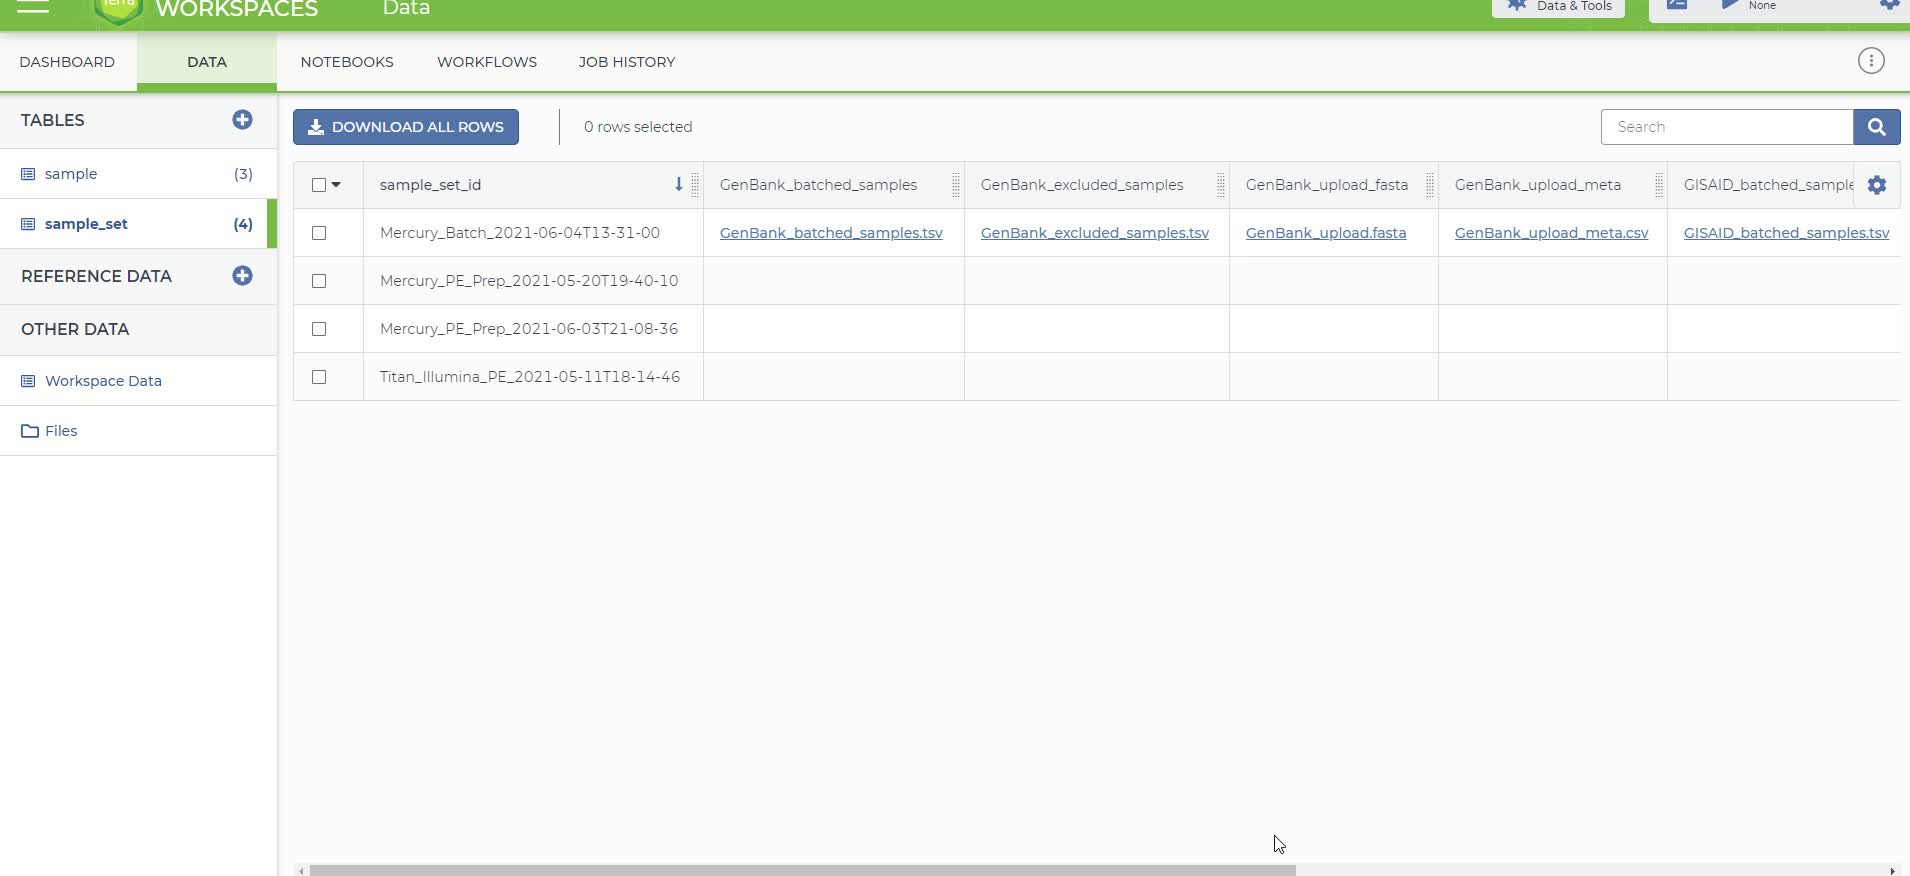
The outputs of this workflow that are used for submission are:
- GenBank_upload_fasta - Concatenated assembly file for GenBank
- GenBank_upload_meta - Combined metadata file for GenBank
- GISAID_upload_fasta - Concatenated assembly file for GISAID
- GISAID_upload_meta - Combined metadata file for GISAID
There are also 2 tsv files that contain the names that were batched and excluded from the analysis.
Output of Mercury Batch workflow
The GenBank upload files (fasta and meta) as well as the GISAID fasta file are completely compatible for upload!
Output fasta and metadata files for upload to repositories
However, GISAID is VERY specific in how to format and upload its metadata. So the GISAID_upload_meta will need to be transferred to the GISAID metadata template first.
GISAID Metadata Upload
Navigate to the GISAID homepage and login.
GISAID home page.
Login page
Click the 'Upload' button at the top of the page. Then select the 'Batch upload' option.
Upload pop-up window
On GISAID's batch upload page, click on the "Download Instructions and Template" button found at the bottom left of the page.
Download Instruction and Template
On the Terra data page, download the GISAID_upload_meta file by clicking on it and then clicking "Download". Navigate to where the file downloaded and right click on it, chose "Open with" and then open it with a basic text editor (Notepad or TextEdit). DO NOT OPEN WITH EXCEL!!! Excel will reformat the dates and this will lead to a bunch of chaos!!
Open GISAID_upload_meta.csv file in notepad (or another text editor).
Now we will copy the information out of the GISAID_upload_meta sheet into the GISAID template on the SECOND SHEET. Copy everything in your opened GISAID upload file opened in the text editor. Return to the open GISAID template and in the SECOND sheet click the "A1" cell and then click on the paste drop down menu and choose "Text Import Wizard".
Paste with text import wizard.
Make sure the "Delimited" box is checked and click "Next". Select only the "Comma" delimiter and click "Next".
Step 1 import wizard
Step 2 of import wizard
Scroll to the "Collection Date" column and click it. While the "Collection Date" column is selected make sure the "Column data format" is set to Text and NOT GENERAL. Click "Finish" then "Ok". Save it and you can upload it directly to the GISAID page.
Step 3 of import wizard
Save the file and you can upload it directly to the GISAID page.
Upload to GISAID page
Here is a video of the whole process:
Submitting to SRA
Once you have submitted to GISAID, follow the NCBI submission to SRA, BioSample, and BioProject protocol to submit raw (filtered) sequencing reads to SRA.
During this step you will be asked to create a NCBI user group. If you are not listed as an owner on the BioProject/BioSample(s), you will be unable to properly link GenBank submissions to those existing records.
Note
An overview of NCBI's SARS-CoV-2 submission process and the required metadata is provided here:
Submitting to Genbank
Navigate to the SARS-CoV-2 landing page for NCBI and login. If you have not yet created an account, please follow the NCBI submission to SRA, BioSample, and BioProject protocol to do so before proceeding.
NCBI SARS-CoV-2 landing page before login
Once logged in, your home screen will have additional tabs at the top. Click on the GenBank submit button.
NCBI SARS-CoV-2 landing page after login
There is a lot of text on this page, but the SARS-CoV-2 sequence information at the bottom is the only thing that pertains to us here. Click the "New Submission" button at the top of the page.
New submission page with SARS-CoV-2 sequence information
Note
If you click on "requirements and sequence processing steps" you will find the following information about sequence submission requirements.
Sequence submission requirements for SARS-CoV-2 consensus sequences
Rest assured the Titan and Mercury protocols are compliant with these requirements, but this information is good to know as it can help guide your lab in QC cutoffs in your protocol or determining what kind of information you want to add to your metadata.
After clicking "New Submission" you will be directed to a new page. Under "*What do your sequences contain?" Select "SARS-CoV-2, Influenza, Norovirus, or Dengue virus". Next select "SARS-CoV-2" under "Which virus?". Add an optional submission title if you want and click "continue".
Step 1 of GenBank submission
The submitter info should auto populate, but if not, enter appropriate info. Here, “submitter” is the name of the person, or user group, who is physically doing the submissions, not a supervisor or PI. This must be the same person or group that submitted the associated BioSamples and BioProject. Select the appropriate submission group name for your laboratory and check the contact information.
Note
If you do not have a submission group available to click, see Steps 1.2-1.3 in the SRA submission protocol to establish a new one for your laboratory, or to add your name to a group already established for your lab.
submitter page.
Click "Continue" when done. The new step requires information about the sequencing and bioinformatic platforms.
You will most likely have used either Illumina or Nanopore/ONT (Oxford Nanopore Technology). Select which is appropriate for your data, for Nanopore select "other" and enter "ONT" in the field. Select "Assembled sequences (each sequence was assembled from two or more overlapping sequence reads)" then enter the assembly information. You can find this information in the assembly_method column of the Titan output on Terra.
Assembly method column on Terra
Alternatively, you can find the assembly information in your "GISAID_upload_meta.csv" file under the "Assembly method" column.
Assembly method in GISAID_upload_meta.csv
The completed form should look similar to the example below:
Fill out sequencing and bioinformatic information.
Click "Continue" when done. Under "Release date" Click "Release immediately following processing" for routine surveillance isolates. Your lab might also have a policy describing the timetable for data release.
Drag-and-drop the "GenBank_upload.fasta" file downloaded from the Mercury workflow into the "Sequences" box.
After clicking "Continue", your sequences will be checked for strings of NNNs and ambiguous bases. If it finds one of these it will return an error message. If you get a warning about NNNs click "A region of estimated length between the sequenced regions based on an alignment to similar sequences or genome" and then "Continue". Further details are given in the Genbank submission protocol.
NNNs warning
In the next tab, you will be asked how you want NCBI to handle sequences that fail to be processed. Pick how you would like to proceed and click "Continue"
An example of the sequence processing tab
On the next tab, under "How do you want to apply source modifiers?" select "Upload a tab-delimited table" and then drag and drop the "GenBank_upload_meta.csv" file from the Mercury pipeline.
Once you have uploaded your metadata table you will get a warning about not submitting "isolation-source" missing from your data table. If you have this information, you can click "Under an editable table" under the "How do you want to apply source modifiers" header. Once you select this an editable table will appear.
editable table.
If the answer for "isolation-source" is identical, you can type the answer into the first cell then hover your mouse over the lower right corner of that cell until a large "+" appears. Drag to the bottom cell to copy the same text into all the cells as you would in Excel. Click "Continue" when done.
Now you should be on step 7 "References". Enter the author(s) information and select if these sequences are for a article that is unpublished, in press or published. This page will require at least 1 author entered to continue. Click "Continue" when done.
On the last page, review that your data is correct and hit submit when ready. Review the submission and Genbank record preview, paying close attention to correct linkage of BioProject and BioSample, plus any other metadata submitted.
Double check these fields to make sure they are correct before submitting.
Checking the status of your submissions
The status of your submission can be tracked under the "My Submissions" tab: https://submit.ncbi.nlm.nih.gov/subs/
GenBank accessions will be listed here, under "GenBank: Processed" and available for download in the "AccessionReport.tsv" file.
Sequences with no annotation issues will be listed as Processed. Submissions with annotation discrepancies will be marked as Error and a "Fix" button will appear. A report is emailed to you and listed on the submissions page with the detailed issues to be resolved. If the data are incorrect, click the "Fix" button and you will return to the sequences page of your submission to upload a corrected file.
If you have evidence that the discrepancy is due to a naturally occurring mutation, send an email to [email protected] with the SUB number and supporting evidence.
Data stewardship and curation
It is a good idea to develop an internal method for storing and tracking your GenBank accessions as these are required for making future updates to your records.
For updates to your GenBank records follow the NCBI Curation Protocol hosted by GenomeTrakr: