Nov 27, 2024
In vivo calcium imaging of the L4 sensory ganglion in mice
- George Goodwin1,
- Kim Chisholm2
- 1King's College London;
- 2University of Nottingham


Protocol Citation: George Goodwin, Kim Chisholm 2024. In vivo calcium imaging of the L4 sensory ganglion in mice. protocols.io https://dx.doi.org/10.17504/protocols.io.eq2ly635rgx9/v1
Manuscript citation:
Chisholm KI, Khovanov N, Lopes DM, La Russa F, McMahon SB. Large Scale In Vivo Recording of
Sensory Neuron Activity with GCaMP6. eneuro 2018;5(1):ENEURO.0417-0417.
Ingram S, Chisholm KI, Wang F, De Koninck Y, Denk F, Goodwin GL. Assessing spontaneous
sensory neuron activity using in vivo calcium imaging. Pain 2023.
License: This is an open access protocol distributed under the terms of the Creative Commons Attribution License, which permits unrestricted use, distribution, and reproduction in any medium, provided the original author and source are credited
Protocol status: Working
We use this protocol and it's working
Created: November 15, 2024
Last Modified: November 27, 2024
Protocol Integer ID: 112171
Keywords: in vivo calcium imaging, dorsal root ganglion, GCaMP, sensory neuron, vivo calcium imaging of the l4 sensory ganglion, mice for in vivo calcium imaging, surgical exposure of the l4 dorsal root ganglion, l4 dorsal root ganglion, vivo calcium imaging, l4 sensory ganglion, imaging, vivo
Funders Acknowledgements:
UKRI
Grant ID: MR/W027518/1
Abstract
This protocol describes the preparation and surgical exposure of the L4 dorsal root ganglion (DRG) in mice for in vivo calcium imaging with GCaMP6s.
![Icon for Figure 1. Diagram from Yuan et al 2023 [4] showing anatomy of bony structures surrounding the DRG.png](https://content.protocols.io/files/ryevcguux.png)

Image Attribution
Figure 1 reused with permission from Yuan et al 2023
Guidelines
The surgery and clamping steps for this protocol are challenging. It is advised that you shadow someone who has experience performing this technique before attempting it on your own.
Materials
AAV9.CAG.GCaMP6s.WPRE.SV40 - RRID: Addgene_100844, Adgene
Drugs & Chemicals:
| Name | Dose | |
| Urethane | 12.5% w/v | |
| Isoflurane | 5% induction, 1-2% maintenance | |
| Saline | 0.9%, sterile |
Other equipment:
| A | |
| Name | |
| Homeothermically controlled heat pad and rectal probe | |
| Isofluorane anaesthetic rig | |
| Electric Shaver | |
| Tape | |
| Cotton tips | |
| Gauze pads | |
| 1ml syringes with 26g needles | |
| Chlorhexidine | |
| Bone wax | |
| Gelfoam | |
| Kwik-Sil Silicone Elastomer (WPI) | |
| Dissection microscope | |
| Vaseline | |
| Sterile gloves |
Recommended tool set:
| Name | Product code | |
| Rongeur (Friedman Pearson, curved) | FST 16221-14 | |
| Forceps 2 teeth | FST 11027-12 | |
| Serrated curved forceps | FST 11003-12 | |
| Angled (45 degree) Dumont Forceps | FST 11253-25 | |
| Sharply Curved Spring Scissors | FST 15017-10 | |
| Black Tough cut Scissors | FST 14085-09 | |
| Forceps 5.SA | Ideal-tek | |
| Vertebral clamps | Precision Systems and Instrumentation, VA, USA |
Troubleshooting
Mice
Perform experiments in C57BL/6J mice (RRID:IMSR_JAX:000664).
Administration of GCaMP6s calcium indicator
Prepare the viral vector containing GCaMP6s calcium indicator: Use AAV9.CAG.GCaMP6s.WPRE.SV40 (available from Addgene, USA[1]; RRID:Addgene_100844) for injection.
Transport the virus to the animal facility on ice.
Select mouse pups at post-natal day P2–P5 and separate groups of 3–4 pups from their mother.
Fill a 10 µL Hamilton syringe equipped with a 30G needle with 6 µL of the AAV9 vector.
Administer 6 µL of the AAV9 solution subcutaneously into the nape of the neck of each pup.
** We find that approximately 50% of sensory neurons from all sensory ganglia are labelled with GCaMP6s using this approach **
Place the injected pups back with their mother immediately after injection.
Preparation of mouse for surgery:
Select appropriate GCaMP6s injected mouse of at least 10 weeks of age.
Weigh mouse.
Perform intraperitoneal injection of urethane (~1g/kg dose using 12.5% w/v solution) to lightly anaesthetise mouse.
Place mouse into isoflurane induction chamber and set vaporiser to 5% until surgical plane of anaesthesia is achieved. Check depth of anaesthesia by checking pedal reflex in front hind paw (avoid squeezing hind paws if imaging lumbar DRGs).
In a separate preparation area place the anaesthetised mouse on a heated pad and place the nose of the mouse into an anaesthesia nose cone. Note that homeothermic control is not necessary for this brief shaving step; however, ensure that the pad is not too hot to the touch. Set the vaporiser to the appropriate level at which anaesthesia is maintained (by checking front paw pedal reflexes), but no more (usually around 2%).
Shave the back of the animal and remove loose fur.
Disinfect surgical area with chlorohexidine.
Move the mouse to a sterile surgical area with a dissection microscope and a homeothermally controlled heating mat with a rectal probe.
Place the mouse in a supine position on the heating pad and place the head in nose cone.
Using lubricating gel on the rectal probe (e.g. vaseline) and carefully insert the temperature probe into the rectal cavity.
Tape the temperature probe to the tail. It may be necessary to also tape the tail and/or probe to the bench or stage to avoid it moving the body of the mouse (depending on the flexibility of the cabling).
Check the depth of anaesthesia (front paw) to ensure surgical plane of anaesthesia is maintained.
Surgical dissection to expose the L4 DRG
Using black tough cut scissors, cut away skin on the back covering the lumbar part of the spinal cord.
Use thumb and index finger, covered by sterile gloves, to feel where the ileac crests are (hip bones). In C57BL6/J mice, the L5 vertebrae are approximately in line with the point where the hip bones line up. Use this as a reference point for the next steps.
Find the spinous processes of the dorsal spinal column and remove the soft tissue between the spinous processes and the transverse processes from L6-L3 DRG (Figure 1).
Figure 1: Diagram from Yuan et al 2023 [4] showing anatomy of bony structures surrounding the DRG
Note that the L6 vertebrae can be identified, because they are mobile when moved against L5, whilst S1 is fused to S2). You should be cutting close to the bone, removing the tendons connecting the surrounding muscle to the bone and clearing the dorsal part of the spinal column of all connective tissues, without damaging the bone underneath.
*CAREFUL: do not cut below the level of the transverse processes, to avoid cutting or damaging the lumbar spinal nerves.*
Carefully turn the mouse over until its position is between prone and lateral recumbent (lying slightly on its side).
Place vertebral clamps on the intact transverse processes (i.e. onto L5 and L3 vertebrae). *This step will take practice even for those experienced with rodent surgery. The clamps should be positioned so that the DRG is as close to horizontal as possible – see Figure 2.
Figure 2: Diagram illustrating optimum positioning of clamps for imaging DRG on a horizontal plane
The dorsal processes should be angled away from you slightly.* *Ensure clamps are not overtightened or placed in the small gap between vertebrae, to avoid damaging the spinal cord or spinal nerves.*
Once the mouse has been clamped securely, carefully insert the rongeurs onto the facet joint between L4 and L5, with the tip of the rongeurs facing rostrally. Carefully clip away a small part of the L4 vertebrae using the rongeurs, in a caudal-rostral direction, thereby widening the gap between L4 and L5. This can cause bleeding, which can be stemmed using gelfoam.
Continue to carefully chip away the L4 vertebral bone until a hemilaminectomy of L4 is achieved. The laminectomy needs to be extended into the lateral direction, to expose the DRG which should lie just ventral of the transverse processes. Continue to use gel foam to stem any bleeding.
*Note that there tends to be more bleeding from the caudal side so do not remove too much bone from this end.*
Bleeding can be stemmed using gelfoam. Bone wax can be applied to stem bleeding from the bone.
Once the DRG is exposed, make sure all bleeding has stopped before coating with silicone elastomer. Apply a drop of saline onto the DRG to check for minor bleeding.
Apply a very thin coat of silicone elastomer to the DRG and wait ~5min for it to set and to ensure there is no bleeding. *Ensure that there are no bubbles in the silicone elastomer.
*Should any bleeding occur while the silicone elastomer sets, remove the elastomer, stem the bleed and reapply.*
Rehydrate mouse with 0.25mL saline subcutaneously. Repeat every hour to maintain hydration.
The optically cleared window over the DRG is complete, and the mouse can now be placed under the microscope for the visualisation of DRG.
Image acquisition
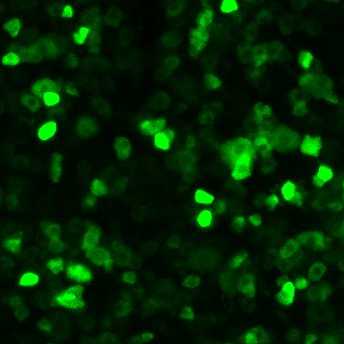
Image L4 sensory neurons using a 10x dry objective on a confocal microscope with the pinhole partially open (~154µm).
*Note that a standard fluorescent microscope can be used but a confocal is preferred to minimise contamination from background fluorescent signal*
A 488-nm Argon ion laser line can be used to excite GCaMP6s, and the signal is collected at 500–550 nm.
Perform time lapse recordings with an in-plane resolution of at least 512 ×512 pixels at ~ 3-4 frames per second.
*Note that these acquisition parameters are sufficient to visualise GCaMP6s calcium transients produced by single action potentials[3].*
Protocol references
[1] Chen, TW., Wardill, T., Sun, Y. et al. Ultrasensitive fluorescent proteins for imaging neuronal activity. Nature 499, 295–300 (2013). https://doi.org/10.1038/nature12354
[2] Chisholm KI, Khovanov N, Lopes DM, La Russa F, McMahon SB. Large Scale In Vivo Recording of
Sensory Neuron Activity with GCaMP6. eneuro 2018;5(1):ENEURO.0417-0417. https://doi.org/10.1523/ENEURO.0417-17.2018
[3] Ingram, Sonia; Chisholm, Kim I.; Wang, Feng; De Koninck, Yves; Denk, Franziska; Goodwin, George L. Assessing spontaneous sensory neuron activity using in vivo calcium imaging. PAIN 165(5):p 1131-1141, May 2024. | DOI: 10.1097/j.pain.0000000000003116
[4] Yuan X, Han S, Zhao F, Manyande A, Gao F, Wang J, Zhang W and Tian X (2023) Rapid injection of lumbar dorsal root ganglia under direct vision: Relevant anatomy, protocol, and behaviors. Front. Neurol. 14:1138933. doi: 10.3389/fneur.2023.1138933
Acknowledgements
Thanks to Dr Franziska Denk for proofreading this protocol