Oct 28, 2021
Immuno-correlative light and electron microscopy (iCLEM) using STEM
- Viola Oorschot1,
- Jill Danne1,
- Benjamin Lindsey2,
- Jan Kaslin2,
- Georg Ramm1
- 1Ramaciotti Centre for Cryo EM, Monash University, Melbourne, Australia;
- 2Australian Regenerative Medicine Institute, Monash University, Melbourne Australia


External link: https://store.erc.monash.edu.au/experiment/view/14488/
Protocol Citation: Viola Oorschot, Jill Danne, Benjamin Lindsey, Jan Kaslin, Georg Ramm 2021. Immuno-correlative light and electron microscopy (iCLEM) using STEM. protocols.io https://dx.doi.org/10.17504/protocols.io.bv89n9z6
Manuscript citation:
Oorschot, Viola, et al. "TEM, SEM, and STEM-based immuno-CLEM workflows offer complementary advantages." Scientific reports 11.1 (2021): 1-16.
License: This is an open access protocol distributed under the terms of the Creative Commons Attribution License, which permits unrestricted use, distribution, and reproduction in any medium, provided the original author and source are credited
Protocol status: Working
We use this protocol and it’s working
Created: July 01, 2021
Last Modified: October 28, 2021
Protocol Integer ID: 51201
Keywords: Correlative light and electron microscopy, Tokuyasu technique, Transmission electron microscopy, Zebrafish, Fluorescence microscopy, Stem cells, Progenitor cells, Scanning electron microscopy, zebrafish telencephalon brain, progenitor cell populations of the vertebrate nerve system, complete dorsal telencephalic niche, progenitor cell, investigating neural stem, immunofluorescence, electron microscopy, telencephalic niche, vertebrate nerve system, immunofluorescence labelling, high resolution electron microscopy, local neural stem, neural stem, using immunofluorescence labelling, diverse cell profile, examination of ultrathin tissue section, regenerative potential of local neural stem, cytochemical marker, progenitor cell population, ultrathin tissue section, cell, scanning tem, heterogeneous cell populations in small organism, heterogeneous cell population, complete dorsal, immuno,
Abstract
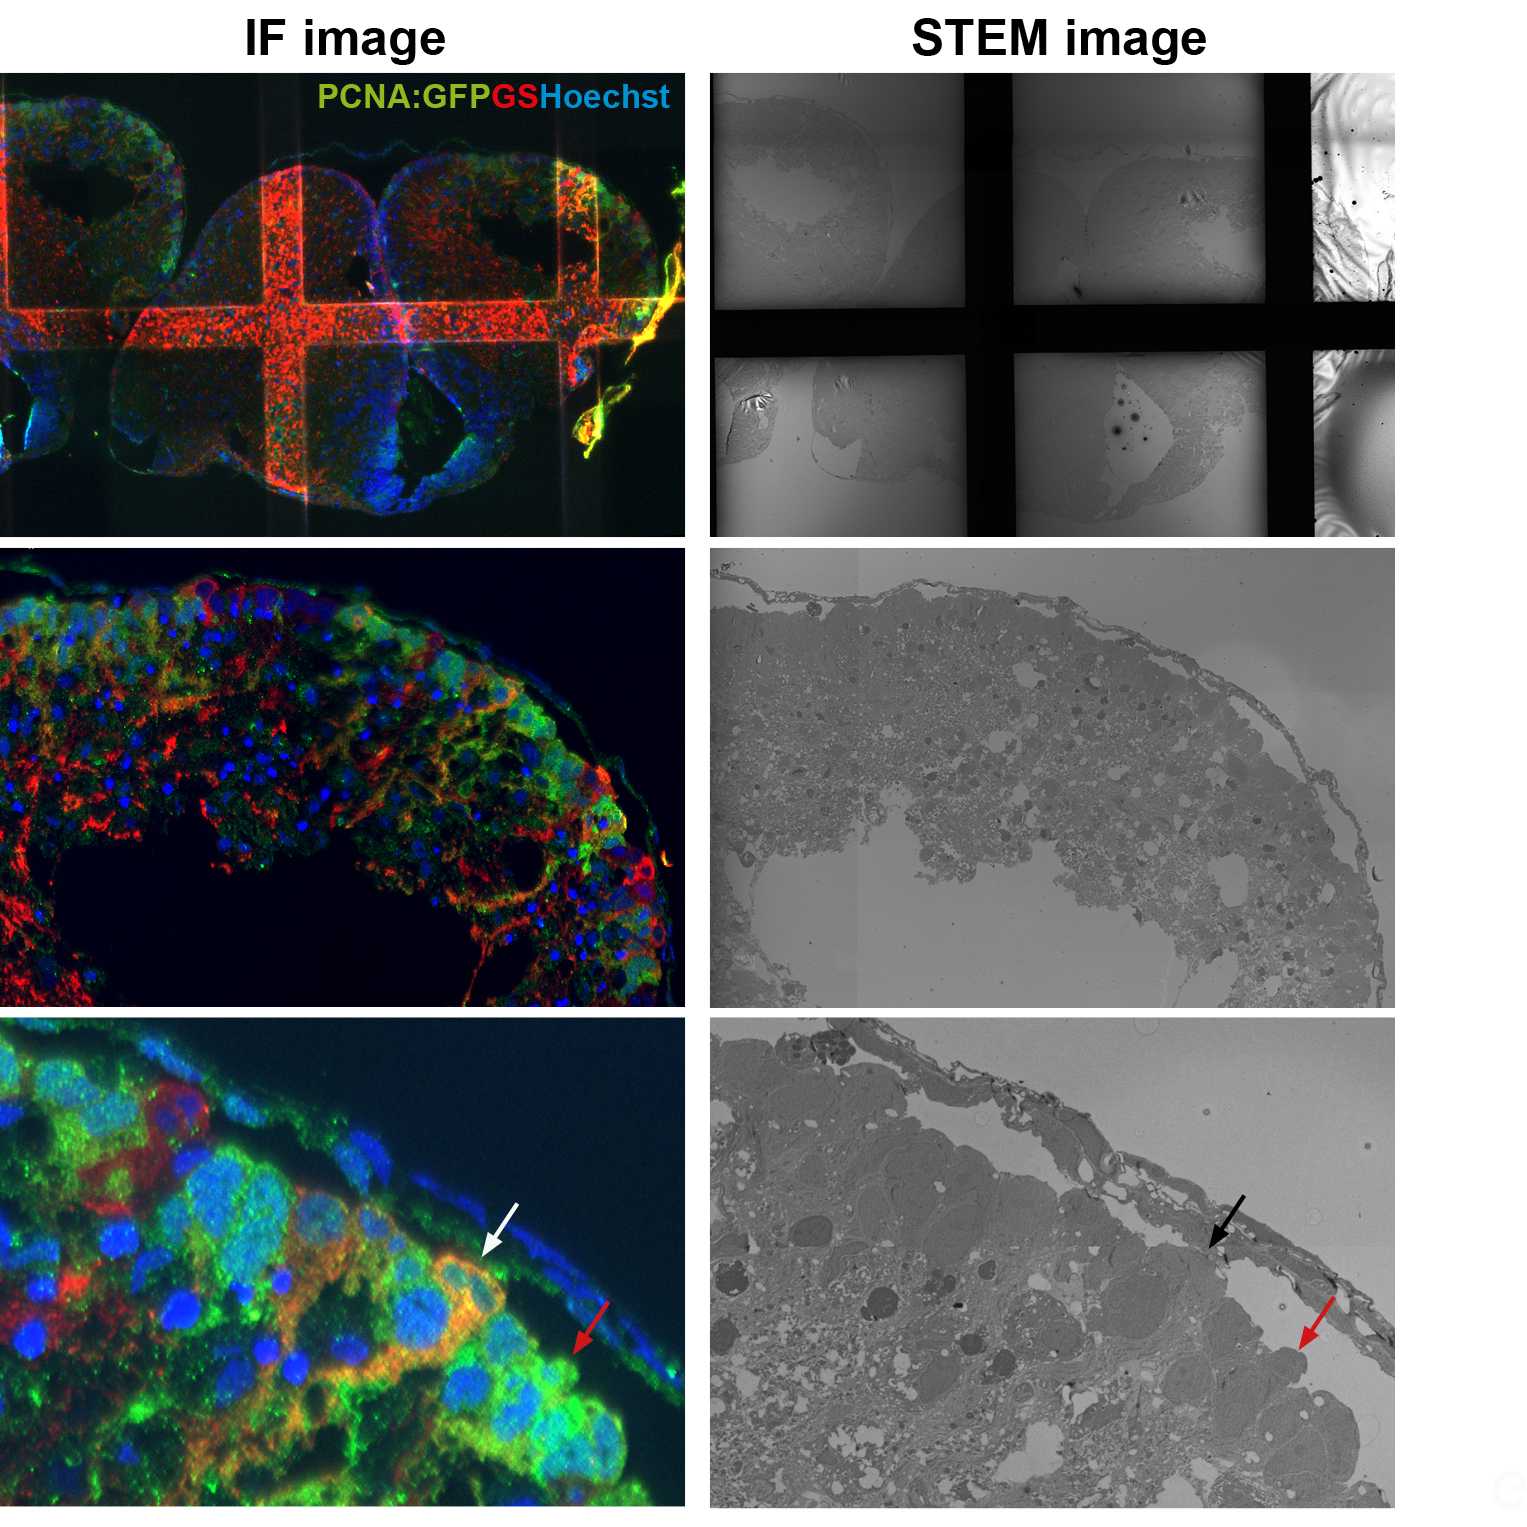
Immuno- correlative light and electron microscopy (iCLEM) combines ultrastructural information obtained from high resolution electron microscopy and the use of genetically encoded or cytochemical markers. Immuno-CLEM takes advantage of the antigenicity preserved by Tokuyasu sample preparation to identify, quantify and characterise heterogeneous cell populations in small organisms, organs and tissue of healthy and diseased states. iCLEM can be used in combination with scanning EM (SEM), scanning TEM (STEM), and transmission EM (TEM). These protocols are well-suited, for example, for investigating neural stem and progenitor cell populations of the vertebrate nerve system and are available as separate protocols on protocol.io. Here, a method for iCLEM-STEM is described using an adult zebrafish telencephalon brain as a model. This organ is small in size allowing the complete dorsal telencephalic niche to be visualised in sections, and has diverse cell profiles and regenerative potential of local neural stem and progenitor cells. iCLEM-STEM involves the examination of ultrathin tissue sections (62-70 nm) using immunofluorescence labelling and subsequent SEM imaging to obtain a high resolution overview of these sections with greater morphological detail compared to iCLEM-SEM. This protocol should be of particular interest to EM facilities with SEM, but not TEM access.

Image Attribution
Oorschot, Viola, et al. "TEM, SEM, and STEM-based immuno-CLEM workflows offer complementary advantages." Scientific reports 11.1 (2021): 1-16.
Materials
Paraformaldehyde, 16% (wt/vol)Electron Microscopy SciencesCatalog #15710
Glutaraldehyde 8% (wt/vol)Polysciences, Inc.Catalog #00216
SucroseMerck Millipore (EMD Millipore)Catalog #1.07654.1000
Formvar powder ProSciTechCatalog #C064
0.1M Phosphate buffer pH 7.4
0.2M Phosphate buffer pH 7.4
1x Phosphate buffered saline pH 7.4
GlycineMerck MilliporeSigma (Sigma-Aldrich)Catalog #G-7403
Gelatin from porcine skinMerck MilliporeSigma (Sigma-Aldrich)Catalog #G1890-500g
Methyl cellulose Merck MilliporeSigma (Sigma-Aldrich)Catalog #M-6385
Methylene blueMerck MilliporeSigma (Sigma-Aldrich)Catalog #115943
Azure IIMerck MilliporeSigma (Sigma-Aldrich)Catalog #861065
MilliQ water
Toluidine blue Merck MilliporeSigma (Sigma-Aldrich)
Bovine serum albumin, heat shock fraction pH7Merck MilliporeSigma (Sigma-Aldrich)Catalog #A9647
Mouse anti-glutamine synthetase antibodyMerck Millipore (EMD Millipore)Catalog #MAB302
Biotinylated anti-eGFP antibodyRocklandCatalog #600-106-215
Rabbit anti-biotin antibodyRocklandCatalog #100-4198
Goat anti-mouse alexaFluor-555 antibodyThermofisherCatalog #A21424
Goat anti-rabbit alexaFluor-488 antibodyThermofisherCatalog #A11008
Rabbit anti-mouse Ig antibodyRocklandCatalog #610-4120
Protein A-Gold 10nmUMC UtrechtCatalog #PAG 10nm
Protein A-Gold 20nmUMC UtrechtCatalog #PAG 20nm
Hoechst 33342Thermo Fisher ScientificCatalog #62249
2% Uranyloxylate pH 7.0
Uranyl acetateElectron Microscopy SciencesCatalog #22400
Liquid nitrogen
Ice
Glycerol >99%Merck MilliporeSigma (Sigma-Aldrich)Catalog #G5516
Equipment
Double edge blades
NAME
Personna
BRAND
72000
SKU
Equipment
Black teflon plate
NAME
N/A
BRAND
N/A
SKU
Equipment
Fine Forceps
NAME
Forceps
TYPE
Dumont
BRAND
11251-10
SKU
LINK
Equipment
Blade scalpel ST #11
NAME
Swann Morton
BRAND
21016SM
SKU
Equipment
Bite and boxing wax-500g
NAME
Investo (Lordell)
BRAND
WI-BB
SKU
Equipment
Micro spatula, stainless steel narrow spoon
NAME
ProSciTech
BRAND
T1453
SKU
Equipment
Dry block heater
NAME
Ratek
BRAND
DBH4000D
SKU
Equipment
Sample pin for cryo-ultramicrotomes, aluminium
NAME
Leica
BRAND
75959-06
SKU
Equipment
Embedding mould, single ended flat 21 cavities
NAME
ProSciTech
BRAND
RL064
SKU
Equipment
Falcon® Centrifuge Tubes
NAME
Polypropylene, Sterile, 15 mL
TYPE
Corning®
BRAND
352096
SKU
Equipment
Falcon® Centrifuge Tubes
NAME
Polypropylene, Sterile, 50 mL
TYPE
Corning®
BRAND
352070
SKU
Equipment
Tube 5ml 5016 PP yellow cap GS
NAME
Pacific Laboratory Products
BRAND
P5016SU
SKU
Equipment
UC7/FC7 Cryo-ultramicrotome
NAME
Leica
BRAND
EMFC7
SKU
Equipment
Cryotrim20 diamond knife
NAME
Diatome
BRAND
TT-20
SKU
Equipment
Cryo immuno diamond knife, 3mm
NAME
Diatome
BRAND
DCIMM3530
SKU
Equipment
Perfect loop
NAME
Diatome
BRAND
70944
SKU
Equipment
Mini hot plate
NAME
Thermofisher
BRAND
HP2310BQ
SKU
Equipment
50 Mesh copper grids
NAME
Gilder
BRAND
GCU50
SKU
Equipment
50 Mesh palladium/copper grids
NAME
Gilder
BRAND
GCU-PD50
SKU
Equipment
150 Mesh copper grids
NAME
Gilder
BRAND
GCU150
SKU
Equipment
150 Mesh palladium/copper grids
NAME
Gilder
BRAND
GCU-PD150
SKU
Equipment
Stainless steel loop, 3mm
NAME
Contributed by user
BRAND
N/A
SKU
Equipment
Remanium wire loop
NAME
N/A
BRAND
N/A
SKU
Equipment
Plain glass slides 76mm x 39mm x 1.0-1.2mm
NAME
Thermo Scientific
BRAND
AGL4222A
SKU
Equipment
Leica AF6000LX widefield microscope, with 63x 1.3NA glycerol objective
NAME
Leica
BRAND
N/A
SKU
Equipment
Olympus widefield microscope, model CHK2-F-GS
NAME
Olympus
BRAND
N/A
SKU
Equipment
Petri dish 100mm x 20mm
NAME
Greiner Bio-One
BRAND
664160
SKU
Equipment
24-well clear flat bottom TC-treated multi-well cell culture plate
NAME
Falcon
BRAND
FAL353047
SKU
Equipment
Transfer pipette, standard bulb, PE, fine tip, capacity 5ml
NAME
ProSciTech
BRAND
LCH192
SKU
Equipment
Parafilm M
NAME
Bemis
BRAND
IA041
SKU
Equipment
Glass board
NAME
N/A
BRAND
N/A
SKU
Equipment
Glass petri dish, 100mm
NAME
BRAND
BRAND
BR455751
SKU
Equipment
Oven MINO/6/CLAD
NAME
Genlab
BRAND
N/A
SKU
Equipment
Coverslip 22mm x 22mm, No 1
NAME
Menzel Glaser
BRAND
CS22221G
SKU
Equipment
30mm Glass bottom culture dish
NAME
ProSciTech
BRAND
H500730
SKU
Equipment
Filter paper, grade 1, 12.5cm
NAME
Whatman
BRAND
1001-125
SKU
Equipment
Polystyrene esky
NAME
N/A
BRAND
N/A
SKU
Equipment
Leica EM ACE200 coater
NAME
Leica
BRAND
N/A
SKU
Equipment
JEOL JEM-1400 Plus 120keV Transmission electron microscope
NAME
JEOL
BRAND
N/A
SKU
Safety warnings
Liquid Nitrogen is extremely cold (-196 degrees Celsius) and can cause severe burns if not handled properly. Personal Protective Equipment (PPE) must be worn when handling liquid nitrogen.
Uranyl Acetate is radioactive and acutely toxic. Personal protective equipment must be worn when handling this substance.
Paraformaldehyde and glutaraldehyde are toxic, corrosive and potentially carcinogenic. These chemicals must be handled in a fume hood using the appropriate PPE.
Tissue fixation
Dissect out the tissue of interest (example, forebrain of Tg(proliferating cell nuclear antigen:GFP) transgenic adult zebrafish with olfactory bulbs attached for tissue orientation) on a teflon plate or dental wax sheet using fine forceps and a scalpel blade, at room temperature and place in fixative, either 2% paraformaldehyde, 0.2% glutaraldehyde in 0.1M phosphate buffer (PB) (pH 7.4) or 4% paraformaldehyde in 0.1M PB (pH 7.4). Keep the tissue submerged in fixative at all times.
Always perform fixation using a fume hood and wear appropriate personal protective equipment (PPE).
Place the tissue in 5 ml tubes containing the fixative used in Step 1 (2% paraformaldehyde, 0.2% glutaraldehyde in 0.1M PB (pH 7.4) or 4% paraformaldehyde in 0.1M PB (pH 7.4)) and fix overnight, at 4 degrees Celsius on a rotor. For brain samples, add 4% sucrose to the fixation solution.
Samples can be stored in 1% paraformaldehyde in 0.1M PB at 4 degrees Celsius until further processing.
Tokuyasu embedding and sectioning
Remove the fixative and wash with phosphate buffered saline (PBS), 3 x 10 mins.
Wash with 0.15% glycine in PBS for 10 mins.
Infuse tissue with pre-warmed 6% gelatin in 0.1M PB for 1 hour at 37 degrees Celsius, agitating. Use a heat block to maintain the temperature.
Infuse tissue again with pre-warmed 6% gelatin in 0.1M PB for 1 hour at 37 degrees Celsius, agitating.
Place gelatin infused tissue in plastic embedding moulds containing pre-warmed 6% gelatin in 0.1M PB at 37 degrees Celsius, and solidify gelatin blocks by cooling at 4 degrees Celsius for 60 mins.
Alternatively, the flat embedding method can be used to minimise gelatin block shrinkage following sucrose infiltration. Add 6 percent pre-warmed gelatin in 0.1M PB to a petri dish and solidify at 4 degrees Celsius for 1 hour. Place the tissue on top in a layer of 6 percent gelatin pre-warmed to 37 degrees Celsius. Solidify gelatin at 4 degrees Celsius for 1 hour.
Place the gelatin infused tissue blocks on a teflon plate or dental wax sheet and cut off excess gelatin from around the tissue using a razor blade or scalpel.
For flat embedded samples, cut around the tissue using a razor blade or scalpel and remove the gelatin embedded sample from the petri dish using a small spatula. Cut off excess gelatin using a razor blade or scalpel.
Fix the gelatin infused tissue blocks in 0.2% paraformaldehyde in 0.1M PB for 30 mins at 4 degrees Celsius, rotating.
Wash tissue blocks with 0.1M PB, 3 x 10 mins, agitating.
Infuse tissue blocks with 2.3M sucrose in 0.1M PB for 2 days at 4 degrees Celsius, rotating.
Mount each block on a clean aluminium bullseye pin. Position tissue in the correct orientation and remove the excess sucrose with strips of filter paper.
Freeze each sample block by gently submerging the pins in liquid nitrogen. For large blocks, cool the sample pin in the chamber of a cryo-ultramicrotome (-100 degrees Celsius) for 10 mins prior to freezing in liquid nitrogen. Pins should be mounted and frozen one at a time.
Trim the front face and edges of the frozen tissue block cutting 50-100 μm deep on all four sides. Cut at a speed of 100 mm/sec with a 100 nm feed, at -90 to -100 degrees Celsius using a Leica UC7/FC7 cryo-ultramicrotome and Diatome cryotrim 20 knife.
To check the region of interest:
Cut semi thin sections with a feed of 100-300 nm, at 3 mm/sec and at -90 to -100 degrees Celsius.
Pick up sections in a 1:1 mixture of 2% methylcellulose: 2.3M sucrose in 0.1M PB using a 3 mm stainless steel loop.
Place sections on a slide and stain with methylene blue/Azure II or toluidine blue solution for 10-20 seconds before rinsing with water and drying on a mini hotplate.
Observe sections with a wide-field light microscope. If the region of interest has not been obtained, continue trimming and repeat Step 16.
Once the region of interest has been obtained, cut 62-70 nm ultrathin sections at 0.8 mm/sec and -90 to -100 degrees Celsius using a Leica UC7/FC7 cryo-ultramicrotome and Diatome cryo immuno knife.
Pick up ultrathin sections in a 1:1 mixture of 2% methylcellulose : 2.3M sucrose in 0.1M PB using a 3 mm stainless steel loop, and place sections on 50-150 mesh copper or palladium coated copper grids with carbon-coated formvar film.
Store grids in an enclosed petri dish at 4 degrees Celsius until use.
62-70nm ultrathin sections can be used for immunofluorescence (IF) labelling for optical microscopy using different cellular markers (Steps 20-37) and then subsequent SEM imaging to obtain a high resolution overview (Steps 38-48).
Immunofluorescent labelling of ultrathin sections for optical microscopy using two cellular markers
Fill the wells of a 24-well plate with PBS and float grids section side down.
Use a fine tip pasteur pipette to remove enough PBS from each well so that the lid can be secured on the well-plate without disturbing the floating grids. Seal the lid with parafilm.
Put the well-plate containing the grids in an oven set to 50-60 degrees Celsius for 1 hour to remove the 2% methylcellulose : 2.3M sucrose and 6% gelatin from the tissue sections.
Place a sheet of parafilm on a clean flat bench or a glass board using a small amount of water underneath to keep the film flat.
For the following steps, use a perfect loop or fine forceps to transfer grids from one drop of solution to another, section side down. Use approximately 100-200 μl drops for rinsing solutions and 5 μl drops for antibodies on a clear parafilm surface. Centrifuge all antibodies for 30 seconds using a benchtop microcentrifuge prior to use.
Quench aldehydes with 0.15% glycine in PBS, 5 x 2 mins.
Block with 1% bovine serum albumin (BSA) in PBS for 5 mins.
Incubate with both primary antibodies diluted in 1% BSA/PBS for 45 to 60 mins in a dark moist chamber, at room temperature.
Example: Mouse anti-glutamine synthetase (1:500 dilution), to label glial cells.
Example: Biotinylated anti-eGFP (1:300 dilution), to label green fluorescent protein labelled proliferating cell nuclear antigen (PCNA).
Rinse with 0.1% BSA in PBS, 5 x 2 mins.
Optionally incubate with a bridging antibody diluted in 1% BSA/PBS for 30 mins at room temperature.
Example: Rabbit anti-biotin (1:10,000 dilution)
Rinse with 0.1% BSA in PBS, 5 x 2 mins.
Incubate with both secondary antibodies diluted in 1% BSA/PBS for 45 mins in a dark moist chamber, at room temperature.
Example: Goat anti-mouse AlexaFluor-555 (1:300 dilution).
Example: Goat anti- rabbit AlexaFluor-488 (1:300 dilution)
Rinse with PBS, 5 x 2 mins.
Rinse with distilled water, 4 x 2 mins.
Incubate with Hoechst nuclear stain (1μM in distilled water) for 20 mins.
Rinse with water, 4 x 2 mins.
Fluorescent optical microscopy imaging for grids
Place grid section side up in a drop of 50% glycerol in water. Ensure the grid is completely covered in glycerol with no air bubbles present.
Place grid section side down on a 30 mm glass bottom culture dish and cover grid with a glass coverslip.
Acquire a fluorescent montaged z-stack of 62-70 nm ultrathin tissue sections using an inverted widefield fluorescent microscope.
Example: Leica AF6000LX with a DFC 350FX camera, and a 40x 0.6 NA dry or 63x 1.3 NA glycerol objective.
After imaging, prepare the grids for scanning electron microscopy as follows:
Preparation of immunofluorescence grids for scanning transmission electron microscopy
Add distilled water to the 30 mm glass bottom culture dish and agitate gently until the coverslip floats.
Remove the coverslip and lift the grid out using fine forceps.
Carefully remove water from the backside of the grid by placing filter paper at the grid edge.
Put a drop of distilled water on a sheet of parafilm and place the grid on the drop. The grid should float.
Rinse with distilled water, 6 x 2 mins. Water drops should be placed on a clean parafilm sheet.
Stain the grid in a drop of 2% Uranyloxalate (pH 7.0) for 5 mins at room temperature.
Rinse once with distilled water.
Cover a glass petri dish with parafilm using a small amount of water under the film to keep it flat. Place the dish on ice and add 3 drops of filtered 2% methylcellulose : 4% uranyl acetate (9 ml : 1 ml) (pH 4.0) to the surface.
Float the grid briefly in the first two drops of methylcellulose/uranyl acetate, then transfer to the third drop and leave for 10 minutes.
Remove and dry the grid following the looping out method:
Clean a remanium wire loop with water and dry.
Push the loop into the the methylcellulose/uranyl acetate drop and under the grid.
Lift the grid out from the drop using the loop.
Tilt the loop and grid at a 45-60 degree angle and bring the loop to a piece of filter paper.
As soon as the loop contacts the filter paper, drag it slowly along the filter paper to remove excess liquid. A thin film of methylcellulose-uranyl acetate should remain on the surface of the grid. The slower the drag, the thinner the film.
Dry the grid in the loop for 30 minutes at room temperature.
Remove the grid from the loop using fine forceps, taking care not to tear the methylcellulose/uranyl acetate film away from the grid. Store the grid in a grid box.
Place the grid in a specialised STEM grid holder for image acquisition of a high resolution overview using a scanning electron microscope.
Example: Thermofisher/FEI Nova NanoSEM 450 equipped with a bottom mount STEM II (HAADF) detector set at 30 keV with a working distance of 6.8 mm, dwell time of 3 μs, and with MAPS 2.0 software used for generating montages and correlation.