Sep 17, 2025
Image capture for 3D photogrammetry of stony corals V.2
- 1University of Southern California;
- 2Perry Institute for Marine Science
- Coral Bleaching RCN protocols
- Stony Coral Morphology + Morphometry


Protocol Citation: Maya Gomez, Carly Kenkel 2025. Image capture for 3D photogrammetry of stony corals V.2 . protocols.io https://dx.doi.org/10.17504/protocols.io.bp2l6xj1rlqe/v1
License: This is an open access protocol distributed under the terms of the Creative Commons Attribution License, which permits unrestricted use, distribution, and reproduction in any medium, provided the original author and source are credited
Protocol status: Working
We use this protocol and it's working
Created: February 26, 2024
Last Modified: September 17, 2025
Protocol Integer ID: 95724
Keywords: 3D, photogrammetry, coral, 3D models, images for underwater coral colony, unique agisoft metashape markers for automatic scaling, color object for underwater photogrammetry reference, underwater image capture pipeline, underwater photogrammetry reference, corals of all morphology, unique agisoft metashape marker, image capture for 3d photogrammetry, agisoft metashape command, underwater coral colony, using agisoft metashape command, 3d photogrammetry, level photogrammetry, metashape on the command line, image capture, olympus tough camera, using metashape, metashape, autoscaling model, olympus, additional imaging guidance, kenkel lab for 3d model generation, generating image, automatic scaling, 3d model generation, 3d model, meshlab, v2 scoupr build, growth data from 3d model, photograph,
Abstract
This is a protocol for generating images for underwater coral colony-level photogrammetry.
In this protocol, we utilize Olympus Tough cameras and custom-made, adjustable PVC arrays that incorporate unique Agisoft Metashape markers for automatic scaling during the model building process and bleaching color cards. Instructions for creating your own Scaling and Color Object for Underwater Photogrammetry References (SCOUPRs) are included here, along with our Underwater Image Capture Pipeline that includes tips to collect photographs to improve model building, and Pre-Processing instructions.
- V2 SCOUPR builds that allow for autoscaling in Metashape and other minor improvements
- In-depth workflow and additional imaging guidance
- Changes to in water methodologies that allow for the removal image pre-processing steps, thus streamlining the overall pipeline
Though this protocol is primarily used by the Kenkel lab for 3D model generation of Acropora cervicornis colonies, these methods can be applied to corals of all morphologies (or any object, really).
Our photosets are later batched processed and autoscaled using Agisoft Metashape command-line scripts integrated with USC's high-performance computing system.
Additional resources:
- V2 scripts for batch processing and autoscaling models can be found here:
- Additional guidance for using Metashape on the command line and V1 scripts can be found here: https://github.com/wyattmillion/Coral3DPhotogram.
- Our lab's protocol for deriving coral morphological and growth data from 3D models can be found here: Phenotyping in MeshLab.
SCOUPR Construction
Building the SCOUPR frame
The Scaling and Color Object for Underwater Photogrammetry Reference (SCOUPR), fka Tomahawk, is a custom designed, adjustable object that allows for automatic scaling during the model building process.
SCOUPR bars, or "arms", can be made from any sturdy sheet material. The goal is for the material to be lightweight enough to easily move, study enough to resist warping, and heavy enough to rest on the reef substrate without additional weight. In high wave energy conditions, dive weights can be attached or placed on top of SCOUPR arms to further stabilize the system. Avoid porous and shiny materials for the SCOUPR arms. White is helpful for downstream white balancing.
Two materials that we have used for SCOUPR arms in the past include:
- 1/4" thick High Density Polyethylene (HDPE): https://www.usplastic.com/search/?it=item&keyword=hdpe%20sheet
- 1/4" thick PVC/Acrylic Sheet: https://www.mcmaster.com/8650K33/
SCOUPR Frame Materials:
4 - 9.75" x 1.25" x 0.25" HDPE/PVC-Acrylic bars (see Figure 1 below)
3 - 0.25" stainless steel carriage bolts (1" length)
3 - 0.25" stainless steel washers
3 - 0.25" stainless steel wing nuts
Figure 1: Schematic for building a SCOUPR.
We estimate that the total SCOUPR build cost is about $12 per unit.
Drill two 1/4" diameter holes in each SCOUPR arm about 7/8" from either end of the bar.
The holes in our V2 SCOUPRs were made on a milling machine with a small endmill to generate a square backside. This allows the carriage bolt to sit into the plastic, preventing it from turning as you tighten the wing nut.
The holes in our V1 SCOUPRs were made with a 1/4" drill bit and squared off by hand. Squaring off can be done with an appropriately-sized chisel or flathead screwdriver to create a pocket roughly a 1/8" deep.
The SCOUPR arms can then be connected together with a carriage bolt secured by a washer and wing nut (see Figure 1c). Wing nuts are especially useful for adjusting the SCOUPR underwater or when wearing gloves. Stainless steel hardware is important to prevent rusting.
Front side of hole.
Back side of V2 SCOUPR hole. Square hole made using a milling machine.
Back side of V1 SCOUPR hole. Square hole made by hand.
Generating Scale Bars with Metashape Markers
Agisoft Metashape provides printable markers that can be included in the image capture process for improved model building and automatic scaling. Because each marker is unique and recognized by Metashape, the software can more easily determine overlapping points in photosets which include markers.
These markers are free and can be accessed through the Metashape GUI interface of Metashape Standard/Professional or from the free trial version.
Our V2 SCOUPRs feature four unique scalebars, one on each arm of the SCOUPR. Each scalebar contains 3 unique markers (or targets) for automatic scaling in Agisoft Metashape. These scale bars can be printed directly onto rectangular stickers or waterproof paper. For example, we order 6 x 1" rectangular stickers from StickerMule.
Scale bar #4 includes targets 45-47.
Automatic scaling can be incorporated into your Metashape model building pipeline using the following scale bar file (model building instructions not included here). The scale is set based on the distance between the center of the two outermost targets. Be sure to double check this distance on your scalebars and modify the text file as needed.
If desired, you can make your own scale bars or by exporting additional markers from Metashape and printing them on waterproof paper (or stickers). Within your Metashape window, navigate to Tools > Markers > Print Markers. You can then select the marker size and number you'd like to print on a page. The target size should be based on the object you're planning to photograph. For example, large reef-scapes will need larger targets to be seen easily by the camera.
Adhere scale bar 1, 2, 3, and 4 onto each of the SCOUPR arms, being mindful corners where the bars overlap. Use electrical tape if scale bars are on underwater paper rather than stickers, being careful not to cover any of the black/white of each circle target.
V2 SCOUPR with 4 unique scale bars.
NOTE: Each unique marker can only occur once within each SCOUPR and image set. Do not include the same scale bar more than once within a single SCOUPR.
Incorporating Color Reference
The Kenkel lab also includes a CoralWatch Coral Health Chart color reference card on each SCOUPR to allow for downstream analyses of bleaching.
Each of the four Coral Health Chart color scales is cut out, cut in half, and attached to the four arms of the SCOUPR with electrical tape.
V2 SCOUPR arm with Metashape markers and Coral Health Chart scale D. White electrical tape holds down the Coral Health Chart while ensuring that all markers and colored sections are visible.
Completed V2 SCOUPR that incorporates 12 Metashape markers and all 4 CoralWatch Coral Health Chart color scales.
SCOUPR Identification
Assigning some form of identification to your SCOUPRs can be helpful for a handful of reasons:
- Allows you keep track of the connection between photoset quality and divers for feedback.
- Allows for the incorporation of different scale bars and separate processing (if desired).
- Assists in locating scale bars that need replacing as a result of damage to targets.
Write numbers/letters on the white bars of the SCOUPRs with tag pens / sharpies to identify it.
Completed V2 SCOUPR with identifying marks.
Using your SCOUPR
The SCOUPR is designed to be adjustable to fit the size and shape of the area/object that you are photographing. By loosening the wing nuts, the PVC bars can pivot to enclose the focal object. Once the wing nuts are tightened, the SCOUPR will maintain its shape and position despite wave energy, thus ensuring a stable reference point for later model building. Small weights can be attached to the back with zip ties or placed on the corners of the SCOUPR to further reduce movement of the scaling object in high wave energy environments.
Underwater Image Capture Pipeline
Overview
Image capture is the most important part of 3D photogrammetry. Creating 3D models from 2D images requires the collection of photos of your subject from numerous angles so that the software can use photo overlap to recreate the dimensions of your subject.
The total number of photos required is dependent on the size and complexity of your coral. When in doubt, err in favor of more photos, but do not sacrifice quality for quantity.
The per coral imaging time requirement is also dependent on coral size, complexity, underwater conditions, diver experience, and goal resolution. In general, for experienced divers and a low complexity Acropora cervicornis coral, we estimate around 2-5 minutes for the full image capture pipeline.
Night Prior to Fieldwork
- Charge all cameras + extra batteries
- Ensure that any previous photoset have been successfully copied before formating your SD cards. Do not select "erase all" on your camera NOR from your computer. This risks SD card corruption. "Format all" can be found in the settings of your camera.
- Organize materials
Materials List:
- 1 SCOUPR per diver + 1-2 extras on the boat
- 1 Olympus Tough camera per diver + 1 extra camera per buddy pair if supplies allow
- Dry bag with extra batteries, cameras, and SD cards on the boat
- Gloves, if desired
- 1lb soft dive weights for placement on SCOUPR arms in high surge (or 1lb hard weights + zipties)
- Optional: map of coral outplants
NOTE: All surveyors should use the same camera type. The Kenkel lab prefers Olympus Toughs for their small size and durability. Using different Olympus Tough models is okay, but note that menu items may differ slightly.
If materials allow, we recommend that every buddy team have at one backup camera underwater with them for ease of transition when batteries die / SD cards fill.
Before each Dive
- Set camera settings and check that they are consistent among all divers.
- Make sure the camera is sealed. Remember: red is dead.
- Assign target corals to dive teams in such a way that prevents diver groups from swimming too close together.
- Optional: Record diver camera and SCOUPR IDs so that you can later connect photosets and models to specific divers for feedback. Once assigned a SCOUPR and camera, try to use the same set for the whole day/trip to simplify things.
Camera Settings
- Mode: Underwater Snapshot (TG4) or Single (TG2)
- Shutter Speed and Aperture should be set automatically
- ISO: Auto ISO
- 4:3
- LF (TG6) or 16M (TG2)
- Autofocus
- Flash Off
- Custom White Balance
Full Underwater Workflow
- Once at the depth of the corals, set the camera white balance on the white of one of the SCOUPR arms (or a dive slate). Take a look at the screen. Does it look accurate? If not, set it again. Be mindful of the location of your shadow.
- Now locate your first coral. Take a picture of the tag or any other identifying information. This is CRITICAL for photo organization and model identification later.
- Take your time to encircle the coral with your SCOUPR, nestling the SCOUPR into the surrounding rocks. Tighten the wing nuts to hold in place. If your SCOUPR moves during imaging you will need to restart. If necessary, place a soft weight on the SCOUPR in such a way that it does not block your scalebars. Always invest in the initial placement of your SCOUPR.
- Proceed with imaging. Focus your camera on the coral. Take a series of images in full circle around the base, a full circle at 45 degrees, and a circle around the top. Take additional photos of any undersides of branches you may have missing in the first pass. If you need to restart your image set due to SCOUPR movement, take a picture of your hand making a thumbs down before restarting. See section 9.1 for more details on imaging methodologies.
- Once done, take a picture of the sky to denote the end of the image set.
- Find your next coral and repeat steps 2-5. Proceed in ascending/descending tag order to prevent from missing corals in your survey.
Imaging Methodologies
The complex structure of (branching) corals requires photographs from multiple angles to provide the full context for 3D model construction. We recommend imaging in 3-4 passes around the coral (see Figure 2 below), holding the camera a consistent distance (6-12 inches) away from the coral. The closer the camera is to the coral, the more photos required for full coverage at 80% overlap. When imaging, manually press the shutter-release for each photo so we can ensure the coral is in frame and in focus.
Pass 1: Starting at one corner of your SCOUPR, focus on the coral before rotate in a circle, taking pictures as close to 0 degrees off the reef substrate as possible.
Pass 2: Once you return to your starting corner, move the camera to about 45 degrees off the substrate looking downward at the coral. Rotate around the coral as you take photos.
Pass 3: Take a handful of photos from the top down that include the coral and the entire scaling object in the frame.
Optional Pass 4: Take additional photos of any areas requiring additional coverage, such as the undersides of branches or complex branch intersections. Take photos continuously as you move the camera closer to this focal location. This will ensure that any close up photos have proper context.
Figure 2. Optimal camera paths and angles to photograph a single coral colony for 3D photogrammetry
The total number of photos required varies my coral size and complexity. We typically work with relatively small Acropora cervicornis colonies and a photoset sizes of around 75-150 images.
Some good approximations of numbers of photos per Acropora cervicornis colony of a given total linear extension (TLE) are as follows:
- 5-20 cm TLE : 50 -75 photos
- 15 - 40 cm TLE: 75 - 125 photos
- 40-70 cm TLE: 125 - 175 photos
- 90-125 cm TLE: 175 - 300 photos
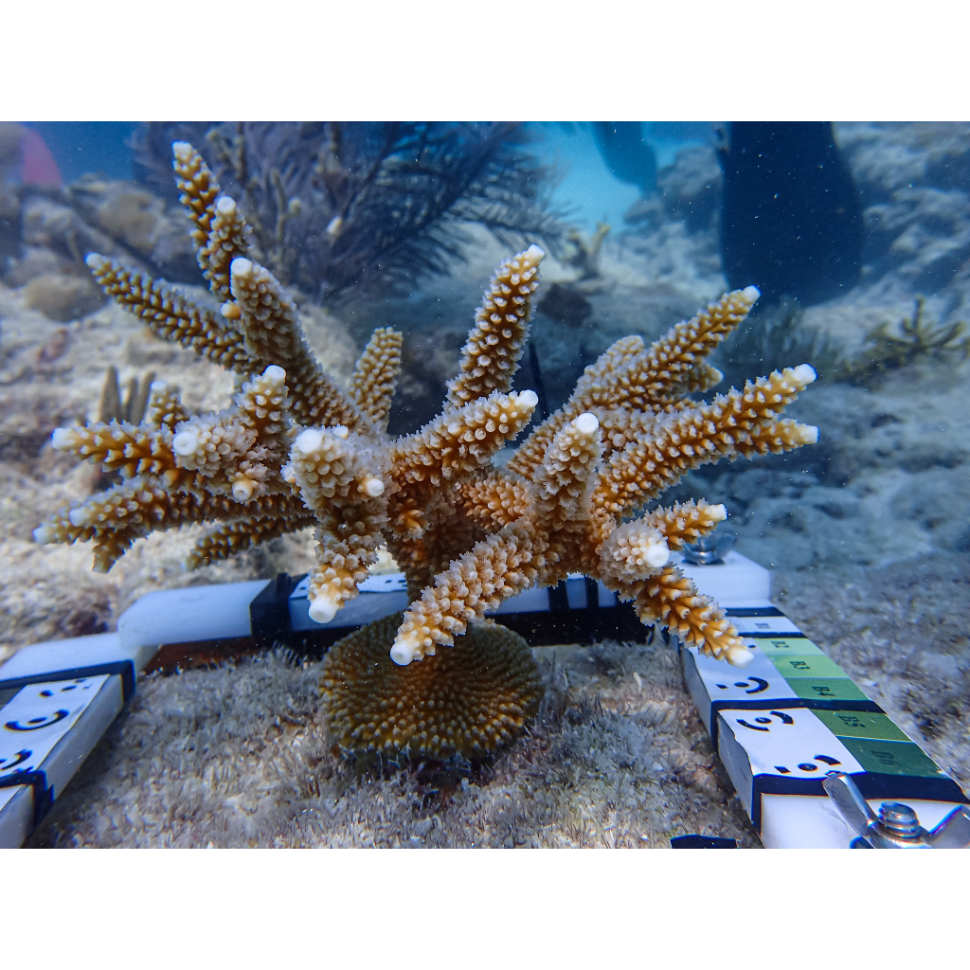
Example 1: 52 photos were taken of this coral with a TLE of 8 cm.
Example 2: 97 photos were taken of this coral with a TLE of 29 cm.
Example 3: 143 photos were taken of this coral with a TLE of 60 cm.
Example 4: 276 photos were taken of this coral with a TLE of 114 cm.
Imaging Do’s and Don’t
- Images should be of high quality. More images does not replace high quality images. More photos do not help if they are bad quality.
- Aim for 80% image overlap between images.
- Always focus on the coral. When focused, your camera should be about a 6-12in away from the coral. The SCOUPR will be captured without focusing directly on it.
- Do not use the zoom function on your camera.
- All images should be taken in landscape orientation. Do not switch between landscape and portrait mid photoset.
- Avoid rapid or burst mode for imaging (click and hold). This usually results in many, many poor quality images. Although interval mode is helpful for reefscale photogrammetry, it can actually be too slow for individual coral photogrammetry. We instead choose to manually press the shutter-release for each photo so we can ensure the coral is in frame and in focus.
- The SCOUPR cannot move during imaging. Restart if SCOUPR movement occurs. If wave energy is high, a dive weight can be place on top to weigh down the scaling object.
- Also ensure that there are no moving objects within the SCOUPR focal area (ex. algae, loose tag, your hand, gorgonians). Remove or move out of the way if necessary.
- Check you screen occasionally, do the photos look over or under exposed (washed out / dark)? Sometimes the FS can get bumped. Set this back to zero if you notice that its off.
- Take care not to kick up sediment. If you do, wait for it to settle and make sure the camera is focusing on the coral, not the sediment.
- Shadows are inevitable. However, tactful body positioning can help limit massive changes in coloration.
SCOUPR Care and Marker Guidance
Each SCOUPRs has four scale bars that can be used to automatically scale models in the build process. However, if targets get damaged or covered, scale bars can start to disappear. Losing one scalebar is not an issue per say, but it is best practice to try to maintain the functionality of all four scalebars.
There are two main causes of scalebar disappearance:
- Damage to the Metashape targets themselves. This can happen if the SCOUPRs are closed without first loosening the wing nuts, or just from time in the field. Replace the sticker if you notice any large gashes through the outtermost targets generating the scalebar on each SCOUPR arm.
- Covering one of the target outtermost targets on each SCOUPR arm when setting up to image (Figure 3), either by another SCOUPR arm, a dive weight or zip tie.
Figure 3. A) Proper SCOUPR set up to ensure intact scalebars (green). B) However, if one of the outtermost targets on the SCOPUR arms is covered, that particular scalebar will not be able to be used during model reconstruction and scaling (red, dashed line).
After a Dive
- Rinse all SCOUPRs and soak cameras in freshwater. Soaking cameras is always preferable to rinsing.
- Let cameras dry as much as possible before opening.
- Copy images to your harddrive / cloud.
Pre-processing
Photoset Organization
Organize each photoset into unique folders labeled with key identifying information, such as the date of image capture, reef, and coral tag/replicate/genotype ID (optional: surveyor initials). Skip any images that are purely to assist with photoset organization (ex. images of the sky) and delete any incomplete photosets (ex. before the thumbowns d)
Example image set directory name: 060625_LooeReef_Tag101
Optional: Image Filtering
Metashape automatically omits unusable photos as it builds. Though not necessary, you can improve the build process by manually remove undesirable images, such as blurry, out of focus, or images where the coral is not present.
Since the Kenkel Lab processes hundreds of photosets at a time, we instead rely on the Metashape build reports, alignment success, and model quality to inform us of which photosets may need additional cleaning and model reconstruction.
Optional: Color Adjustments
If you did not set the white balance when initially imaging or your environmental conditions were not conducive to capturing images with sufficient contrast and sharpness, you can batch edit images post hoc in softwares like Adobe Lightroom.
The goal of any image editing is to help the coral stand out from the background and give definition to branches, especially those that overlap and near any white apical tips. Some edits to try include setting the white balance, adjusting exposure, contrast, and sharpening.
Batch Processing 3D Models with Agisoft Metashape
The Kenkel lab uses Agisoft Metashape to build coral models. This software can be run through an interactive GUI window, but total build time is limited by the processing power of the computer. Instead, the Kenkel lab utilizes a high power computing system to increase the speed of individual model construction while also fully automating the process.
Scripts for batch processing and autoscaling models in Agisoft Metashape can be found here:
https://github.com/mayagomez/metashape_batch_process and DOI: 10.5281/zenodo.17136227. Guidance for using Metashape on the command line and V1 scripts can be found here: https://github.com/wyattmillion/Coral3DPhotogram. Our lab's protocol for deriving coral morphological and growth data from 3D models can be found here: Phenotyping in MeshLab.