Jan 26, 2026
Histological Sectioning and Hematoxylin–Eosin Staining of Prepubertal Rat Ovary (10 µm)
- Eloir Gallegos Pacheco1,
- María Elena Ayala Escobar2,
- Andrés Aragón Martínez1
- 1Laboratorio de Gametos y Desarrollo Tecnológico, Facultad de Estudios Superiores Iztacala, UNAM;
- 2Unidad de Biología de la Reproducción, Laboratorio de Pubertad, Facultad de Estudios Superiores Zaragoza, UNAM
- Andrés Aragón Martínez: Andrés Aragón Martínez: Correspondence [email protected];


Protocol Citation: Eloir Gallegos Pacheco, María Elena Ayala Escobar, Andrés Aragón Martínez 2026. Histological Sectioning and Hematoxylin–Eosin Staining of Prepubertal Rat Ovary (10 µm). protocols.io https://dx.doi.org/10.17504/protocols.io.x54v9bp34l3e/v1
License: This is an open access protocol distributed under the terms of the Creative Commons Attribution License, which permits unrestricted use, distribution, and reproduction in any medium, provided the original author and source are credited
Protocol status: Working
We use this protocol and it's working
Created: January 15, 2026
Last Modified: January 26, 2026
Protocol Integer ID: 238746
Keywords: Histology, Ovarian tissue, Hematoxylin–eosin staining, Paraffin sections, Rat model, rat ovarian tissue, ovarian tissue, prepubertal rat ovary, histological sections from paraplast, histological sectioning, histological section, cytoplasmic contrast, routine histological examination, suitable for routine histological examination, eosin, hematoxylin
Funders Acknowledgements:
This work was supported by UNAM-DGAPA-PAPIIT
Grant ID: IN218920
This work was supported by UNAM-DGAPA-PAPIIT
Grant ID: IN221018
This work was supported by UNAM-DGAPA-PAPIIT
Grant ID: IN224925
This work was supported by UNAM-DGAPA-PAPIIT
Grant ID: IN226017
Disclaimer
This protocol is provided for research and educational purposes only. Users are responsible for ensuring that all procedures are performed in compliance with institutional guidelines, local regulations, and applicable biosafety and chemical safety requirements. The authors assume no responsibility for any injury, damage, or loss resulting from the use or misuse of this protocol. Proper training, appropriate personal protective equipment, and the use of certified laboratory facilities are required when handling biological samples, sharp instruments, and hazardous chemicals.
The biological samples used for the photographs included in this protocol were obtained from projects funded by the Dirección General de Asuntos del Personal Académico (grants UNAM-DGAPA-PAPIIT IN226017, IN218920, IN221018, and IN224925.
Abstract
This protocol details the preparation of 10 µm histological sections from paraplast-embedded rat ovarian tissue using a rotary microtome, followed by hematoxylin–eosin staining and permanent mounting. Key steps include sectioning, slide preparation, deparaffinization, staining, dehydration, clearing, and mounting.
The resulting rat ovarian sections exhibit strong tissue adherence, uniform staining, and clear nuclear-cytoplasmic contrast, making them suitable for routine histological examination and quantitative morphometric analysis.
Image Attribution
All images were generated by the authors of this protocol.
Guidelines
- This protocol should be performed by trained personnel in laboratories equipped for histological processing.
- Procedures involving volatile, flammable, or toxic solvents (e.g., xylene, carbol–xylene, ethanol, ether) must be carried out inside a chemical fume hood.
- Sharp instruments, including microtome blades and razor blades, must be handled and disposed of according to institutional safety procedures.
- Biological samples must be handled following institutional biosafety guidelines approved for animal-derived tissues.
- All reagent and solvent waste generated during the procedure that cannot be reused must be disposed of in accordance with the Mexican regulations established in the Ley General Para la Prevención y Gestión Integral de los Residuos (General Law for the Prevention and Integral Management of Waste) and in compliance with NOM-052-SEMARNAT-2005
- For countries other than Mexico, the applicable local regulations must be verified.
Materials
Materials
- Wooden block
- Short-bristle brush
- Dissecting needles
- Adson Tissue Forceps
- Microscope slides (75 × 25 mm)
- Lighter or matches
- Alcohol burner
- Single-edge razor blades
- Eight horizontal glass staining jars with lids and Wheaton baskets
- Wheaton staining basket handle
- Gauze (sufficient quantity).
- Wash bottle with 96% ethanol (500 mL)
- Dropper bottle with eosin (30 mL)
- Coverslips (24 × 50 mm)
- Glass rod (8 cm)
- Glass thermometer (To check the temperature of the flotation bath)
- Vertical Coplin jar (with ethanol-ether 1:1)
- Beakers (250 mL or 500 mL)
- Paper towels
- Spatula with a wooden handle
Equipment
- Rotary microtome with blade (American Optical 820)
- Tissue flotation bath
- Chemical fume hood
- Drying oven (optional)
Protocol materials
Chemical Permount Mounting MediumFisher ScientificCatalog #SP15-100
XyleneJT BakerCatalog #9490
Hematoxylin solution according to MayerSigma aldrich.comCatalog #51275
Phenol, CrystalJT BakerCatalog #2858
Absolute EthanolJ.T. BakerCatalog #2606
Eosin Y Solution, Alcoholic, with PhloxineMerck MilliporeSigma (Sigma-Aldrich)Catalog #HT110380
Diethyl etherJ.T. BakerCatalog #9244
Glycerine, anhydrousJ.T. BakerCatalog #2136
Safety warnings
- Xylene, carbol–xylene, ether, and ethanol are volatile, flammable, and toxic; inhalation and skin contact must be avoided.
- All steps involving organic solvents must be performed inside a chemical fume hood.
- Microtome blades and razor blades are extremely sharp and present a high risk of injury if improperly handled.
- Do not allow tissue sections to dry during the staining process, as this may result in tissue damage and poor staining quality.
- Inadequate clearing or mounting may result in uneven staining, reduced contrast, or air bubble formation.
Ethics statement
All experiments were conducted in accordance with the guidelines established by the Technical Specifications for the Production, Care, and Use of Laboratory Animals (NOM-062-ZOO-1999). The experimental protocols were reviewed and approved by the Bioethics Committee of the Facultad de Estudios Superiores Zaragoza, Universidad Nacional Autónoma de México (approval letter FESZ/DEPI/CE/001/21).
Before start
- Ensure that all reagents, solutions, and consumables are prepared, properly labeled, and within their expiration dates.
- Verify that the rotary microtome is clean, correctly calibrated, and equipped with a sharp, undamaged blade.
- Preheat the flotation bath to 42 °C and confirm temperature stability before sectioning.
- Prepare albumin-coated glass slides in advance and allow them to dry completely.
- Confirm that a chemical fume hood is available and operational for all steps involving organic solvents.
- If solvents and reagents in the staining series have been previously used, verify that they are free of residues or precipitates; if necessary, they may be filtered before use.
- Inspect coverslips for cleanliness and absence of stains. If contaminants are present, clean by immersing in a 1:1 alcohol-ether solution and wiping thoroughly with clean gauze.
- Ensure access to appropriate waste containers for biological material, sharps, and chemical solvents in accordance with institutional procedures.
Histological sectioning using a rotary microtome
1w 0d 0h 30m
Obtaining histological sections of biological samples embedded in paraplast at 10 µm thickness in a rotary microtome.
Take one Paraplast block containing the embedded tissue and trim it into a pyramid shape using a razor blade, making diagonal cuts on each side. Attach the largest face (base) to a wooden block by melting excess Paraplast using a spatula with a wooden handle and an alcohol burner. Cool at 4 °C for 30 min. 4 °C 00:30:00
Figure 1. Proper mounting of the paraplast block containing the ovary onto the wooden block. Once mounted, the ovary should be positioned at the center of the pyramid.
30m
Fill the flotation bath with distilled water and heat to 42 °C. 42 °C
Label the microscope slides with the animal identifiers using a diamond-tipped pencil. Prepare microscope slides by immersing them in a Coplin jar containing a 1:1 ethanol–ether solution. Remove and clean with gauze. Coat one side with Mayer’s albumin (prepared from egg white, glycerol, and thymol); this side will receive the sections. Diethyl etherJ.T. BakerCatalog #9244 Glycerine, anhydrousJ.T. BakerCatalog #2136
Note
Mayer’s egg albumin is prepared by filtering the white of a white egg through cotton in a graduated cylinder. An equal volume of glycerol (1:1) is added to the filtrate, mixed thoroughly, and finally a few crystals of thymol are added as a preservative (approximate shelf life: 3 months).
Figure 2. Materials prepared prior to sectioning. A horizontal Coplin jar containing a 1:1 ethanol–ether solution is used to degrease glass slides. Slides are immersed for 5 min, removed, and cleaned with gauze, then placed on a grooved rack. Once clean, a thin layer of Mayer’s albumin is applied to the slides using a fingertip, and the slides are returned to the rack to dry.
Prepare the microtome by setting the section thickness to 10 µm and securing the blade.
Note
Ensure the blade is sharp and free of nicks; do not touch the cutting edge with fingers.
Figure 3. Before sectioning, the microtome is set to the desired section thickness (10 µm in this protocol) using the thickness control knob located at the rear of the instrument. The advance mechanism is fully reset by rotating the handwheel on the left side to its starting position, as the advance system has a fixed limit; reaching this limit during sectioning may interrupt the cutting sequence and result in tissue loss. Once adjustments are completed, the blade is positioned as close as possible to the surface of the paraplast block.
Move the block holder carriage to the starting position and secure the wooden block using the clamping screw.
Using a razor blade, cut a rectangular area around the tissue on the block face facing the operator. Advance the handwheel until the block reaches mid-height, then bring the microtome blade closer and fix it in place.
Figure 4. Using a single-edge razor blade, a rectangular area is trimmed around the ovary, leaving sufficient surrounding paraplast to allow later adjustments (e.g., if section ribbons appear curved) and to facilitate handling of the ribbons during subsequent steps without damaging the tissue.
Begin rotating the handwheel until Paraplast sections appear. Gradually adjust the rectangle to match the size of the ovary, leaving excess material for handling.
Note
During adjustment, ensure that section ribbons emerge straight and not curved.
Once ovarian sections appear, collect ribbons of 30 sections using dental forceps and a dissecting needle. Arrange the ribbons sequentially on a board or cardboard until sectioning is complete.
Figure 5. All trimming and alignment adjustments are completed before tissue-containing sections appear. When sections with tissue begin to emerge, the first 10 sections are discarded, after which the ribbon is gently held with forceps without pulling. Sectioning continues until a ribbon of approximately 30 sections is obtained (the number may vary depending on operator skill). One end of the ribbon is held with forceps while the opposite end is guided with a dissecting needle and placed onto a cardboard surface positioned next to the microtome. Correct sequence is maintained and ribbon flipping is avoided; the upper surface is opaque, whereas the underside is glossy. Sectioning continues until ovarian tissue is no longer present.
Cut the ribbons into segments of 10 sections using a razor blade.
Note
The number of sections per ribbon may vary depending on section size and should not exceed the length of the coverslips used during staining.
Figure 6. The ribbon is cut into segments of approximately 10 sections. A coverslip intended for final mounting is used as a reference to estimate the appropriate segment length, ensuring that all sections fit within the coverslip area and do not extend beyond its edges.
Place one ribbon segment onto the flotation bath using a moistened brush tip, allowing the sections to spread.
Figure 7. The bristles of a short-bristle brush are moistened, and the brush tip is used to gently touch one end of the first 10-section segment to lift it and transfer it to the flotation bath. The ribbon is placed into the bath promptly to prevent steam-induced folding, which may result in section loss or excessive ribbon folding. Once in the bath, the ribbon is allowed to relax and spread for a few seconds before being transferred onto albumin-coated glass slides.
Take an albumin-coated slide and place it directly on the surface of the flotation bath. Using a dissecting needle, guide a drop of water along the slide edge where the first ribbon will be placed to facilitate positioning.
Using the same needle, gently drag the ribbon from one end onto the slide in a single motion until properly positioned. Repeat until 4–5 ribbons are placed on each slide, depending on section size.
Figure 8. Using a short-bristle brush, a drop of water is placed onto the glass slide and allowed to run along the slide surface, creating a wet path that facilitates transfer of the first section. The ribbon is held at the end containing the first section with a dissecting needle, brought close to the slide, and transferred in a single smooth motion. The procedure is repeated sequentially until the slide is filled. The number of ribbons mounted per slide depends on section size and the amount of surrounding paraplast retained during trimming.
Allow slides to dry for at least one week at room temperature, protected from dust, before staining. Room temperature 168:00:00
Note
Drying time may be reduced by placing slides in a drying oven al 37-40 °C for 24-48 h.
Figure 9. Mounted sections are allowed to dry while protected from dust. Slides are dried for approximately one week to ensure adequate adhesion and prevent section detachment during subsequent staining, which involves multiple solution changes and washes. Slides are preferably placed horizontally on slide trays, although wooden or cardboard supports may also be used.
1w
Hematoxylin–Eosin staining
2d 0h 51m 30s
Staining of histological sections of the ovary using the hematoxylin-eosin technique.
Prepare the staining rack consisting of a series of staining jars containing the following solutions:
I. Xylene (1) XyleneJT BakerCatalog #9490
II. Xylene (2)
III. Distilled water
IV. Mayer’s hematoxylin Hematoxylin solution according to MayerSigma aldrich.comCatalog #51275
V. Running tap water
VI. Running tap water
VII. Carbol–xylenePhenol, CrystalJT BakerCatalog #2858
VIII. Xylene (mounting)
A wash bottle with 96% ethanol, eosin in a dropper bottle, Permount.Absolute EthanolJ.T. BakerCatalog #2606 Eosin Y Solution, Alcoholic, with PhloxineMerck MilliporeSigma (Sigma-Aldrich)Catalog #HT110380 Chemical Permount Mounting MediumFisher ScientificCatalog #SP15-100
Safety information
The staining rack should be placed inside a chemical fume hood, as xylene is a volatile, flammable, and toxic organic solvent.
Figure 10. Organization of the hematoxylin–eosin staining setup and required materials inside a chemical fume hood, including staining jars, slide baskets, and reagents used throughout the procedure.
Place the microscope slides containing mounted ovarian sections into the staining basket.
Immerse the basket in:
- Xylene (1): 5 min 00:05:00
- Xylene (2): 5 min00:05:00 Drain between steps by tilting the basket against the jar edge.
Note
At no point during the staining procedure should the ovarian sections be allowed to dry.
10m
Place a clean, dry basket into distilled water.
Individually remove each slide, clean the back surface with gauze, rinse with 96% ethanol, dry, and place into distilled water.
Incubate for 1 min. 00:01:00
1m
Remove the basket, drain excess water thoroughly, and immerse it in the jar containing Mayer’s hematoxylin for 15 min.00:15:00
15m
Rinse slides in the first jar of running tap water by raising and lowering the basket 3 times.
Transfer to the second jar of running tap water for 15 min.00:15:00
15m
Place a clean, dry basket in carbol–xylene.
Remove one slide at a time, dry the back surface, place horizontally, and apply 3 drops of eosin, ensuring full coverage of sections.
Incubate for 30 s.00:00:30
Figure 11. After eosin application, the slide is gently tilted to allow the stain to spread evenly and fully cover all sections. The slide is rested on the edge of a beaker to facilitate handling and then rinsed with 96% ethanol from a wash bottle while tilting the slide over the beaker.
30s
Rinse the slide with a wash bottle containing 96% ethanol, dry with clean gauze, and place it into the basket inside the carbol–xylene jar to clear the tissue.
Once all slides have been placed in carbol–xylene, incubate for 5 min.00:05:00
5m
Remove the basket using the handle, drain excess solution, and transfer the basket to xylene (for mounting) and incubate for 5 min.00:05:00
5m
Remove slides individually, dry the back and edges with gauze, and place horizontally.
Apply two consecutive drops of Permount with the glass rod onto the sections closest to the slide label.
Hold a coverslip vertically and gently push the first drop of mounting medium with its edge. Slowly lower the coverslip to a horizontal position while applying gentle pressure to allow even spreading and prevent bubble formation.
Note
Air bubbles may be removed by gently pressing with a pencil eraser toward the nearest edge.
Allow slides to dry at room temperature for 24–48 h.Room temperature 48:00:00
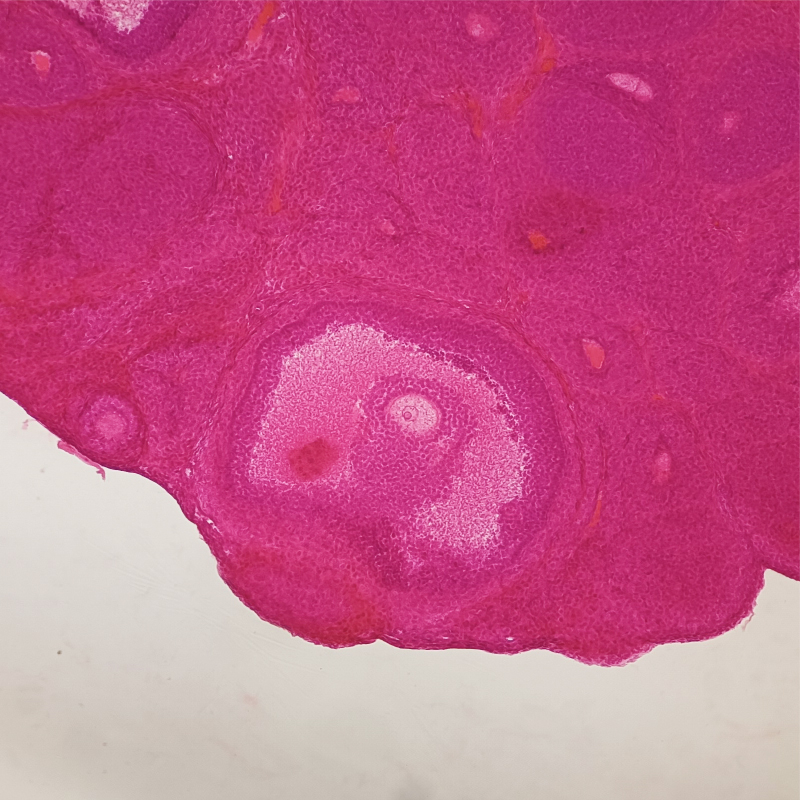
Figure 12. Two representative preparations of ovarian histological sections stained with hematoxylin–eosin, demonstrating adequate tissue preservation, uniform section thickness, and consistent nuclear and cytoplasmic contrast. Representative photomicrographs at 200× magnification (top) and 400× magnification (bottom) illustrate the staining outcome.
2d
Protocol references
American Optical Corporation. (1979). American Optical 820 rotary microtome: Instruction manual. American Optical Corporation.
Rehfeld, A., Nylander, M., Karnov, K. (2017). Histological Methods. In: Compendium of Histology. Springer, Cham. https://doi.org/10.1007/978-3-319-41873-5_2
Suvarna, K. S., Layton, C., & Bancroft, J. D. (2018). Bancroft's theory and practice of histological techniques E-Book. Elsevier health sciences.
Hewitson, T. D., & Darby, I. A. (Eds.). (2010). Histology protocols (p. 229). Totowa^ eNJ NJ: Humana Press.
Acknowledgements
This work was supported by the Programa de Becas Posdoctorales de la Dirección General de Asuntos del Personal Académico (DGAPA), UNAM to the postdoctoral fellow Eloir Gallegos Pacheco.
The authors thank laboratory technician Dulce María Hernández for executing the technique and for allowing photographic documentation of the procedure.