May 28, 2026
High-Throughput PCR Amplification of MLST Loci Using a One-Pot Approach
- 1National Cheng Kung University


Protocol Citation: Khaled Abdrabo, Yin-Tse Huang 2026. High-Throughput PCR Amplification of MLST Loci Using a One-Pot Approach. protocols.io https://dx.doi.org/10.17504/protocols.io.kqdg3nb7qv25/v1
License: This is an open access protocol distributed under the terms of the Creative Commons Attribution License, which permits unrestricted use, distribution, and reproduction in any medium, provided the original author and source are credited
Protocol status: Working
We use this protocol and it's working
Created: February 06, 2026
Last Modified: May 28, 2026
Protocol Integer ID: 242792
Keywords: throughput pcr amplification of mlst loci, pcr amplification, throughput pcr amplification, pot pcr workflow for multilocus sequence typing, pot pcr workflow, reaction setup with barcoded primer, scale pcr application, barcoded primer, efficient gel, mlst loci, successful amplification, agarose gel, multilocus sequence typing, amplicon, multichannel pipette, mlst, automated bead
Abstract
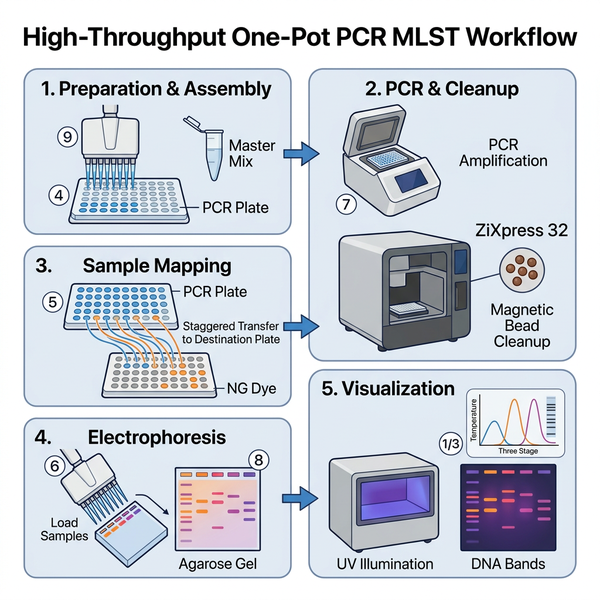
This protocol outlines a high-throughput, one-pot PCR workflow for multilocus sequence typing (MLST) in a 96-well format. It combines simplified reaction setup with barcoded primers and automated bead-based cleanup using the ZiXpress 32 system. An optimized plate-mapping strategy enables efficient gel loading with multichannel pipettes. Amplicons are resolved on agarose gels and visualized to confirm successful amplification. The method is scalable, reproducible, and suitable for large-scale PCR applications.
One Pot PCR
1h 25m 12s
Prepare the PCR master mix for each primer set in a reagent reservoir sufficient for a 96-well plate. To account for pipetting variability, it is recommended to prepare 10% excess volume (1.1× total reaction volume).
PCR mixture for primer set for each reaction as the following:
| A | B | C | D | E | |
| Components | Vol. /reaction | Vol. /96-well plate | Vol. (1.1X) | Final Conc. | |
| X-Forward Primer (10 µM) | 0.5 µL | 48 µL | 55 µL | 0.1 µM | |
| X-Reverse Primer (10 µM) | 0.5 µL | 48 µL | 55 µL | 0.1 µM | |
| Y-Forward Primer (10 µM) | 0.5 µL | 48 µL | 55 µL | 0.1 µM | |
| Y-Reverse Primer (10 µM) | 0.5 µL | 48 µL | 55 µL | 0.1 µM | |
| Z-Forward Primer (10 µM) | 0.5 µL | 48 µL | 55 µL | 0.1 µM | |
| Z-Reverse Primer (10 µM) | 0.5 µL | 48 µL | 55 µL | 0.1 µM | |
| PowerPol 2X PCR Master Mix | 25 µL | 2,400 µL | 2,750 µL | 1X | |
| ddH2O | 17.5 µL | 1,680 µL | 1,925 µL | ||
| Total volume | 45.5 µL | 4,368 µL | 5.005 µL |
Note
The volume of ddH₂O is variable and should be adjusted based on the volumes of the primer set and DNA template. It is recommended to calculate the required ddH₂O volume so that the final reaction volume reaches 50 µL per reaction.
5m
Using a multichannel micropipette, dispense 45.5 µL of the prepared PCR master mix into each well of a 96-well plate.
5m
Aliquot the selected barcodes (1.5 µL) into each well of the 96-well plate containing the PCR master mix.
5m
Add the DNA template to each well at a volume appropriate for the DNA quality and concentration. Based on the calculations above, 3 µL of DNA template per reaction is recommended, resulting in a final reaction volume of 50 µL per well.
10m
Seal the 96-well PCR plate with the sealing film. Clearly label the plate with the necessary information (e.g., sample ID, date, and experiment name).
Gently mix the contents of the 96-well PCR plate (e.g., by brief shaking or tapping). Avoid vigorous mixing, as this may lead to cross-contamination between wells.
2s
Briefly centrifuge the 96-well PCR plate using a plate centrifuge (e.g., a DIY 96-well plate centrifuge) to collect the reaction mixture at the bottom of the wells.
10s
Run the PCR under the following conditions:
| A | B | C | D | E | |
| Stage | Step | Temperature | Time (Sec) | No. of cycles | |
| 1 | Intitial denaturation | 95 ºC | 180 | 1 | |
| 2- MLST loci amplification | Denaturation | 95 ºC | 15 | 25 | |
| Annealing | 60 ºC | 15 | 25 | ||
| Extension | 72 ºC | 30 | 25 | ||
| 3- Barcoding the amplified regions | Denaturation | 95 ºC | 15 | 10 | |
| Annealing | 65 ºC | 15 | 10 | ||
| Extension | 72 ºC | 30 | 10 | ||
| 4 | Final extension | 72 ºC | 60 | 1 | |
| Preservation | 4 ºC | ∞ | ∞ |
Note
The annealing temperature should be optimized for each primer set. Use the temperature that has been validated to work effectively with your specific primers.
1h
Automated Size Selection
50m
Using ZiXpress 32 96-well plate, fill in as the following:
| A | B | C | |
| Well no. | Reagent | Volume | |
| 1 | BeaverBeads™ DNA Select | Variable ratio | |
| 1 | PCR product | 50 µL | |
| 2 | Ethanol 75% | 400 µL | |
| 3 | Ethanol 75% | 400 µL | |
| 4 | DEPC-treated water | 50 µL | |
| 6 | ddH2O | 400 µL |
| 1 | 2 | 3 | 4 | 5 | |
| A | Beads + PCR 1 | EthOH | EthOH | DEPC_H2O | |
| B | Beads + PCR 2 | EthOH | EthOH | DEPC_H2O | |
| C | Beads + PCR 3 | EthOH | EthOH | DEPC_H2O | |
| D | Beads + PCR 4 | EthOH | EthOH | DEPC_H2O | |
| E | Beads + PCR 5 | EthOH | EthOH | DEPC_H2O | |
| F | Beads + PCR 6 | EthOH | EthOH | DEPC_H2O | |
| G | Beads + PCR 7 | EthOH | EthOH | DEPC_H2O | |
| H | Beads + PCR 8 | EthOH | EthOH | DEPC_H2O |
| 6 | |
| A | ddH2O |
| B | ddH2O |
| C | ddH2O |
| D | ddH2O |
| E | ddH2O |
| F | ddH2O |
| G | ddH2O |
| H | ddH2O |
Note
The volume of BeaverBeads is variable and should be adjusted according to the size of the target amplicons. Smaller amplicons typically require a lower bead volume ratio.
Refer to the following figure:
Note
It is recommended to leave well position 5 empty to minimize the risk of cross-contamination during the initialization of the ZiXpress 32 instrument.
Note
Each ZiXpress plate can accommodate up to 16 PCR products (8 × 2 layout). As each cleaning run can process two plates simultaneously, a full 96-well PCR plate can be completed in three sequential cleaning runs.
20m
Subject the plates to the automated cleaning program (Program No. 10) using the following settings:
| A | B | C | D | E | F | G | |
| Well no. | Standby (min) | Mix (min) | Vol (µL) | Mix Speed | Mag (Sec) | Temp. | |
| 1 | 0 | 2 | 75 | 1 | 0 | 0 | |
| 1 | 5 | 0 | 75 | 0 | 120 | 0 | |
| 2 | 0 | 0 | 400 | 1 | 60 | 0 | |
| 3 | 0 | 0 | 400 | 1 | 60 | 0 | |
| 3 | 5 | 0 | 0 | 0 | 0 | 0 | |
| 4 | 0 | 10 | 50 | 2 | 120 | 55 | |
| 6 | 0 | 2 | 400 | 0 | 0 | 0 |
30m
Gel Electrophoresis
1h 5m
For efficient distribution of NG dye, prepare an 8-well strip containing approximately 150 µL of 10× NG dye per well. Using a multichannel micropipette, dispense 2 µL of NG dye into each well of a new 96-well PCR plate.
5m
For efficient gel loading using a multichannel micropipette, note that the spacing between adjacent pipette tips may not perfectly align with standard gel wells. To address this, apply the following plate-mapping strategy when mixing PCR products with loading dye:
Distribute each column of the 96-well PCR plate across the first two columns of a corresponding 96-well dye plate. Specifically, transfer:
- Well A1 (PCR plate) → A1 (dye plate)
- Well A2 (PCR plate) → B1 (dye plate)
- Continue this alternating pattern down the column
This approach ensures proper alignment with gel wells during multichannel loading. Refer to the representative figure below for guidance.
| 1 | 2 | 3 | |
| A | PCR1 | PCR9 | PCR17 |
| B | PCR2 | PCR10 | PCR18 |
| C | PCR3 | PCR11 | PCR19 |
| D | PCR4 | PCR12 | PCR20 |
| E | PCR5 | PCR13 | PCR21 |
| F | PCR6 | PCR14 | PCR22 |
| G | PCR7 | PCR15 | PCR23 |
| H | PCR8 | PCR16 | PCR24 |
| 1 | 2 | 3 | |
| A | PCR1 + Dye | PCR2 + Dye | PCR17 + Dye |
| B | PCR3 + Dye | PCR4 + Dye | PCR18 + Dye |
| C | PCR5 + Dye | PCR6 + Dye | PCR19 + Dye |
| D | PCR7 + Dye | PCR8 + Dye | PCR20 + Dye |
| E | PCR9 + Dye | PCR10 + Dye | PCR21 + Dye |
| F | PCR11 + Dye | PCR12 + Dye | PCR22 + Dye |
| G | PCR13 + Dye | PCR14 + Dye | PCR23 + Dye |
| H | PCR15 + Dye | PCR16 + Dye | PCR24 + Dye |
- Only the first two columns should be loaded using a multichannel micropipette; therefore, they must follow the distribution strategy described above. The third column should be handled using a single-channel micropipette and can be distributed sequentially down the column in a standard manner.
15m
Gently mix the contents of the 96-well PCR plate (e.g., by brief shaking or tapping). Avoid vigorous mixing, as this may lead to cross-contamination between wells.
Briefly centrifuge the 96-well PCR plate using a plate centrifuge (e.g., a DIY 96-well plate centrifuge) to collect the reaction mixture at the bottom of the wells.
Use a high-throughput casting tray to prepare an agarose gel with two combs, each generating 25 wells. Prior to casting, wet the tray and combs with TBE buffer to prevent the gel from sticking and to facilitate smooth removal and transfer for imaging.
Each gel contains 25 wells after solidification. Reserve one well for the DNA ladder, leaving 24 wells available for sample loading.
Use a multichannel micropipette to load samples from the first column of the PCR plate. Repeat the same loading for the second column. This setup, combined with the adjusted sample distribution strategy and appropriate tip spacing, ensures that samples are loaded sequentially in the correct order corresponding to the PCR plate.
For the third column, use a single-channel micropipette and load samples sequentially down the column. Repeat this loading pattern (two columns with multichannel pipette followed by one column with single-channel pipette) for every set of three consecutive columns.
Note
Each 96-well PCR plate can be loaded onto four gels, with 24 samples per gel (excluding the DNA ladder well).
10m
Run the gel at 110 V for 35 minutes.
35m
Visualize the gel using a UV transilluminator to assess the success of the PCR amplification.