Sep 08, 2022
Exploring tissue morphodynamics using the photoconvertible Kaede protein in amphioxus embryos
Peer-reviewed method
- 1[Sorbonne Université, CNRS, Biologie Intégrative des Organismes Marins, BIOM, F-66650, Banyuls-sur-Mer, France ]
- PLOS ONE Lab ProtocolsTech. support email: [email protected]


External link: https://doi.org/10.1371/journal.pone.0275193
Protocol Citation: Lydvina Meister, Hector Escriva, Stephanie Bertrand 2022. Exploring tissue morphodynamics using the photoconvertible Kaede protein in amphioxus embryos. protocols.io https://dx.doi.org/10.17504/protocols.io.j8nlk46z6g5r/v1
Manuscript citation:
Meister L, Escriva H, Bertrand S (2022)Exploring tissue morphodynamics using the photoconvertible Kaede protein in amphioxus embryos. PLOS ONE 17(9): e0275193. https://doi.org/10.1371/journal.pone.0275193
License: This is an open access protocol distributed under the terms of the Creative Commons Attribution License, which permits unrestricted use, distribution, and reproduction in any medium, provided the original author and source are credited
Protocol status: Working
We use this protocol and it's working
Created: April 28, 2021
Last Modified: September 08, 2022
Protocol Integer ID: 49501
Keywords: Kaede, photoconversion, development, cell tracing, amphioxus, cephalochordate, embryo, fluorescent protein, confocal, FRAP wizard, photoconvertible kaede protein in amphioxus embryo, photoconvertible kaede protein, using photoconvertible protein, photoconvertible protein, amphioxus embryo, specific cells during embryogenesi, cellular biology, exploring tissue morphodynamic, cell fate during embryonic development, stony coral trachyphyllia geoffroyi, embryogenesi, cell lineage, unconventional animal model, cell dynamic, using unconventional animal model, tissue morphodynamic, developmental biology application, irreversible photoconversion from green, cephalochordate branchiostoma lanceolatum, red fluorescence, embryo, embryonic development, marine animal, uv light, irreversible photoconversion, organelle, protein, cell fate
Funders Acknowledgements:
Agence Nationale de la Recherche
Grant ID: ANR-19-CE13-0011-01
Agence Nationale de la Recherche
Grant ID: ANR-16-CE12-0008-01
H2020-INFRAIA-1-2016- 2017
Grant ID: 730984
Abstract
Photoconvertible proteins are powerful tools widely used in cellular biology to study cell dynamics and organelles. Over the past decade, photoconvertible proteins have also been used for developmental biology applications to analyze cell lineage and cell fate during embryonic development. One of these photoconvertible proteins called Kaede, from the stony coral Trachyphyllia geoffroyi, undergoes irreversible photoconversion from green to red fluorescence when illuminated with UV light. Undertaking a cell tracing approach using photoconvertible proteins can be challenging when using unconventional animal models. In this protocol, we describe the use of Kaede to track specific cells during embryogenesis of the cephalochordate Branchiostoma lanceolatum. This protocol can be adapted to other unconventional models, especially marine animals.
Protocol materials
Nuclease-free Water
AgaroseMerck MilliporeSigma (Sigma-Aldrich)Catalog #A9539
Ethanol 70%
mMESSAGE mMACHINE™ SP6 Transcription KitThermo FisherCatalog #AM1340
NotI - 500 unitsNew England BiolabsCatalog #R0189S
CutSmart® BufferNew England BiolabsCatalog #B7204S
Ethanol
ammonium acetate
MilliQ water
Thin-Wall Capillary 4 1.0mm (fil)World Precision InstrumentsCatalog #TW100F-4
Falcon™ Easy-Grip Tissue Culture DishesFisher ScientificCatalog #10038820
POLY-D-LYSINE HYDROBROMIDE MOL WT 70000 - 5MGMerck MilliporeSigma (Sigma-Aldrich)Catalog #P6407-5MG
Fast Green FCFMerck MilliporeSigma (Sigma-Aldrich)Catalog #F7252
Glycerol - for molecular biology, ≥99%Merck MilliporeSigma (Sigma-Aldrich)Catalog #G5516
Eppendorf™ Microloader™ Pipette TipsEppendorfCatalog #5242956003
Magnesium sulfate heptahydrateMerck MilliporeSigma (Sigma-Aldrich)Catalog #M2773
Sodium chlorideMerck MilliporeSigma (Sigma-Aldrich)Catalog #746398
Potassium chlorideMerck MilliporeSigma (Sigma-Aldrich)Catalog #P9333
Magnesium chloride hexahydrateMerck MilliporeSigma (Sigma-Aldrich)
Calcium chloride dihydrateMerck MilliporeSigma (Sigma-Aldrich)Catalog #C5080
Nunc™ Glass Bottom Dishes, 12mmThermo FisherCatalog #150680
Preparation of the Kaede mRNA
Plasmid linearization
1. Mix together:
- 5 µg of the pCS2+ plasmid containing the coding sequence of the Kaede protein from Trachyphyllia geoffroyi (AB085641.1)
- 5 µL of NotI - 500 unitsNew England BiolabsCatalog #R0189S
- 20 µL of CutSmart® BufferNew England BiolabsCatalog #B7204S
- Nuclease-free Water q.s. 200 µL
2. Incubate 02:00:00 at 37 °C .
3. Add:
- 20 µL of ammonium acetate 3 Mass Percent
- 400 µL of Ethanol
4. Incubate at -20 °C Overnight .
5. Centrifuge 13000 rpm, 4°C, 00:20:00 .
6. Discard the supernatant.
7. Add 600 µL of cold Ethanol 70% .
8. Centrifuge 13000 rpm, 4°C, 00:10:00 .
9. Discard the supernatant and let the pellet air dry.
10. Disolve the pellet in 10 µL of Nuclease-free Water .
11. Run 0.5 µL in an 1 Mass / % volume AgaroseMerck MilliporeSigma (Sigma-Aldrich)Catalog #A9539 gel to test for complete linearization.
12. Measure the plasmid concentration using 0.5 µL with a
Equipment
Nanodrop 2000C
NAME
Thermo Scientific
BRAND
TSC-ND2000C
SKU
or equivalent equipment.
2h 30m
mRNA synthesis
Use the mMESSAGE mMACHINE™ SP6 Transcription KitThermo FisherCatalog #AM1340 and follow the manufacturer's instructions.
1. Thaw the frozen reagents.
2. Mix together:
- 10 µL of 2X NTP/CAP
- 2 µL of 10X Reaction Buffer
- 1 µg of the linearized plasmid
- 2 µL of Enzyme mix
- Nuclease-free Water q.s. 20 µL
3. Incubate at 37 °C during 02:00:00 .
4. Add 1 µL TURBO DNase and incubate at 37 °C during 00:15:00 .
5. Add 30 µL of Nuclease-free Water and 30 µL of LiCl Precipitation Solution.
6. Mix and incubate at -20 °C during at least 00:30:00 .
7. Centrifuge 13000 rpm, 4°C, 00:20:00 .
8. Remove the supernatant and add 1 mL of Ethanol 70% .
9. Centrifuge 13000 rpm, 4°C, 00:10:00 .
10. Remove the supernatant.
11. Let the pellet air dry and resuspend in 10 µL ofNuclease-free Water .
12. Mesure the concentration and check for the integrity of the RNA on a 1 Mass / % volume AgaroseMerck MilliporeSigma (Sigma-Aldrich)Catalog #A9539 gel.
13. The mRNA is either kept in small aliquots at -80 °C for upcoming experiments or directly used for the microinjection experiment.
If the concentration is low (less than 2 µg/µL ), you can undertake several synthesis reactions, precipitate them together and resuspend the pellet in a smaller volume.
3h 15m
Gametes obtaining
Adult collection
Ripe Branchiostoma lanceolatum adults are obtained by sieving the sand collected at a 5 m depth near the Racou beach (Argelès sur Mer, France) during the months of May and June.
They are kept in small seawater tanks with few centimeters of sand. The temperature is maintained at 17 °C and a light/dark cycle of 14:00:00 /10:00:00 is applied. The seawater is changed three times per day.
1d
Spawning induction
Gametes are obtained using the heat stimulation method published in:
Citation
Amphioxus spawn at night, just after the sunset. Briefly, ripe adults kept at 17 °C are placed in a tank without sand at 23 °C the day before spawning, with the same day/night cycle. Two hours before the light is turned off the spawning day, animals are individualized in plastic cups filled with a small volume of filtered seawater and placed on a black background in order to facilitate the vizualisation of the gametes as they are released. After one hour in the dark, the gametes are collected: the sperm diluted in the seawater is conserved at 4°C and can be used during several hours. The eggs are collected by pipetting and placed in small scratched Petri dishes to avoid sticking to the plastic.
Oocytes injection
Microinjection is undertaken following the protocol published previously in:
Citation
LINK
Material to prepare in advance
1. Injection needles are prepared using Thin-Wall Capillary 4 1.0mm (fil)World Precision InstrumentsCatalog #TW100F-4 capillaries and a micropipette puller as for example:
Equipment
P-97 micropipette puller
NAME
Flaming/Brown Micropipette Puller
TYPE
Sutter instrument
BRAND
N/A
SKU
LINK
2. Poly-D-lysine coated dishes are prepared as follows:
- Dilute the POLY-D-LYSINE HYDROBROMIDE MOL WT 70000 - 5MGMerck MilliporeSigma (Sigma-Aldrich)Catalog #P6407-5MG in MilliQ water to a final concentration of 0.1 mg/mL .
- Cover the bottom of Falcon™ Easy-Grip Tissue Culture DishesFisher ScientificCatalog #10038820 with this solution.
- Incubate at Room temperature during 00:05:00 .
- Remove the solution.
- Let the dishes air dry.
- Keep the dishes at 4 °C until use.
5m
Microinjection
1. Prepare a mix containing as final concentrations:
- 1.5 µg/µL of Kaede mRNA
- 18 % volume of Glycerol - for molecular biology, ≥99%Merck MilliporeSigma (Sigma-Aldrich)Catalog #G5516
- 18 % volume of a 10 mg/mL solution of Fast Green FCFMerck MilliporeSigma (Sigma-Aldrich)Catalog #F7252 diluted in MilliQ water .
2. Load the injection needle using Eppendorf™ Microloader™ Pipette TipsEppendorfCatalog #5242956003 .
3. Place the needle on a micromanipulator and connect it to the microinjector:
Equipment
Picospritzer III Intracellular Microinjection Dispense System
NAME
Injection system
TYPE
Picospritzer
BRAND
052-0500-900
SKU
LINK
100 psi, 2 channel
SPECIFICATIONS
4. Deposite a line of oocytes in a Falcon™ Easy-Grip Tissue Culture DishesFisher ScientificCatalog #10038820 dish coated withPOLY-D-LYSINE HYDROBROMIDE MOL WT 70000 - 5MGMerck MilliporeSigma (Sigma-Aldrich)Catalog #P6407-5MG and filled with filtered seawater.
5. Cut the end of the needle using fine forceps under the binocular. Use a binocular that allows for 200X magnification.
6. Insert the needle into the oocyte and inject a small volume of injection mix (1/100 to 1/50 of the volume of the oocyte). Depending on the size of the needle after cutting, several injection pulses might be necessary to inject a sufficient volume.
7. When all the oocytes are injected, proceed to fertilization. 10 µL of diluted sperm are sufficient to fertilize 50 injected oocytes. The embryos are detached from the poly-D-lysine coated dish by delicate water waves pushes after fertilization membrane raising, transferred into a clean Petri dish filled with filtered seawater and kept at 19 °C .
Photoconversion
Preparing the embryo for the photoconversion
1. 00:30:00 before the photoconversion, observe the embryos under a fluorescent binocular using the green filter.
2. Individualize the fluorescent well-developed embryos into glass bottom culture dishes (35 mm) Nunc™ Glass Bottom Dishes, 12mmThermo FisherCatalog #150680 . Transfer the embryos using a P200 tip to minimize the risk of damage.
3. Maintain the embryo in the smallest possible volume of filtered seawater. In the center of the Petri dish, a volume of 500 µL of seawater is sufficient for the embryo survival and photoconversion.
4. Place the embryo in the desired orientation (blastopore view in our example) using a 10 cm steel syringe needle tip under the binocular.
5. Transfer the Petri dish under the confocal inverted microscope for the photoconversion. Here we will describe the procedure using the following microscope:
Equipment
White Light Laser Confocal Microscope Leica TCS SP8 X
NAME
Confocal Inverted Microscope
TYPE
Leica
BRAND
NA
SKU
However, any confocal inverted microscope equipped with a UV laser and lasers to image the fluorescence emitted by the Kaede protein can be used. The microscope must also allow scan zoom and ROI scanning in order to effectively target a specific region using this protocol for photoconversion. The UV laser intensity and scan time must be adjusted. If a FRAP module or a photoconversion/photoactivation module is available on the microscope, it can be used following the manufacturer's instructions.
6. Visualize the embryo under the 20x/NA 0.8 objective by setting the white laser excitation wavelength at 508nm.
7. Scan the embryo all along the z-axis in order to see if the specimen is properly positioned.
8. Activate the FRAP-Wizard (Fluorescent Recovery After Photobleaching) module of the LAS X software platform.
30m
Photoconversion settings
At the top of the FRAP-wizard interface, several buttons corresponding to the different steps are available : “Overview”, “Set Up”, “Bleach”, “Time course”, “Evaluation”. For photoconversion, the "Evaluation" step is not used.
1. Step 1: Settings for pre- and post- bleach imaging
- Click on the "Set Up" button and adjust the parameters for imaging the embryo before and after photoconversion.
- Set up the laser and detectors parameters to excite and detect emission of the Kaede in its two states: before (uncleaved, green, Ex508/Em518) and after (cleaved, red, Ex572/Em582) photoconversion.
- Adjust the intensity of the laser depending on the amount of Kaede produced by the embryo (correlated to the amount of mRNA injected in the oocyte). Usually, an intensity of 15% is sufficient for imaging the photoconversion.
- Choose the "xyt" acquisition mode for photoconvertion.
2. Step 2: Parameters for photobleaching
- Click on the "Bleach" button.
- Set the intensity of the 405nm (UV) diode laser at 85%.
- Turn off the white laser.
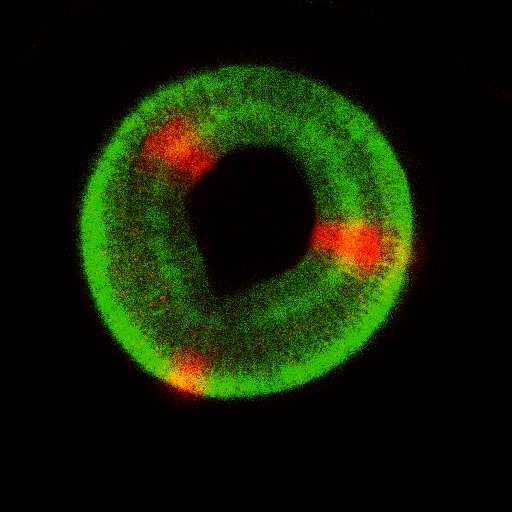
- Draw the Regions Of Interest (ROI) on the image of the embryo obtained before the photoconversion. In our example, three circles are drawn, two at the position of the presumptive paraxial mesoderm and one in the putative ventral ectoderm territory.
- Activate the Zoom-In mode (more light is applied to the ROI).
- Turn on the following options: « Set Background to Zero », « Delete Bleach Images after Scan » and « Use laser Settings for all ROIs ».
3. Step 3: Time Course - Defining the number of prebleach, bleach and postbleach intervals
- Select the "Time-Course" menu.
- One pre-bleach and one post-bleach intervals are imposed. For photoconversion, use only one repetition. The photoconversion time depending on the total size of ROIs, adjust the photoconversion session in order to program a total bleaching time of 00:01:00 .
After setting all these parameters, the photobleaching can be started. If the photoconversion is successful, the ROI previously fluorescent after an excitation at 508 nm becomes fluorescent under an excitation at 572 nm. The Petri dish is then filled with 2 mL of filtered seawater and incubated at 19 °C .
1m
Imaging embryos at later stages
1. Keep the embryo in the incubator until the desired developmental stage.
2. After 15 hours post fertilization, the embryo starts moving thanks to cilia beating and becomes difficult to scan at high magnification. To immobilise it, incubate the embryo into 2X Artificial Sea Water :
- 1038.4 millimolar (mM) Sodium chlorideMerck MilliporeSigma (Sigma-Aldrich)Catalog #746398
- 22.2 millimolar (mM) Potassium chlorideMerck MilliporeSigma (Sigma-Aldrich)Catalog #P9333
- 20 millimolar (mM) Calcium chloride dihydrateMerck MilliporeSigma (Sigma-Aldrich)Catalog #C5080
- 49 millimolar (mM) Magnesium chloride hexahydrateMerck MilliporeSigma (Sigma-Aldrich)
- 51 millimolar (mM) Magnesium sulfate heptahydrateMerck MilliporeSigma (Sigma-Aldrich)Catalog #M2773
Transfer the specimen with a p20 tip to a Petri dish containing 2X Artificial Sea Water. When the embryo is totally immobilised (around 00:00:10 ) and sinks to the bottom of the dish, put it back in the initial glass-bottom dish using the same tip. The embryo will remain immobilised for 00:05:00 .
3. Proceed to embryo imaging (z-stack) using excitation at 508 nm (green) and at 572 nm (red) and using the sequential mode. Depending on the developmental stage, the embryo can be imaged on both sides by turning it over delicately after the first scan using a 10 cm steel syringe needle.
5m 10s
Citations
Step 2.2
Fuentes M, Benito E, Bertrand S, Paris M, Mignardot A, Godoy L, Jimenez-Delgado S, Oliveri D, Candiani S, Hirsinger E, D'Aniello S, Pascual-Anaya J, Maeso I, Pestarino M, Vernier P, Nicolas JF, Schubert M, Laudet V, Geneviere AM, Albalat R, Garcia Fernandez J, Holland ND, Escriva H. Insights into spawning behavior and development of the European amphioxus (Branchiostoma lanceolatum).
Step 3
Hirsinger E, Carvalho JE, Chevalier C, Lutfalla G, Nicolas JF, Peyriéras N, Schubert M. Expression of fluorescent proteins in Branchiostoma lanceolatum by mRNA injection into unfertilized oocytes.
https://doi.org/10.3791/52042