Jun 26, 2026
Determination of gRNA Efficiency In Vivo
- Carl Olson1,2,
- Ryan Gillis1,
- Molly Logsdon1,
- Bowen Tan1
- 1Allen Institute / Neural Dynamics;
- 2Second Faculty of Medicine, Charles University, Prague, CZ
- Bowen Tan: Correspondence: [email protected]; [email protected];
- Allen Institute for Neural Dynamics


Protocol Citation: Carl Olson, Ryan Gillis, Molly Logsdon, Bowen Tan 2026. Determination of gRNA Efficiency In Vivo. protocols.io https://dx.doi.org/10.17504/protocols.io.4r3l2x42jv1y/v1
License: This is an open access protocol distributed under the terms of the Creative Commons Attribution License, which permits unrestricted use, distribution, and reproduction in any medium, provided the original author and source are credited
Protocol status: Working
We use this protocol and it's working
Created: June 23, 2026
Last Modified: June 26, 2026
Protocol Integer ID: 319843
Keywords: CRISPR/Cas9, gRNA Validation, In Vivo Editing Efficiency, Nuclei Isolation, FACS, guide RNA, INDEL analysis, nuclei extraction, fluorescence-activated cell sorting, flow cytometry, Nanopore sequencing, amplicon sequencing, AAV, adeno-associated virus, stereotaxic injection, flash-frozen brain tissue, mouse brain, genomic DNA extraction, PCR amplification, touchdown PCR, PCR cleanup, agarose gel electrophoresis, DNA purification, DNA quantification, CRISPResso2, PlasmidSaurus, H2B-mScarlet, nuclear reporter, gene knockout, knockout efficiency, Hoechst 33342, Proteinase K, QIAquick, cell sorting, tissue homogenization, nuclei quantification, Trypan Blue exclusion, Countess II, gentleMACS, Dounce homogenizer, brain tissue processing, gene editing, viral vector, systems neuroscience, neuroscience, sgRNA, PAM sequence, cut site, genome engineering, quantitative estimate of in vivo crispr, revolutionized gene editing, vivo crispr, editing efficiency after in vivo expression, gene editing, efficiency at target genomic loci, quantifying guide rna, target genomic l
Funders Acknowledgements:
Ministry of Health of the Czech Republic
Grant ID: NW24-04-00041
Abstract
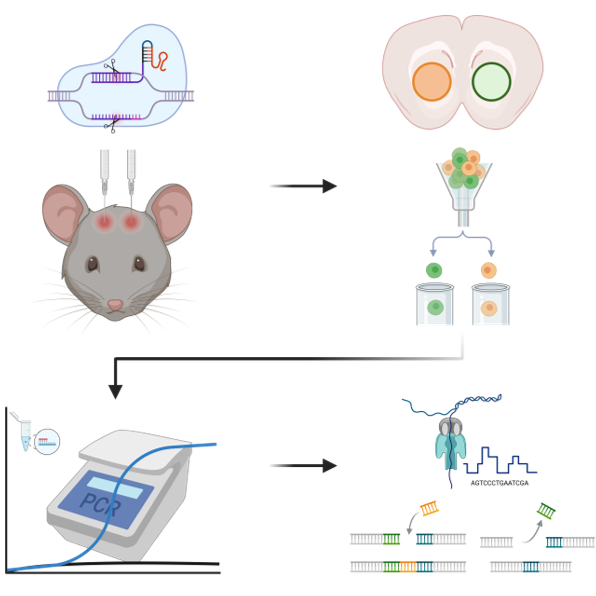
Dissecting how specific genes causally contribute to the function of defined cell types requires knocking them out in vivo. While CRISPR/Cas9 has revolutionized gene editing and genomic engineering, methods to characterize its editing efficiency after in vivo expression have been lacking. This protocol addresses that gap by quantifying guide RNA (gRNA) editing efficiency at target genomic loci in brain tissue, thereby providing a quantitative estimate of in vivo CRISPR/Cas9 knockout efficiency at the population level. The workflow proceeds in four stages: (1) enrichment of gRNA-expressing nuclei from flash-frozen brain tissue by Fluorescence-Activated Cell Sorting (FACS); (2) genomic DNA extraction from sorted nuclei; (3) PCR amplification and purification of each gRNA-targeted genomic site; and (4) amplicon sequencing followed by computational quantification of editing efficiency.
Materials
Buffer Recipes:
Nuclei Lysis (Homogenization) Buffer (Stock)
| Component | Volume/Amount | Storage | |
| Nuclei Isolation Media (NIM) | 25 mL | 4 °C | |
| 100× Protease inhibitor | 250 µL | 4 °C | |
| 10% NP40 (final 0.1%) | 250 µL | 4 °C | |
| 100 mM DTT stock (final 0.1 mM) | 25 µL | ‒20 °C |
Nuclei Blocking Buffer (Stock)
| Component | Volume | Storage | |
| 1× PBS | 45 mL | Room temperature | |
| 30% BSA (final 3% BSA) | 5 mL | 4 °C |
Nuclei Isolation Media (Stock) — store at 4°C
| Component | Amount | Final Concentration | |
| 2 M KCl | 3.13 mL | 25 mM | |
| Nuclease-free water | 243.12 mL | — | |
| Sucrose | 21.45 g | 250 mM | |
| 1 M Tris Buffer, pH 8.0 | 2.5 mL | 10 mM | |
| 1 M MgCl₂ | 1.25 mL | 5 mM |
Prepare in a 250 mL bottle. Mix until sucrose is fully dissolved. Store at 4 °C.
Genomic DNA Extraction Buffer (prepare fresh, per sample)
| Component | Volume | Storage | |
| Direct PCR buffer | 200 µL | 4 °C | |
| Proteinase K (>600 U/mL) | 4 µL | ‒20 °C |
Master Equipment and Reagents List
Equipment
| Item | Specification / Notes | Manufacturer / Cat. # | |
| Mouse brain matrix | Coronal; metal or plastic | Protech Intl.; Cat. #: 69-2175-1 | |
| Tissue punch (1.0 mm) | 1.0 mm diameter | Fisher Scientific; Cat. #: 21-520-159 | |
| gentleMACS Octo Dissociator | Tissue homogenization; Method A | Miltenyi Biotec; Cat. #: 130-134-029 | |
| Dounce tissue grinder (1 mL) | Alternative homogenization; Method B | DWK Life Sciences; Cat. #: 357538 | |
| Rotator (4 °C) | For 10 min nuclei incubation post-homogenization | ||
| Refrigerated centrifuge | Capable of 750 × g / 2900 rpm; pre-cooled before use | ||
| Countess II automated cell counter | For nuclei quantification | Invitrogen; Cat. #: AMQAX1000 | |
| Ice bucket | For sample transport to FACS facility | ||
| FACS sorter | Facility instrument; book ≥1 days in advance | Facility-dependent | |
| Thermocycler | With touchdown PCR program (see PCR Setup section) | ||
| Horizontal gel electrophoresis system | Runs at 80 V; with power supply | ||
| 300 mL beaker | For agarose gel preparation | ||
| Microwave | For melting agarose | ||
| Gel imager | Blue light / SYBR Safe compatible; with image capture software | ||
| Nanodrop / spectrophotometer | For 260/280 nm DNA concentration measurement | ||
| 55 °C heat block / incubator | For elution water pre-warming and gDNA extraction step 1 | ||
| 65 °C and 98 °C heat block / incubator | For gDNA extraction steps 2 and 3 |
Reagents and Consumables:
| Item | Specification / Notes | Manufacturer / Cat. # | |
| Surgical blades | For sectioning; quantity matched to 1–2 mm interval | ||
| Dry ice | For re-freezing tissue sections | ||
| 2.0 mL low protein binding tubes | Labeled with mouse ID and hemisphere (R/L) | Thermo Scientific; Cat. #: 88379 | |
| 2.0 mL DNA LoBind tubes | For genomic DNA extraction (Part III) | Eppendorf; Cat. #: 022431048 | |
| 1.5 mL microcentrifuge tubes | For QIAquick column flow-through | ||
| 200 µL PCR tubes | For Countess quantification | ||
| gentleMACS M tubes | For use with gentleMACS Octo Dissociator | Miltenyi Biotec; Cat. #: 130-093-236 | |
| gentleMACS Octo Coolers | Cooling tubes for gentleMACS runs | Miltenyi Biotec; Cat. #: 130-130-533 | |
| P-1000 pipette + tips | |||
| 70 µm Flowmi cell strainer | First filtration step | SP Bel-Art; Cat. #: 136800070 | |
| 40 µm Flowmi cell strainer | Second filtration step | SP Bel-Art; Cat. #: 136800040 | |
| Countess chamber slides | For use with Countess II | Invitrogen; Cat. #: C10283 | |
| Collection tubes | Pre-coated with 300 µL nuclei blocking buffer before sorting | ||
| QIAquick spin columns (purple) | Included in QIAquick PCR Cleanup Kit | QIAGEN; Cat. #: 28106 | |
| Nuclei lysis (homogenization) buffer | See Buffer Recipes; prepare fresh before use | ||
| Nuclei blocking buffer | 1× PBS + 3% BSA; see Buffer Recipes | ||
| Nuclei Isolation Media (NIM) | Sucrose-based; see Buffer Recipes; store at 4 °C | ||
| 0.4% Trypan Blue | For Countess live/dead staining | Invitrogen; Cat. #: T10282 | |
| Hoechst 33342 (10 mg/mL) | 2 µL per 10⁶ nuclei; light-sensitive; store at 4 °C in dark | Invitrogen; Cat. #: H3570 | |
| 100× Protease inhibitor | Store at 4 °C | ||
| 10% NP40 (IGEPAL CA-630) | Final conc. 0.1% in lysis buffer; store at 4 °C | ||
| 100 mM DTT stock | Store at ‒20 °C | ||
| Sucrose | 21.45 g per 250 mL NIM (250 mM final) | ||
| Nuclease-free water | Invitrogen; Cat. #: AM9932 | ||
| 1 M Tris Buffer, pH 8.0 | |||
| 2 M KCl | |||
| 1 M MgCl₂ | |||
| 1× PBS | |||
| 30% BSA | Store at 4 °C | Thermo Scientific; Cat. #: AAJ65833AE | |
| Direct PCR buffer | 200 µL per sample; store at 4 °C | Viagen; Cat. #: 302-C | |
| Proteinase K (>600 U/mL) | 4 µL per sample; store at ‒20 °C | New England Biolabs; Cat. #: P8107S | |
| Q5 Hot Start Master Mix (2×) | 10 µL per 20 µL reaction | New England Biolabs; Cat. #: M0492 | |
| Gene-specific forward primer (10 µM) | Optimal annealing at 61 °C ±2 °C | ||
| Gene-specific reverse primer (10 µM) | Optimal annealing at 61 °C ±2 °C | ||
| 1× TAE buffer | 200 mL per gel | ||
| Agarose | 3 g per 200 mL (1.5% m/v gel) | Sigma-Aldrich; Cat. #: A4718 | |
| 10,000× SYBR Safe DNA Gel Stain | 20 µL per 200 mL gel (1:10,000) | Invitrogen; Cat. #: S33102 | |
| 5× Blue Gel Loading Buffer | 1 µL per 5 µL sample | Bioline; Cat. #: BIO-37045 | |
| HyperLadder 1 kb DNA ladder | Bioline; Cat. #: BIO-33053 | ||
| QIAquick PCR Cleanup Buffer PB | 5× volume of PCR product; included in kit | QIAGEN; Cat. #: 28106 | |
| QIAquick PCR Cleanup Buffer PE | Ensure EtOH added before first use; included in kit | QIAGEN; Cat. #: 28106 | |
| 96‒100% EtOH | For adding to Buffer PE |
Protocol materials
Nuclei blocking buffer
0.4% Trypan Blue,InvitrogenCatalog #T10282
Hoechst 33342Catalog #H3570
DNA ladder (HyperLadder 1kb),BiolineCatalog #BIO-33053
QIAquick PCR Cleanup Kit protocolQiagenCatalog #28106
Rodent brain matrices - AcrylicWorld Precision InstrumentsCatalog #RBMA-200C
Trypan Blue
Blue Gel Loading Buffer,BiolineCatalog #BIO-37045
Safety warnings
Read the relevant Safety Data Sheet (SDS) for each reagent before beginning. Wear a lab coat and safety glasses throughout. Step-level reminders appear at each point in the protocol where these hazards are first encountered.
| Reagent / Material | Hazard and Precautions | |
| Trypan Blue | Possible carcinogen (IARC Group 2B). Wear nitrile gloves; avoid inhalation; work in a well-ventilated area. Dispose of waste in designated hazardous containers. | |
| SYBR Safe DNA Gel Stain | Potential mutagen despite reduced-hazard labeling. Treat as a DNA intercalator: wear nitrile gloves, avoid skin contact, dispose of gels and buffer in designated hazardous waste. | |
| Proteinase K | Respiratory and dermal sensitizer; repeated exposure may cause allergic reactions. Wear gloves and eye protection; avoid aerosols; work in a ventilated area. | |
| Molten agarose | Thermal burn hazard. Swirl the flask carefully when microwaving to prevent superheating. Allow to cool until safely handleable before adding SYBR Safe. | |
| Hoechst 33342 | Mutagen and potential carcinogen. Wear nitrile gloves and eye protection; minimize skin contact. Handle stained samples in subdued light. | |
| Flash-frozen tissue (−80 °C storage) | Cryogenic burn risk. Use insulated or cryogenic gloves when transferring samples from −80 °C storage or dry ice. | |
| DTT (Dithiothreitol) | Skin and respiratory irritant; strong odor. Wear gloves; weigh or aliquot in a ventilated area or chemical fume hood. | |
| Dry ice | Cryogenic burn risk (−78.5 °C). CO2 asphyxiation risk in enclosed spaces. Use insulated gloves; ensure room ventilation; never seal in an airtight container. | |
| 96–100% Ethanol (for Buffer PE) | Highly flammable. Keep away from open flames and ignition sources; store in an approved flammables cabinet; wear gloves. |
Before start
The following steps must be completed before beginning this protocol. Confirm all conditions are met before proceeding.
1. Multiple (10–15) generic AAV plasmids carrying dual gRNA cassettes are pooled in equal amounts to reach the total DNA required for an AAV prep. The gRNA plasmid pool is then used for AAV production.
2. Stereotaxic injection of AAV constructs expressing both gRNA cassettes and the nuclear reporter (H2B-mScarlet). For stereotaxic AAV injections, see SOP AF0111.
3. A viral expression period of at least 3 weeks post-injection.
4. Mouse brain perfusion (without fixation) and flash freezing have been performed; see SOP AF0138.
5. Flash frozen brain samples are stored at −80 °C until processing.
PART I: Nuclei Extraction: Tissue Processing
Flash-frozen brain tissue is sectioned coronally to expose the AAV-transduced regions of interest. Targeted tissue punches are taken from the injection site to capture the target cell population while preserving hemispheric identity for left and right viral injection sites.
Allow the frozen brain to equilibrate for a few minutes on dry ice with the surface exposed toRoom temperature before matrix sectioning. This keeps the tissue semi-firm enough to hold its shape without requiring a cryostat.
Dissect coronal sections containing the target brain regions from the stereotaxic coordinates using a
Rodent brain matrices - AcrylicWorld Precision InstrumentsCatalog #RBMA-200C
- Place all blades at the desired interval (1-2 mm ) on the matrix above the brain before slicing (all at once).
- Remove all blades at once, keeping the brain section(s) sandwiched between blades.
- Keep the blade on the posterior side of the tissue section so that the anterior face of the slice faces up while resting on the blade.
Safety information
- This step aims to preserve the left and right hemispheres relative to the injection coordinates.
- Dry ice and frozen tissue — Dry ice (−78.5 °C) and samples from −80 °C storage can cause immediate cryogenic burns. Use insulated or cryogenic gloves when handling. Do not use dry ice in sealed or poorly ventilated spaces; CO₂ sublimation can displace oxygen.
Place the blade with tissue back on dry ice to re-freeze before tissue punching.
Label enough 2.0 mL low protein binding tubes with the mouse ID and hemisphere (R - right or L - left).
Equipment
Low Protein binding tubes
NAME
Thermo Fisher Scientific
BRAND
88379
SKU
Dissect the regions of interest (ROIs) from AAV-transduced spots using 1.0 mm tissue punches, collecting as much tissue as possible with multiple punches along the viral injection track to capture the whole region.
Equipment
Tissue punches
NAME
Thermo Fisher Scientific
BRAND
21-520-159
SKU
Track sample ID and note R or L hemisphere for each sample.
Transfer each tissue punch into the corresponding labeled2.0 mL low protein binding tubes on wet ice.
Note
Wait until tissue collection from all samples is complete before proceeding to the next step.
Tissue Homogenization
15m
Mechanical disruption releases nuclei into the lysis buffer while preserving nuclear integrity. The gentleMACS Dissociator (max 8 samples per run) is the recommended method for consistent, reproducible homogenization. Controlled incubation and centrifugation following disruption allow nuclei to equilibrate and pellet cleanly.
Safety information
Nuclei lysis buffer contains DTT — DTT is a skin and respiratory irritant with a strong, unpleasant odor. Wear gloves; weigh or aliquot DTT stock in a ventilated area or chemical fume hood when preparing this buffer.
After collecting all tissues, add 1 mL of nuclei lysis (homogenization) buffer to each tissue punch to flush the tissue into the low protein binding tube using a P-1000 pipette. Keep samples on ice.
Method A — gentleMACS Dissociator (recommended)
Transfer tissue from tissue punches into individual gentleMACS M tubes.
Equipment
gentleMACS M tubes
NAME
Miltenyi Biotechnology
BRAND
130-093-236
SKU
Load tubes onto the gentleMACS Octo Dissociator and create a user protocol (2 ×00:05:00 at 200 rpm , total 00:10:00 ).
Equipment
gentleMACS Octo Dissociator
NAME
Miltenyi Biotec
BRAND
130-134-029
SKU
15m
Run all samples simultaneously with cooling tubes (gentleMACS Octo Coolers).
Equipment
GentleMACS Octo Coolers
NAME
Miltenyi
BRAND
130-130-533
SKU
Method B —Dounce Tissue Grinder (alternative)
Transfer the tissue into a 1 mL Dounce tissue grinder (begin with the loose pestle, then use the tight pestle if tissue clumps remain) and grind 20–30 times until no visible tissue pellets remain in the buffer. Avoid generating bubbles.
Equipment
Dounce tissue grinder
NAME
DWK Life Sciences
BRAND
357538
SKU
includes both loose and tight pestles
SPECIFICATIONS
After Either Method
20m
Gently pipette the homogenate up and down five times using a P-1000 pipette with filtered tips.
Note
Do not generate bubbles; do not fully expel the pipette.
Transfer the tissue homogenates into a labeled 2.0 mL low protein binding tube using a P-1000 pipette.
If there are any visible tissue clumps, use a tissue grinder for further homogenization.
Incubate homogenates on a rotator (a rotating tube mixer or wheel revolver, such as a Labnet Revolver or
equivalent) at 4 °C for 00:10:00 .
10m
Note
Pre-cool the centrifuge while samples are on the rotator.
Centrifuge at 750 x g, 4°C, 00:10:00 , 2900 rpm (rpm depending on rotor radius).
10m
After centrifugation, carefully discard the supernatant without disturbing the pellet.
Nuclei Mixture Preparation
10m
Sequential filtration through 70 µm and 40 µm cell strainers removes residual tissue debris and nuclear aggregates. A wash centrifugation step then concentrates and further cleans the nuclei pellet, producing a well-dispersed suspension for accurate quantification.
Resuspend the pellet with1 mL Nuclei blocking buffer , flushing until the pellet is fully detached.
Gently pipette up and down approximately 20 times until no visible aggregates remain.
Note
Avoid creating bubbles.
Filter the nuclei mixture through a 70 µm Flowmi cell strainer into a new2.0 mL low protein binding tube.
Equipment
70 µm Flowmi cell strainer
NAME
SP Bel-Art
BRAND
136800070
SKU
Filter the nuclei mixture again through a 40 µm Flowmi cell strainer into a new 2.0 µL low protein binding tube.
Equipment
40 µm Flowmi cell strainer
NAME
SP Bel-Art
BRAND
136800040
SKU
Centrifuge at 750 x g, 4°C, 00:10:00 , 2900 rpm .
10m
After centrifugation, carefully discard the supernatant without disturbing the nuclei pellet.
Resuspend the nuclei pellet in 500 µL Nuclei blocking buffer .
Gently pipette up and down approximately 20 times until no visible aggregates remain.
Note
Avoid creating bubbles.
Nuclei Quantification
Trypan Blue exclusion staining labels permeable (lysed) cells, which appear as nuclei in this preparation. The Countess II counts Trypan Blue-positive events as the Dead fraction, which serves as the nuclei count. A high Dead percentage confirms efficient lysis. This measurement is used to calculate the correct dilution for FACS.
| A | B | |
| Reagent | Volume | |
| 0.4% Trypan Blue | 5 µL | |
| Nuclei sample | 5 µL |
Safety information
Trypan Blue — Classified as a possible carcinogen (IARC Group 2B). Wear nitrile gloves; avoid inhalation; work in a well-ventilated area. Dispose of Trypan Blue waste in designated hazardous waste containers.
Prepare 200 µL PCR tubes and add 5 µL of 0.4% Trypan Blue,InvitrogenCatalog #T10282 to each tube (one tube per sample).
Add5 µL of each resuspended nuclei sample to the corresponding tube and mix thoroughly.
- Trypan Blue: nuclei sample, 1:1 volume ratio
Load 10 µL of the mixture into a Countess chamber slide and insert it into the Countess II for quantification.
Equipment
Countess chamber slide
NAME
Invitrogen
BRAND
C10283
SKU
Equipment
Countess II
NAME
Invitrogen
BRAND
AMQAX1000
SKU
Note
Avoid air bubbles.
Record the nuclei density (dead count) for each sample. An efficient lysis should yield > 90% nuclei (dead
cells).
Note
The dilution factor for the recorded density is set to 2x due to account for the 1:1 volume mix between the sample and the dye.
Final Sample Preparation (before FACS sorting)
Nuclei are diluted to a standardized concentration to ensure consistent FACS throughput across samples. Our sorting was performed with a BD FACSAriaTM Fusion Flow Cytometer using a standard 130 µm nozzle, event rate between 2000−5000 events/s. Hoechst 33342 intercalates into DNA in intact nuclei and provides the DAPI-channel signal used to gate the single-nuclei population during sorting.
Equipment
BD FACSAria Fusion Flow Cytometer
NAME
BD Biosciences
BRAND
SORP
SKU
Dilute the nuclei samples with nuclei blocking buffer to a final density of 2 × 10⁶ nuclei/mL using the
following formula:
| Variable | Definition | |
| C1 | Nuclei density measured by Countess (nuclei/mL) | |
| V1 | 495 µL (500 µL blocking buffer added to nuclei pellet, minus 5 µL used for quantification) | |
| C2 | Target nuclei density: 2 × 10⁶ nuclei/mL | |
| V2 | Total final volume (µL) = (C1 × V1) / C2 |
Calculate V2 = (C1 × V1) / C2, then add (V2 − V1) µL of nuclei blocking buffer to the sample.
Safety information
Hoechst 33342 — Mutagen and potential carcinogen. Wear nitrile gloves and eye protection; minimize skin contact. Samples stained with Hoechst should be handled in subdued light to preserve fluorescence signal.
Add 10 mg/mL Hoechst 33342Catalog #H3570 to each sample at a ratio of 2 µL per 1 × 10⁶ nuclei.
- Shortcut: Volume of Hoechst 33342Catalog #H3570 (µL) = Nuclei density (C1) per 106 nuclei/mL.
Gently pipette up and down 20 times until Hoechst 33342 is fully dissolved.
Keep samples on a rotator at 4 °C in the dark until FACS sorting.
Safety information
It is recommended to send samples to FACS within 24 hours; longer storage at 4 °C reduces nuclei yield.
PART II: FACS Enrichment of gRNA+ Nuclei
Fluorescence-activated cell sorting selects nuclei expressing the H2B-mScarlet reporter, or any nuclear-localized reporter expressed from the same construct as the gRNA cassette, enriching the population for gRNA-positive cells. Hoechst 33342Catalog #H3570 staining provides the DAPI-channel gate for single-nuclei dentification. Collecting at least 20,000 target nuclei per sample ensures sufficient genomic DNA for reliable downstream PCR and sequencing.
Example of successful FACS sorting with single nuclei peak DAPI gate and RFP fluorescence gate.
Transport samples to a flow cytometry facility in a wet ice bucket.
Gently pipette each sample up and down 20 times before loading it into the sorting tube.
Pre-coat each collection tube with 300 µL Nuclei blocking buffer ; remove excess before sorting.
Sort at least 20,000 target nuclei into each collection tube.
Verify sorting parameters before starting:
- DAPI+ gate: Ensure a stringent single-nuclei peak.
- Fluorescence detection: Set the corresponding fluorescent channel for the fluorophore of interest. For H2B-mScarlet (RFP), use excitation wavelength at 561 nm.
- FSC-A and SSC-A threshold: Should be less than 150 × 103.
- Target fluorescence threshold: this depends on the voltage applied; in our experiments we set it above 103 with clear separation from the RFP-negative population.
If drift in the nuclei peak occurs or the percentage of the target population decreases during sorting, stop sorting, gently pipette the sample up and down 20 times, and resume sorting.
Record the number of nuclei sorted on each tube.
Note
Genomic DNA extraction must be performed immediately after sorting.
PART III: Amplicon and Indel Analysis: Genomic DNA Extraction
1h 10m
Sorted nuclei are lysed using a Proteinase K-supplemented Direct PCR Lysis buffer system that releases genomic DNA without requiring column purification. The stepped temperature protocol (55 °C → 65 °C → 98 °C ) first digests proteins, then heat-inactivates Proteinase K to prevent carryover interference with the downstream PCR reaction.
Transfer sorted nuclei (fragile at this step) into a 2.0 mL DNA LoBind tube for each sample. Mix with a pipette before drawing up buffer and nuclei.
Equipment
DNA LoBind tube
NAME
Eppendorf
BRAND
022431048
SKU
Optional centrifugation step to concentrate nuclei density:
If volume exceeds 200 µL , centrifuge at750 x g, 4°C, 00:10:00 , 2900 rpm .
10m
After centrifugation, carefully pipette out the supernatant, leaving approximately 100-200 µL of buffer with nuclei in the tube. Make sure the pipette tip is slowly moving slightly below the liquid surface.
Freshly prepare the genomic DNA extraction buffer (per sample):
| A | B | C | |
| Reagent | Volume per Sample | Storage | |
| DirectPCR lysis buffer (Viagen; Cat. #: 302-C) | 200 µL | 4°C | |
| Proteinase K (>600 U/mL; New England Biolabs; Cat. #: P8107S) | 4 µL | ‒20 °C |
Safety information
Proteinase K — Respiratory and dermal sensitizer; repeated exposure may cause allergic reactions. Wear gloves and eye protection; avoid generating aerosols when pipetting; work in a ventilated area.
Add 200 µL of freshly prepared genomic DNA extraction buffer (1:50 v/v, ProK : Direct PCR lysis buffer) to each sample tube.
Vortex each sample thoroughly to ensure complete mixing.
Incubate at 55 °C for 00:20:00 .
20m
Increase temperature to 65 °C and incubate for another 00:20:00 .
20m
Increase temperature to 98 °C and incubate for 00:20:00 to inactivate Proteinase K.
Note
Do not incubate at 98 °C for longer than 20 minutes.
20m
Cool samples at 4 °C or on ice.
PAUSE POINT: Samples may be stored at 4 °C at this point or at 20 °C for long-term storage.
PCR Primer Design
Design PCR primers using the IDT primer design tool, PrimerQuest™ (PCR 26 qPCR primer design tool).
Enter a reference sequence of 400–500 bp as the design region (~200 bp flanking each side of the gRNA target site).
Set the target amplicon size to 200–300 bp.
Set the optimal annealing temperature to 61 °C (± 2°C) .
Use the default parameters for all other settings in PrimerQuest.
PCR Reaction Setup (on ice)
A touchdown PCR protocol maximizes specificity by gradually decreasing the annealing temperature from 68 °C to 61 °C over the first 10 cycles, each cycle with a ∆T of -0.7 °C , then continuing at 61 °C for 25 standard amplification cycles. Primers are pre-designed with an annealing temperature at 61 °C (± 2°C) . This approach is particularly important for low-input gDNA from sorted nuclei, where off-target amplification must be minimized, and also serves as a universal PCR program suitable for a wide range of gRNA target sites.
Prepare one PCR reaction per sample per gene target locus. Each gRNA target site requires a separate, independent PCR reaction — do not attempt to amplify multiple loci in a single multiplex reaction. Assemble the following reagents on ice:
| A | B | C | |
| Reagent | Volume per Reaction | Notes | |
| Nuclease-free water (Invitrogen; Cat. #: AM9932) | 0–6 µL | Bring total volume to 20 µL | |
| Q5 Hot Start Master Mix (2×; New England Biolabs; Cat. #: M0492) | 10 µL | ||
| Forward primer (10 µM) | 1 µL | All primer pairs are designed to be optimal at 61±2 °C annealing temp. | |
| Reverse primer (10 µM) | 1 µL | Or 2 µL if forward and reverse are pre-combined | |
| Genomic DNA (sample) | 2–10 µL | 20K nuclei: 2 µL (scale proportionally with the number of sorted nuclei) | |
| Total | 20 µL |
For each gene, a master mix of all components except the genomic DNA template may be prepared, then aliquoted (18 µL per tube), followed by addition of 2 µL gDNA.
- Include a no-template control for each gene.
- Spin down, mix (flick tube), and spin down again before placing in thermocycler.
- Run the thermocycler using the following touchdown PCR protocol:
| Step | Stage | Temperature | Time | Notes | |
| 1 | Initial denaturation | 98 °C | 30 s | ||
| 2 | Denaturation | 98 °C | 10 s | ↑ Touchdown cycles | |
| 3 | Annealing | 68 °C → 61 °C | 30 s | −0.7 °C / cycle | |
| 4 | Extension | 72 °C | 30 s | ||
| 5 | Repeat steps 2–4 | — | × 10 cycles | ||
| 6 | Denaturation | 98 °C | 10 s | ↑ Standard cycles | |
| 7 | Annealing | 61 °C | 30 s | ||
| 8 | Extension | 72 °C | 30 s | ||
| 9 | Repeat steps 6–8 | — | × 25 cycles | ||
| 10 | Final extension | 72 °C | 2 min | ||
| 11 | Hold | 10 °C | ∞ | Until user interrupt |
Agarose Gel Electrophoresis
Gel electrophoresis verifies that PCR amplification was successful and that products are the expected size for each locus before committing samples to sequencing. Prepare the gel while the PCR is running to minimize total workflow time.
While the PCR is running, prepare a 1.5% m/v agarose gel:
| Reagent | Amount | |
| 1× TAE buffer | 200 mL | |
| Agarose (Sigma-Aldrich; Cat. #: A4718) | 3 g | |
| 10,000× SYBR Safe DNA Gel Stain (Invitrogen; Cat. #: S33102) | 20 µL (add after cooling) |
Safety information
- Molten agarose — Risk of thermal burns. Swirl the flask carefully when microwaving to prevent superheating. Allow the solution to cool until it can be held comfortably before handling further or adding SYBR Safe.
- SYBR Safe DNA Gel Stain — Despite its reduced-hazard labeling, SYBR Safe shows mutagenic activity in some in vitro assays. Treat it as a potential mutagen: wear nitrile gloves, avoid skin contact, and dispose of gels and buffer in designated hazardous waste.
Combine TAE buffer and agarose in a beaker. Microwave until the solution becomes transparent, swirling periodically to prevent boiling over.
Allow the solution to cool until it can be safely handled, then add 20 µL SYBR Safe DNA Gel Stain (1:10,000 dilution).
Pour the gel into thin loading trays. Add enough so the gel reaches the top of the comb teeth.
Sample Loading for Gel Electrophoresis
30m
Once PCR is complete, prepare samples for loading:
Add 4 µL of each PCR product to1 µL of 5× Blue Gel Loading Buffer,BiolineCatalog #BIO-37045 in a new labeled PCR tube. Save the rest of PCR products (amplicons) for PCR purification prior to sequencing.
Note
If using 6× loading dye, use 5 µL sample + 1 µL dye.
Load samples (one per well) into the gel without puncturing the gel or creating bubbles.
Load DNA ladder (HyperLadder 1kb),BiolineCatalog #BIO-33053 into a well adjacent to the samples.
Run the gel at 80 V for ~00:30:00 (or bands run towards the middle of the gel, depending on the gel size). Confirm the gel is running by observing bubble formation in the buffer.
30m
Image the gel using a gel imager with SYBR Safe settings. Save images to the appropriate project archive location.
Dispose of the gel properly in the biohazard waste bin.
PCR Cleanup (QIAquick Kit; QIAGEN; Cat. #: 28106)
8m
Follow the standard QIAquick PCR Cleanup Kit protocolQiagenCatalog #28106 . This step is required for downstream premium PCR amplicon sequencing through PlasmidSaurus. Two key modifications from the standard kit protocol are noted below: (1) elute with pre-warmed (55 °C ) nuclease-free H₂O instead of Buffer EB — the heated water significantly improves DNA recovery from the membrane; and (2) elute into a 1.5 mL DNA LoBind tube to minimize DNA adhesion during subsequent steps. Purified amplicons are used for concentration measurement and sequencing submission.
Pre-warm one aliquot of nuclease-free H₂O per sample to 55 °C before beginning.
Add 5 volumes of Buffer PB to 1 volume of PCR sample and mix thoroughly.
Place a QIAquick spin column (purple) in a 1.5 mL collection tube, one per sample (blank controls do not require cleanup).
Apply the sample to the QIAquick column and centrifuge at maximum speed for 1 - 2 min. Discard the flow-through.
2m
Add 750 µL Buffer PE (ethanol added) to the column and centrifuge at maximum speed for 1 - 2 min. Discard the flow-through.
Safety information
Ensure ethanol has been added to the Buffer PE container before first use and initial with date upon adding. Ethanol (96–100%) is highly flammable — keep away from open flames and ignition sources; store in an approved flammables cabinet; wear gloves.
2m
Centrifuge the column at maximum speed for an additional 00:01:00 to remove residual buffer and fully dry the column.
1m
Transfer the QIAquick column to a new 1.5 mL DNA LoBind tube.
Add 20 µL of pre-warmed (55 °C ) nuclease-free H₂O to the center of the column. The warmed water increases the elution yield of the DNA.
Wait 00:01:00 , then centrifuge at maximum speed for 00:02:00 .
3m
Discard the column and proceed to DNA concentration measurement.
DNA Concentration Measurement
Spectrophotometric quantification verifies sample purity and concentration before sequencing submission. A 260/280 nm ratio of 1.8–2.0 confirms that the DNA is free from significant protein contamination.
Use1 µL of nuclease-free H₂O as a blank control.
Use 1 µL of each sample to measure DNA concentration by absorbance.
Verify that each sample shows a peak at 260 nm with a 260/280 nm ratio of 1.8–2.0.
Record the DNA concentration for each sample.
Sample Submission for Sequencing
Purified amplicons are pooled at a standardized concentration and submitted for Nanopore long-read sequencing via PlasmidSaurus Premium PCR. Long-read sequencing enables detection of both small indels and larger structural rearrangements across the full amplicon.
Each PCR reaction amplifies the genomic locus surrounding a single gRNA target site. To prepare one amplicon sequencing sample, combine the amplicons from multiple gRNA target sites into a single pool. Pool each amplicon at a concentration of ~2.5 ng/µL , for a total volume of ~10 µL per sequencing sample.
Follow the PlasmidSaurus sample submission guidelines.
Post-Hoc Analysis of Editing Efficiency
Sequencing reads from each gRNA-targeted site are aligned to the corresponding wild-type reference amplicon sequence using CRISPResso2. Editing efficiency is quantified as the proportion of reads carrying mutations near the predicted Cas9 cut site, providing a per-site, per-sample measure of in vivo CRISPR activity.
Editing efficiency (INDEL%) definition: the fraction of sequencing reads carrying mutations within ±1 bp of the predicted Cas9 cut site (3 bp upstream of the PAM) out of total reads aligned to the reference amplicon.
Follow the instructions on CRISPResso2 to align sequencing reads from each gRNA-target locus to the wild-type reference amplicon and quantify editing efficiency.
Select “Single End Reads” mode.
Upload Fastq file from sequencing data.
Copy/paste the reference amplicon sequence into the amplicon box.
Copy/paste the gRNA sequence (5’-3’) to the sgRNA box.
Leave remaining settings in the default configuration.
Editing efficiency is then quantified as the proportion of reads with mutations at of the predicted Cas9 cut site (3 bp upstream of the PAM).