Oct 01, 2025
Cyclic Multiplex Immunofluorescence Workflow for Mouse Models of Parkinson’s Disease
- Magdalena Shumanska1,
- Rashmitha Senthilvel Selvakumar2,
- Pietro La Vitola2,
- Eugenia Harbachova2,
- Dominik Stappert1,
- Philip Denner1,
- Ayse Ulusoy2
- 1German Center for Neurodegenerative Diseases (DZNE), CRFS-LAT, Bonn, Germany;
- 2German Center for Neurodegenerative Diseases (DZNE), AG Ulusoy - Parkinson's disease pathology and spatial biology (PPSB)
- Ayse Ulusoy: Corresponding author;


Protocol Citation: Magdalena Shumanska, Rashmitha Senthilvel Selvakumar, Pietro La Vitola, Eugenia Harbachova, Dominik Stappert, Philip Denner, Ayse Ulusoy 2025. Cyclic Multiplex Immunofluorescence Workflow for Mouse Models of Parkinson’s Disease. protocols.io https://dx.doi.org/10.17504/protocols.io.81wgbw2eygpk/v1
License: This is an open access protocol distributed under the terms of the Creative Commons Attribution License, which permits unrestricted use, distribution, and reproduction in any medium, provided the original author and source are credited
Protocol status: Working
We use this protocol and it's working
Created: September 30, 2025
Last Modified: October 01, 2025
Protocol Integer ID: 228557
Keywords: Immunofluorescence, Multiplex, Antibody, Parkinson's disease, Mouse, Brain, Perfusion, Conjugation, Metadata, Epitope retrieval, Cryosectioning, cyclic multiplex immunofluorescence workflow for mouse model, cyclic multiplex immunofluorescence workflow, plex immunohistochemistry approach, subcellular resolution, plex immunofluorescence, custom antibody conjugation, mouse midbrain tissue, conventional immunohistochemistry, mouse model, models of parkinson, complex cellular microenvironment, neurodegenerative disease, studies of neurodegenerative disease, multiplex, epitope retrieval, step protocol for cyclic multiplex, immunofluorescence, immunohistochemistry
Disclaimer
This protocol has not been peer-reviewed and may undergo future updates and changes.
Abstract
High-plex immunofluorescence (IF) is a powerful technique that has become popular among the scientific community in the recent years. Its appeal lies in enabling multi-target measurements on the same tissue area of interest with intact spatial relationships and lower sample burden, outperforming single- or low-plex immunohistochemistry approaches. Compared with conventional immunohistochemistry, multiplex IF delivers higher information density, robust co-expression mapping at cellular and subcellular resolution, quantitative comparability across cycles, and automation-ready workflows that increase throughput and reproducibility. Here, we present a step-by-step protocol for cyclic multiplex IF on mouse midbrain tissue. We describe procedures for tissue preparation, epitope retrieval, custom antibody conjugation, and automated cyclic IF using the MACSima‱ Platform (Miltenyi Biotec ‱). We also provide guidance on how to deal with metadata and data management, as well as basic image quality control. This protocol is optimized for studies of neurodegenerative disease and is readily applicable to mouse models of Parkinson’s disease pathology with an aim to resolve complex cellular microenvironments and biomarker patterns in situ.
Attachments
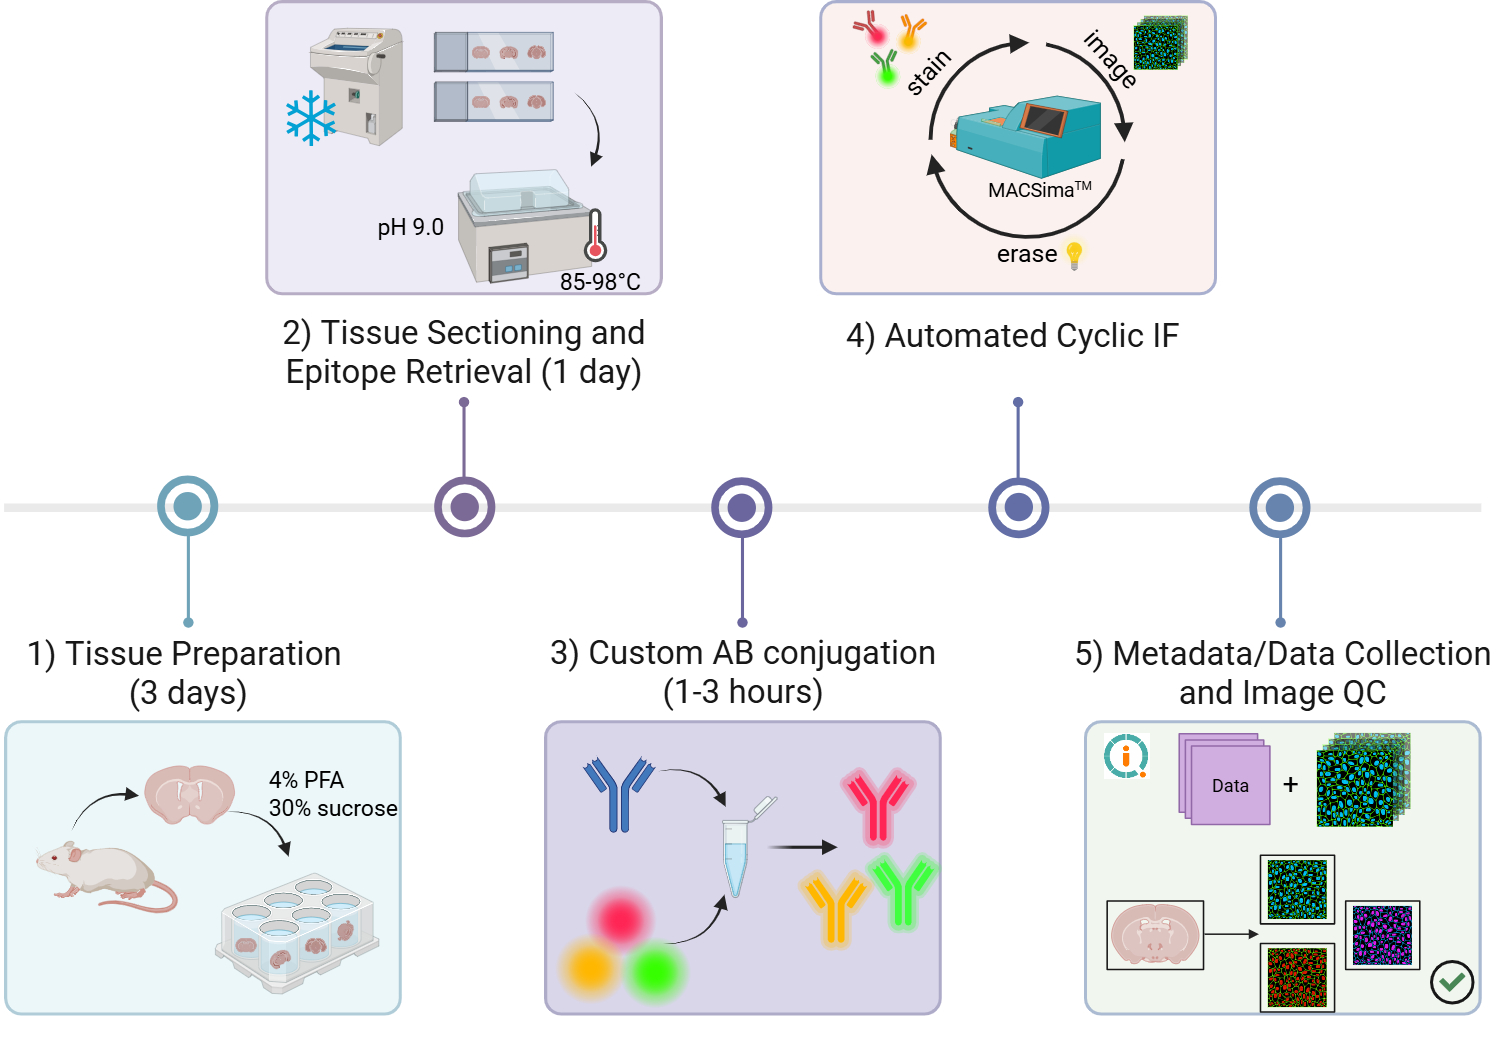
Image Attribution
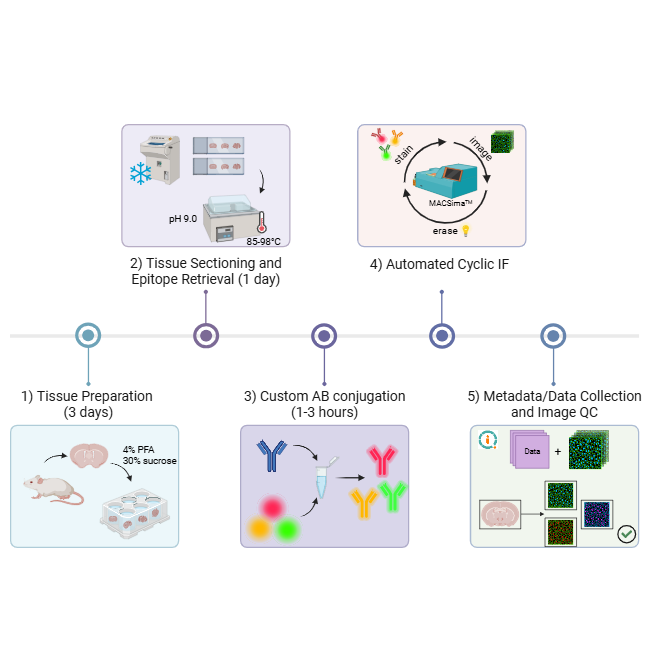
Graphical Abstract: Step-by-step workflow for cyclic multiplex immunofluorescence (IF) on mouse brain tissue. The workflow includes: 1) tissue harvesting and preparation (hands-on time up to 3 days), 2) tissue sectioning and pH-based epitope retrieval (hands-on time up to 1 day), 3) optional custom antibody conjugation (1 to 3 hours depending on type of conjugation kit used), 4) automated cyclic IF using the MACSima‱ Platform (Miltenyi Biotec) (run-time dependent on size of antibody panel and experimental conditions), and 5) data collection and QC (time dependent on experimental conditions).
Figure generated using BioRender.
Materials
Transcardiac Perfusion – Anesthesia and Brain Collection
- Chemical safety cabin
- 24-gauge oral gavage needle (Fine Science Tools #18061-24)
- Metal spatula to take out the brain
- Sharp-blunt surgical scissors (Fine Science Tools #14008-14)
- Surgical scissors (Fine Science Tools #14502-14)
- Fine Scissors - ToughCut‱ (Fine Science Tools #14058-09)
- Halsted-mosquito hemostat (Fine Science Tools #13009-12)
- Taylor forceps (Fine Science Tools #11011-17)
- Watson Marlow 300 Series Laboratory Pump
- MoliCare‱ Premium Bed Mat (Hartmann #161070)
- Pumpsil platinum-cured silicone tubing (Watson Marlow #12188121)
- T-shaped connector and tubing clamps/valves
- Timer
- Wax molds to fix the mouse
- Depyrogenated Sterile Empty Vials (Thermo Scientific‱ #15123518)
- Needles – 18G (BD Microlance‱ #303262) and 23G (BD Microlance‱ #300800)
- 0.2M phosphate buffer, RT: Dissolve 27.6 g of NaH2PO4 (Carl Roth #2370.3) in 1 L of Milli-Q H2O to make solution A. Dissolve 53.6 g of Na2HPO4 (Carl Roth #X987.1) in 1 L of Milli-Q H2O to make solution B. Mix 240 mL of solution A with 760 mL of solution B to prepare 1 L of 0.2 M phosphate buffer.
- 4% paraformaldehyde (PFA) in 0.2 M phosphate buffer, pH = 7.4, 4℃: Dissolve 40 g of paraformaldehyde (Carl Roth #0335.3) in 500 mL Milli-Q H2O. Heat the solution up to 65℃ and add 1-2 NaOH pellets (Merck #1310-73-2). Cool the solution down to RT and filter it. Add 500 mL of 0.2 M phosphate buffer and adjust the final pH to 7.4. PFA is a toxic substance and should be handled with care according to proper institutional safety regulations.
- Saline, RT: Dissolve 9 g of NaCl (Carl Roth #3957.1) with 111 mg of Heparin in 1 L of Milli-Q H2O to prepare 0.9% Saline - 0.011% heparin solution.
- 30% sucrose in 0.1 M phosphate buffer, pH = 7.4, RT: Dissolve 150 g of sucrose (Sigma Aldrich #S7903-1kg) in 250 mL of 0.2 M phosphate buffer. Add 500 mL of Milli-Q H2O and adjust the pH to 7.4
- 70% ethanol (Carl Roth #T913.2)
Tissue Embedding and Sectioning
- Tissue-Tek‱ O.C.T. Compound (Sakura Finetek #4583)
- Disposable Base Molds - 7x7x5 mm (Polysciences #25374)
- ROTILABO‱ Aluminum foil (Carl Roth #1770.1)
- Cryostat chucks or sample holders (Epredia‱ #12697576)
- RNaseZap‱ Rnase Decontamination wipes (Invitrogen #AM9786)
- MX35 Ultra Microtome Blades (Epredia‱ #3053835)
- Paint brushes - sizes 0 and 1
- Anti-roll glass plate (Epredia‱ #12093049)
- SuperFrost Plus‱ Adhesion slides (Epredia‱ #J1800AMNZ)
- MACSwell‱ imaging frames (one-, two- or four-well depending on tissue size; Miltenyi Biotec, #130-124-673, #130-126-794, #130-124-675, # 130-124-676)
Heat-induced pH-based epitope retrieval
- Staining troughs
- Forceps
- Water bath (or steamer) with controlling unit for temperature (up to 98℃)
- Metal tissue slide holder
- 1X Tris Buffered Saline (TBS), pH 7.6: Dissolve 6.05 g of 0.05 M Trizma Base (Carl Roth #4855.2) and 8,76 g of 0.15 M NaCl (Carl Roth #3957.1) in 1 L of Milli-Q water
- TRIS/EDTA/Citrate (TEC) buffer, pH 9.0
- NaOH solution (10 M)
- MACSima Running buffer (Miltenyi Biotec, #130-121-565)
Custom Antibody Fluorophore Conjugation
- Primary purified antibodies to conjugate (pre-diluted to a concentration based on the type of conjugation kit used: 10 µg, 100 µg, 1 mg)
- Conjugation kit (e.g. Abcam Lightning-Link‱) - FITC, PE or APC
- PD SpinTrap-G-25 purification columns (Cytiva, #28-9180-04)
- 1X sterile DPBS
- Dark Eppendorf tubes
Automated Cyclic Immunofluorescence
Mounted tissue section slides on a MACSwell imaging frame of choice
- Conjugated antibody panel (see example panel in Table 1)
- DAPI staining solution (part of Miltenyi Biotec #130-127-575)
- REAlease Release Reagent with septum caps (part of Miltenyi Biotec #130-127-574)
- MACSima mixing vial (part of Miltenyi Biotec #130-127-574)
- MACSima Running buffer (Miltenyi Biotec, #130-121-565)
- MACSima Storage solution (Miltenyi Biotec, #130-092-748)
- MACSima System buffer (Miltenyi Biotec, #130-125-315)
- MACSwell 96-deepwell plates (Miltenyi Biotec, #130-126-865)
- MACSwell sealing foils (Miltenyi Biotec, #130-126-866)
| A | B | C | D | E | F | G | |
| Antibody Name (Cat#) | Target protein | Vendor | Clone | Conjugate | Working dilution | Incubation time (min) | |
| GFAP (130-118-489) | Glial Fibrillary Acidic Protein | Miltenyi Biotec | REA335 | PE | 1:50 | 30 | |
| Iba1 (019-19741) | Ionized Calcium-Binding Adaptor Molecule 1 | WAKO | polyclonal | APC (custom) | 1:25 | 30 | |
| NeuN (ab223994) | Neuronal Nuclear Antigen | Abcam | EPR12763 | FITC | 1:50 | 30 | |
| ALDH1A1 (HPA002123) | Aldehyde dehydrogenase 1 family, A1 | Sigma | polyclonal | APC (custom) | 1:50 | 30 | |
| TH (130-120-350) | Tyrosine Hydroxylase | Miltenyi Biotec | REA1159 | FITC | 1:25 | 30 | |
| HuC/HuD (A21271) | HuC/HuD neuronal protein | Thermo Fisher | 16A11 | PE (custom) | 1:25 | 30 | |
| Cal-D-28K (C9848) | Calbindin-D-28K | Sigma | cb-955 | PE (custom) | 1:25 | 30 | |
| Actin (130-123-363) | Actin | Miltenyi Biotec | REAL650 | FITC | 1:50 | 30 |
Table 1. Example of a small antibody panel (mouse-specific; validated for PFA fixation)
Software
MACS iQ View
NAME
Miltenyi Biotec
DEVELOPER
Safety warnings
PFA is a toxic substance and should be handled with care according to proper institutional safety regulations.
Handle sharp surgical tools with care.
Ethics statement
This protocol was established in full adherence to all applicable safety and animal welfare regulations under local legislation. When conducting this protocol or parts thereof, ensure adherence to applicable safety and animal welfare regulations.
All animal procedures specific for this protocol were approved by the State Office for Consumer Protection and Nutrition Nordrhein-Westfalen (Landesamt für Verbraucherschutz und Ernährung, LAVE), Germany.
Animal Handling and Sample Preparation: Transcardiac Perfusion – Anesthesia and Brain Collection
3d 1h 10m
Place the pump, icebox with 4% PFA, 0.9% NaCl, wax molds and surgery tools in a chemical safety cabin.
Safety information
PFA is a toxic substance and should be handled with care according to proper institutional safety regulations.
Attach the tubes to the T-shaped connector and put two tubes each in PFA and NaCl bottles. Place the valves/tubing clamps to control which solution will be directed to the outlet. Fill the PFA tubing with the PFA solution, change the valve position to NaCl and flush out any PFA solution that may come from the outlet.
Check the flow rate and adjust the speed to run 12 mL/min. Make sure that the tubing is filled with the solutions and is free from air bubbles.
Take the cage with the required animal in it. Check the ear tag for the animal ID.
Scruff the mouse and inject 600 mg/kg of pentobarbital intraperitoneally and place it inside an empty cage.
Check for any reflexes by pinching one of the paws or end of the tail with forceps, once the breathing slows down. If there are none, secure the limbs with 23G needles on the wax mold. 00:30:00
30m
Open the chest by making two flap-like incisions laterally with sharp-blunt surgical scissors. Expose the thoracic cavity completely and fix the flap with an 18G needle to make the working area free.
Safety information
Handle sharp surgical tools with care.
Cut through the diaphragm and remove the fat tissue covering the heart. Secure the heart with a hemostat. Make a small nick in the apex with fine scissors to easily insert the gavage needle. Insert the gavage needle from the tip of the left ventricle and clamp it using the hemostatic forceps. Cut the right atrium to let the venous blood flow out. 00:10:00
10m
Start running the saline at 12 mL/min to flush the blood out. Observe the solution coming out from the atrium. Once it is clear, change the flow to ice cold 4% PFA. The blood from the liver should clear out and turn pale yellow. If it is not clearing out properly, gently adjust the position of the gavage needle until it appears to clear out.
The time of PFA reaching the body depends on the length of the tubing. Therefore, when the limbs start to become rigid, initiate the timer and remove the needles to visualize the fixation more clearly. After 5 min (60 mL 4% PFA), remove the gavage needle as the body is completely fixed and stiff. Afterwards, take the animal away to harvest the brain and flush the tube with saline to start the next perfusion. 00:10:00
10m
Decapitate the animal using surgical scissors. Incise the skin from the neck towards the nose. Remove the skin and hold the head tightly in one hand. Take the neck muscles off using the blunt end of the Taylor forceps to observe the spinal cord.
Remove the skull covering the cerebellum entirely. Make a continuous cut by sliding the fine scissors along the midline. Remove the crania one flap at a time.
Nick the meninges using fine scissors and detach the brain from the base carefully to avoid tissue damage. Scoop the brain out using the metal spatula gently into the vials with 4% PFA. Make sure the vials are cold and remain on ice. 00:20:00
20m
After perfusion, clean the tools with soap and dispose the waste with care.
Sterilize the working surface with 70% ethanol.
Keep the brains in 4% PFA for 24 hours and transfer to vials containing 30% sucrose filled to the brim. Use the brains when they sink to the bottom of the vial. Overnight
3d
Animal Handling and Sample Preparation: Tissue Embedding and Sectioning
2h 30m
Section the brain as a whole or dissect into smaller slices with corresponding regions of interest, e.g. midbrain. 00:10:00
10m
Put a few drops of Tissue-Tek inside the plastic mold. Orient the brain slices depending on the desirable anatomical plane like coronal plane. Fill the mold with Tissue Tek completely without any bubbles.
Keep the molds frozen in dry ice.
Wrap the samples in aluminum foil after they are completely frozen and store at -80℃ until they are ready to be processed. 00:30:00
30m
Keep the samples inside the cryostat at least 1 hour before sectioning for acclimatization. This duration needs to be adjusted based on the size of the sample. 01:00:00
1h
The cryoblocks can then be mounted on sample holders/chucks. Different chucks can be used if processing many samples. Mount the cryoblocks on a flat surface with Tissue-Tek and make sure they are not angled. 00:10:00
10m
Ensure that the tissue is sectioned evenly. If not, the angle of the block can be adjusted. The blade temperature can also be altered to generate a smooth cut.
Using a new blade is recommended for every ~100 sections. The anti-roll plate can be optionally sterilized with RNaseZap™ wipes.
Set the thickness of the sections to 8 µm (recommended section thickness by Miltenyi Biotec is 5 µm).
To mount thin sections, the slides can be kept inside the cryostat, and with help of sterile and cold paint brushes the sections can be transferred to the slide. Once the tissue appears to be flat on the surface, mount it by gently touching the back of the slide. The heat from the finger melts the TissueTek from the section helping it adhere to the slide. The sections need to be mounted as per the type of MACSwell™ imaging frame chosen. Use the template frame for guidance (provided with each package of MACSwell imaging frames).
Use the slides immediately or store them at -80℃.
Incubate the desired slides at 37℃ for 30 min. 00:30:00
30m
Wash the slides in 1X TBS for 10 min. Continue directly with epitope retrieval. 00:10:00
10m
Animal Handling and Sample Preparation: Heat-induced pH-based epitope retrieval
1h 15m
Prepare 1 L of 10X TEC buffer by dissolving 2.5 g Trizma Base, 5.75 g of EDTA and 3.2 g of Sodium citrate tribasic dihydrate into distilled water. Use 10 M NaOH solution to set the pH to 9.0. The 10X TEC buffer can be stored at 4℃ up to 6 months. 00:10:00
Note
This part of the protocol is based on a recommended protocol by Miltenyi Biotec ‱ (v.1.1, 2025) with some alterations.
10m
Prepare a working 1X TEC buffer by diluting the 10X buffer into distilled water. Verify the pH of 9.0. Always prepare the 1X working buffer fresh before use. 00:05:00
5m
Dry the prepared slides at RT for 30 min. 00:30:00
30m
Afterwards, wash the slides in 1X TBS buffer for 5 min. 00:05:00
5m
Fill the water bath (or the tank of a steamer) with the necessary volume of 1X TEC buffer (enough to fully immerse the glass slides in; account for evaporating liquid while boiling at high temperatures). Preheat the buffer to 85℃. Ensure that the temperature of the buffer is even throughout the system.
Place the glass slides onto a metal slide holder and place the holder in the preheated buffer. Allow the buffer to heat up to 98℃. Incubate the slides at 98℃ for 20 min. 00:20:00
20m
Allow the buffer to cool down to 85℃. Remove the slides and proceed immediately with the next step. The tissues should not dry out.
Mount the tissue slides onto a MACSwell imaging frame of choice as fast as possible. Follow the mounting procedure described on the frame data sheet. Immediately add a respective volume of MACSima Running buffer into the wells: 00:05:00
- 1900 µL per well in a “MACSwell one”
- 950 µL per well in a “MACSwell one small” or “MACSwell two”
- 475 µL per well in a “MACSwell four”
5m
Continue with automated multiplexed immunofluorescence or store the mounted slides in buffer (covered with lid to avoid dust particles from going into the sample) at 4℃ for up to 1 week.
Custom Antibody Fluorophore Conjugation
3h 45m
Note
This protocol is based on the recommended antibody conjugation protocols from Abcam with slight alterations (Abcam ‱, 2025).
The conjugation procedure can be done under a sterile fume hood if required. It is essential to work in low-light conditions when pipetting the conjugation dyes.
Components in the antibodies such as BSA, sodium azide or glycerol might affect the conjugation reaction.
Pre-dilute antibodies to the required concentration to a final volume of 10, 100 or 1000 µL based on the type of kit used. Pre-dilute using either dH2O or 1X sterile DPBS.
Add 1 µL of Modifier reagent to each 10 µL of antibody to be labeled and mix gently with the pipette (e.g. for 100 µL antibody add 10 µL Modifier reagent).
Pipette the entire volume of the antibody + modifier into the vial containing the lyophilized conjugation dye. Mix by pipetting.
Incubate 1-3 hours (depending on kit used) at RT in low-light conditions. Longer incubation times have no negative effects. 03:00:00
3h
Add 1 µL of Quencher reagent to each 10 µL of antibody to be labeled and mix gently with the pipette (e.g. for 100 µL antibody add 10 µL Quencher reagent).
Incubate 30 min at RT in low-light conditions. 00:30:00
30m
Column purification (based on a protocol by Cytiva ©, 2020-2022): 00:15:00
- Place labelled PD SpinTrap-G-25 purification columns in the provided collection tubes. Vortex heavily to re-suspend the resin. Loosen the cap and remove the closure on the bottom of the columns. Remove the storage solution by centrifugation (maximal speed, 1 min, RT).
- Wash the columns four times by adding 400 µL 1X sterile DPBS and by centrifugation (maximal speed, 1 min, RT). Remove the flow-through each time.
- After the last wash, place the columns in dark Eppendorf collection tubes. Load the entire volume of previously conjugated antibody. The minimal volume in the column should be 140 µL; top up with 1X sterile DPBS if less.
- Centrifuge (maximal speed, 3 min, RT). The eluted antibody is ready to use.
- Typically, the conjugated antibody can be stored at 4℃ for up to 18 months.
15m
Automated Cyclic Immunofluorescence
2d
Note
Here, we utilize the MACSima‱ Imaging Cyclic Staining (MICS) technology in an automated platform developed by Miltenyi Biotec (refer to Kinkhabwala et al., 2022 for a detailed description; another example has been recently described by Scheuermann et al., 2024). Briefly, this novel technology is based on cycles of staining (three fluorophores per cycle), imaging and fluorophore erasure (using photobleaching or enzymatic release), enabling imaging of multiple protein targets across a single specimen and reaching subcellular resolution. A programmable liquid handling system prepares the antibody staining solution, applies it to the sample, and then washes it off once the imaging is complete. The images are obtained using an epifluorescence widefield microscope (a set of four LEDs), two different objectives (2x, NA 0.1 and 20x, NA 0.45), and a monochromatic CMOS (SCMOS) camera. Autofocus can be achieved from a constant distance via the DAPI signals.
Antibody Panel Design Tips:
- Pre-test your antibodies of interest with single stainings before running a multiplex experiment to ensure that the expression pattern is as expected and to estimate a good working dilution.
- Place weaker and important antibodies in the first cycles.
- Place stronger antibodies and strong FITC-conjugates in the later cycles.
- Place untested antibodies and fluorophores with suboptimal bleaching capacity in the last cycle.
- Do not use antibodies against the same protein target in the same cycle, or in consecutive cycles when using the same fluorophore.
- Use previously validated co-markers for quality control (QC).
- Include at least two nuclear markers and multiple cell surface markers for your cell types of interest for optimal QC and image analysis later on.
- If your tissue is highly autofluorescent in nature, consider using fewer FITC-conjugated antibodies.
Equilibrate the mounted tissue slides in the MACSwell frame of choice at RT for 10-15 min before starting.
Dilute the DAPI stock solution 1:5 (1 µg/mL) with MACSima Running buffer to a final volume of 250 µL per well for a MACSwell four frame, 500 µL per well for a MACSwell two/one small frame, or 1000 µL per well for a MACSwell one frame. The optimal DAPI staining dilution is dependent on the type of tissue used and the thickness of the sections. Thicker sections might require higher DAPI concentrations for pre-staining.
Remove the buffer from the samples by pipetting carefully without disturbing the tissue. If there are some dust particles on top of or surrounding the sections, try to remove them by gentle washing. Do not pipette directly on top of the tissue to avoid detachment.
Add the pre-staining DAPI solution, mix gently by tilting the MACSwell frame a few times, and incubate the tissue sections for 10-15 min at RT, covered from light.
Remove the DAPI solution and wash the tissue sections at least three times with MACSima Running buffer.
Depending on the MACSwell frame used, add:
- 1900 µL Running buffer per well of a “MACSwell one”
- 950 µL Running buffer per well of a “MACSwell two or one small”
- 475 µL Running buffer per well of a “MACSwell four”
It is important to have the correct volume per well, otherwise the antibody working dilutions will be incorrect.
Prepare your antibody panel in a MACSwell 96 deepwell plate based on the required antibody working dilution and on the MACSwell imaging frame used. Each well of the 96-deepwell plate is representative of one IF staining cycle.
Briefly centrifuge the antibody tubes before pipetting to sediment any antibody precipitates. All antibodies are diluted in Running buffer.
Add DAPI (1:50 dilution) every eighth cycle to re-stain the tissue.
Seal the plate with sealing foil.
Prepare your automated cyclic IF experiment on the MACSima™ Platform:
- An automated cyclic IF experiment on the MACSima Platform software consists of: 1) sample metadata, 2) reagent/antibody metadata, and 3) procedure metadata. These three components are then merged into an executable experiment.
- Before initiating the sequential cycles, ROIs are defined based on a 2x overview scan (via DAPI staining) and a focus is set for each ROI.
- The MACSima™ captures raw images of each field of view in the ROIs and uses algorithms for automated background subtraction and image stitching.
- Image datasets are automatically integrated into the MACS iQ View™ software throughout the experimental run.
- The total time duration of a run is dependent on the designed antibody panel and in general on the experimental setup. 48:00:00
2d
Recommendations for Meta(Data) Collection and Image Quality Control
Note
Metadata/Data collection is crucial for data accessibility, promoting research under FAIR principles, especially when dealing with complex and automated workflows. The MACSima‱ Platform easily enables users to collect sufficient metadata for experimental reproducibility by already implementing collection during the experimental design. Furthermore, all raw and pre-processed image datasets are stored in a logical folder order and can be easily exported and recognized. Here, we outline some recommendations for optimal metadata and data collection as well as tips for image quality control (QC) before starting a deeper image analysis pipeline.
Prior to start of a cyclic multiplex IF workflow, detailed and structured collection of metadata is essential. Use consistent and standardized formats to collect all experimental details including:
- Study ID with short description (any relevant details should be included), affiliation and date;
- Detailed description of the biological sample (e.g. ID, source, tissue preparation method, performed epitope retrieval, slice thickness, additional tissue treatments done prior to this experiment, etc.);
- Detailed antibody/probe metadata (e.g. target name, fluorophore, vendor, Cat/Lot number, clone, species, validation for fixation type, etc.);
- Expected expression patterns of each antibody (based on this, further QC and analyses can be done).
This type of metadata can be recorded within the MACSima‱ Platform software as soon as certain samples, reagents and procedures are assigned to an experiment. Always export your experimental metadata along with the generated raw images for proper documentation. Do not change the folder order of the datasets.
Document all changes of experimental conditions.
Raw and pre-processed image QC should be done using the MACS iQ View software once the experiment is complete, prior to performing additional image analyses.
Firstly, compare raw and pre-processed images to ensure that the pre-processing algorithm has been executed correctly and that no images were distorted. Problems with pre-processing can be usually solved by performing manual pre-processing or by re-calibration of the instrument. Look into channel background and autofluorescence, as well as other image corrections.
Check cell nuclei alignment by looking at the different DAPI signals in all the cycles. Since image stitching and segmentation pipelines are highly based on DAPI, this is a crucial step to ensure data quality.
Control that the bleaching has been effective by comparing different probes with the same fluorophores.
Use the automated QC function on the MACS iQ View as a starting point to flag any underperforming antibodies.
For each antibody (especially untested ones), compare the background signal with the “actual expression”. Using the ‘histogram’ and ‘line plot’ function on the MACS iQ View, optimize the channel settings and evaluate whether the marker used has the expected expression pattern or not.
If background signals are very high, antibody concentration, incubation time and exposure time can be adapted.
Min/Max histogram ranges should be determined based on marker expression. Settings should be saved and kept consistent throughout the entire analysis process.
Cytoplasmic markers for one cell type should have similar contrast. This is the basis for a good segmentation algorithm.
Note
Following these guidelines will help with further analysis pipelines and standardize multiplex workflows. Once standardized, automated data collection and automated analysis workflows can easily be implemented.
Protocol references
Abcam Copyright ‱ (Antibody conjugation protocols, 2025) (https://www.abcam.com/en-us/technical-resources/guides/conjugation-guide)
Cytiva Copyright ‱ (PD SpinTrap-G-25 purification protocol, 2020-2022) (https://www.cytivalifesciences.com/en/us/shop/chromatography/prepacked-columns/desalting-and-buffer-exchange/pd-spintrap-g-25-p-05854)
Kinkhabwala, A., Herbel, C., Pankratz, J., Yushchenko, D. A., Rüberg, S., Praveen, P., Reiß, S., Rodriguez, F. C., Schäfer, D., Kollet, J., Dittmer, V., Martinez-Osuna, M., Minnerup, L., Reinhard, C., Dzionek, A., Rockel, T. D., Borbe, S., Büscher, M., Krieg, J., Nederlof, M., … Bosio, A. (2022). MACSima imaging cyclic staining (MICS) technology reveals combinatorial target pairs for CAR T cell treatment of solid tumors. Scientific reports, 12(1), 1911. https://doi.org/10.1038/s41598-022-05841-4
Miltenyi Biotec Copyright ‱ (Sample preparation protocol for PFA/FFPE tissue, v1.1, 2025) (https://www.miltenyibiotec.com/DE-en/products/macs-imaging-and-spatial-biology.html?query=:relevance:allCategoriesOR:10000646)
Scheuermann, S., Kristmann, B., Engelmann, F., Nuernbergk, A., Scheuermann, D., Koloseus, M., Abed, T., Solass, W., & Seitz, C. M. (2024). Unveiling spatial complexity in solid tumor immune microenvironments through multiplexed imaging. Frontiers in immunology, 15, 1383932. https://doi.org/10.3389/fimmu.2024.1383932