Apr 25, 2026
Cryo-Expansion Microscopy of C. elegans and Tardigrades
- 1Institute of Physics, École Polytechnique Fédérale de Lausanne (EPFL), Lausanne, Switzerland
- Matthew Lycas: Current affiliation: Janelia Research Campus, Howard Hughes Medical Institute, Ashburn, VA, USA
- Janelia


Protocol Citation: Matthew Lycas 2026. Cryo-Expansion Microscopy of C. elegans and Tardigrades. protocols.io https://dx.doi.org/10.17504/protocols.io.e6nvww4qzvmk/v1
License: This is an open access protocol distributed under the terms of the Creative Commons Attribution License, which permits unrestricted use, distribution, and reproduction in any medium, provided the original author and source are credited
Protocol status: Working
We use this protocol and it's working
Created: March 22, 2026
Last Modified: April 25, 2026
Protocol Integer ID: 313714
Keywords: Expansion Microscopy, High Pressure Freezing, C. elegans, Tardigrade, Cryo-ExM, ExM, HPF, qExM, Freeze Substitution, expansion microscopy of whole caenorhabditis elegan, cryofixation with expansion microscopy, resolution expansion microscopy, broader trajectory of expansion microscopy, quantitative expansion microscopy at the scale, quantitative expansion microscopy, based expansion microscopy, expansion microscopy, microscopy, whole caenorhabditis elegan, tissues with iterative ultrastructure expansion microscopy, molecule localization microscopy, tardigrades expansion microscopy, antibody labeling paradigm, iterative ultrastructure expansion microscopy, iterative expansion microscopy, molecular resolution, antibody labeling, invertebrate visual proteomic, chemical fixation with cryo, resolution fluorescence imaging, visual proteomic, fluorescent labeling, approach to intact invertebrate model organism, antibody labeling of endogenous atp synthase, advances in cryo, expansion of invertebrate, intact invertebrate mod
Disclaimer
This work was conducted while I was working at EPFL
Abstract
Expansion microscopy (ExM) improves imaging resolution through sample-level physical expansion, complementing optical resolution improvements and enabling the two to compound (1). Beyond resolution gains, ExM sample preparation itself enhances antibody labeling, likely by unmasking epitopes through increased physical separation of biological targets (2,3,4). Replacing chemical fixation with cryo-fixation further boosts labeling quality — presumably by eliminating formaldehyde and glutaraldehyde from the workflow — to a degree that enables quantitative expansion microscopy (qExM): the estimation of endogenous protein complex abundances through a dual-antibody labeling paradigm (5,6).
However, cryo-fixation for ExM has so far been limited to cultured cells and yeast (5,6,7,8). Extending this approach to intact invertebrate model organisms presents unique challenges due to sample size, cuticle permeability, and the need for whole-animal structural preservation. This protocol describes a pipeline for cryo-fixation-based expansion microscopy of whole Caenorhabditis elegans and wild-caught tardigrades. Specimens are cryo-fixed by high-pressure freezing (HPF), subjected to freeze substitution in pure acetone, and rehydrated through a graded ethanol series before undergoing standard ExM processing — including gelation, disruption, and fluorescent labeling. This approach preserves ultrastructural morphology while maintaining high antigenicity, enabling high-resolution fluorescence imaging of intact whole-animal specimens.
Cryo-fixation followed by acetone freeze substitution offers several advantages over aldehyde-based chemical fixation. Unlike formaldehyde or glutaraldehyde, acetone does not covalently crosslink proteins, leaving protein-rich structures such as the cuticle more pliable and amenable to disruption during the expansion process — likely reducing distortions upon gel swelling. Consistent with this, the groundbreaking C. elegans ExM paper (ExCel) demonstrated, among many contributions including some of the earliest NHS ester labeling in expansion experiments, that chemically fixed specimens do not expand to the degree of the surrounding gel (9). There is the potential that with cryo-fixed specimens, that their expansion of the specimen will be closer to that of the hydrogel due to the absence of aldehyde based crosslinking resisting the expansion of the sample. This method also enabled antibody labeling of endogenous ATP synthase in C. elegans, yielding mitochondrial structures without any potential
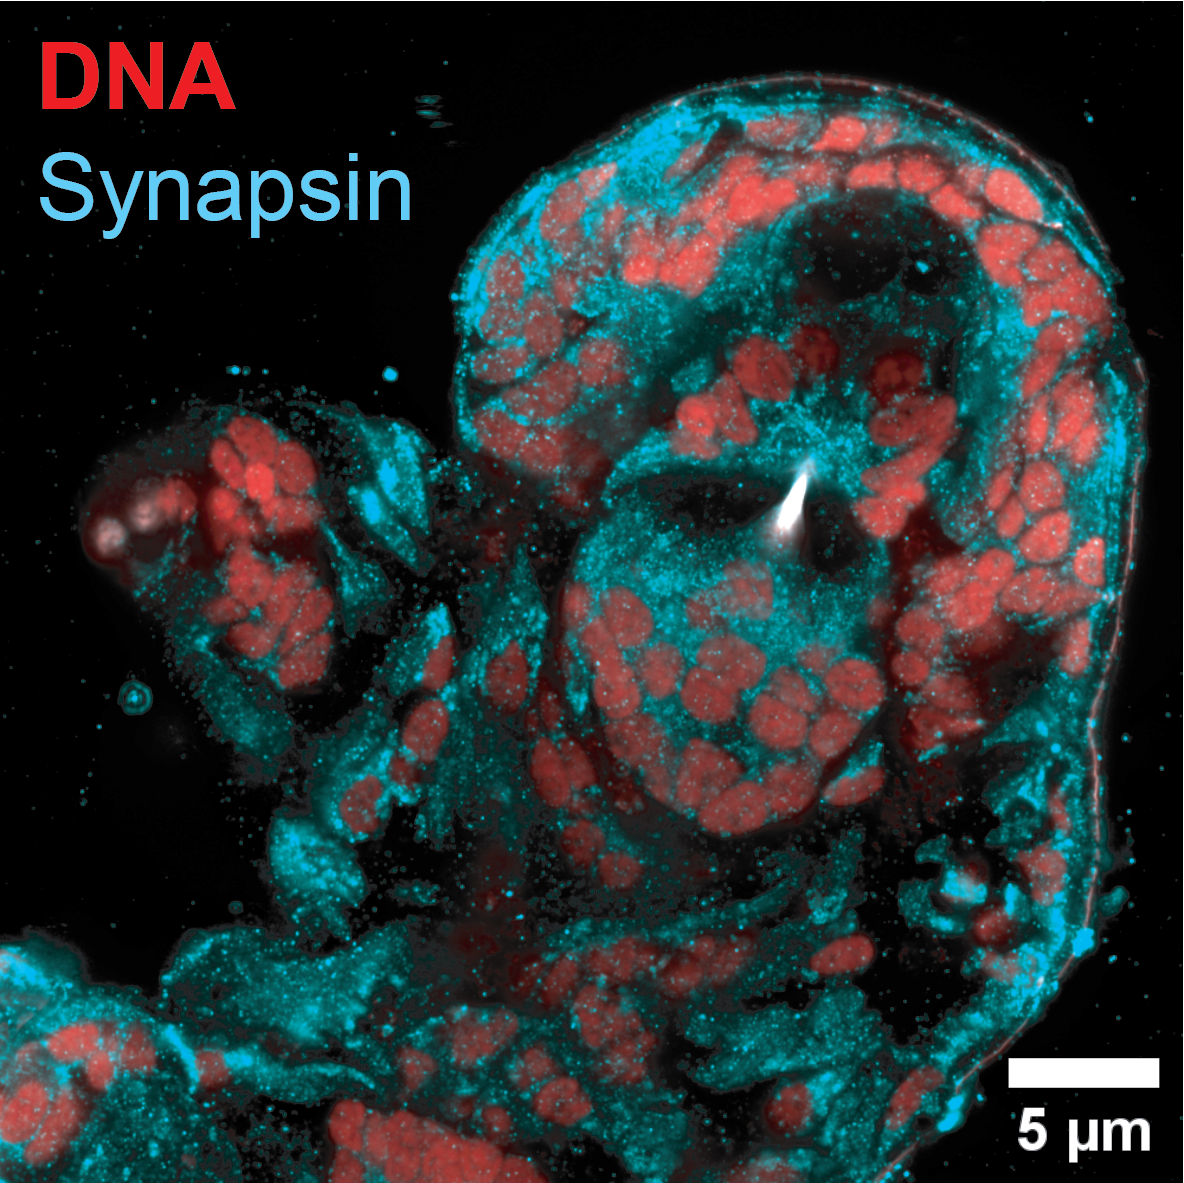
compromise from genetically encoded labels (Figure 1). In wild-caught tardigrades, NHS ester total protein staining captured the total protein content, enabling visualization of neurons, muscle cells, and storage cells in the full whole-animal context (Figure 2). Finally, synapse staining with anti-synapsin alongside DNA labeling in wild tardigrades provides a promising first step toward whole-invertebrate visual proteomics and, ultimately, quantitative expansion microscopy at the scale of the entire animal (Figure 3).
By combining high-pressure freezing with freeze substitution for expansion of invertebrates, we extend the benefits of cryo-ExM to larger, intact organisms. The resulting increase in antigenicity allows for measurement of endogenous targets via antibody labeling. We anticipate that these advances in cryo-based sample preservation will compound with the broader trajectory of expansion microscopy, complementing qExM with fields such as parasitology and connectomics (10,11).
References
- Chen F, Tillberg PW, Boyden ES. Expansion microscopy. Science. 2015;347(6221):543–548. doi: 10.1126/science.1260088
- Sarkar D, et al. Revealing nanostructures in brain tissue via protein decrowding by iterative expansion microscopy. Nat Biomed Eng. 2022;6:1057–1073.
- Zwettler FU, et al. Molecular resolution imaging by post-labeling expansion single-molecule localization microscopy (Ex-SMLM). Nat Commun. 2020;11:3388.
- Eilts J, Reinhard S, Michetschläger N, Werner C, Sauer M. Enhanced synaptic protein visualization by multicolor super-resolution expansion microscopy. Neurophoton. 2023;10.
- Laporte MH, Klena N, Hamel V, Guichard P. Visualizing the native cellular organization by coupling cryofixation with expansion microscopy (Cryo-ExM). Nat Methods. 2022;19(2):216–222. doi:10.1038/s41592-021-01356-4
- Lycas MD, Landoni JC, Noferi B, Zimmerli CE, Douglass KM, Manley S. Quantitative Expansion Microscopy for In Situ Estimation of Endogenous Target Abundance. bioRxiv 2026.01.18.700178. doi: 10.64898/2026.01.18.700178
- Hinterndorfer K, Laporte MH, Mikus F, Tafur L, Bourgoint C, Prouteau M, Dey G, Loewith R, Guichard P, Hamel V. Ultrastructure expansion microscopy reveals the cellular architecture of budding and fission yeast. J Cell Sci. 2022;135(24):jcs260240. doi: 10.1242/jcs.260240
- Louvel V, Haase R, Mercey O, Laporte MH, Eloy T, Baudrier É, Fortun D, Soldati-Favre D, Hamel V, Guichard P. iU-ExM: nanoscopy of organelles and tissues with iterative ultrastructure expansion microscopy. Nat Commun. 2023;14:7893. doi: 10.1038/s41467-023-43582-8
- Yu CC, Barry NC, Wassie AT, Sinha A, Bhattacharya A, Asano S, Zhang C, Chen F, Hobert O, Goodman MB, Haspel G, Boyden ES. Expansion microscopy of C.elegans. eLife. 2020;9:e46249. doi: 10.7554/eLife.46249
- Liffner B, Alves e Silva TL, Vega-Rodriguez J, Absalon S. Mosquito Tissue Ultrastructure-Expansion Microscopy (MoTissU-ExM) enables ultrastructural and anatomical analysis of malaria parasites and their mosquito. BMC Methods. 2024;1:13. doi: 10.1186/s44330-024-00013-4
- Tavakoli MR, Lyudchik J, Januszewski M, Vistunou V, Agudelo Dueñas N, Vorlaufer J, Sommer C, Kreuzinger C, Oliveira B, Cenameri A, Novarino G, Jain V, Danzl JG. Light-microscopy-based connectomic reconstruction of mammalian brain tissue. Nature. 2025;642:398–410. doi: 10.1038/s41586-025-08985-1

Guidelines
This protocol is focused on the cryo preservation and freeze substitution. It can be applied for any array of expansion microscopy monomer solutions. Less disruption is needed compared to other C. elegans protocols as there is no formaldehyde used in the initial fixation nor the anchoring.
Materials
Organisms
1. C. elegans: obtain from established laboratory stocks
maintained on NGM agar plates seeded with OP50 bacteria.
2. Tardigrades: collected from moss scraped from tree bark.
Specimen Collection Equipment
1. 9-well borosilicate spot plate
2. Stereo dissection microscope
3. P2 and P200 micropipettes with appropriate tips
4. Fine forceps (for tardigrade retrieval from FBS gel, post-HPF)
Cryoprotectants
1. 20% (v/v) fetal bovine serum (FBS) in deionized water — for tardigrades
2. 20% (w/v) dextran (MW ~40 kDa) in 0.1 M phosphate buffer (PB), pH 7.4 — for C. elegans
NOTE: Both solutions must be thoroughly dissolved and degassed prior to use. Degassing is
achieved by placing the solution in a cell media sterilization filter container
and attaching this to a vacuum pump until there are no more bubbles released by
the solution. This is important for use in the HPF.
High-Pressure Freezing
1. Leica EM ICE (or equivalent) high-pressure freezer
2. Brass specimen carriers (planchets): Type A (3 mm diameter; depressions of 0.1 mm and 0.2 mm on opposing faces) and Type B (3 mm diameter; single 0.3 mm depression, flat on reverse)
NOTE: The carrier configuration described here is based on standard Leica EM ICE carrier
types. Type A is used as the receiving carrier (0.2 mm depression facing up); Type B provides the flat mating surface coated with hexadecane.
3. Hexadecane (anhydrous, for coating the flat planchet face)
4. Liquid nitrogen (LN2), large dewar for HPF machine pre-cooling, and additional smaller dewars for sample storage
5. Permanent marker (for planchet orientation labeling)
6. Post-it note or clean absorbent paper (for excess hexadecane blotting)
Freeze Substitution
1. Anhydrous acetone
2. 80 mL plastic beaker or cryo-compatible container
3. Aluminium foil
4. -80°C freezer
Rehydration and Anchoring
1. Ethanol series: 100%, 95%, 75%, 50%, 25% (v/v) in deionized water
2. Phosphate-buffered saline (PBS), pH 7.4
3. 0.1 M sodium bicarbonate (NaHCO3), pH 8.3
4. Glycidyl methacrylate (GMA): prepare 0.1% (v/v) working solution in 0.1 M NaHCO3 vortexed thoroughly
5. 6-well tissue culture plates
Expansion Microscopy (ExM)
1. Monomer solution (non-activated): 23% (w/v) sodium acrylate, 10% (w/v) acrylamide, 0.1% (w/v) N,N'-methylenebisacrylamide (Bis), 1× PBS
NOTE: Sodium acrylate should be of high purity.
2. Gel activators: TEMED (N,N,N',N'-tetramethylethylenediamine) and APS (ammonium persulfate)
3. Standard glass slides and 18 mm or 22 mm coverslips
4. Double-sided adhesive tape (e.g., Scotch brand, ~100 µm per layer)
5. Humidified gelation chamber: sealed plastic container (e.g., Tupperware) with damp tissue
6. 37°C incubator
Enzymatic Disruption Buffer
1. Collagenase Type IV: 1 mg/mL
2. Chitinase :1 mg/mL:
3. NaCl: 500 mM
4. CaCl2: 50 mM
5. Tris-HCl, pH 7.0
NOTE: Prepare enzyme buffer fresh on the day of use.
Denaturation / Protein Disruption
1. SDS denaturation solution: (200 mM SDS, 200 mM NaCl, 50 mM Tris, pH 9.0)
Labeling Reagents
1. NHS ester dye (e.g., NHS-Alexa 488 or equivalent): 20 µM working solution in PBS
2. Primary antibody: diluted 1:100 in PBS supplemented with 3% (w/v) BSA and 0.1% (w/v) sodium azide
3. Secondary antibody (fluorophore-conjugated): 5 µg/mL in PBS supplemented with 3% BSA and 0.1% sodium azide
4. SYBR Gold nucleic acid stain: 1:10,000 dilution in deionized water
5. Paraformaldehyde (PFA), 16% stock (Electron Microscopy Sciences): dilute to 6% in PBS for post-fixation
Imaging
1. Poly-D-lysine (PDL)-coated 25 mm round coverslips
2. Glass-bottom dishes (MatTek or equivalent, uncoated, 35 mm)
3. Coverslip holder
4. Widefield fluorescence microscope with 63× water immersion objective (Zeiss Apochromat water immersion NA 1.2)
5. Nikon NSPARC and/or Yokogawa W1 spinning disk confocal microscope
Troubleshooting
Problem
The tardigrades go into the tun state prior to the HPF
Solution
This happens because of the salt content of the antifreeze medium. I had the best success with the FBS as the cryoprotectant but I still had to move the tardigrades very fast through to the point of freezing otherwise they would go into the tun state. Potentially this is worth trying with no cryoprotectant and risk the formation of ice artifacts.
Problem
I have difficulty identifying the planchet with the sample when it is in the liquid nitrogen
Solution
For this I was using a marker to color on the back side of the planchet that would have the sample as I was setting up the materials for HPF. This then would have enough contrast for identification.
Problem
I am losing the samples as they fall from the planchet in the graded ethanol washes during freeze substitution
Solution
I was doing these steps either in a 6-well tray or in a glass spot plate. With these holders for the solution it became possible to find the specimens with a dissection microscope that remained when I transferred the planchets to the next solution.
Problem
Will my antibody work for labeling in this preparation?
Solution
If your antibody labels well for western blots, then it is a great candidate for this preparation. Think of these samples as "in situ westerns". The disrupted protein will be in a hydrogel just like in a western blot, and as formaldehyde was omitted from the protocol until after antibodies were labeled the protein targets are most similar to that from western blots at time of labeling.
Safety warnings
Working with liquid nitrogen is dangerous, learn how to work with liquid nitrogen with proper safety precautions.
Lab coat and face shields very important when working with cryogens. Please consult your lab safety experts when conducting these protocols.
Specimen Collection
2h 45m
Tardigrade C. elegans
Transfer C. elegans from plates into a well of a 9-well borosilicate spot plate using a worm pick or P200 pipette. Pool sufficient animals for multiple HPF runs.
1h
Tardigrade Tardigrades (wild-collected)
Collect moss from tree bark and place in a 60 mm
Petri dish.
Add deionized water until the moss is barely submerged.
Incubate at room temperature for 45 minutes to
allow tardigrades to egress from the moss into the water.
45m
Under a stereodissection microscope, identify tardigrades in the water film and collect individually using a P200 pipette. Transfer to a well of a 9-well spot plate.

1h
Cryoprotectant Preparation
30m 20s
Degas both cryoprotectant solutions prior to use by placing them following mixing in a cell media sterilization flask connected to a vacuum. Run the vacuum until no more bubbles emerge from the solution
30m
In a separate well of the spot plate, place 1 mL of the appropriate cryoprotectant solution: 20% FBS in deionized water (tardigrades) or 20% dextran in 0.1 M PB (C. elegans).
High-Pressure Freezing (HPF)
1h 11m 30s
Pre-cool the Leica EM ICE high-pressure freezer by filling the internal dewar with LN2 using a large storage dewar. Allow the machine to equilibrate to LN2 temperature (~20 minutes). Fill the HPF sample
collection dewar with LN2 and insert into the freezer chamber prior to beginning runs.
20m
Perform one blank (empty) run at the start of the HPF session to purge the system and verify function
1m
Mark the shallow face of all Type A planchets (the 0.1 mm depression face) with a permanent marker. This allows orientation identification post-freezing under LN2.
Immerse the flat face of a Type B planchet in anhydrous hexadecane and blot briefly then place on a post-it note to leave a thin, even film. This facilitates the future separation of the planchets.
Planchets used for the HPF preparation
Assemble the loading cartridge in the HPF machine. Place the Type A planchet into the cartridge holder with the 0.2 mm depression facing upward.
Using a P2 pipette set to 2 µL, transfer as many specimens as possible from the cryoprotectant well and dispense the 2 µL volume directly into the 0.2 mm depression of the Type A planchet. Work quickly, this is not a physiologically normal environment for the specimen.
30s
Seat the hexadecane-coated flat face of the Type B planchet on top to sandwich the sample. Initiate the HPF run by closing the loading lever. The specimen will be frozen under ~2,000 bar within milliseconds.

The frozen planchet assembly is ejected and deposited into the LN2-filled collection reservoir within the machine.
Repeat Steps the freezing sample steps for a total of 10 HPF runs.
30m
After completing all runs, retrieve the planchet assemblies from the collection dewar under LN2. Identify the Type A planchet (marked on the 0.1 mm face) and separate.
Setup for removing the planchets from spaces under cryo conditions. In the image these are currently at room temperature. For their use, the container is filled with liquid nitrogen and the planchet assembaly
20m
Transfer all planchets to a cryogenic storage vessel and transport to the laboratory immersed LN2.
Freeze Substitution
1w 0d 0h 10m
Add 50 mL of anhydrous acetone to an 80 mL plastic beaker. Cover with aluminum foil.
Submerge the beaker in a LN2 bath until the acetone freezes solid. Continue cooling until the beaker reaches LN2 temperature (allow several minutes).
10m
Under LN2 vapor, transfer the HPF planchet assemblies onto the surface of the frozen acetone block inside the beaker. To do this, bring the planchets in a plastic carrier into liquid nitrogen with the beaker of frozen acetone (covered with aluminium foil to reduce water condensing and in the beaker). Then remove the foil from the acetone beaker, and with fine forceps, transfer each planchet to the surface of the acetone. Once all the planchets are transfered, re-cover the acetone beaker with foil.
Transfer the planchets with the samples to the covered beaker with frozen acetone. The planchets are in the plastic carrier on the left side. The beaker of acetone is on the right, covered with foil. The planchets from each well of the plastic carrier need to be placed on the surface of the frozen acetone, and finally the beaker is recovered with foil and placed in the -80°C freezer.
Transfer the covered beaker to a -80°C freezer. Maintain at -80°C for 7 days (1 week). During this time, acetone slowly permeates the sample as a substitution medium, replacing vitreous water while
preserving ultrastructure.
1w
Rehydration (Graded Solvent Exchange)
13h
Remove the beaker from -80°C and allow to warm to room temperature on the benchtop for 8 hours
8h
In a 6-well tissue culture plate, prepare the following rehydration series (2 mL per well): 100% ethanol (×2), 95% ethanol (×2), 75% ethanol, 50% ethanol, 25% ethanol, and 1× PBS
Transfer planchet assemblies sequentially through each ethanol step and then into PBS. Incubate approximately 5–10 minutes per step.
5h
Monitor specimen release under the dissection
microscope:
Tardigrade C. elegans (dextran cryoprotectant): Animals typically detach from the planchet and enter suspension around the 50% ethanol step. By the PBS wash, animals are freely suspended and can be collected by
pipette.
Tardigrade Tardigrades (FBS cryoprotectant): FBS forms a gel upon hydration, retaining animals within the planchet cavity. Tardigrades must be manually extracted from the gel using fine forceps under the dissection microscope, after the PBS wash.
Anchoring
16h 25m
Wash specimens twice in 0.1 M NaHCO3 using the spot plate (2 × 5 min).
10m
Incubate specimens in 0.1% (v/v) glycidyl methacrylate (GMA) in 0.1 M NaHCO3 overnight shaking at room temperature. GMA covalently crosslinks amine groups on proteins and will act as the anchor to the acrylate backbone of the expansion gel.
16h
Wash specimens 3× in 1× PBS (5 min each).
15m
Monomer Infiltration
16h
Transfer specimens to non-activated monomer solution: 23% (w/v) sodium acrylate, 10% (w/v) acrylamide, 0.1% (w/v) Bis, in 1× PBS.
Incubate overnight at 4°C with gentle agitation to allow full infiltration.
16h
Gelation
1h
Prepare the gelation chamber: place two layers of double-sided adhesive tape (~200 µm total spacer height) onto a clean glass slide as parallel walls.
Remove as much non-activated monomer solution from the specimens as possible without drying the sample.
Prepare activated monomer solution by adding TEMED and APS to fresh cold non-activated monomer solution to final concentrations of 0.25% each. Mix by gentle pipetting.
Pipette the activated monomer solution onto the specimens and mix briefly by pipetting up and down. Immediately transfer the specimen + solution into the gelation chamber on the glass slide. Place a
coverslip gently on top.
Transfer the assembly to a sealed, humidified chamber (plastic container with damp tissue). Incubate at 37°C for 1 hour.
1h
After gelation, carefully disassemble the gelation chamber and cut the gel piece containing the embedded specimen away from surrounding gel using a clean razor blade or scalpel.
Enzymatic Disruption
16h
Transfer the gel piece containing the specimen into enzymatic disruption buffer: 1 mg/mL collagenase Type IV, 1 mg/mL chitinase, 500 mM NaCl, 50 mM CaCl2, in Tris-HCl pH 7.0.
Incubate at 37°C with shaking overnight. For this I used a VWR Incubating Microplate Shaker, set to 100 RPM.
16h
SDS Denaturation
2h
Transfer gel piece to SDS denaturation solution (200 mM SDS, 200 mM NaCl, 50 mM Tris, pH 9.0). Incubate at 95°C for 2 hours.
2h
Wash gel piece 2–3× in deionized water to expand and remove the SDS.
Initial Expansion and Labeling
1d 15h 5m
For NHS ester total protein staining:
Equilibrate expanded gel briefly in PBS until its
size change halts.
30m
Incubate in 20 µM NHS ester dye in PBS for 2 hours at room temperature with gentle agitation.
2h
Wash and re-expand in deionized water (3× water exchanges).
For antibody labeling:
Equilibrate gel in PBS + 3% BSA + 0.1% sodium azide.
30m
Incubate with primary antibody (1:100 dilution) in PBS + 3% BSA + 0.1% sodium azide, overnight at 37°C.
The sodium azide at this stage is used to prevent any bacterial growth in the solution during the incubation. As the sample is fixed and attached to the gel, there should be no change to organelle morphology.
16h
Wash 3× in PBS (5 min each).
15m
Incubate with secondary antibody (5 µg/mL) in PBS + 3% BSA + 0.1% sodium azide, overnight at 37°C.
16h
Wash 2× in PBS (5 min each).
10m
Re-expand gel in deionized water for 1 hour.
1h
Post-fix in 6% paraformaldehyde (PFA) in PBS for 30 minutes at room temperature.
This step is to retain the antibody staining. If omitted, the antibody signal will decrease significantly over the course of days. Omit this step if one plans on doing sequential labeling, as the PFA will negatively impact the sample antigenicity for further labeling.
30m
Re-expand in deionized water until fully expanded.
1h
For DNA labeling (SYBR Gold):
After expansion, incubate gel in 1:10,000 SYBR Gold in deionized water for 10 minutes.
10m
Wash out excess stain with 2–3 changes of deionized water.
1h
Gel Mounting for Imaging
1h
Screening: Place the expanded gel on an uncoated glass-bottom MatTek dish. Examine on a widefield fluorescence microscope using a water immersion objective to identify which face of the gel contains the most specimens closest to the coverslip surface. Confirm sample quality and select regions of interest. In this experiment I had 10 specimens per gel, and from these I would have 3 to 5 that had the majority of the sample imageable by high NA water immersion objectives, and all would be imageable by water dipping objectives.
30m
Once the preferred face is identified, place the gel flat on a poly-D-lysine (PDL)-coated 25 mm round coverslip with the specimen-rich face down (against the PDL surface).
Remove excess water gently with a Kimwipe or lint-free tissue by blotting around the edge of the gel. Do not allow the gel to dry.
Gently press the gel against the coverslip using the flat of a clean fine-bristled paint brush to promote adhesion.
Submerge the coverslip and gel in deionized water in the well of a 6-well plate for ~30 minutes to allow the gel to re-equilibrate.
30m
High-Resolution Imaging
Mount the PDL-coated coverslip with adherent gel into a coverslip holder. Fill with the same deionized water used to store the sample as immersion medium.
Image using one of the following platforms:
Nikon NSPARC array detector system: for high-sensitivity, enhanced-resolution confocal imaging.
Yokogawa CSU-W1 spinning disk confocal: for rapid volumetric acquisition.
Acquire image channels appropriate to the labeling: NHS ester (total-protein morphology), antibody (specific targets), and/or SYBR Gold (DNA/nuclei).
Protocol references
- Chen F, Tillberg PW, Boyden ES. Expansion microscopy. Science. 2015;347(6221):543–548. doi: 10.1126/science.1260088
- Sarkar D, et al. Revealing nanostructures in brain tissue via protein decrowding by iterative expansion microscopy. Nat Biomed Eng. 2022;6:1057–1073.
- Zwettler FU, et al. Molecular resolution imaging by post-labeling expansion single-molecule localization microscopy (Ex-SMLM). Nat Commun. 2020;11:3388.
- Eilts J, Reinhard S, Michetschläger N, Werner C, Sauer M. Enhanced synaptic protein visualization by multicolor super-resolution expansion microscopy. Neurophoton. 2023;10.
- Laporte MH, Klena N, Hamel V, Guichard P. Visualizing the native cellular organization by coupling cryofixation with expansion microscopy (Cryo-ExM). Nat Methods. 2022;19(2):216–222. doi:10.1038/s41592-021-01356-4
- Lycas MD, Landoni JC, Noferi B, Zimmerli CE, Douglass KM, Manley S. Quantitative Expansion Microscopy for In Situ Estimation of Endogenous Target Abundance. bioRxiv 2026.01.18.700178. doi: 10.64898/2026.01.18.700178
- Hinterndorfer K, Laporte MH, Mikus F, Tafur L, Bourgoint C, Prouteau M, Dey G, Loewith R, Guichard P, Hamel V. Ultrastructure expansion microscopy reveals the cellular architecture of budding and fission yeast. J Cell Sci. 2022;135(24):jcs260240. doi: 10.1242/jcs.260240
- Louvel V, Haase R, Mercey O, Laporte MH, Eloy T, Baudrier É, Fortun D, Soldati-Favre D, Hamel V, Guichard P. iU-ExM: nanoscopy of organelles and tissues with iterative ultrastructure expansion microscopy. Nat Commun. 2023;14:7893. doi: 10.1038/s41467-023-43582-8
- Yu CC, Barry NC, Wassie AT, Sinha A, Bhattacharya A, Asano S, Zhang C, Chen F, Hobert O, Goodman MB, Haspel G, Boyden ES. Expansion microscopy of C.elegans. eLife. 2020;9:e46249. doi: 10.7554/eLife.46249
- Liffner B, Alves e Silva TL, Vega-Rodriguez J, Absalon S. Mosquito Tissue Ultrastructure-Expansion Microscopy (MoTissU-ExM) enables ultrastructural and anatomical analysis of malaria parasites and their mosquito. BMC Methods. 2024;1:13. doi: 10.1186/s44330-024-00013-4
- Tavakoli MR, Lyudchik J, Januszewski M, Vistunou V, Agudelo Dueñas N, Vorlaufer J, Sommer C, Kreuzinger C, Oliveira B, Cenameri A, Novarino G, Jain V, Danzl JG. Light-microscopy-based connectomic reconstruction of mammalian brain tissue. Nature. 2025;642:398–410. doi: 10.1038/s41586-025-08985-1
Acknowledgements
I thank Jean Daraspe from the UNIL EMF for teaching me how to use the HPF, Hari Shroff and Meng Wang for feedback on the manuscript, Juan Cruz Landoni and Isabel LuValle-Burke for the C. elegans specimens and age identification.