Aug 05, 2024
Cryo-electron microscopy and helical reconstructions of α-synuclein fibrils
- Arpine Sokratian1,
- Nilakshee Bhattacharya1,
- Elizabeth Viverette1,
- Yezhou867 1
- 1Duke Univeristy
- West lab protocols


Protocol Citation: Arpine Sokratian, Nilakshee Bhattacharya, Elizabeth Viverette, Yezhou867 2024. Cryo-electron microscopy and helical reconstructions of α-synuclein fibrils. protocols.io https://dx.doi.org/10.17504/protocols.io.ewov1qwy2gr2/v1
Manuscript citation:
License: This is an open access protocol distributed under the terms of the Creative Commons Attribution License, which permits unrestricted use, distribution, and reproduction in any medium, provided the original author and source are credited
Protocol status: Working
We use this protocol and it's working
Created: January 22, 2024
Last Modified: August 05, 2024
Protocol Integer ID: 93921
Keywords: ASAPCRN, synuclein fibril image collection, synuclein fibril, krios microscope, specific settings for the krios microscope, synuclein, electron microscopy, fibril, helical reconstruction, cryo
Funders Acknowledgements:
ASAP
Grant ID: 020527
Abstract
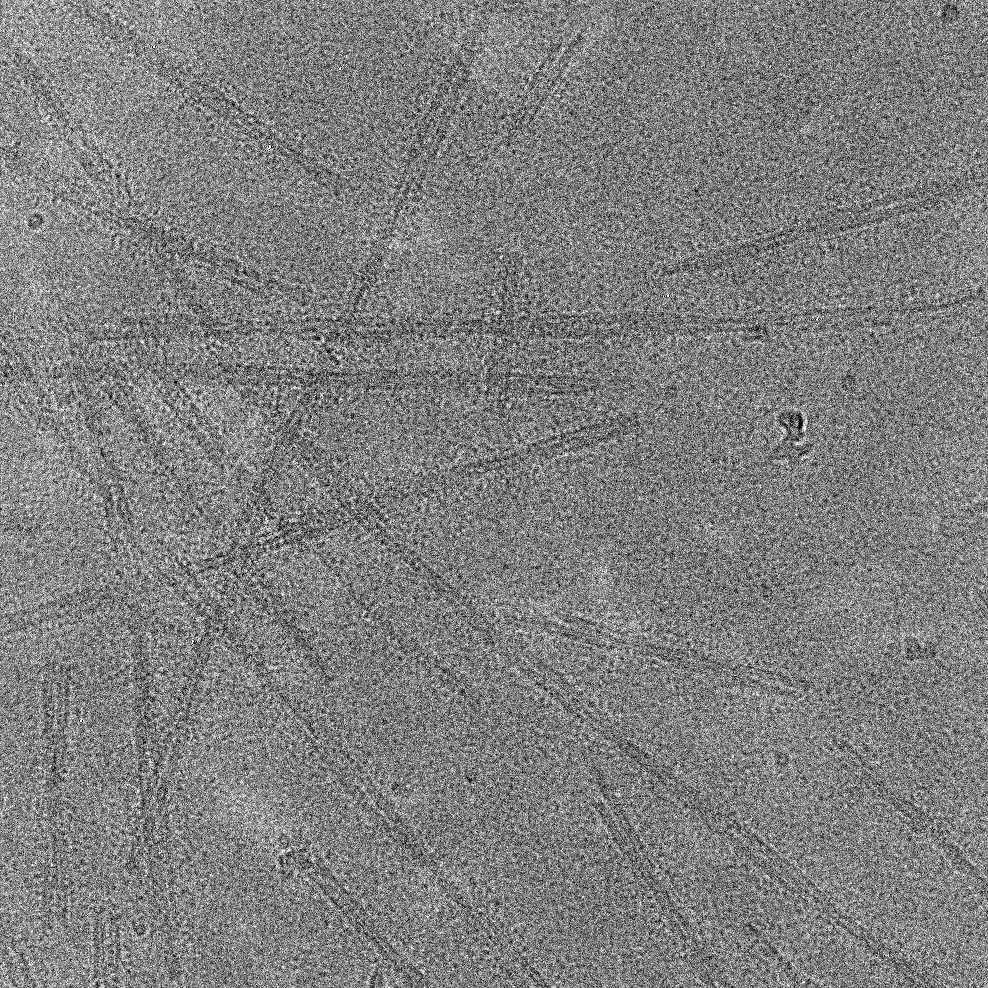
This protocol describes how to create cryo-EM grids for α-synuclein fibril image collection. It also includes the specific settings for the KRIOS microscope, including parameters for latitude collection and contains details on post-image collection processing for model generation.
Protocol materials
13UltrAuFoil® Holey Gold FilmsElectron Microscopy SciencesCatalog #Q350AR13A
Freezing alpha-synuclein onto AuFoil grids
Preparation of α-synuclein protein is described here:
Protocol

CREATED BY
Arpine Sokratian
Preparation of α-synuclein fibrils is described here:
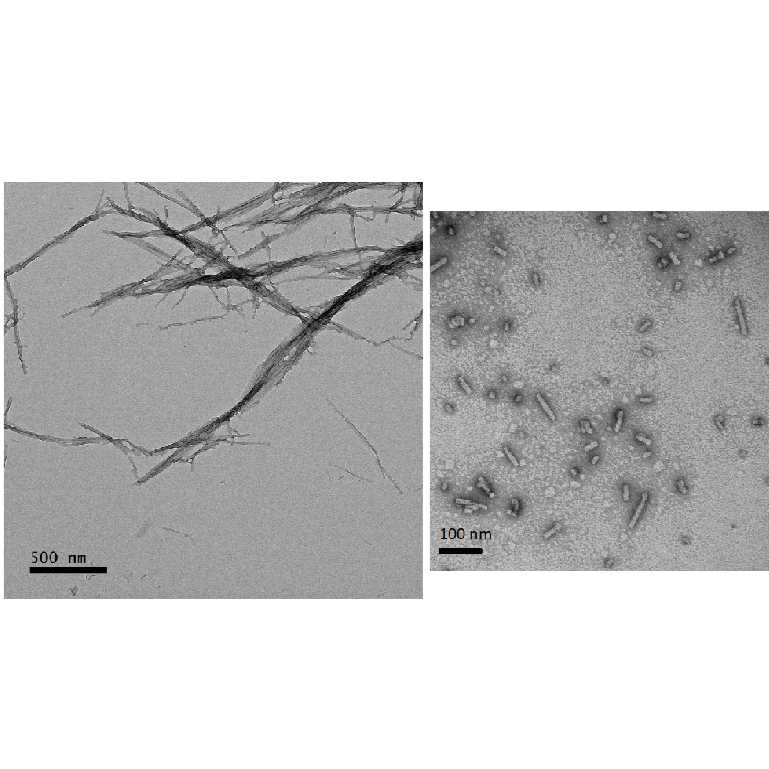
Generated purified fraction of full-length fibrils removed from any soluble species should be diluted to concentration 0.1 mg/mL, immediately before plunge freezing
Note: Vortex for 15 sec. to prevent clumping
Prepare grids for glow discharge
Grids: 1.2/1.3 UltrAufoil (Quantifoil) grids 13UltrAuFoil® Holey Gold FilmsElectron Microscopy SciencesCatalog #Q350AR13A
Glow discharge plasma-cleaned (Pie Scientific) using protocol:
Mode: immersion
PF Power (W): 38
Pulse ratio (N/255) 255
Gas 1 (sccm) 3.1
Gas 2 (sccm) 27.9
Duration: 1 min 15 sec
Purging: no purge
Prepare vibroblot (add liquid nitrogen to reach temperature around -150C). Add ethane into plunging cup, insert blotting paper (x2)
Set vibroblot conditions: back-blot 4.5 sec, humidity 95C, temperature 10C
Add 3 ul of well-shaken diluted fibrils onto the grid following immediate freezing cycle in ethane,
carefully move the grid into liquid nitrogen and place it into the grid box.
After all the grids are collected, start the clipping process in liquid nitrogen
Cryo-EM collection (Adapted from Duke SMIF cryo-EM protocol)
Insert the grids into ThermoFisher Krios G3i Cryo TEM
Equipment
Krios G3i Cryo TEM
NAME
Cryo TEM
TYPE
Thermo Fisher Scientific
BRAND
NA
SKU
Under the Vacuum tab check the pressure readings
- Gun should be ~1
- Liner should be ~16
- Octagon should be ~1
- Autoloader should be ~16
Under the Autoloader tab, go to the temperature control panel to check the temperature readings.
Temperatures for Docker, Holder, Cassette gripper, Autoloader dewar, and Column dewar should all be below -180⁰C.
For direct alignments, a sample carbon grid or the cross-grating grid can be used. Gold sample grids do not perform well with the AutoCTF function.
Set rough eucentric height using microscope conditions for atlas and grid square.
Insert Flu screen by pressing R1 on right TEM
control panel if not already inserted
- Open column valves in Vacuum tab of TEM software if not already open
- Use the joystick in the control panel to center a prominent feature (e.g. dirt spot). Make sure that the grid square that contains this feature is intact.
- Go to the Stage+ tab in the TEM software
a. Ensure alpha angle is -20, then select alpha (this will tilt the sample by -20 degrees)
b. Use the Z-axis +/- buttons on the control panel to shift the prominent feature back to the center
c. Select alpha again to return to 0 degree tilt and verify that prominent feature remains in about the same place. Repeat steps 4 and 5 if needed.
- In EPU, select Grid Square under the Preparation tab and then click Set
- Repeat steps 4 and 5 to get rough Eucentric Height at the Grid Square magnification
- Press Eucentric focus button on the TEM panel and then press L2 to normalize all
Adjust Eucentric Height and AutoFocus in EPU (Microscope conditions: Hole Eucentric Height)
Adjust AutoEucentric Height by Beam Tilt
Select Autofocus
Press the L2 button to normalize all
Set C2 Aperture Alignment (Microscope conditions: Hole Eucentric Height)
Reduce the size of the beam to the diameter of the small circle on the screen using the intensity knob on the control panel
Use the Multifunction X and Y knobs on the TEM panel to center the beam
Increase the size of the beam to the diameter of the large circle on the screen using the intensity knob on the control panel
In the Column tab of the TEM software, select Condenser 2 Adjust in the Apertures panel
Center the beam over the large circle in the display using the Multifunction X and Y knobs on the TEM panel
De-select Condenser 2 adjust in the Apertures panel
In the beam settings panel, select TEM and then select Nanoprobe (this reactivates the C3 lens)
Set beam tilt pivot point in EPU software and adjust C3 condenser Alignment
Check or optimize objective Stigmation and Coma Free Alignments using Sherpa software (Microscope conditions: Data Acquisition)
Latitude Data Collection Set-Up Procedure (Adapted from Duke SMIF cryoEM protocol)
Under the Latitude S panel, press the New button
Before doing proceeding to the next step, check C2 aperture is around 50. After that check the beam at different magnitudes. Press go to atlas and then retract the scope. You can leave it on
while changing the magnitudes. See if the beam is aligned, if not, you can
shift it but then update the scope info in latitude
Make sure the dose is around 50 - 55 e-/Å2, pixel size of 1.08; Defocus Range [um] -2.5 to -0.8, do not need energy slit.
Image alignment:
1. Select the State Setup – Atlas menu box.
a. Press the Goto button. This sets the Krios to the Atlas magnification and spot size.
b. Press the Capture button to acquire an image.
c. Right click on the image and a function box will appear.
d. Select the Centering cursor; it looks like a gray circle. Anytime you click inside the image, the software will reposition center. This shift will not be visible until the next image is collected.
e. Find a grid square with a piece of dirt or ice.
f. Using the Centering cursor, click on this feature to center the Atlas image on this grid square. Choose a grid square with poor quality, but it must not be broken or cracked.
g. Press the Capture button to acquire another Atlas image.
h. Check the image to see if the grid square with the particle is in the center of the screen.
i. Go back to State Setup-Atlas panel and press the Next button. The software will goto the next magnification in State Setup.
- State Set-Up Grid menu box
a. Press the Goto button. This sets the Krios to the Grid magnification and spot size.
b. Press the Capture button to acquire an image.
c. Use the Centering cursor to center the image on the piece of dirt/ice from the first image.
d. Go back to the State Setup panel and press the Next button. The software will goto the next
magnification in State Setup.
State Set-Up Hole menu box
a. Press the Goto button. This sets the Krios to the Hole magnification and spot size.
b. Press the Capture button to acquire an image. The image will flip, so keep that in mind when centering the feature.
c. Use the Centering cursor to center the image on the piece of dirt/ice from the first image.
d. If unsure if the image is centered where you want it or if the Centering cursor was accidentally clicked in the wrong place, capture the image again.
e. Go back to the State Setup panel and press the Next button. The software will goto the next magnification in State Setup.
State Set-Up Focus menu box
a. Press the Goto button. This sets the Krios to the Focus magnification and spot size.
b. Press the Capture button to acquire an image.
c. Use the Centering cursor to center the image on the piece of dirt/ice from the first image.
d. Go back to the State Setup panel and press the Next button. The software will goto the next magnification in State Setup.
State Set-Up Data menu box
a. Press the Goto button. This sets the Krios to the Data magnification and spot size.
b. Press the Capture button to acquire an image.
c. Verify that edges of the beam are not present in the image.
d. Verify that the measured dose is in the 50-60 e/A2 range.
e. Use the Centering cursor to center the
image on the piece of dirt/ice from the first image.
- Perform Fine Alignment
a. Open the Fine Alignment Panel and press the Capture button.
b. Images will appear from Atlas to Data magnifications.
c. Once the 5 images have been collected, right click on one of the images and select the black arrow cursor.
d. Inside each image, move the red cross so it is centered over the same edge location of a piece of dirt/ice. Zooming in on the low magnification images can help ensure the same location is selected. This is aligning the images to the same point in the software.
e. Once the red crosses are all aligned well, press the Calculate button.
f. Press the Capture button again to verify that the alignments calculated properly.
g. If the red crosses are not in the same
location in each image, then re-center the crosses and Calculate again.
Collect an Atlas:
- Open the Latitude Experiment panel.
- The Atlas size should be set to 5 by 7. If it is not, change the values.
- Center the stage in the Krios software. a. Go to the Stage+ tab. b. In the second to left panel press the XY button. This will move the stage to the x=0 and y=0 position.
- Go back to the Latitude software and press the Capture button.
- This will collect the atlas image in sets of 5 by 7 grid squares, and will take 10-15 mins to complete.
Image processing
Image alignments and fine alignments were performed prior to the atlas collection.
1. Movie frames were gain-corrected, aligned, and dose-weighed using Relion 4.0 software 46.
2. Contrast transfer function (CTF) parameters were estimated using CTFFIND-4.1 software 47. For helical reconstructions, ~40 images were selected randomly for manual picking and ~14k fragments were extracted with inter-particle distance of 6 β-rungs of 28.5 Å (with estimated helical rise of 4.75 Å) from the start-end coordinate pairs.
3. Extracted coordinates were used for training CRYOLO 48. The same model was used for all
image datasets in auto picking mode with CRYOLO.
4. Fragments were first extracted using a box size of 1024 pixels and down scaled to 256 pixels resulting in a pixel size of 4.32 Å. Reference-free 2D classifications were performed to assess different fibril strains, cross-over distances (estimated as 1,200 Å), and helical rise (4.82 Å), and to select suitable fragments for further processing.
5. Initial references were generated from selected 2D class averaged images using
the Relion_helix_inimodel2d command using a cross-over distance of 1200 Å, search shift of 15
Å, and search angle of 15 degrees.
6. The clean set of fragments was re-extracted using box sizes of 512 pixels and down-scaled to 256 pixels (binned pixel size of 2.16 Å) for optimal performance in 3D classifications.
7. To minimize reference bias, initial models were low-pass filtered to 40 Å. 6-8 classes were used during 3D classification together with initial helical twists set to -0.7 degrees, initial helical rises of 4.82 Å, and regularization parameter T of 4.
7. Helical symmetry local search was performed with helical twist ranges varying from -0.85 to -0.5 and helical rise ranges varying from 4.8 to 4.84 during classification.
8. Only the central 10% of the z length was used for reconstructions. Classes with nominal folding features were selected individually and re-extracted with box sizes of 384 pixels.
9. Additional rounds of 3D classification were performed with the new reconstructions as reference using an initial low-pass filter set to 10 Å to clean the particles further. Classes with the same fibril types and folding features were merged together for 3D auto refinement.
10. Initial helical twist and helical rise parameters were updated from 3D classifications.
11. Local symmetry search was not performed at the first round of refinement.
12. In the second round refinement, a shape mask comprising 90% of the central z
length was applied along with local symmetry search. To improve the resolution, multiple rounds
of CTF refinement, Bayesian polishing, and refinements with previous results using a particle
extraction size of 256 pixels were used.
13. Post processing was accomplished using a shape mask comprising 10% of the central z length, and final resolutions were estimated for each dataset using the gold standard FSC 0.143 cutoff.
Fibril modeling
Two dimerization related chains from PDB IDs 6SST was used as initial models.
Residues fitting model geometries were refined manually using COOT based on each sharpened density map 49.
Helical symmetry parameters from reconstructions were applied to the templates to generate β-strand stacks with 6 or 7 rungs. Final models were refined in PHENIX using phenix.real_space_refine (Phenix-1.2-4459) 50. Manually defined non-crystallographic symmetry constraints according to the helical symmetry and β-sheet secondary
structure restraints were imposed during refinement. Multiple iterations of PHENIX refinement
and manual adjustment with COOT were performed and model evaluation was done using
Molprobity
Protocol references
Adapted from Duke SMIF cryoEM protocol