Jun 01, 2026
CRISPR-Cas9 RNP and rAAV-Mediated Gene Editing in Human Pluripotent Stem Cells
- Erdene Baljinnyam1,
- Laura Grisanti1,
- Shalini Tattari2,3,
- Samuele Marro2,3,4
- 1Icahn School of Medicine at Mount Sinai;
- 2Stem Cell Engineering CoRE, Icahn School of Medicine at Mount Sinai, New York, NY, USA (RRID:SCR_027503);
- 3Department of Stem Cell Biology and Regenerative Medicine, Icahn School of Medicine at Mount Sinai, New York, NY, USA;
- 4Nash Family Department of Neuroscience, Friedman Brain Institute, Icahn School of Medicine at Mount Sinai, New York, NY, USA
- COREdinates


Protocol Citation: Erdene Baljinnyam, Laura Grisanti, Shalini Tattari, Samuele Marro 2026. CRISPR-Cas9 RNP and rAAV-Mediated Gene Editing in Human Pluripotent Stem Cells. protocols.io https://dx.doi.org/10.17504/protocols.io.ewov1rpnylr2/v1
License: This is an open access protocol distributed under the terms of the Creative Commons Attribution License, which permits unrestricted use, distribution, and reproduction in any medium, provided the original author and source are credited
Protocol status: Working
We use this protocol and it's working
Created: May 04, 2026
Last Modified: June 01, 2026
Protocol Integer ID: 316321
Keywords: CRISPR-Cas9, Cas9 RNP, homologous recombination, homology-directed repair, HDR, knock-in, genome engineering, pluripotent stem cells, induced pluripotent stem cells, stem cell engineering, donor template, nucleofection, electroporation, human PSCs, AAV6, gene targeting, isogenic controls, CRISPR knock-in, stem cells, mediated gene editing, gene editing, efficient strategy for crispr, recombinant cas9 protein, using cas9 ribonucleoprotein, human pluripotent stem cell, crispr, genome engineering, precise genome engineering application, useful for precise genome engineering application, pluripotent stem cell, induced pluripotent stem cell, cas9 ribonucleoprotein, raav donor template, cas9 rnp, recombinant adeno, generation of isogenic cell line
Disclaimer
This protocol is intended for research use only by personnel trained in human pluripotent stem cell culture and genome engineering techniques. All work involving recombinant viral vectors and CRISPR-Cas9 reagents should be performed in accordance with institutional biosafety and regulatory guidelines. Editing efficiencies and cell viability may vary depending on cell line, target locus, reagent quality, and culture conditions.
Abstract
This protocol describes a highly efficient strategy for CRISPR-Cas9–mediated gene editing in human induced pluripotent stem cells (hiPSCs) using Cas9 ribonucleoprotein (RNP) complexes combined with recombinant adeno-associated virus (rAAV)-mediated donor delivery. Synthetic sgRNA and recombinant Cas9 protein are assembled into RNP complexes and delivered into hiPSCs together with an rAAV donor template to facilitate precise homology-directed repair (HDR)-mediated genome engineering, including targeted knock-in applications and generation of isogenic cell lines. Using this workflow, hiPSCs typically maintain high viability and pluripotency while achieving robust HDR-mediated targeting efficiencies suitable for downstream clonal isolation and characterization. Compared with plasmid-based approaches, this protocol provides improved editing efficiency, reduced off-target effects, and lower cellular toxicity, making it particularly useful for precise genome engineering applications in human pluripotent stem cells.
Attachments

AAV+RNP_v2_SM.png
939KB
Image Attribution
Created in BioRender. Marro, S. (2026) https://BioRender.com/undefined
Guidelines
This protocol was optimized for precise CRISPR-Cas9 RNP and rAAV-mediated HDR genome engineering in human pluripotent stem cells (hPSCs). Editing efficiency, cell survival, and clone quality are highly dependent on:
- hPSC health and passage number,
- sgRNA quality and genomic context,
- donor construct design,
- rAAV titer,
- nucleofection handling,
- and downstream clonal screening strategy.
Particular attention should be paid to:
- validation of the target locus prior to editing,
- proper homology arm and CRISPR-resistant donor design,
- minimization of prolonged exposure to nucleofection solution,
- and rigorous molecular validation of edited clones.
Whenever possible, edited clones should be validated using multiple orthogonal approaches, including junction PCR, Sanger sequencing, zygosity PCR, copy-number analysis, and assessment for tandem integrations or allelic dropout.
Materials
hPSCs Media
- mTeSR plus media kitSTEMCELL Technologies Inc.Catalog #100-0276 *
- StemFlex MediumThermo Fisher ScientificCatalog #A3349401 *
* interchangeable for this protocol
hPSCs Matrix
- 200 µL
Cultrex Stem Cell Qualified Reduced Growth Factor Basement Membrane ExtractR&D SystemsCatalog #3434-001-02
- 50 mL DMEM/F-12Thermo ScientificCatalog #11320033
- Store at 4 °C up to 1 month
hPSCs Detaching Solution
- 500 µL Invitrogen™ UltraPure™ 0.5M EDTA, pH 8.0Fisher ScientificCatalog #15-575-020
- 500 mL DPBS, no calcium, no magnesiumThermo FisherCatalog #14190136
Chroman 1
10mM (200,000x) Stock:
- 50 mg Chroman 1Bio-TechneCatalog #7163
- 9.815 mL Dimethyl sulfoxide (DMSO)Merck MilliporeSigma (Sigma-Aldrich)Catalog #D2650
- Store at -80 °C up to 5 years
5,000x Working Solution:
- 250 µL Chroman 1Bio-TechneCatalog #7163
- 9.750 mL Dimethyl sulfoxide (DMSO)Merck MilliporeSigma (Sigma-Aldrich)Catalog #D2650
- Aliquot to 250 µL and store at -80 °C up to 5 years
MEF medium
- 440 mL DMEM, high glucose, HEPESThermo FisherCatalog #12430062
- 50 mL Calf SerumFisher ScientificCatalog #SH30087.04
- 5 mL Sodium Pyruvate (100 mM)Thermo Fisher ScientificCatalog #11360070
- 5 mL MEM Non-Essential Amino Acids Solution (100X)Gibco - Thermo Fisher ScientificCatalog #11140050
- 4 µL ß -mercaptoethanol Merck MilliporeSigma (Sigma-Aldrich)Catalog #M3148
- Filter-sterilize with 0.22 µM Vacuum Filtration SystemMerck Millipore (EMD Millipore)Catalog #SCGPU05RE/S2GPU05RE
- Store at 4 °C up to 4 months
Poly-L-ornithine (PO)
100x Stock:
- Dilute 100 mg Poly-L-ornithine hydrobromideMilliporeSigmaCatalog #P3655 in 67 mL MilliQ water
- Filter-sterilize with0.22 µM syringe-end filterMerck Millipore (EMD Millipore)Catalog #SLGV004SL
- Store at -20 °C as 5 mL 5 mL aliquots
1x Working Solution:
- Dilute 5 mL of 100x stock in 495 mL MilliQ water
- Filter-sterilize with0.22 µM syringe-end filterMerck Millipore (EMD Millipore)Catalog #SLGV004SL
- Store at 4 °C up to 6 months
Polyethylenimine (PEI)
10x Stock:
- Dilute 2 g Polyethylenimine (PEI) Polysciences, Inc.Catalog #23966-2 in 200 mL MilliQ water at 80 °C
- Adjust to 7.2 with Hydrochloric acidMerck MilliporeSigma (Sigma-Aldrich)Catalog #258148
- Aliquot in 1 mL and store at -80 °C
1x Working Solution:
- Preheat one 10X aliquot at 80 °C
- Dilute 1 mL of 10x stock in 9 mL DPBS, no calcium, no magnesiumThermo FisherCatalog #14190136
- Filter-sterilize with0.22 µM syringe-end filterMerck Millipore (EMD Millipore)Catalog #SLGV004SL
- Store at 4 °C up to 6 months
Note
PEI is a stable polymer and has not been reported to be sensitive to repeated thawing. Determine the optimal DNA:PEI ratio experimentally each time a new 10X stock is made
Benzonase Buffer
- 2 mL Tris, 1 M pH 8.5MilliporeSigmaCatalog #SBR0005
- 80 µL Magnesium chloride 1MMilliporeSigmaCatalog #M1028
- 38 mL MilliQ water
- Filter-sterilize with0.22 µM syringe-end filterMerck Millipore (EMD Millipore)Catalog #SLGV004SL
- Store at -20 °C up to 3 years
NaCl 3M
- 1.753 g Sodium chlorideMerck MilliporeSigma (Sigma-Aldrich)Catalog #S9888-25G
- Bring final volume to 10 mL MilliQ water
- Filter-sterilize with0.22 µM syringe-end filterMerck Millipore (EMD Millipore)Catalog #SLGV004SL
- Aliquot and store at -20 °C up to 3 years, or at 4 °C for up to 3 months
Cells
- WTC11Human pluripotent stem cell registry (hpscreg)Catalog #UCSFi001-A
- HEK/293TATCCCatalog #HEK293T
Plasmids
- pAAV (add Addgene ID)
- Ad5 (add Addgene ID)
- AAV6 (add Addgene ID)
Other reagents
- BenzonaseMerck Millipore (EMD Millipore)Catalog #1.01695.002 typically 250 U/uL
- Alt-R™ S.p. Cas9 Nuclease V3Integrated DNA Technologies, Inc. (IDT)Catalog #1081058
- Synthetic Single Guide RNA KitSynthego
- Accutase®, 100 mlInnovative Cell Technologies, IncCatalog #AT104
- P3 Primary Cell 4D-NucleofectorTM X Kit LLonzaCatalog #V4XP-3024
- BAMBANKER(R)FUJIFILM Cellular Dynamics, Inc.Catalog #302-14681
- Trypsin-EDTA (0.05%), phenol redThermo FisherCatalog #25300054
Safety warnings
Human pluripotent stem cells are highly sensitive to:
- dissociation stress,
- prolonged nucleofection handling,
- excessive rAAV exposure,
- and suboptimal culture conditions.
Over-confluent cultures, poor-quality cells, excessive viral input, or delayed post-nucleofection recovery can substantially reduce editing efficiency and cell survival.
Interpretation of HDR-positive clones requires careful molecular validation. Standard junction PCR alone is insufficient to exclude:
- tandem donor integrations,
- random donor integrations,
- large deletions,
- complex rearrangements,
- or allelic dropout events.
Clones initially appearing homozygous should be rigorously validated using additional orthogonal methods before final classification.
Ethics statement
Institutional permissions Before starting, ensure all necessary approvals for working with hPSCs are secured.
This includes obtaining authorization from your Institutional Review Board (IRB), Ethics Committees, and any other relevant regulatory bodies. Additionally, confirm compliance with all institutional and national guidelines
concerning the ethical use of hPSCs.
The authors declare no competing interests.
Before start
Before beginning the workflow, ensure that:
- hPSCs are healthy, actively proliferating, and largely free of spontaneous differentiation,
- all sgRNA, Cas9, donor plasmid, and rAAV reagents have been quality controlled,
- the target locus has been sequence-verified in the parental hPSC line,
- and all required PCR screening primers have been designed and, when possible, validated in advance.
It is strongly recommended to pre-optimize:
- nucleofection conditions for the selected hPSC line,
- and PCR conditions for both 5′ and 3′ In-Out PCR assays before initiating large-scale clonal screening workflows.
Prepare sufficient backup cryovials of edited pools before proceeding to single-cell cloning.
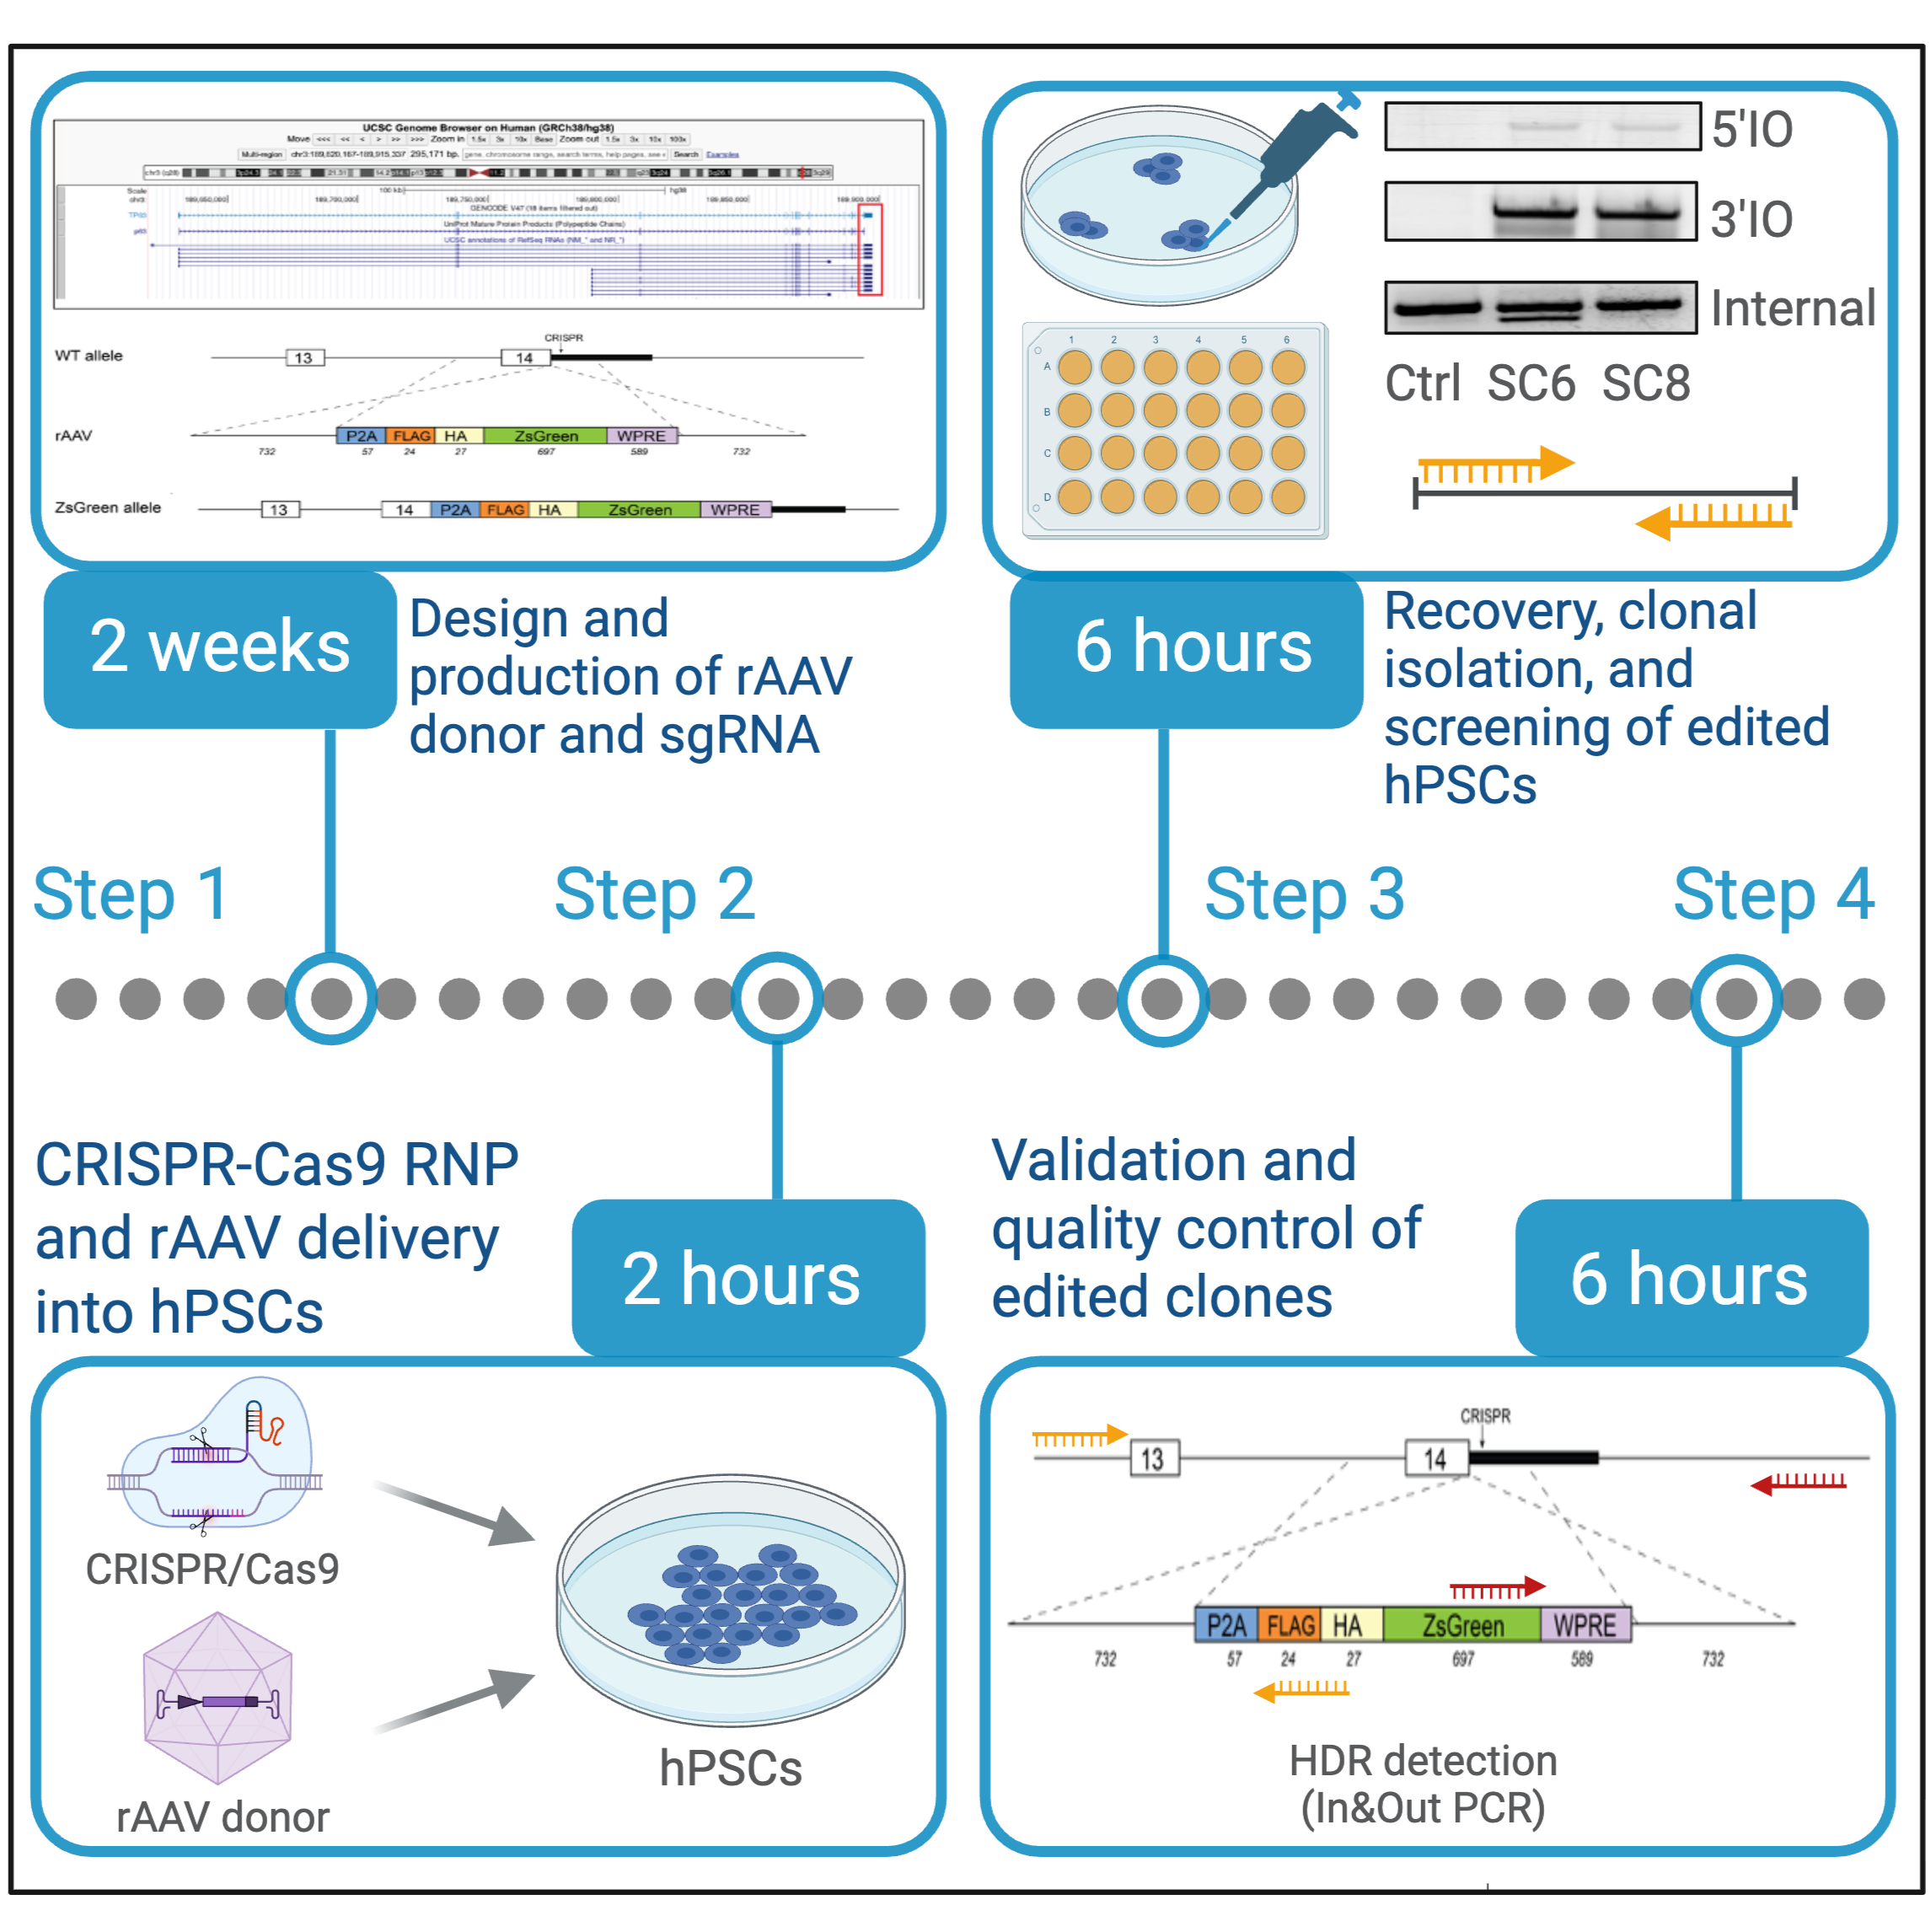
Design rAAV HDR donors and sgRNAs for Cas9 RNP editing
2w 0d 2h 30m
This section describes the workflow for designing sgRNAs and rAAV HDR donor templates for CRISPR-Cas9 genome engineering in human pluripotent stem cells (hPSCs), including target locus evaluation, homology arm design, sgRNA selection, donor construction, and AAV packaging considerations.
Identify and validate the target locus
Search the target gene using the UCSC Genome Browser with the human genome assembly GRCh38/hg38.
Identify the genomic locus of the gene of interest and review the overall genomic organization, including exon structure, untranslated regions (UTRs), neighboring genes, and strand orientation.
If using a commonly used hPSC line with available whole-genome sequencing (WGS) data, such as WTC11, verify that the target region does not contain single nucleotide polymorphisms (SNPs), insertions/deletions, or other variants that may interfere with sgRNA binding, PAM recognition, PCR primer binding, or homology arm design. Even single mismatches within the sgRNA target region can significantly reduce Cas9 cutting efficiency and HDR outcomes.
For WTC11 and related lines, publicly available WGS datasets can be used to evaluate the target locus prior to sgRNA and donor design. If WGS data are not available for the selected hPSC line, perform targeted Sanger sequencing of the genomic region encompassing the planned sgRNA target site and homology arms before finalizing the donor construct and editing strategy.
30m
Generate annotated genomic reference files
Using SnapGene, import the RefSeq transcript sequence by selecting File → Import → NCBI Sequences and entering the RefSeq accession number corresponding to the canonical transcript. This will generate an annotated RNA reference file containing the exon structure, coding sequence (CDS), untranslated regions (UTRs), and transcript orientation.
Download the genomic DNA sequence from the UCSC Genome Browser by selecting View → DNA and import the sequence into SnapGene to generate a genomic DNA reference file. Ensure that the downloaded genomic region includes sufficient upstream and downstream sequence surrounding the intended editing site to facilitate donor design, primer design, and downstream genotyping.
Annotate the genomic DNA file using the transcript features from the RNA reference file by selecting Features → Import Features → Import Features from a SnapGene File. This step will map exons, coding regions, untranslated regions (UTRs), and transcript orientation onto the genomic DNA sequence, facilitating accurate donor and sgRNA design.
30m
Select sgRNAs
Find a suitable sgRNA using the CRISPR/Cas9 track in the UCSC Genome Browser or CRISPOR. For a typical C-terminal gene-tagging strategy, such as insertion of a T2A-GFP cassette, select an sgRNA that cuts as close as possible to the desired insertion site.
For C-terminal tagging, the donor cassette should be inserted immediately after the last amino acid and before the endogenous STOP codon, unless the design intentionally replaces or modifies the STOP codon. Carefully verify that the endogenous coding sequence remains in frame with the inserted tag or T2A-GFP cassette.
For C-terminal tagging strategies, it is generally preferable to select an sgRNA that cuts within the 3′ UTR rather than within the coding sequence itself. This reduces the risk that indels on the untargeted allele will alter the protein sequence.
When possible, select sgRNAs that cut within regions of the 3′ UTR showing low evolutionary conservation, as these regions are less likely to contain critical regulatory elements. Among suitable candidates, prioritize guides with:
- MIT specificity score >85
- Moreno-Mateos/CRISPRscan score >40
- No predicted high-risk off-targets with few mismatches.
30m
Design homology arms
Design 5′ and 3′ homology arms of approximately 500–700 bp each flanking the desired modification site. In our experience, HDR efficiency drops substantially when homology arms are shorter than approximately 500 bp. Longer homology arms within this range generally improve targeting efficiency while remaining compatible with rAAV packaging constraints.
The wild-type AAV genome is approximately 4.7 kb, including the inverted terminal repeats (ITRs), which defines the practical upper packaging limit for recombinant AAV vectors. For optimal AAV packaging efficiency and viral yield, the total HDR donor construct, including both ITRs, homology arms, reporter/selection cassettes, and any additional inserted sequences, should remain close to or below this size limit.
When designing the homology arms, ensure that the outer regions are suitable for downstream PCR primer design and genotyping. In particular, the beginning of the 5′ homology arm should start within a non-repetitive genomic region to facilitate the design of unique external PCR primers. The end of the 5′ homology arm should terminate precisely at the intended insertion site.
Similarly, the 3′ homology arm should begin immediately downstream of the insertion site and extend into a non-repetitive genomic region suitable for external PCR primer design and validation of correct targeting. Careful positioning of homology arm boundaries is critical for efficient HDR, accurate junction PCR screening, and preservation of proper coding frame and gene structure following insertion.
After designing the homology arms, it is strongly recommended to validate their genomic uniqueness using the BLAT tool in the UCSC Genome Browser. Homology arms containing repetitive elements may produce multiple genomic alignments, which can reduce targeting specificity and complicate downstream PCR validation.
Note
If multiple BLAT hits are observed, inspect the region using the UCSC Genome Browser RepeatMasker/Repeat Elements tracks to identify repetitive elements such as SINEs, LINEs, LTRs, or low-complexity regions. When possible, redesign the homology arm boundaries to exclude repetitive elements while preserving sufficient homology length and maintaining compatibility with the desired insertion site. This is particularly important for designing unique external PCR primers and ensuring accurate HDR-mediated genome targeting.
30m
Design the rAAV HDR donor construct
Design the rAAV HDR donor according to the following guidelines:
- The total donor construct size, including both ITRs, homology arms, reporter/selection cassettes, and any additional regulatory elements, should remain below approximately 4.7 kb to remain compatible with efficient AAV packaging.
- Include 5′ and 3′ homology arms of approximately 500–700 bp each flanking the desired editing site.
- Insert the desired genetic modification between the two homology arms. Depending on the application, this may include fluorescent reporters, epitope tags, point mutations, conditional alleles, recombinase recognition sites, or selection cassettes.
When designing coding-sequence insertions, carefully verify preservation of the open reading frame (ORF) across all junctions. For reporter knock-in strategies, confirm that linker sequences, self-cleaving peptides (e.g., T2A/P2A), tags, and endogenous coding sequences remain in frame after insertion.
The HDR donor must be designed to be CRISPR-resistant in order to prevent Cas9-mediated re-cutting of the edited allele. The optimal design strategy is to position the sgRNA cut site directly across the junction between the 5′ and 3′ homology arms, such that the insertion point disrupts the sgRNA recognition sequence or PAM sequence after HDR-mediated insertion. Ideally, the insertion junction should fall within the seed region of the sgRNA or within the PAM itself, as disruption of these regions is most effective at preventing re-cutting.
When this strategy is not feasible, introduce silent mutations within the sgRNA recognition sequence and/or PAM sequence in the donor template to disrupt Cas9 recognition while preserving the endogenous amino acid sequence and coding frame. Care should be taken to avoid introducing unwanted splice alterations, cryptic regulatory motifs, or changes that may affect codon usage or transcript stability.
30m
Clone and validate the donor plasmid
Clone the HDR donor construct into an appropriate pAAV backbone plasmid according to the final donor design. Ensure that the plasmid contains intact AAV inverted terminal repeats (ITRs) flanking the donor cassette, as these are required for efficient AAV packaging.
After cloning, verify the integrity of the donor plasmid by restriction digest, Sanger sequencing, or whole-plasmid NGS, paying particular attention to:
- homology arm boundaries
- insertion junctions
- open reading frame preservation
- sgRNA/PAM silent mutations
- integrity of the ITR regions (can be verified by XmaI digestion)
Note
Note: For propagation of pAAV plasmids containing ITRs, use recombination-deficient bacterial strains, such as JM109, when possible, and minimize prolonged bacterial culture to reduce the risk of ITR instability.
2w
Package recombinant AAV
Package the recombinant AAV (rAAV) donor either in-house using a standard AAV production workflow (see next step) or through a commercial AAV packaging service provider such as VectorBuilder (small scale) or equivalent vendors.
Select the appropriate AAV serotype according to the target cell type and delivery strategy. For human pluripotent stem cells (hPSCs), AAV6 is commonly used because of its high transduction efficiency and compatibility with HDR-mediated genome editing workflows.
Following viral production. Store rAAV aliquots at -80 °C to minimize repeated freeze-thaw cycles.
Small-scale in-house rAAV production (optional)
3d 8h 45m
This section does not describe a full-scale, high-purity rAAV production and purification workflow intended for in vivo applications or large-scale viral manufacturing.
Instead, this protocol describes a simplified, small-scale rAAV production approach that yields crude viral supernatant sufficient for efficient genome-editing applications in hPSCs.
The workflow is optimized for rapid, cost-effective production of functional rAAV donor preparations suitable for in vitro CRISPR-Cas9 HDR experiments. For applications requiring highly purified, high-titer, endotoxin-controlled, or clinical-grade rAAV preparations, refer to dedicated large-scale AAV production protocols or commercial viral production services.
Prepare HEK293T packaging cells
Day 1 — cell plating
Coat a 15 cm tissue culture dish with poly-L-ornithine (PO) for 01:00:00 at 37 °C . After incubation, rinse the dish once with sterile PBS.
Seed 15 × 10^6 HEK293T cells per coated dish in 40 mL of MEF medium. Cells should reach approximately 70–80% confluency at the time of transfection, the following day. Uniform cell density and healthy morphology are critical for efficient rAAV production.
Note
Use low-passage HEK293T cells whenever possible and avoid over-confluent cultures, as cell health strongly influences transfection efficiency and viral yield. Keep cells in culture in MEF medium for at least 2 passages before packaging. Split cells with trypsin at approximately a 1:20 ratio.
1h
Transfect HEK293T packaging cells
Day 2 — PEI transfection
Start the transfection procedure in the morning. Prior to transfection, verify that HEK293T cells are approximately 90–95% confluent.
Note
Cells should form a nearly confluent monolayer while still maintaining visible space between adjacent cells. Over-confluent cultures may reduce transfection efficiency and viral yield.
Carefully remove 20 mL of medium from each 15 cm dish, leaving 20 mL remaining on the cells.
Prepare the polyethylenimine (PEI) transfection mixture. For each 15 cm dish, prepare Tube A and Tube B separately as described below.
| A | B | |
| DMEM | 2 mL | |
| pAAV plasmid | 25 μg | |
| Ad5 (helper) | 25 μg | |
| AAV6 | 25 μg |
Table 1. Transfection mix — Tube A
| A | B | |
| DMEM | 2 mL | |
| 1 X PEI | 150 μL |
Table 2. Transfection mix Tube B
Combine Tube A and Tube B and vortex briefly to mix thoroughly. Incubate the transfection mixture at Room temperature for 00:15:00 to allow formation of PEI-DNA complexes.
Add the transfection mixture dropwise to the HEK293T cells while gently swirling the plate to ensure even distribution across the culture surface.
After 06:00:00 , remove the transfection medium and rinse the cells once with sterile PBS to reduce PEI-associated toxicity.
Add 40 mL of fresh MEF medium and return the cells to the incubator for 72:00:00 to allow rAAV production and accumulation in the culture supernatant.
Note
In our experience, initiating the transfection step (Day 2) on a Friday often works particularly well for rAAV production workflows, as the subsequent 72:00:00 incubation period allows viral accumulation over the weekend with minimal disturbance to the cultures.
3d 6h 15m
Harvest recombinant AAV
Day 5 — Harvest rAAV particles (3 days post-transfection)
Add 500 µL of 0.5 M EDTA per 15 cm dish and incubate the cells at 37°C for 15 min to facilitate detachment.
After incubation, tap the plate firmly to detach the cells and transfer the entire cell suspension into 50 mL conical tubes. Centrifuge at 300 x g, Room temperature, 00:05:00 to pellet the cells.
Resuspend each pellet in 1 mL Benzonase buffer per original plate and transfer the suspension to a 15 mL tube.
Perform three rounds of freeze-thaw cycles to lyse the cells and release viral particles:
1. Freeze the samples in a dry ice/ethanol bath for approximately 00:05:00 .
2. Thaw the samples in a 37 °C water bath for approximately 00:05:00 .
3. Pipette thoroughly after each thaw step to mechanically disrupt remaining cell aggregates.
After the second thaw cycle, add 1 µL Benzonase to each sample to digest contaminating nucleic acids.
Following the third thaw cycle, incubate the samples at 37 °C for 01:00:00 to allow Benzonase-mediated digestion of residual DNA.
Transfer the lysate to 1.5 mL microcentrifuge tubes and centrifuge at 5000 rpm, Room temperature, 00:15:00 using a benchtop centrifuge to pellet cellular debris.
Carefully transfer the clarified supernatant containing rAAV particles into fresh tubes (typically approximately 200 µL × 5 aliquots) and store at 80 °C for up to .
1h 30m
CRISPR-Cas9 RNP and rAAV delivery into hPSCs
3h 55m
This section describes simultaneous delivery of Cas9 RNP complexes and rAAV HDR donors into hPSCs using nucleofection-based genome editing workflows optimized for high viability and efficient HDR-mediated targeting.
1h
Prepare rAAV donor and recovery plate
Thaw one vial of pre-packaged rAAV donor by placing it at 4 °C Overnight or at Room temperature for approximately 00:10:00 before the experiment.
Note
0 µL Before each use, centrifuge the rAAV tube at 5.000 rpm, 00:15:00 in a benchtop centrifuge to pellet residual HEK293T cell debris. A white floating lipid layer may be visible after centrifugation; this is normal. Carefully collect the viral supernatant from immediately below this layer without disturbing any debris.
Prepare a 6-well plate coated with Cultrex. Add 1 mL mTeSR Plus + Chroman 1 to each well, supplemented with the appropriate amount of rAAV donor supernatant.
Note
For crude in-house rAAV preparations, test a range of approximately 1-30 µL rAAV supernatant per well. In our experience, higher volumes, such as 30 µL per well, can be toxic depending on the preparation.
For high-titer commercial AAV6 preparations, such as VectorBuilder-produced virus, dilute the virus before use. A starting dilution series of 1:10 and 1:100 is recommended, followed by testing 1-10 µL μL per well, as excessive viral input can substantially reduce hPSC survival.
Critical: Always include a negative control well without rAAV to distinguish AAV-dependent effects from nucleofection-, RNP-, or culture-related effects.
10m
Prepare sgRNA and Cas9 reagents
Resuspend chemically modified synthetic sgRNA (e.g., Synthego) in TE buffer according to the manufacturer’s instructions to a final concentration of approximately 4 µg/µL . For example, resuspension of 1.5 nmol sgRNA in 12.1 µL TE buffer yields approximately 123.5 micromolar (µM) sgRNA.
Note
Keep sgRNA aliquots on ice during the experiment and minimize repeated freeze-thaw cycles.
Pre-warm the following reagents prior to nucleofection:
- mTeSR Plus + Chroman 1 recovery medium at room temperature
- Accutase at room temperature for approximately 15 min
- P3 nucleofection solution at room temperature
Keep all reagents at room temperature unless otherwise specified. Maintain Cas9 protein on a cold block or ice throughout the setup procedure to preserve activity.
Prepare recovery medium by supplementing mTeSR Plus with Chroman 1.
30m
Assemble Cas9 RNP complexes
Prepare a master Cas9 dilution mixture according to Table 3.
| A | B | C | D | E | F | G | H | |
| Stock Concentration | for 1 sample | Final amount for one sample | for 2 samples | for 3 samples | for 4 samples | for 5 sample | ||
| Cas9 | 10 μg/μL | 1 | 10 μg | 2.2 | 3.3 | 4.4 | 5.5 | |
| MilliQ water | 1 | 2.2 | 3.3 | 4.4 | 5.5 | |||
| NaCl | 3M | 0.256 | 0.5632 | 0.8448 | 1.1264 | 1.408 | ||
| TOT | 2.256 | 4.9632 | 7.4448 | 9.9264 | 12.408 |
Table 3. Cas9 dilution
In separate labeled cryovials, assemble individual Cas9 RNP complexes for each sgRNA according to Table 4.
| A | B | C | D | |
| Stock Stock Concentration | Final amount in the reaction tube | Reaction per sample | ||
| Mix from table 3 | 2.256 μL | |||
| sgRNA | 8 μg | 4 μg/μL | 2 μL | |
| Total | 4.256 μL |
Table 4. RNP assembly mixture
Critical: Addition of salt during RNP assembly is important to maintain optimal Cas9 activity and improve formation of stable Cas9-sgRNA complexes.
For nucleofection controls, prepare a separate control tube containing 2 µL TE buffer and 2 µL pMax-GFP plasmid (2 µg total DNA).
After assembling each reaction, gently mix using a P20 pipette. Avoid introducing bubbles during mixing. Close tube caps immediately after preparation to minimize evaporation.
Return Cas9 and sgRNA stock tubes to the cold block immediately after use.
Incubate assembled RNP complexes at Room temperature 00:30:00 to allow formation of stable Cas9-sgRNA ribonucleoprotein complexes.
00:30:00
1h
Harvest and prepare hPSCs for nucleofection
While the Cas9 RNP complexes are incubating, begin harvesting hPSCs for nucleofection.
Add 1.5 mL Accutase per well of a 6-well plate and incubate the cells at 37 °C for approximately 00:15:00 , or as long as necessary to achieve complete detachment.
During the dissociation step, switch on the Lonza 4D Nucleofector and select nucleofection program CA-137 using the P3 nucleofection kit settings.
After cell detachment, add 1 mL mTeSR Plus + Chroman 1 per well and gently triturate until a homogeneous single-cell suspension is obtained.
Transfer the cells into labeled conical tubes containing an additional 2 mL mTeSR Plus + Chroman 1.
Count the cells while maintaining the suspension well mixed to ensure accurate quantification.
Transfer 1 × 10^6 hPSCs per nucleofection into individual Falcon tubes and centrifuge at 200 x g 00:03:00
Note
Some hPSC lines are particularly sensitive to nucleofection and may require increased input cell numbers (up to approximately 3 × 10^6 cells) to achieve acceptable post-nucleofection recovery and survival.
Carefully aspirate the supernatant completely prior to resuspension in nucleofection solution. Residual medium can substantially reduce nucleofection efficiency and cell viability. Use a P1000 pipette followed by a P200 pipette to remove residual liquid completely without disturbing the cell pellet.
30m
Prepare nucleofection solution
For each nucleofection reaction, prepare 100 µL of P3 nucleofection solution in a labeled1.5 mL cryovial according to Table 5.
| A | B | C | D | E | |
| 1X ( μL) | 2x | 3x | 4X | ||
| Solution P3 | 81.8 | 179.96 | 269.94 | 359.92 | |
| Supplement | 18.2 | 40.04 | 60.06 | 80.08 | |
| Total | 100 μL |
Table 5. Nucleofection solution
Remove supernatant from the cell pellet ( use a P1000, then P200 pipette tips to make sure to remove all the liquid)
Immediately before nucleofection, resuspend the cell pellet in the prepared nucleofection solution and gently mix until no visible clumps remain.
Transfer the entire cell suspension into the corresponding Cas9 RNP reaction tube and mix carefully using the same pipette tip to minimize sample loss.
Work quickly during this step to minimize the amount of time cells remain in nucleofection solution prior to electroporation, as prolonged exposure can reduce cell viability.
Critical: Avoid introducing bubbles while mixing or transferring the nucleofection mixture. Air bubbles can interfere with electrical pulse delivery and substantially reduce nucleofection efficiency and cell survival.
10m
Nucleofection of hPSCs
Carefully remove the supernatant from each cell pellet immediately prior to nucleofection. Use a P1000 pipette followed by a P200 pipette to remove residual liquid completely without disturbing the pellet.
Resuspend each cell pellet in the corresponding prepared P3 nucleofection solution and gently mix until a homogeneous suspension is obtained.
Transfer the cell suspension into the corresponding Cas9 RNP reaction tube and mix carefully using the same pipette tip to minimize sample loss.
Quickly transfer the complete nucleofection mixture into a Lonza nucleofection cuvette, ensuring that no air bubbles are introduced during pipetting.
Critical: Air bubbles can interfere with electrical pulse delivery and substantially reduce both nucleofection efficiency and cell survival. If bubbles are observed, gently tap the cuvette on a flat surface to dislodge them before electroporation.
Nucleofect the cells immediately using the Lonza 4D Nucleofector with program CA-137.
Immediately after nucleofection, use a disposable Lonza Pasteur pipette to gently transfer the cells from the nucleofection cuvette into a 15 mL conical tube containing 3 mL mTeSR Plus + Chroman 1 recovery medium.
Critical: Minimize the time cells remain in nucleofection solution after electroporation, as prolonged exposure can significantly reduce hPSC viability and recovery.
30m
Recovery and plating of nucleofected hPSCs
Following nucleofection, gently transfer the recovered cells into the pre-prepared Cultrex-coated 6-well plate containing mTeSR Plus + Chroman 1 supplemented with the appropriate amount of rAAV donor.
Plate approximately 300,000 nucleofected hPSCs per well. In this workflow, cells from a single nucleofection reaction are typically distributed across three wells containing different rAAV concentrations or control conditions.
Incubate the cells overnight at 37 °C .
Note
Addition of Chroman 1 substantially improves post-nucleofection survival of hPSCs. For particularly sensitive cell lines, CloneR may further improve recovery and clonal survival compared with standard ROCK inhibition strategies.
Perform media changes every other day using fresh mTeSR Plus medium.
Expected result
Healthy hPSCs should begin reattaching within several hours after nucleofection and typically reform compact colonies within 24–48 h. Excessive cell death, poor attachment, or widespread differentiation may indicate suboptimal nucleofection conditions, excessive viral input, poor cell quality prior to editing, or prolonged exposure to nucleofection solution.
5m
Recovery, clonal isolation, and screening of edited hPSCs
6d 5h
This section describes recovery, clonal isolation, expansion, and molecular screening of edited hPSCs following CRISPR-Cas9 RNP and rAAV-mediated genome engineering. With optimization of Cas9 RNP delivery, donor design, and hPSC culture conditions, HDR efficiencies are now sufficiently high that correctly targeted clones can often be isolated without antibiotic selection. Instead, edited colonies are identified based on reporter expression, colony morphology, and downstream molecular screening approaches such as junction PCR and genotyping analyses.
Monitor post-nucleofection recovery
After nucleofection and rAAV transduction, monitor hPSC survival and recovery daily by assessing cell attachment, colony morphology, overall confluency, and reporter expression when applicable.
Typically, surviving hPSCs should begin reattaching within several hours and reach approximately 60–70% confluency after 2–5 days, depending on the cell line, nucleofection efficiency, and editing conditions.
Once cultures reach approximately 80% confluency, dissociate the cells into a single-cell suspension using Accutase.
At this stage, it is strongly recommended to divide the recovered edited pool into multiple downstream applications:
- Use approximately 50% of the cells for genomic DNA extraction (“pool gDNA”) to evaluate HDR efficiency in the bulk-edited population using In-Out PCR and related screening assays.
- Freeze the remaining 50% of the cells as at least two independent backup cryovials labeled as the corresponding edited “pool”. Maintaining frozen backup pools is highly recommended before initiating single-cell cloning workflows.
The remaining recovered cells can subsequently be used for clonal isolation using one of the following approaches:
- Single-cell deposition into 96-well plates (approximately one cell per well),
- or low-density plating onto a 10 cm dish (typically approximately 100 cells per dish) to generate what we refer to as a limited dilution plate, from which spatially isolated colonies can later be manually picked and expanded.
Expected result
Healthy recovering hPSCs should progressively reform compact colonies with defined borders and minimal spontaneous differentiation. Excessive cell death, poor attachment, widespread differentiation, or absence of reporter-positive cells may indicate suboptimal nucleofection conditions, excessive viral input, poor cell quality prior to editing, or inefficient sgRNA/donor design.
6d
Validate HDR in the edited pool using In-Out PCR
Before proceeding to single-cell cloning and expansion, it is strongly recommended to first confirm successful HDR-mediated targeting within the edited bulk population using In-Out PCR strategies.
In-Out PCR is designed such that:
- one primer anneals within a sequence unique to the HDR donor construct and absent from the endogenous genome (for example, within a reporter cassette, linker, or synthetic donor sequence),
- while the second primer anneals outside the homology arm within the endogenous genomic region.
This design ensures that amplification only occurs following correct HDR-mediated integration at the target locus. Importantly, episomal donor DNA, random integrations, or residual rAAV sequences should not generate the expected PCR product when primers are properly designed.
Typically, both a 5′ In-Out PCR, and a 3′ In-Out PCR should be designed and validated independently to confirm correct integration across both HDR junctions.
Critical: Validation of HDR using the "pool gDNA" from step 4.1 prior to single-cell cloning is an essential quality-control step. Proceeding directly to clonal isolation without evidence of detectable HDR in the pool can result in extensive downstream screening of negative clones.
Optimization of In-Out PCR conditions can be challenging because true positive control DNA is often unavailable at this stage. However, even relatively low HDR efficiencies within the edited pool (for example approximately 0.1–1%) are typically sufficient to generate a detectable PCR product under optimized conditions.
For this reason, it is highly recommended to:
- test multiple PCR conditions,
- optimize annealing temperatures,
- evaluate different primer combinations,
- and compare multiple edited pools generated using different rAAV titers or editing conditions.
Most importantly, edited pools should always be compared against DNA from untreated parental hPSCs processed in parallel. Only PCR bands that are reproducibly detected in edited pools and completely absent from parental control DNA should be considered candidate HDR-specific products.
Once putative HDR-specific bands are identified, gel-purify and confirm them by Sanger sequencing. Sequencing traces should clearly demonstrate precise HDR-mediated junction formation between the endogenous genomic DNA and donor construct sequence, including correct insertion boundaries and expected edited sequence architecture.
2h
Screen and identify correctly targeted single-cell clones
Once at least one 5′ or 3′ In-Out PCR produces a robust and reproducible HDR-specific band in the edited bulk population, proceed with single-cell cloning and downstream screening of individual hPSC clones.
Single clones isolated either from single-cell deposition plates or limited dilution plates should first be screened using the same 5′ and 3′ In-Out PCR strategies validated in the edited pool. Clones positive for both junction PCRs represent candidate correctly targeted HDR events.
Following identification of candidate HDR-positive clones, perform a zygosity PCR to distinguish:
- heterozygous HDR clones,
- homozygous HDR clones,
- and clones containing indels or complex alleles.
The zygosity PCR is designed using primers located entirely within the endogenous genomic locus outside the HDR donor-specific sequences. As a result, this PCR amplifies:
- the unmodified wild-type allele,
- or alleles containing small indels generated by non-homologous end joining (NHEJ), but typically does not efficiently amplify the HDR-targeted allele because of the larger insertion size.
- In correctly targeted heterozygous clones, the zygosity PCR therefore usually produces:
- a wild-type-sized band,
- or a slightly shifted band corresponding to a small indel on the untargeted allele.
In contrast, homozygous HDR clones may show complete absence of the endogenous wild-type band.
Critical: Interpretation of zygosity PCR results should always be confirmed by Sanger sequencing of the amplified endogenous allele. In many apparently heterozygous HDR clones, the second allele contains small insertions or deletions generated during CRISPR-Cas9 editing. Sequencing of the zygosity PCR product is therefore essential to determine whether the untargeted allele remains truly wild type or instead contains frameshift or in-frame indels.
In addition to junction PCR validation, Sanger sequencing should also be performed across both HDR junctions and inserted sequences to confirm:
- precise donor integration,
- preservation of the expected coding frame,
- correct junction architecture,
- and absence of unintended mutations introduced during genome editing or donor construction.
3h
Advanced validation and quality control of edited clones
3d
Gene editing in hPSCs has been performed for over 20 years, beginning with the pioneering demonstration of HDR-mediated gene targeting by Zwaka and Thomson in 2003. Subsequent advances, including rAAV-mediated gene targeting (Mitsui et al., 2009; Khan et al., 2010) and, more recently, programmable nucleases such as ZFNs, TALENs, CRISPR-Cas9, base editors, and prime editors, have greatly improved editing efficiency and precision.
Citation
LINK
Citation
LINK
Citation
LINK
Despite these advances, comprehensive validation of edited clones remains essential. Even when initial genotyping confirms the desired modification, additional quality control measures are recommended before establishing a clone as a final edited line, particularly for disease modeling, drug discovery, or clinical applications.
Random integration of the donor construct should be considered, although the overall risk is relatively low because rAAV donors are delivered as predominantly single-stranded DNA molecules and typically require homology-directed repair for stable integration. Nevertheless, random or partial integrations can occasionally occur and may be assessed using methods such as ddPCR, Southern blotting, or other copy-number-based approaches when rigorous genomic characterization is required.
More importantly, correctly targeted clones should be evaluated for potential tandem donor integrations at the target locus. Tandem integration events can occur when multiple donor copies integrate sequentially during HDR and may not always be detected by standard junction PCR approaches.
Tandem insertions can often be identified using:
- extended internal PCR strategies spanning the inserted cassette,
- long-range PCR,
- or quantitative copy-number approaches such as ddPCR.
Finally, in clones initially classified as homozygous HDR edits, allelic dropout must be rigorously excluded before definitive annotation as homozygous. Allelic dropout can lead to false conclusions regarding zygosity. As discussed by Simkin et al. allelic dropout can be addressed using several complementary approaches, including:
- identification of heterozygous SNPs within the PCR amplicon,
- allele copy-number assays such as quantitative genotyping PCR,
- high-density SNP array analysis,
- or, when feasible, whole-genome sequencing.
Citation
LINK
Careful validation of edited hPSC clones is particularly important prior to downstream differentiation studies, disease modeling applications, or the generation of reference isogenic cell lines.
Citations
Step 5
Simkin D, Papakis V, Bustos BI, Ambrosi CM, Ryan SJ, Baru V, Williams LA, Dempsey GT, McManus OB, Landers JE, Lubbe SJ, George AL Jr, Kiskinis E. Homozygous might be hemizygous: CRISPR/Cas9 editing in iPSCs results in detrimental on-target defects that escape standard quality controls.
https://doi.org/10.1016/j.stemcr.2022.02.008Step 5
Mitsui K, Suzuki K, Aizawa E, Kawase E, Suemori H, Nakatsuji N, Mitani K. Gene targeting in human pluripotent stem cells with adeno-associated virus vectors.
https://doi.org/10.1016/j.bbrc.2009.08.075Step 5
Khan IF, Hirata RK, Wang PR, Li Y, Kho J, Nelson A, Huo Y, Zavaljevski M, Ware C, Russell DW. Engineering of human pluripotent stem cells by AAV-mediated gene targeting.
https://doi.org/10.1038/mt.2010.55