May 28, 2025
Creating a chromosomal knockout in ADP1 via overlap PCR
- Christopher Goodall1,
- Bradley Biggs1
- 1University of Michigan


Protocol Citation: Christopher Goodall, Bradley Biggs 2025. Creating a chromosomal knockout in ADP1 via overlap PCR. protocols.io https://dx.doi.org/10.17504/protocols.io.6qpvr2d52lmk/v1
License: This is an open access protocol distributed under the terms of the Creative Commons Attribution License, which permits unrestricted use, distribution, and reproduction in any medium, provided the original author and source are credited
Protocol status: Working
We use this protocol and it's working
Created: April 30, 2025
Last Modified: May 28, 2025
Protocol Integer ID: 195758
Keywords: ADP1, oPCR, knockout, chromosomal integration, gene editing, PCR, chromosomal knockout in adp1, adp1 genome, gene in the adp1 genome, overlap pcr technique, adp1, pcr this protocol, designing genetic part, chromosomal knockout, genetic part, pcr, gene, overlap
Abstract
This protocol will outline the steps needed to knock out a gene in the ADP1 genome with overlap PCR techniques. This protocol will reference use of Benchling, the cloud based organization software for designing genetic parts.
Materials
Protocol Overview
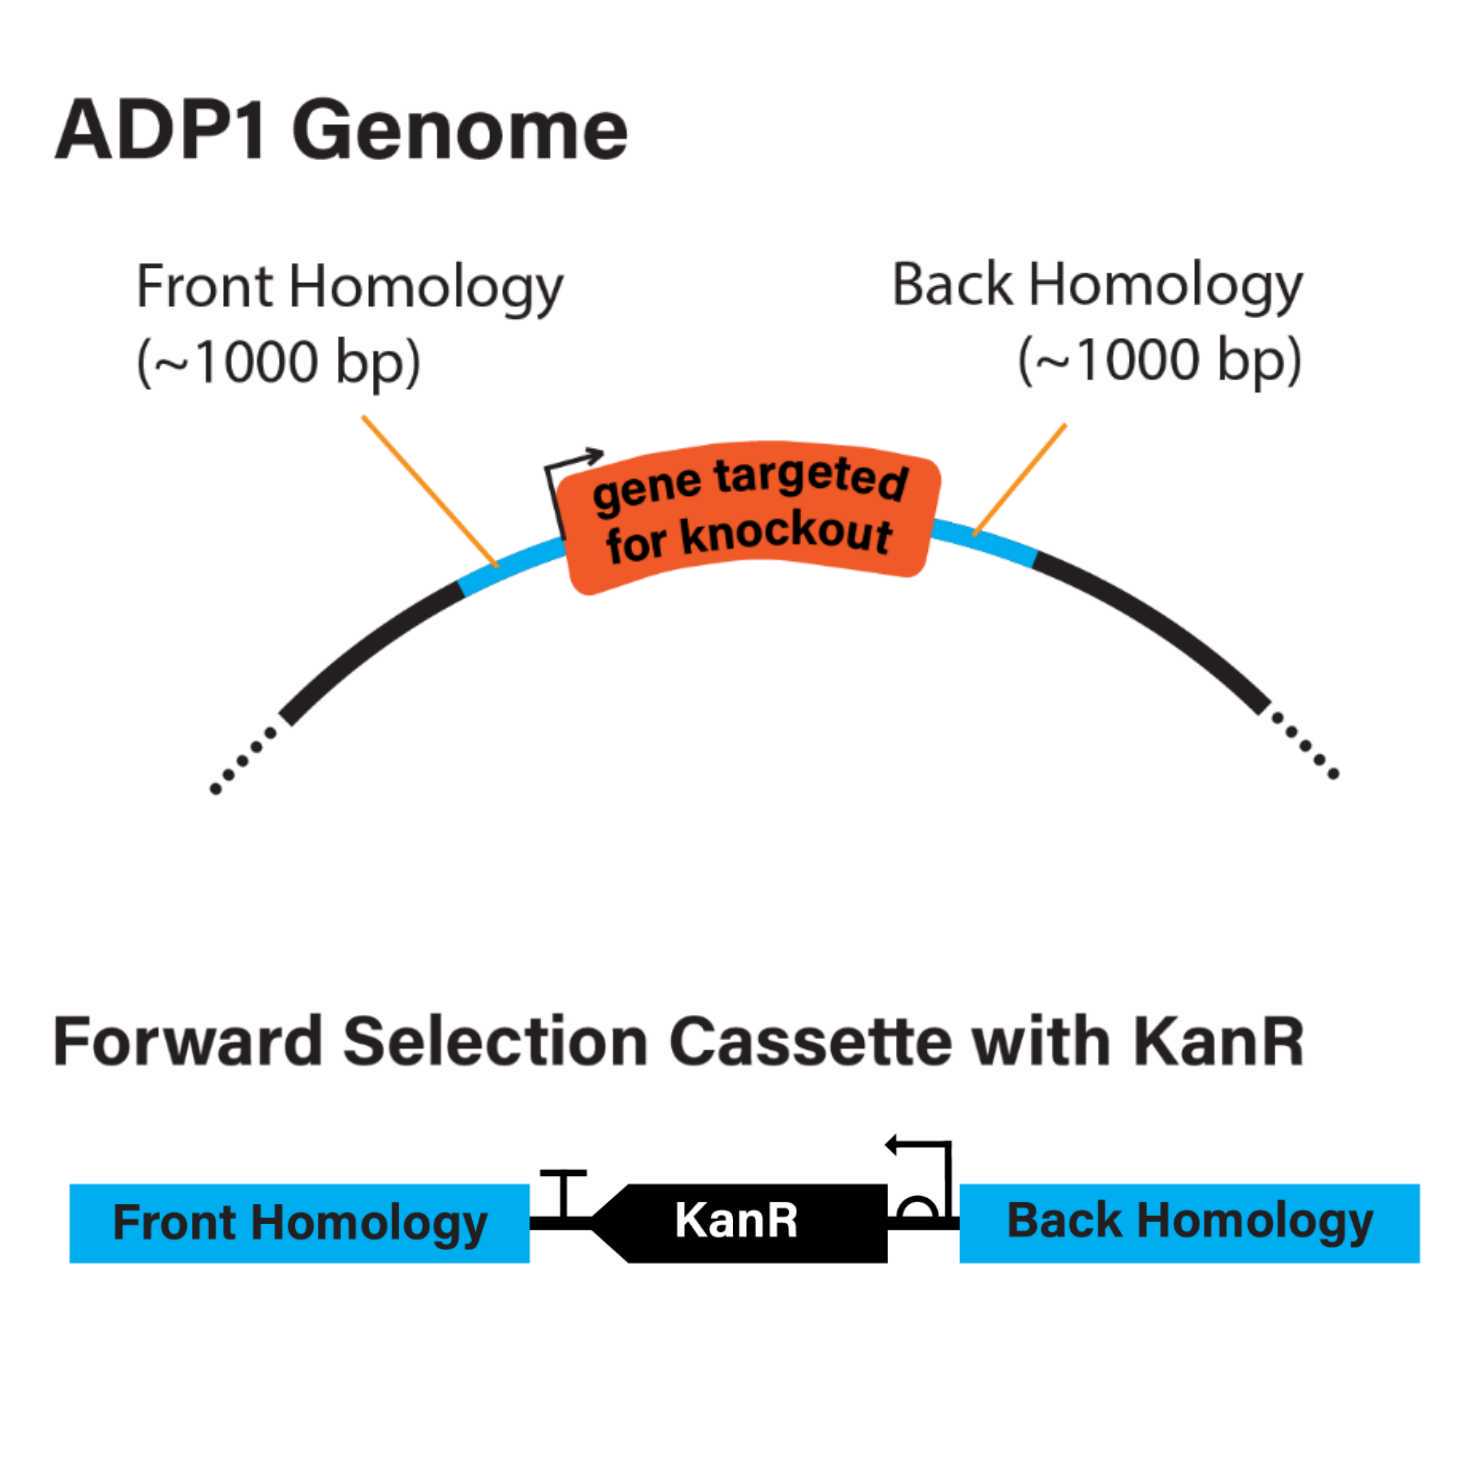
- This protocol aims to create a targeted chromosomal knockout in ADP1.
- To achieve this goal, we use a "forward selection cassette." The forward selection cassette contains an antibiotic resistance gene. The resistance gene is flanked by two 500-1000 bp spans of nucleotides. These flanking regions are homologous to the front and back chromosomal sequences flanking the gene targeted for knockout (Figure 1A, Figure 1B).
Note: the forward selection cassette can optionally contain an mCherry gene under lacI/lacO control. Including the mCherry gene allows one to assess translation strength at the knockout site (Figure 1C).
Assemble the selection cassette in silico
Overview
- This method was built from protocols reported in the work of Biggs et al., Nucleic Acids Research, 2020, 48(9) 5169.
- This section focuses on the in silico preparation of the forward selection cassette using a cloning software. Here we utilize Benchling.
- All genetic parts for the forward selection cassette can be sourced from the pBWB162 expression plasmid (https://www.addgene.org/140634/).
Figure 1: Overview of forward selection cassette design. A. ADP1 genome highlighting the gene targeted for knockout and the front and back genomic homology regions flanking the targeted gene. B. Schematic for assembly of KanR forward selection cassette. C. Schematic for assembly of KanR forward selection cassette with additional mCherry gene.
Create an in silico map of the gene targeted for knockout
- Import the ADP1 genome into Benchling.
- Find the gene targeted for knockout in the ADP1 genome. Highlight 1000 bp of homology before and after the gene.
- Copy and paste the highlighted gene + front and back homology into a new Benchling file. (Create DNA / RNA sequence > create > paste [front homology-gene-back homology]).
Create an in silico map of the forward selection cassette(s)
- Create a new Benchling file (Create DNA / RNA sequence > create)
- Copy the front homology and paste it into the new file.
If including just kanamycin
- Copy from ~5-15 nucleotides before the start of the lambda T0 terminator to ~5-10 nucleotides after the the KanR promoter. We recommend copying from the sequence "gcctagtgcttggattctcac" through "caattcactgttccttgcattctaaaac".
- Paste this region in the new file following the front homology.
- Paste the back homology following the forward selection cassette.
If including kanamycin + lacI-mCherry
- Copy from ~5-10 nucleotides before the start of the lambda T0 terminator to ~5-10 nucleotides after the end of the rrnb T1 terminator. We recommend copying from the sequence "gcctagtgcttggattctcac" through "cgtttcagcatcaagaacctttg".
- Paste this region after the front homology.
- Paste the back homology following the forward selection cassette.
Design primers to amplify the forward selection cassette
Overview
- This section outlines methods to design an overlap PCR (oPCR).
- The forward selection cassette is synthesized from three independent complementary PCR regions with homologous overhangs: 1. the front homology, 2. the selection gene, and 3. the back homology.
- You will design six primers to generate the these three parts.
- oPCR primer design uses Gibson assembly like rules to create overhangs (20-40 bp of homology)
Quick rules of thumb for designing effective primers
- Aim for 55° melting temperature (we use the Benchling calculation).
- Have the primer start and end with a C or G.
- Aim for 20-30 nucleotides in length.
- Aim for total GC content ~40-60%.
- Avoid regions with repeated strings of any single nucleotide (i.e. five adenines in a row).
Design primers
1. Forward primer for front homology.
- Pick out a region ~500-600 bp upstream of the junction between the front homology and the forward selection cassette. See note.
- Pick a span of nucleotides in this region which meets the criteria for primer design listed above. Highlight that region and create the primer (Create > primer > forward > *name primer something useful* > save primer).
Note: Designing primers to amplify a longer region of front homology (say 800-1200 bp) will increase downstream integration efficiency; however, larger pieces of DNA put more strain on the oPCR method.
2. Reverse primer for front homology
- This primer will also have a ~20-30 bp overhang complementary with the start of the forward selection cassette.
- Focusing first on the binding part of the primer, highlight 20-30 nucleotides in the front homology in accordance with the above guidelines for primer design. The highlighted region should end at the junction between the front homology and the forward selection cassette (see Figure 3A). Create an annotation marking this region. [create > annotation > *name annotation* > save].
- Focusing on the primer's overhang, highlight 20-30 nucleotides from the start of the forward selection cassette to a point which meets the above primer design criteria. Create another annotation marking this region (Figure 3B).
- Create the reverse primer: Highlight both the marked binding and overhang regions, [create > primer > reverse > *name primer something useful* > save primer] (Figure 3C).
Figure 3: Diagram for designing junction-spanning primers in Benchling. A. Box highlighting binding region for forward homology reverse primer. B. Box highlighting overhang for forward homology reverse primer. C. Box highlighting complete forward homology reverse primer. D. Complementary forward primer for forward expression cassette.
3. Forward primer for selection cassette
- Highlight the two annotations created for the reverse primer.
- Create a forward primer (create > primer > forward > *name primer something useful* > save primer) (Figure 3D).
4. Reverse primer for selection cassette
- Primer design for the second junction mirrors that of the first. Follow the same guidelines outlined above for the previous junction primers.
5. Forward primer for back homology
- Follow the same guidelines outlined for the previous junction primers.
6. Reverse primer for back homology
- Pick out a region ~500-600 bp downstream from junction between the downstream genomic flanking region and the selection cassette.
- Pick a span of nucleotides in this region which meets the primer design criteria.
- Highlight that region. [Create > primer > reverse > *name primer something useful* > save primer].
Order primers from your preferred vender.
PCR amplification of parts for oPCR
Overview
- Our lab utilizes Takara Bio's PrimeSTAR‱ Max DNA Polymerase (2x master mix) for oPCRs.
- We have found that "colony water" works better than purified ADP1 genome as a PCR template. We provide a method to make colony water below.
- For the selection cassette, we use the pBWB162 plasmid as a template ( https://www.addgene.org/140634/).
(Optional) make colony water
- You will need an LB agar plate with individual ADP1 colonies growing on it.
- Make colony water: add 30 μL of nuclease free water to a PCR tube.
- Using a pipette tip attached to the pipetter, pick a single ADP1 colony from the LB agar plate.
- Transfer the colony to the tube with nuclease free water. Pipette up and down to mix.
Note. The colony water should appear slightly hazy but not opaque.
Run PCRs for overlap PCR parts
- Setup 50 μL PCRs according to your preferred manufacturer's protocol. If using colony water, in place of the specified ng DNA, include 1 μL of colony water/reaction.
- Amplify PCRs. For PrimeSTAR Max, we use a 10 second extension time per 1 kb product size and amplify for 31 cycles.
- While the reactions are cycling, pour a 1% agarose + 1x TAE gel.
- After PCRs complete, add loading dye to each sample and load the entire reaction mix onto the gel. Run the gel until proper separation has been achieved. While the gel is running, label a single 1.5 mL tube for each PCR. These tubes will be used in the next step for gel extractions.
- Cut the DNA bands from the agarose gel and transfer to the complementary labelled tubes. Use a razor or scalpel and clean the tool between each cut.
- Purify DNA bands using a DNA extraction kit. We have found that higher DNA concentrations improve success of downstream steps. If you think the extracted band was faint, consider eluting from the gel extraction column with 20 μL nuclease free water instead of 35 μL (standard elution volume). Letting the column stand for 5 minutes after adding nuclease free water also helps improve elution efficiency.
- Check DNA concentrations following extraction.
Prepare overnight ADP1 culture for transformation tomorrow
- Tomorrow, you can run an oPCR and transform the PCR product into ADP1. Prepare an overnight culture today.
- If this is your first genomic knockout, we will be using WT ADP1.
- Add 5 mL LB to a 14 mL bacterial tube.
- Scrape from a glycerol stock or pick a colony from an LB + agar plate and mix into the LB broth.
- Grow at 30° overnight.
Running overlap PCR to generate forward selection cassette
Overview
- oPCR uses homology between three PCR products to create a single continuous PCR product.
- The oPCR protocol proceeds through two stages/PCRs: 1. Stage one combines the three PCR products (front homology, forward selection cassette, back homology) and uses the homology regions as primers. This initial PCR runs for 14 cycles. 2. Stage two introduces the front homology forward primer and back homology reverse primer. Addition of these primers encourages formation of the final oPCR product.
Setting up and running oPCR
- This work assumes that your front and back homology PCR product concentrations are at least 20 ng/μL. If you have a lower concentration than this, use at least 20 ng of homology PCR product. It is ok if the sample DNA concentrations are higher than 20 ng/μL.
- We have found that combining near equimolar concentrations of front homology, forward selection cassette, and back homology PCR parts encourages product formation.
- To have sufficient DNA for downstream transformations, it can be beneficial to setup two or three 50 μL oPCR reactions.
- In PCR tubes, prepare a 50 μL PCRs. In place of manufacturer's specified DNA concentration, add near equimolar concentrations of the front homology, the forward selection cassette, and back homology PCR products (see intro). Add polymerase/nucleotides/salts. Add water, BUT leave room in the final volume for the later addition of primers during the second stage of oPCR. i.e. if we have a target 50 μL reaction and we plan to add 0.3 μL of each primer in the second stage oPCR, we would add water to our PCRs to a 49.4 μL final volume.
- Amplify PCRs for 14 cycles under standard PCR conditions. Make sure to adjust specified reaction volume based on the dead-space left in the tube for later addition of primers. For PrimeSTAR Max, We have found that a 10 second extension time per 1 kb product size helps oPCR efficiency.
- Retrieve the PCR tubes after 14 cycles and add the front homology forward and back homology reverse primers.
- Return the PCR tubes to the thermocycler. Amplify for 19 additional cycles with the same cycling conditions used during the initial oPCR.
- While PCRs are cycling, pour a 1% agarose + 1x TAE gel.
- Once the reactions complete, add loading dye to each sample and load the entire reaction mix directly onto the gel. Run the gel until proper separation has been achieved.
- While the gel is running, label a 1.5 mL tube for each oPCR. These tubes will be used in the next step for gel extractions.
- Cut the DNA bands from the agarose gel and transfer to the complementary labelled tubes. Use a razor or scalpel and clean the tool between each cut.
- Purify DNA bands using a DNA extraction kit. We have found that higher DNA concentrations improve success of downstream steps. If you think the extracted band was faint, consider eluting from the gel extraction column with 20 μL nuclease free water instead of 35 μL (standard elution volume). Letting the column stand for 5 minutes after adding nuclease free water helps improve elution efficiency.
- Check DNA concentration following extraction.
Transforming ADP1 with forward selection cassette
Overview
- ADP1 is naturally competent and has native homologous recombination machinery making it quite easy to transform with DNA. Because our oPCR product has two 500+ bp regions of homology, mixing PCR product with ADP1 should enable the subsequent chromosomal integration during the transformation.
Transforming ADP1
- In a 14 mL bacterial tube, combine 1 mL LB, 70 μL ADP1 overnight culture, and 150+ ng oPCR product.
- Incubate for at least 3 hours or up to overnight at 30 °C.
Plating transformations
- Three hours to the the following day later, plate 40 μL and 120 μL of transformation on LB agar + kanamycin plates. Spread the bacteria throughly. We use glass beads but inoculating loops will also work. Return the remaining transformation culture to the 30° incubator in case it is needed later. We recommend plating at two different concentrations to control for both high and low efficiency transformations.
- Incubate at 30 °C overnight overnight.
Troubleshooting
- If you see very limited or zero growth the following day, plate up to 600 μL of the remaining transformation mix onto an LB + kanamycin plate. Incubate overnight.
- You can also try re-transforming with more than 150 ng oPCR product.
Patching, running colony PCRs, and making glycerol stocks
Overview
- Chromosomal integration oftentimes require multiple rounds of selection to create a stable population.
- "Patching" refers to the process of making a small patch-like streak of a single colony on a secondary selection plate. As mentioned above, this secondary selection helps create a stable population.
Picking colonies, patching
- Check the transformations for growth.
- Label sixteen (or less if you have fewer colonies) PCR tubes, numbering them 1-16.
- Add 30 μL nuclease free water to each of the sixteen PCR tubes.
- Pick a single colony with the end of a pipette attached to a pipetter. Dip the tip into the first PCR tube. pipette up and down to mix. Do not eject the tip.
- Take that same tip used to pick a colony and create a short streak on an LB agar + kanamycin plate. Mark the streak with the associated PCR tube number (see Figure 4)
- Repeat the process of making colony water and patching with the remaining PCR tubes.
- Incubate the patched plate overnight at 30° C.
Figure 4: Example of a patched plate.
Running colony PCRs from patch plate
- We run colony PCRs (cPCRs) to determine if chromosomal integration occurred. Because these PCR products will not be used for downstream applications, we can run smaller scale PCRs (10 μL; 9.5 μL PCR master mix, 0.5 μL colony water).
- The following day, check for growth on the patch plate.
- Label two sets of sixteen PCR tubes (or less if you patched fewer colonies) and number both sets 1-16. The first set should be further labelled as colony water. The second set should be further labelled as cPCRs.
- Add 30 μL nuclease free water to the colony water labelled PCR tubes.
- Using a pipette tip attached to a pipetter, lightly tap the edge of the first colony patch growth. Dip the tip into the first colony water PCR tube and pipette to mix. Discard the tip.
- Repeat the process of making colony water for the remaining patched colonies.
- Create a PCR master mix.
- Add 9.5 μL PCR master mix to each of the cPCR labelled tubes.
- Transfer 0.5 μL colony water to each of the corresponding cPCR labelled tubes. We use a multichannel pipette to expedite this process.
- Amplify the cPCR reactions under standard PCR thermocycling conditions.
- While cPCR reactions are amplifying, pour a 1% agarose + TAE gel.
- Once the samples finish amplifying, add loading dye to each sample and load the entire cPCR mix onto the gel. Run the gel until sufficient separation is achieved. You should see a single bright band at the expected molecular weight.
Making glycerol stocks
- Assuming one of your colonies was a hit, you can make an overnight culture in LB from the second patch plate.
- Add 5 mL LB to a 14 mL bacterial tube.
- Tap a pipette tip into the patch associated with a cPCR positive colony and transfer to the LB containing tube. Mix.
- Incubate the tube at 30° overnight.
- The following day, label a cryovial with strain information and add 0.5 mL 50% sterile glycerol to the vial.
- Add 0.5 mL overnight culture to the vial, pipette to mix with the glycerol, and store at -80 °C.
Congrats! You have created a chromosomal knockout in ADP1.
Protocol references
Biggs et al., Nucleic Acids Research, 2020, 48(9) 5169.
Acknowledgements
Thanks to Sebastian Montero and Hadley Griffin for providing feedback on the protocol.