Jun 06, 2025
Contextual Data Collection Form Development & Extraction Protocol (Scoping Review)
- Rhiannon Cameron1,
- Tian Rabbani1,
- Miguel Dario Prieto1,
- Marcus Yee2,
- Jun Duan1,
- Charlotte Barclay1,
- Kijin Kim2,
- Chao Chun Liu2,
- Anoosha Sehar1,
- Aishwarya Sridhar1,
- Arien Fucoy1,
- Emma Griffiths1,
- William Hsiao3
- 1Center for Infectious Disease Genomics and One Health, Simon Fraser University Faculty of Health Sciences, Burnaby, British Columbia, Canada;
- 2Center for Infectious Disease Genomics and One Health, Simon Fraser University Department of Molecular Biology and Biochemistry, Burnaby, British Columbia, Canada;
- 3Center for Infectious Disease Genomics and One Health, Simon Fraser University Faculty of Health Sciences & Department of Molecular Biology and Biochemistry, Burnaby, British Columbia, Canada
- Rhiannon Cameron: Conception, Design, Templates, Validation, Troubleshooting, User Feedback, Acquisition of Data;
- Tian Rabbani: Conception, Design, Troubleshooting, User Feedback, Acquisition of Data;
- Miguel Dario Prieto: Troubleshooting, User Feedback, Acquisition of Data
- Marcus Yee: Troubleshooting, User Feedback, Acquisition of Data
- Jun Duan: Python code, File Organization, Troubleshooting, User Feedback, Acquisition of Data
- Charlotte Barclay: Troubleshooting, User Feedback, Acquisition of Data
- Kijin Kim: Troubleshooting, User Feedback, Acquisition of Data
- Chao Chun Liu: Troubleshooting, User Feedback, Acquisition of Data
- Anoosha Sehar: Troubleshooting, User Feedback, Acquisition of Data
- Aishwarya Sridhar: Troubleshooting, User Feedback, Acquisition of Data
- Arien Fucoy: Acquisition of Data
- Emma Griffiths: Practice Contextual Data (Metadata) Extraction Scenario
- William Hsiao: Conception, Design


External link: https://github.com/tianrabbani/ScopingReview
Protocol Citation: Rhiannon Cameron, Tian Rabbani, Miguel Dario Prieto, Marcus Yee, Jun Duan, Charlotte Barclay, Kijin Kim, Chao Chun Liu, Anoosha Sehar, Aishwarya Sridhar, Arien Fucoy, Emma Griffiths, William Hsiao 2025. Contextual Data Collection Form Development & Extraction Protocol (Scoping Review). protocols.io https://dx.doi.org/10.17504/protocols.io.eq2lywrzevx9/v1
Manuscript citation:
Rabbani, T., Cameron, R., Prieto, M.D., Yee, M., Duan, J., Barclay, C., et al. (TBD) Metadata usage in infectious disease genomic epidemiology applied to outbreak investigation and surveillance settings: a scoping review. <Manuscript undergoing submission, 2025>
License: This is an open access protocol distributed under the terms of the Creative Commons Attribution License, which permits unrestricted use, distribution, and reproduction in any medium, provided the original author and source are credited
Protocol status: Working
We use this protocol and it's working
Created: September 17, 2024
Last Modified: June 06, 2025
Protocol Integer ID: 107723
Keywords: metadata, qualitative, data extraction, data collection form, public health, contextual data, contextual metadata, extraction of contextual metadata, contextual metadata field, presence of contextual metadata, frequency counts of contextual metadata field, metadata, contextual data collection form development, research setting, qualitative protocol, scoping review, correlation with research setting, extraction protocol, multiple data extractor, narrative review, data, manuscript, manual review, derived data, study, different study setting, objective, dynamic data collection form
Funders Acknowledgements:
Canadian Institutes of Health Research Canadian Graduate Scholarship for Doctoral Students
Grant ID: 187519
Interoperable and Distributed Data Ecosystem for Agrifood Systems (IDDEAS)
Grant ID: 322DCC
Developing international best practices for Wastewater Surveillance
Grant ID: Investment ID INV-064277, ORS Proposal: 29633
"Building the Canadian Public Health Genomics Contextual Data Harmonization and Sharing Ecosystem"
Grant ID: 2223-HQ-000265
Vocabulary, Thesaurus and Ontology Development for USDA FoodData Central
Grant ID: 58-8040-8-014-F
Abstract
This is a qualitative protocol that helps users develop dynamic data collection form templates for the extraction of contextual metadata by multiple data extractors. Manuscripts and other resources undergo manual review to assess the presence of contextual metadata, that accompanies sequence-derived data, by grouping them in flat or hierarchical fields and observing their correlation with research settings/objectives. The results can enable the user to explore the frequency counts of contextual metadata fields for different study settings/objectives, while also setting the user up for the option of a narrative review of in-text quotes that argue in favour of or against the use/collection of specific types of contextual metadata.
Image Attribution
Guidelines
Timings are not listed on this protocol since steps are not time-sensitive and will be dependent on the individual executing this workflow as well as the time it takes to iteratively work through certain steps with collaborators. Please note this process may take weeks or months depending on the number of studies you are extracting from and the amount of specification fields you chose to identify values for.
Materials
- Google Sheets
Safety warnings
There are many data items during data collection that could be easily inferred from other values. For example, when provided the sample “collection device” as “nasopharyngeal swab”, one could infer the “collection site host” was the “nasopharynx”. We recommend deciding before data extraction begins the degree of inferences that are permitted during data extraction.
You may want to avoid allowing inferences so that you firstly, know which data fields were addressed directly/explicitly by the authors so you can evaluate which data elements were known to be present for addressing different research questions/objectives. Secondly, avoid inadvertent data transformation. For example, a paper states that a sample was collected in “Nashville”, so one may infer that the state at which sample collection occurred was “Tennessee” without realizing there is actually another “Nashville” located in “Indiana”. Or perhaps a data extractor searches the location of a hospital in a foreign country and believes they have identified the best regional location information, but this country doesn't have English as a first language and more accurate location descriptions may not have been accessible to the curator who is not literate in the native language. Or when given the common name “mink” a data extractor accidentally infers the scientific name for the American mink (Neovison vison) rather than the European Mink (Mustela lutreola). Experienced curators have practice at avoiding these mistakes, but new data extractors don’t have extensive curation training so it may be worth eliminating ambiguity and variability during data collection by avoiding inferences whenever possible.
Before start
This protocol assumes you have already undergone the process of "Quality Appraisal", where careful assessment has been undergone to ensure the documents being used for extraction meet all the necessary criteria for the study. E.g. PRISMA guidelines for a scoping review.
Read over the protocol to make sure this is the right fit for you needs. Consider the "Analysis" section and whether the resulting outputs will be appropriate for your research objectives; will you perform the same analyses or wish to use the outputs in a different way? If you want to use them in another way, does the collection method actually give you data capable of exploring those questions?
EXAMPLE: For your analysis you decide you want to see what kinds of sequencers were listed in the "Metadata Table" results; exploring their presence across studies and how they changed over time. However, the data collection protocol was just looking for "TRUE" values, where the identification of one sequencer is all that was needed to be positive. This means that the data extractors didn't necessarily keep looking for all sequencers mentioned within the study because they could stop after one instance, since as far as they are concerned that is sufficient and efficient. If you want all values and not just the first one, you need to make that clear in the protocol before data extraction begins (or go back and redo the data extraction) and adjust your analysis plan accordingly, otherwise your "sequencer" results will not be comprehensive nor useful.
Consider your objectives and review the "Analysis" section to see if the outputs presented here are an appropriate fit. If not, consider if the protocol can be modified to support your objectives. This protocol was for a scoping review, but we recommend you review qualitative data extraction review practices before proceeding, such as this LibGuides Systematic Review Data Extraction Methodology: https://ifis.libguides.com/systematic_reviews/data-extraction
Data extraction forms preparation
You should start by drafting a list of variables of interest with your team. We recommend separating out overarching variables regarding a study (e.g. open-source, study type, etc.) from the contextual metadata value identification. The "Overview Table" needs to include the characteristics and key information we want to capture while the "Metadata Table" will focus on the contextual metadata "fields" or "values" of interest for your work. If you are not intending on extracting contextual metadata you can ignore the actions regarding it. Discuss which variables are of interest with the team and contextual metadata advisors (if available), and then draft the data collection format based on how they could be used in downstream analysis.
Open up a new worksheet (i.e. collection of spreadsheets) and make the following tabs:
- README
- Overview Table
- Overview Legend
- Metadata Table
- Metadata Legend
If there will be more than one data extractor we recommend using "Google Sheets" or another online collaborative spreadsheet tool so that there can be a "Main/Master/Reference" version of the template that all other instances of individual worksheets can import from. This ensures that (A) when there are changes to any of the worksheets (e.g. clarification in a definition or a variable change) it will be easier to propagate all changes across all active worksheets, and (B) data extractors don't accidently change their reference materials such that they are no longer aligned in their understanding of terms/protocols during data extraction.
Dynamic worksheets. "Main/Master/Reference" versions of the template are imported to individual sheet.
Do not worry about formatting at this point, you are still in the drafting stage. The "Table" tabs will eventually turn into the data extraction forms, while the "Legend" tabs will be where extraction variables are described. The "README" will be information for the data extractor about the data extraction worksheet and how to use it; this should be the opening tab for the worksheet.
Add versioning information to all tabs.
Put the version somewhere you can easily see when the page is first loaded. A basic approach to versioning is "version x.y" where "x" are changes to the overall structure of the template (e.g., the addition or removal of variable columns/rows) and "y" changes are minor (e.g. changes to a definition or an example that were already present).
You can also get more sophisticated by adding additional versioning levels, e.g. "x.y.z.+" where you assign specific types of changes to each increment - usually keeping the largest scale changes at "x" level. This will be easier to do once you are out of the draft stage and have an initial template that you can conceptualize applying the versioning to.
Since we are still in the drafting stage (x = 0), you can keep things simple and begin with "0.1", in the future applying all changes as increments in the "y" spot until you release your pilot version at "1.0".
Note
IMPORTANT: Our approach was to have the individual tabs have their own versions because the component parts end up separated out in the future and sometimes changes in one don't affect all the others. However, another possibility would be to version the entire template, e.g. where "x" are considered major changes, "y" are considered template changes", and "z" are considered legend and/or readme changes. Do what is intuitive to you and that you know you can execute consistently.
Note
HIGHLIGHT/ANNOUNCE VERSION CHANGES: It can be helpful to make version changes obvious, perhaps even tracking them in a separate "version tracking" tab (or perhaps in the "README") to help you and data collectors review what has changed between releases.
Draft the "README"
We recommend that a "horizontal layout" (variables in rows) is used for this spreadsheet to ensure that the text layout is more suitable for a normal "top to bottom" reading experience. Remember you are still in the drafting stage so your descriptions can be simple to start, they will become more comprehensive with relevant information as you go along. To help you get started you can pull from the "EXAMPLE" below.
Include at minimum:
- Data Extractor Name - Full name of the data extractor.
- Date Range of Extraction - For the start and end date of extraction; you can indicate the format with placeholder text.
- General Instructions - General instructions for how users should use the data extraction form.
- Resource Location - How and where users can access the resources they will be extracting from.
- Overview Table - Description of the table and useful user information.
- Metadata Table - Description of the table and useful user information.
Optional recommendations:
- Formatting/Customization - Information on the limitations of personal customization of the table.
- Special Table Variable(s) - Variables whose protocol require a different approach from the majority.
- Additional Contact Information - Contact information for the data extractor and/or project lead(s).
- Troubleshooting - Troubleshooting information for situations that are predictable or experienced during extraction.
-------------------------------------------------------------------------------------------------------------
EXAMPLE
-------------------------------------------------------------------------------------------------------------
| A | B | C | |
| Data Extractor Name: | <First Name> <Last Name> | version 0.1 | |
| Date Range of Extraction: | <YYYY-MM-DD> to <YYYY-MM-DD> | ||
| General: | This is your personal worksheet for the scoping review full-text metadata extraction. All headers are imported from a master reference sheet that will be updated as necessary to ensure everyone has the most up-to-date and comprehensive information available. It is recommended you familiarize yourself with and frequently reference the "Legend" tabs, as they are your guide to filling in the tables. All data extraction tables have a aforementioned “Legend” that describes headers, and provides value examples/descriptions of what those fields are for. Tables are designed so that they import reference information from a reference sheet; when the reference sheet is updated the changes appear on individual data collection sheets. This keeps data collectors in sync when it comes to the table “Legends”, headers, etc. These imported cells are protected so that only the project lead (<First & Last Name>) or the data extract worksheet manager (<First & Last Name>) can edit them to avoid users from accidentally breaking a formula. For data extraction examples, we recommend you review the information provided on your personal scoping review full-text metadata extraction pilot worksheet. All data extraction is to be performed manually as described in the protocol. | ||
| Manuscript Location: | You will find the link to the manuscript you've been assigned under the "Nextcloud (Data Storage Location)" column. Make sure you double check that the title/date in the file matches the information in the overview table. If the file is missing, corrupted, or doesn't appear to be a manuscript, login to Covidence and search for your article using the "Covidence #" with the "#" sign in front. | ||
| Overview Table: | The "Overview Table" is a summary table that provides data extractors with relevant manuscript information and overarching variables of interest the scoping review team and metadata advisors have advised the capture of. Your copy of the table will only contain the manuscripts you have been assigned for data extraction. | ||
| Metadata Table: | The "Metadata Table" is where more granular metadata evidence is captured to indicate the presence or absence of a metadata type/field. “Metadata Type (Field Name)”s are deemed “TRUE” if a required subfield was identified, or in the case where an example subfield value was found, indicated as TRUE by the inclusion of the quoted “value” which supports the conclusion. Otherwise, indicate "FALSE" to confirm you tried but could not find evidence of a data item. | ||
| Formatting/Customization & Troubleshooting: | To make the data extraction worksheet more comfortable for yourself, you are welcome to customize the formatting of cells provided you are customizing the entire cell and not just a selection of text. This is because trying to format a smaller range of text will break the import function and result in a "REF#" error. If you receive this error you can resolve it by undoing the formatting you have applied. You should also not rearrange and columns or rows so as to ensure appropriate data alignment when your tables are merged into the masters. |
Example "README" worksheet tab.
Resource manager data extraction
Extract/export metadata on the data sources from whatever resource manager you are using.
Keep a copy of files for provenance and backup. We encourage you to include RAW and processed data as part of a data package to publish with your final work.
GitHub is a great tool for backing up and sharing your data (you can always keep the repository private until you are ready to go public). That being said do de-identify the data before release or uploading to GitHub. Even if you overwrite an upload, GitHub will keep the information in its commit history and people may use that to find identifying information. It is easier to upload de-identified data to begin with even if in the end you decide to switch to including identifying information.
Resource Manager Data Extraction: COVIDENCE
Login to COVIDENCE.
- Go to the "Summary Page" of your review.
- Select the "Export" tool.
- Under "Type" select "Data Extraction".
- Under "Data" select "Inclusion".
- Under "Format" select "Single sheet (CSV)".
- Select "Prepare file".
- Your file will be ready when the "Download" button appears.
- Select "Download" and save your file.
Note
Keep a copy of this RAW file for provenance and backup, although you may want to proceed with Step 4.2 before doing so.
De-identify COVIDENCE Export (OPTIONAL)
Open a spreadsheet application and use "Find and Replace" to find the reviewer names. It may also be worth searching for first names on their own and nicknames in case they were referenced by another reviewer within a comment; be careful to check these cases individually so you don't accidently overwrite authors with the same name listed for the manuscripts that were reviewed.
You can make a key and assign author numbers that you can reference later in case you need to reverse this in the future and no longer have the version that hasn't been de-identified.
De-identification using "Replace"/"Find and Replace" in Microsoft Excel.
Clean-up COVIDENCE # (OPTIONAL)
We recommend removing the "#" from the "Covidence #" data now, as otherwise it can get in the way of data processing since it makes the cell behave as a non-number.
Removal of the "#" number sign using "Find and replace" in Google Sheets. The "Search" space has been narrowed to the "Specific range" of the relevant column contents.
Draft the "Overview Legend" tab
Resource Manager Data Import
- Go to Sheets and open a blank spreadsheet.
- Go to "File" in the ribbon and select "Import".
- Navigate to your file and upload it.
This can be uploaded to your current worksheet or a new one. We will be using some of the variables (i.e. columns) to jumpstart the "Overview" tabs.
Getting Started
The "Legend" tables are a useful place to initially plan your extraction tables because this will ultimately be your reference guide for your variables. You can capture discussion notes and integrate all relevant information as needed. We recommend that a "horizontal layout" is used for this spreadsheet to ensure that the text layout is more suitable for a normal reading experience.
Give your table the headings:
- Header/Field - A column for the name of the headers/fields that will appear for the columns of the data extraction "Overview Table".
- Description - A description of the "Header/Field".
- Values - The values data collectors can input (e.g., TRUE or FALSE, free-text, etc.), including missing data values ("Not Applicable", "Not Collected", etc. see "Note" for more information).
- Value Description - A description of the input values for data collectors to help them understand and choose the appropriate input for their situation.
- Data Type - The data type of input values (e.g., string, char, int, float, enum, etc. - see the "Note" below for more information). This is important for planning your downstream data use but can be removed from the finished version if deemed redundant or confusing for data collectors.
-------------------------------------------------------------------------------------------------------------
EXAMPLE
-------------------------------------------------------------------------------------------------------------
| A | B | C | D | E | F | |
| Header | Description | Data Type | Values | Value Description | Version 0.1 | |
Initial headers for the "Overview Legend" table.
Note
More information on "Missing Value Reporting Terms": https://www.insdc.org/technical-specifications/missing-value-reporting/
Now it is time to start listing the columns/headers we want to eventually see in the "Overview Table". We recommend including, at minimum, the following headers/fields (or whatever can be similarly found) from your extracted reference list:
- Study/Covidence # - A unique code assigned to the manuscript. If your references export does not have a code like this you can number them once the studies are listed in your "Overview Table" (e.g. using Sheet's "autofill to complete a series" function).
- Study - A shorthand label for the manuscript that includes the first author's last name and publication year (e.g. "Baier 2022").
- Title - The title of the manuscript.
- Authors - The manuscript author list.
- DOI - A persistent digital object identifier (DOI) that can direct you to the journal publication.
Additional recommended fields:
- Data Storage Location - A URL directly to the manuscript or to a folder containing the manuscript. We used a cloud service (e.g. Nextcloud) to organize the manuscripts into folders labelled with assigned Study #. Steps on how to prepare these are under "Preparing files for contextual metadata extraction".
Optional:
- Assignee - The assigned data extractor when working in a group.
- Variables of Interest - a header to help separate the layout of your variables of interest from other data elements.
-------------------------------------------------------------------------------------------------------------
EXAMPLE
-------------------------------------------------------------------------------------------------------------
| A | B | C | D | E | F | |
| Header | Description | Values | Value Description | Data Type | Version 0.1 | |
| Assignee | ||||||
| Study/Covidence # | ||||||
| Study | ||||||
| Title | ||||||
| Authors | ||||||
| DOI | ||||||
| Data Storage Location | ||||||
| Variables of Interest |
Version 0.1. The beginning of forming the "Overview Legend" table.
Add descriptions to these general "Headers/Fields". You can also add "Date Type" and "Values" if you please. We considered this optional for these initial header/fields since we weren't going to use them for downstream analysis and the data extractors would already have this information pre-filled by the collection form manager.
-------------------------------------------------------------------------------------------------------------
EXAMPLE
-------------------------------------------------------------------------------------------------------------
| A | B | C | D | E | E | |
| Header | Description | Values | Value Description | Data Type | Version 0.1 | |
| Assignee | The team member assigned to extra metadata from the associated article. | |||||
| Study/Covidence # | The Covidence document reference number (#). | |||||
| Study | Shorthand study label indicating <1st author> . | |||||
| Title | Manuscript/Document title. | |||||
| Authors | Manuscript/Document author list. | |||||
| DOI | DOI reference ID or PURL. | |||||
| Data Storage Location | URL link to the data storage folder on the Centre for Infectious Disease Genomics and One Health (CIDGOH) Nextcloud server. This is where manuscripts can be found/uploaded, and where to upload additional data such as supplementary files and sequence data (when applicable). | |||||
| Variables of Interest | Overarching variables we've chosen to extract for analysis. |
Version 0.1. Adding descriptions to the current selection of headers.
Developing your "Variables of Interest" (an iterative process). Brainstorm variables of interest (i.e., characteristics and key information) that you want to capture to explore your research question and objectives. The way you format your values will influence downstream data analysis and the structure of the collection forms to facilitate collection and analysis. This will be an iterative development process, only to be truly finalized after you have completed the controlled pilot data extraction.
-------------------------------------------------------------------------------------------------------------
EXAMPLE
-------------------------------------------------------------------------------------------------------------
| A | B | C | D | E | E | |
| Header | Description | Values | Value Description | Data Type | Version 0.1 | |
| [------removed for brevity------] | ||||||
| Variables of Interest | Overarching variables we've chosen to extract for analysis. | |||||
| Sequence Data Accessible | TRUE/FALSE | boolean | ||||
| Metadata Table Accessible | - Are we thinking supplementary tables or in-text too? | TRUE/FALSE | boolean | |||
| Open Access | TRUE/FALSE | boolean | ||||
| Organism | List the name(s) of the infectious pathogens under study. | string | ||||
| Organism Type | Virus, Bacteria | enum (use dropdown list) | ||||
Version 0.1. First attempt at drafting metadata variables
Note
CHECK: Are people allowed to put multiple values upon data entry or just one (e.g. for non TRUE/FALSE cases)?
Note
CHECK: Are any of these perhaps more appropriate for the "Metadata" tables? If so, move or copy into the "Metadata Legend" for consideration.
Meet with collaborators and data extractors. Meet with your team and metadata advisors to continue brainstorming variables of interest that support your research question, objectives, and facilitate downstream analysis. Capture instructions that are useful for data extractors to know because there should be specific guidance for how a variable is to be collected.
Also decide what separator you will be using and include it in the header of any fields where more than one value is allowed. We recommend you be consistent by using one separator across all data entry; the "|" (pipe) is our top choice as it avoids the issues of using the "," (comma) and extracting to CSV, and is unlikely to appear in "in-text quotes" if you are capturing that kind of data.
-------------------------------------------------------------------------------------------------------------
EXAMPLE
-------------------------------------------------------------------------------------------------------------
| A | B | C | D | E | E | |
| Header | Description | Values | Value Description | Data Type | Version 0.2 | |
| [------removed for brevity------] | ||||||
| Variables of Interest | Overarching variables we've chosen to extract for analysis. | |||||
| Sequence Data Accessible | We want this to help us evaluate sequence data sharing and accessibility. Need to double check it is actually shared and not just claimed to be shared. | Database Name, Not Applicable | string | |||
| Sequence Data Recorded | Discusses saving sequence information on the lab server in space dedicated for this purpose. Store in a folder labelled with the covidence number (requested by lab supervisor). | boolean? | ||||
| Metadata Table Accessible | - Are we thinking supplementary tables or in-text too? | TRUE/FALSE | boolean | |||
| Open Access | If the document was was available via open access (i.e. not behind a paywall). IF not indicated on the journal/document provided, this can be checked by (a) checking the DOI link in incognito mode on your browser, and (b) searching the university library catalogue to see if the journal is listed as OPEN (and where)... | TRUE/FALSE | boolean | |||
| Organism Type | Capture this so we can see what the overview of organisms types are. | Virus, Bacteria, Fungi, Protozoa | enum | |||
| Organism | - Supervisor noted this would be of value to the lab for people interested in doing a similar but more pathogen specific version of this scoping review / contextual metadata collection. - Don't need to list at the variant level, probably not even the subspecies level. NCBITaxon could be used for rounding up to more general classes. | List the name(s) of the infectious pathogens under study. | string | |||
Version 0.2. Second attempt at drafting variables in discussion with other team/lab members. Discussion notes are interwoven with definitions (when present) in the descriptions column.
Note
CHECK: Are people allowed to put multiple values upon data entry or just one (e.g. for non TRUE/FALSE cases)?
Note
CHECK: Are any of these perhaps more appropriate for the "Metadata" tables? If so, move or copy into the "Metadata Legend" for consideration.
Fill in the details and separate values out onto individual lines, clearly defining each one. Clean-up the description and move value specific information to the appropriate "Value Description". When pulling descriptions/definitions from other sources be sure to reference them (e.g. include a URL to your source). If you are allowing more than one data value in a field be sure to include the separator information in the description and in the table header when you make the "Overview Table".
-------------------------------------------------------------------------------------------------------------
EXAMPLE
-------------------------------------------------------------------------------------------------------------
| A | B | C | D | E | E | |
| Header | Description | Values | Value Description | Data Type | Version 0.5 | |
| [------removed for brevity------] | ||||||
| Variables of Interest | Overarching variables we've chosen to extract for analysis. | |||||
| Type | If the document type is surveillance, outbreak investigation, or both. Do you best to pick a primary study type of either "surveillance" or "outbreak investigation" (e.g. a surveillance study that references historical outbreaks would be "surveillance" but not "outbreak investigation", and vice versa for an "outbreak investigation" that happens to reference "surveillance" data"). Only use "Both" in cases of extreme certainty or uncertainty. Note: Please refer to the "Glossary" for more study type descriptions and other agreed upon terminology. | Surveillance | We are working with the understanding that surveillance is the ongoing systematic collection, analysis, and interpretation of health data that are essential to the planning, implementation, and evaluation of public health practice. This means a surveillance study can be deduced based on if isolates/data are collected over a span of time (such as with contact tracing); otherwise err on the side of not surveillance if you’re not 100% sure whether the study is conducting surveillance (i.e. if the study is using surveillance isolates but not conducting actual surveillance, etc.). If a study describes itself as surveillance then we defer to the study. (source: https://www.sciencedirect.com/science/article/abs/pii/B9780127640518500421) | enum | ||
| Outbreak Investigation | A study is an outbreak investigation if the authors describe investigating an outbreak. Note that a cluster of cases is not necessarily and outbreak. Generally, the aim of outbreak epidemiology is to study an epidemic in order to gain control over it and to prevent further spread of the disease. Generally outbreak means a 'sudden occurrence,' while in the epidemiological sense an outbreak is defined as a sudden increase in the disease frequency, related to time, place, and observed population. (source: https://www.ncbi.nlm.nih.gov/pmc/articles/PMC7187955/) | enum | ||||
| Both | A surveillance context in which activities are specifically triggered by the detection of [a disease] outbreak. (source: http://purl.obolibrary.org/obo/HSO_0000371) | enum | ||||
| Sequence Data Accessible (Database Name) | If the sequence data is publically available and accessible through information provided by the article, indicate which database it is located at. | [Database Name] | The name of the database where the sequence data was located. Note: Captured as a string but can be converted (>) to a "TRUE" boolean for analysis. | string > boolean | ||
| FALSE | Database information could not be identified. | boolean | ||||
| Sequence Data Saved (TRUE/FALSE) | Please save sequence information on the lab server space dedicated for this purpose. Store in a folder labelled with the manuscript/document Covidence number. ONLY SAVE THE DATA if stored in a non-mainstream repository. Mainstream repositories are deemed more likely to be accessible for future research and thus not necessary to retrieve data from. You may note down the and/or or leave it to researchers to identify this information from the manuscript. | TRUE | Sequence data or information about it has been stored on the CIDGOH server. | boolean | ||
| FALSE | Sequence data or information about it has not been stored on the CIDGOH server. | boolean | ||||
| Open Access (TRUE/FALSE) | If the document was available via open access (i.e. not behind a paywall). If not indicated on the journal/document provided, this can be checked by (a) checking the DOI link in incognito mode on your browser, and (b) searching the institutional Library catalogue to see if the journal is listed as OPEN (and where). It is best to perform both checks as just because the DOI link provided by Covidence isn't open, doesn't mean it isn't openly accessible at another journal. | TRUE | An open access version of the manuscript/document was identified. | boolean | ||
| FALSE | An open access version of the manuscript/document was not identified. | boolean | ||||
| Organism Type (Virus| Bacteria| Fungi| Protozoa) | Infection pathogens that undergo whole genome or near complete genome sequencing. Not including worms or prions. Some studies include more than one type, in which case indicate all applicable organisms, separated by a "|" (vertical bar/pipe). | Virus | An infectious agent which consists of two parts, genetic material and a protein coat. These organisms lack independent metabolism, and they must infect the cells of other types of organisms to reproduce. Most viruses are capable of passing through fine filters that retain bacteria, and are not visible through a light microscope. (source: http://purl.obolibrary.org/obo/NCIT_C14283) | enum | ||
| Bacteria | Unicellular, prokaryotic organisms that reproduce by cell division and usually have cell walls; can be shaped like spheres, rods or spirals and can be found in virtually any environment. (source: http://purl.obolibrary.org/obo/NCIT_C14187) | enum | ||||
| Fungi | A kingdom of eukaryotic, heterotrophic organisms that live as saprobes or parasites, including mushrooms, yeasts, smuts, molds, etc. They reproduce either sexually or asexually, and have life cycles that range from simple to complex. Filamentous fungi refer to those that grow as multicellular colonies (mushrooms and molds). (source: http://purl.obolibrary.org/obo/NCIT_C14209) | enum | ||||
| Protozoa | Unicellular heterotrophic eukaryote in the kingdom protista. (source: http://purl.obolibrary.org/obo/NCIT_C77916) | enum | ||||
| Organism (separator = |) | List the name(s) of the infectious pathogens studied. Indicate all applicable organisms, separated by a "|" (vertical bar/pipe). Note: You do not need to list at the variant level. | [Organism Name] | Latin scientific name for the organism of study. | string | ||
| Metadata Accessible | If a metadata table is available or not. | |||||
| In-Text (TRUE/FALSE) | Metadata available from the main body text of the manuscript/document. This value does not indicate the presence of a metadata table, but is still a variable of interest. | TRUE | Metadata available within text. | boolean | ||
| FALSE | Metadata not available within text. | boolean | ||||
| Manuscript Embedded Table (Summary Table/Line List/FALSE, separator = |) | Metadata available as an embedded table within the manuscript/document. The presence of both can be indicated be listing them using the "|" separator (vertical bar/pipe). | Summary Table | Metadata available within embedded table as a aggregated data (e.g. listing out counts/date for a specific demographic and associated symptoms). Note: Captured as a string but can be converted (>) to a "TRUE" boolean for analysis. | string > boolean | ||
| Line List | Metadata available within embedded table as a individual data points (i.e. individual subjects and their metadata values). Note: Captured as a string but can be converted (>) to a "TRUE" boolean for analysis. | string > boolean | ||||
| FALSE | Metadata not available within embedded table. | boolean | ||||
| [---see manuscript dataset for more examples---] | ||||||
Version 0.5. A preview of what the "Overview Legend" may look like after multiple iterations.
Draft the "Overview Table" tab
Create the "Overview Table" collection template in the "Overview Table" tab.
- The headers should be the same as those listed in the "Overview Legend", but flipped so that they are in a "vertical table" format (i.e., variables along the top row). This can be easily done by copying the "Header/Field" column from the "Overview Legend" and then pasting transposed in the "Overview Table".
- Be sure to include your separator value in the applicable headers, you can also include the input values.
- For enumerated (enum) lists you can make a picklist/dropdown menu (Note: this was not done for "Organism Type" in the example below because this field allowed for the input of one or more items; the Sheets dropdown is only single select so use a pipe "|" to create a separated list).
- Don't forget your version information.
- OPTIONAL: "Freeze" the header rows as default so that they remain in view as users enter data.
-------------------------------------------------------------------------------------------------------------
EXAMPLE
-------------------------------------------------------------------------------------------------------------
Empty "Overview Table" formatted for data entry.
Add the data relevant data extracted from "Resource manager data extraction".
-------------------------------------------------------------------------------------------------------------
EXAMPLE
-------------------------------------------------------------------------------------------------------------
The "Overview table" with Covidence manuscript information.
Add your assignees (if applicable). Keep in mind that assignment is randomized and each data extractor has received the agreed upon number of extraction assignments. The "Overview" will eventually be subdivided/filtered so that data extractors only get their own list.
There are many ways you can do this. One approach is walked through as an example below.
-------------------------------------------------------------------------------------------------------------
EXAMPLE
-------------------------------------------------------------------------------------------------------------
Start a temporary sheet for generating your extractor list.
Click and drag "Extractor name" to the row count that matches the assignment count.
Repeat for the remaining data extractors. Make sure the counts add up as expected.
Combine into one column.
Select column and then "Data" > "Randomize range".
Randomized range results.
Copy & paste into the "Overview Table".
Select column and then "Data" > "Sort Sheet" > "Sort sheet by column A (A to Z)" to group the results by "Assignee". You may need to temporarily remove some rows to make the variable in the first row.
Results.
Note: You can always switch back to sorting by "Covidence #" by repeating the previous step on the "Covidence #" column.
Alternatively: Instead of sorting by "Assignee" you can experiment with using Sheets' "group by view" feature. However, there will not be additional guidance on using this approach as the feature was not present during the original protocol implementation.
Select column and then "Data" > "Create group by view" > "column A" to group the results by "Assignee".
Results.
Note
CHECK: Make sure there are no "unassigned" studies, or that there is at least a plan for them to be assigned later.
Add the relevant data extracted from "Preparing files for contextual metadata extraction". The "Preparing files for contextual metadata extraction" steps can be done in parallel to building these tables. You can add the "Data Storage Location" information at any point onward before full data extraction, although it may be helpful to at least have a subset ready for your data extraction pilot so the data extractors can practice what will most closely resemble the final methodology.
-------------------------------------------------------------------------------------------------------------
EXAMPLE
-------------------------------------------------------------------------------------------------------------
Note
CHECK: Make sure the "Covidence #" column and the "Data Storage Location" column are in the same order before merging.
Draft the "Metadata Legend" & "Metadata Table" tab
The "Metadata Table" will be for recording whether a contextual metadata field has been identified in a resource by the presence of data that could occupy it. We use the word "identify" because we are not collecting the data for use, but rather to indicate "TRUE" or "FALSE" for whether this data was collected by the researchers producing the resource. The goal is to eventually look at the correlation between the research performed and the contextual data fields they collected. Because this is a qualitative study, instead of simply putting "TRUE", the data value/quote that was used to justify "TRUE" is listed in its place. This way if there is eventually some debate about whether a study included a data field or not, we can understand where the data collector was coming from and even return to the original resource(s) to find the value/quote in context. A "Metadata Type (Field Name)” is labelled as TRUE by the inclusion of the quoted “value” which supports the conclusion.
Because some contextual metadata fields may be broader than others, "Subfields" may be worth collecting at a more granular level. In cases when such granular data isn't needed, "Example Subfields" may be included to help data extractors understand whether they have found a positive metadata value or not. If collecting data on narrower subfields, the overarching "Metadata Type (Field Name)” are deemed “TRUE” if a required subfield was identified, or in the case where data matching an example subfield value was found.
With this information in mind, we can begin drafting the "Metadata Legend" and "Metadata Table". You are going to want to begin by deciding what kinds of metadata you are interested in exploring. To help you define metadata fields consider the following one or more of the following resources:
- A contextual metadata expert or data specification developer
- Public Health Alliance for Genomic Epidemiology (PHA4GE) contextual data specifications (https://github.com/pha4ge)
- Centre for Infectious Disease and One Health (CIDGOH) contextual data specifications (https://github.com/cidgoh)
- Minimum information standards (e.g. MIxS: Minimum Information about any (X) Sequence; https://github.com/GenomicsStandardsConsortium/mixs)
- National Center for Biotechnology Information (NCBI) Biosample template and/or packages
- European Nucleotide Archive (ENA) data Standards
- DNA DataBank of Japan (DDBJ) data Standards
- GISAID metadata standards
- etc.
Another good place to look are the Open Biological and Biomedical Ontologies (OBO) Foundry ontologies which can be browsed on https://www.ebi.ac.uk/ols4/ or https://ontobee.org/.
Create the following headers in the "Metadata Legend" tab. There will be two "parts" to this legend, which you can have side by side or separated out into different tabs (leaving them separate or recombing them in the final stages). One table explains the "Metadata Table" "Headers/Fields", like we did for the "Overview Table", while the other expands on the "Metadata Type (Field Name)" specification information.
"Metadata Legend" Tab "Metadata Table - Headers":
- Metadata Type (Field Name) - Specific fields that are usually "required" when present in a specification.
- Description / Definition - Field or subfield definitions, pulled directly from specification vocabulary whenever possible with additional information added as needed.
- Values - Quote from the text the information used as evidence to conclude the presence of a metadata type.
Optional:
- Motivations - A positive or negative in-text motivation for the inclusion of a metadata type. A positive motivation could be along the lines of “<this metadata> allowed us to do this”, while a negative motivation could be “a limitation of that study was we couldn’t study this because we didn’t have <this metadata>”.
-------------------------------------------------------------------------------------------------------------
EXAMPLE
-------------------------------------------------------------------------------------------------------------
"Metadata Legend" Tab "Headers" Table:
| A | B | C | |
| Header | Description / Definition | version 0.1 | |
| Metadata Type (Field Name) | Metadata fields that are usually required when present in a CIDGOH specification. | ||
| Definition | Field or subfield definitions, some pulled directly from specification vocabulary while others are more broadly described categories. | ||
| Values | Quote from the text the information used as evidence to conclude the presence of a metadata type. | ||
| Motivation | A positive or negative motivation for the inclusion of a metadata type. A positive motivation would be along the lines of “this metadata allowed us to do this”, while a negative motivation could be “a limitation of that study was we couldn’t study this because we didn’t have that”. | � |
A simple version of the "Metadata Legend" "Headers" table where there is no hierarchy to the subfields.
"Metadata Table" Tab:
| A | B | C | D | |
| Metadata Type (Field Name) | Definition | # | # | |
| version 0.1 | Values | Motivation | ||
The initial layout of the "Metadata Table" tab. Do not include the "Motivation" column if not applicable. The "#"s are place holders for the assigned "Covidence #". The "Values" and "Motivations" appear in pairs for the same "Covidence #". The version # can be placed somewhere visible but out of the way.
Note
Another column that can be added to support the "Values" column is a "Location" column that indicates what resource the "Value" was pulled from (e.g. manuscript, supplement, accession lookup) to make it easier to track down the value as needed. It could also be used to do a more comprehensive analysis on the availability (e.g. in-text, in-figure, supplementary) of individual data fields, but it adds to the labour of data extractors so it is only recommended if you are working with a small number of fields or a small number of resources undergoing extraction.
"Metadata Legend" Tab "Metadata Type (Field Name)" Table:
- Metadata Type (Field Name) - Specific fields that are usually "required" when present in a CIDGOH specification.
- Description / Definition - Field or subfield definitions, pulled directly from specification vocabulary whenever possible.
- Example - One or more examples of contextual metadata that could be extracted to satisfy the field.
-------------------------------------------------------------------------------------------------------------
EXAMPLE
-------------------------------------------------------------------------------------------------------------
"Metadata Legend" Tab "Metadata Type (Field Name)" Table:
| A | B | C | D | |
| Metadata Type (Field Name) | Description / Definition | Example | version 0.1 | |
The initial layout of the "Metadata Type (Field Name)" table in the "Metadata Legend" tab. The addition of the "Description / Definition" and "Example" columns in this sheet are optional - they were added for this protocol because user testing found it helpful for many data extractors. Individual data collectors can easily "Freeze" the columns they would like to always maintain in view.
Empty "Metadata Legend" tab showing both the "Metadata Type (Field Name)" [LEFT] and "Metadata Legend - Headers" [RIGHT] in the same tab. This layout is useful to data extractors so they have a single point of reference for information on the "Metadata Table" tab, but it can be inconvenient while you are adding to the upper rows of the "Metadata Legend - Metadata Type (Field Name)".
"Metadata Legend" tab with "Metadata Type (Field Name)" data without "levels".
Managing "levels" of metadata fields. (OPTIONAL)
Some specifications may have levels of contextual metadata fields or you may conceive of groupings that you find of particular interest.
E.g. The CIDGOH specification fields "geo_loc name (city)" and "geo_loc latitude" are more granular than "geographical location (sample)" because they are both more specific versions of information that the latter encompasses.
For the purposes of this protocol, levels have been organized as follows:
- Category/Bin - A broad metadata category used to organize the collection template for ease of use of data extractors. They may be used as broad categories of analysis, but be sure to check other categories/bins for subfields that may also count towards this category (i.e., check for polyhierarchical relationships).
- Field - An "upper level" field, for which the presence of a "subfield" counts as a "TRUE" positive.
- Subfield (Required) - A "narrow"/"lower level" field that can count towards an "upper level" field and is deemed required for granular data collection.
- Subfield (Example) - A "narrow"/"lower level" field that can count towards an "upper level" field but is only present as an example to help data extractors identify a "TRUE" positive for the "upper level" (i.e., data is not being collected at a granular level for this field).
You could keep these broader field categories off of the data collection sheet and just organize and apply them to the groupings during data analysis. However, if you want to indicate the presence of a broader data field when an appropriate data value/quote is found that does not fit the criteria of your listed subfields, but does for the example subfields, you will want to proceed with this step.
If you are adding levels add the following to your "Metadata Legend" "Headers" Table and update the "Description/Definitions" to appropriately reflect the levels.
-------------------------------------------------------------------------------------------------------------
EXAMPLE
-------------------------------------------------------------------------------------------------------------
"Metadata Table" Tab:
| A | B | C | |
| Header | Description / Definition | version 0.1 | |
| Metadata Type (Field Name) | The broader metadata / contextual data field type / category. | ||
| Required Subfields | Specific subfields that are usually "required" when present in a CIDGOH specification. | ||
| Example Subfields | Subfields that would be organized under a specific type / category, but don't tend to be required (e.g. instead are recommended or additional options). | ||
| Definition | Field or subfield definitions, some pulled directly from specification vocabulary while others are more broadly described categories. | ||
| Values | Quote from the text the information used as evidence to conclude the presence of a metadata type. | ||
| Motivation | A positive or negative motivation for the inclusion of a metadata type. A positive motivation would be along the lines of “this metadata allowed us to do this”, while a negative motivation could be “a limitation of that study was we couldn’t study this because we didn’t have that”. |
"Metadata Legend" "Headers" table with additional field levels and examples of new and updated "Description / Definition" information (shown in bold).
"Metadata Legend" Tab "Headers" Table:
| A | B | C | D | E | F | |
| Metadata Type (Field Name) | Required Subfield | Definition | Example Subfield | # | # | |
| version 0.1 | Values | Motivation | ||||
Adding required and example subfield columns (shown in bold). How you organize the addition of these columns is up to you. We recommend keeping the two field columns on the left so that data collectors can freeze them and then leave out the reference columns they don't always want in view.
-------------------------------------------------------------------------------------------------------------
EXAMPLE
-------------------------------------------------------------------------------------------------------------
"Metadata Legend" tab with "Metadata Type (Field Name)" data without "levels".
"Metadata Legend" tab with "Metadata Type (Field Name)" data with the early addition of "levels" (yellow highlight).
"Metadata Legend" tab with a column to type the different "Metadata Type (Field Name)" data "levels" (yellow highlight). This is a useful format for downstream data manipulation but is not the best user experience for data extractors.
"Metadata Legend" tab with the temporary type column removed, and instead the field levels broken up across the upper level "Metadata Type (Field Name)" column (yellow highlight) and the lower level "Subfield". If you'd like, you can keep the "type" column in this template and not include it when importing the template to individual data collector sheets.
"Metadata Legend" tab with the field levels broken up across the upper level "Metadata Type (Field Name)" column (yellow highlight) and the lower level "Subfield". Required fields are indicated in bold.
"Metadata Table" formatting with "levels".
-------------------------------------------------------------------------------------------------------------
EXAMPLE
-------------------------------------------------------------------------------------------------------------
Metadata Type (Field Name):
- Category/Bin - No additional variable data.
- Field - Has example subfields and ideally a description.
Subfield:
- Subfield (Required) - bold
- Subfield (Example) - not in bold
"Metadata Table" tab that reflects the different levels created in the "Metadata Legend" tab.
CHECK: Do you need to break a field down into subfields? Are concepts being merged together?
Note
EXAMPLE: Is "Environmental Site" described in a way that allows for data entry that isn't a location? Or is the example provided by the original specification for an "Environmental Material"? Or perhaps the "Environment" field should be broken down into "Environmental Site" and "Environmental Material" levels for more granular analysis?
Review with your data extraction team and advisors.
Create the "Metadata Table" collection template in the "Metadata Table" tab.
- The headers should be the same as those listed in the "Metadata Legend"; depending on how many you have you can choose to switch the table orientation. If you have a lot of contextual metadata fields (the examples in this protocol do), it is best to keep a "horizontal" table format for data collectors. However, had there been fewer fields (e.g. <15) we would have gone with a "vertical" table layout.
- Don't forget your version information.
- "Freeze" the field columns as default so that they remain in view as users enter data. Users may end up wanting to change the freeze to include the descriptive columns as well - this will not cause an issue with permissions or imports.
- If you want you can add additional formatting.
Note
If you want to save yourself from having to update both the "Metadata Legend" and "Metadata Table" separately you can use the Sheets "=IMPORTRANGE()" function to copy the contents over from "Metadata Legend" into the "Metadata Table" tab, adding "=TRANSPOSE" if you want a different orientation. This may be the best way to go for a smaller and/or non-levelled set of metadata fields.
We did not do this because user testing decided on a different layout (see EXAMPLE below) for "Example Subfield" and reminder guidance was added (light grey italic text) to help data collectors implement the protocol. These changes had to be applied directly to cell values which would be an issue if using the "=IMPORTRANGE()" function because editing cell values causes the imported values to fail/vanish. More on this under the "Dynamic Spreadsheets" section.
-------------------------------------------------------------------------------------------------------------
EXAMPLE
-------------------------------------------------------------------------------------------------------------
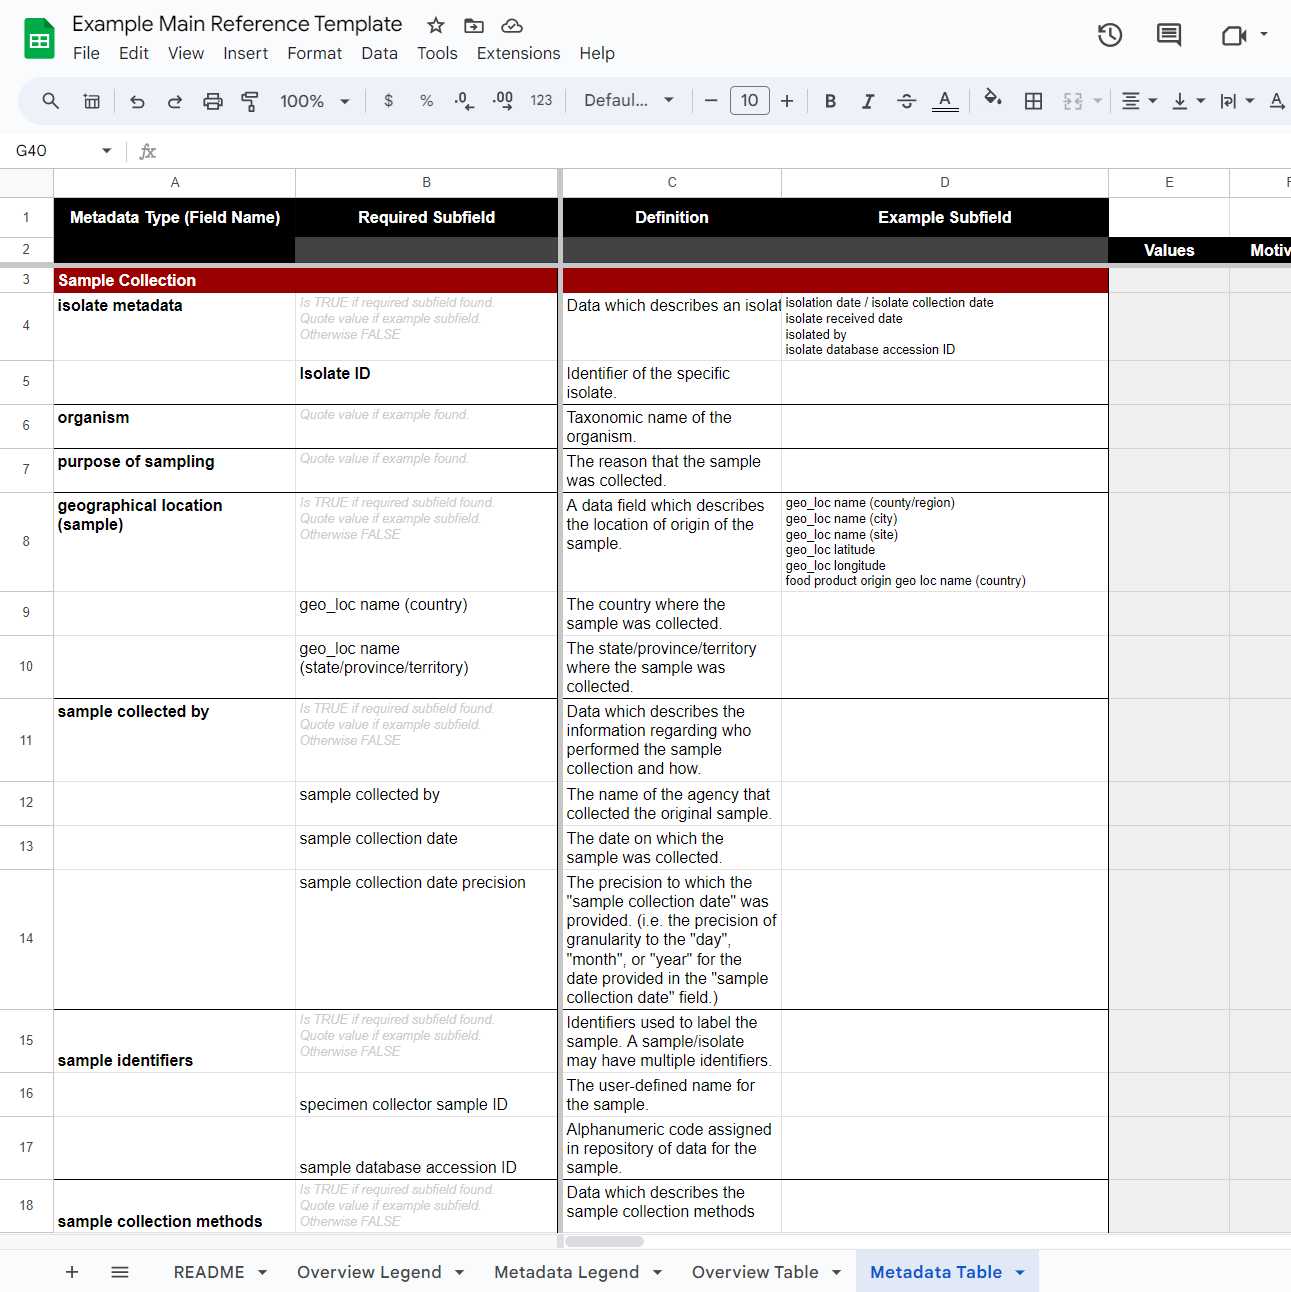
Example "Metadata Table" tab ready for assignment with user guidance added in light grey (these are optional and were added post-pilot data extraction based on user-experience feedback).
Note
FORMATTING RECOMMENDATION: Adding conditional formatting in data input areas can help the users identify "at a glance" values they missed checking and need to do a final review on to confirm presence or absence. We went with a dark "tone" (which works with colour blindness) when "Cell is empty" and "Text is exactly 'FALSE'" (optionally). If you apply this formatting at this stage you can then copy & paste to apply it to your templates.
Preparing files for contextual metadata extraction
We found a helpful step in preparation for contextual metadata extraction was to get copies of all the documents/resources we were intending to review downloaded and organized within a cloud service before extraction. This was especially useful for closed-access manuscripts on the rare occasion where one data extractor had credentials for access while another did not or was at least unsuccessful. You may need lab IT support to execute this step.
We recommend Nextcloud and the guidance that follows will be specific to working with that platform.
From our experience, the COVIDENCE API supports the bulk upload, but not bulk download, of manuscript PDFs. So a custom python script was written to download the manuscripts from the available DOIs and then upload them to our Nextcloud server (available below). If this is a barrier for you, you can continue to the next substep (16.1) for ideas on proceeding manually, or you can explore whether your existing (or other) reference manager has the capacity to download the majority of the PDFs for you.
import pandas as pd
import subprocess
import numpy as np
import os
# Read the data from the tab-separated file (adjust the file path as needed)
from urllib.parse import urljoin
credential = "username:password"
data = pd.read_csv("input2.txt", sep='\t')
# Iterate through the rows of the DataFrame
for index, row in data.iterrows():
doi = row["DOI"]
covidence_number = row["Covidence #"]
covidence_number_only = covidence_number.replace("#", "")
# Check if DOI is missing (NaN)
if pd.notna(covidence_number):
# Construct the scidownl command
command = f"scidownl download --doi {doi} --out ./pdf_results/{covidence_number_only}.pdf"
url = urljoin(base_url, covidence_number_only)
command1 = f"curl -X MKCOL {url} -u {credential}"
# Execute the command
try:
subprocess.run(command1, shell=True, check=True)
print(f"Create folder for: {doi} and Covidence #: {covidence_number} completed successfully.")
except subprocess.CalledProcessError as e:
print(f"Error for DOI: {doi} and Covidence #: {covidence_number}: {e}")
# Upload file
file_path = "pdf_results/"+covidence_number_only+".pdf" # Replace with the actual file path
print(file_path)
# Check if the file exists
if os.path.exists(file_path):
url1 = urljoin(base_url, covidence_number_only+"/")
print(url1)
url2 = urljoin(url1, covidence_number_only+".pdf")
print(f"The file '{file_path}' exists. Now trying to upload file")
command2 = f"curl -T {file_path} {url2} -u {credential}"
try:
subprocess.run(command2, shell=True, check=True)
print(f"Uploading fulltext in pdf format: {doi} and Covidence #: {covidence_number} completed successfully.")
except subprocess.CalledProcessError as e:
print(f"Uploading Error for DOI: {doi} and Covidence #: {covidence_number}: {e}")
else:
print(f"The file '{file_path}' does not exist")
else:
print(f"Skipping line {index + 1} because covidence number is missing (NaN).")
Once the script has successfully ran, data extractors need to review the contents of the folders for studies they were assigned; checking to resolve if files were missing, corrupted, or not the appropriate manuscript. Some may also want to use this time to download additional supplemental data and sample accession data (one random sample if available), rather than waiting to do this during extraction.
- Go to your assigned "Overview Table"
- Navigate to the "Date Storage Location" column for the study
- Select the URL
If a PDF is present:
4. Open the PDF and double check it matches the study information in the overview table
If there isn't a PDF present or the PDF is corrupted:
- Option 1) Using COVIDENCE:
All missing PDFs would've been uploaded to COVIDENCE during the abstract and full manuscript review.
4. Go into COVIDENCE
5. Search for the study COVIDENCE number (do not include "#")
6. Download the study PDF
7. Upload PDF to your data cloud
8. OPTIONAL: Proceed to "Option 2) Steps 4-6" for supplemental data
- Option 2) not using COVIDENCE / Obtaining supplementary data
4. Use the DOI and other study information from the "Overview Table" to locate the article
5. If you cannot access the article through your credentials, request assistance from a work peer or superior
6. OPTIONAL: Use this time to download and upload any supplemental and/or accession data you will be using for data extraction
Note
LIMITATION: It is resource exhaustive to extract metadata from more than one sample accession, or all of them, but by not doing so there could be cases where the sample selected has more or fewer fields than other samples. Due to resource exhaustion, we selected one sample accession at random to extract metadata from.
Generate Nextcloud URLs for the "Overview Table"
Fortunately, the way Nextcloud creates subfolder URLs makes it easy to generate "Data Storage Location" URLs since you only need to append "<folder name>" to the end of the link.
- Open a new spreadsheet and paste in the "Study/Covidence #" column (EXAMPLE COLUMN B).
- Make a new column for the "Nextcloud Parent Folder URL", it can be to the left or right of the previous column (EXAMPLE COLUMN A).
- Use the "=CONCATENATE()" function, or equivalent, to add the contents of the two columns together (EXAMPLE COLUMN C); ensure that the order is "Nextcloud Parent Folder URL" followed by "Study/Covidence #".
- The formula will convert to what you see in "EXAMPLE" "COLUMN D".
- Double check that the order of the "Study/Covidence #" values are the same in both your current worksheet and the destination "Overview Table".
- Copy the "Results" column contents.
- Paste as values in the "Data Storage Location" column of your "Overview Table" (if you do a regular paste, the formula will not retain the values you made).
-------------------------------------------------------------------------------------------------------------
EXAMPLE
-------------------------------------------------------------------------------------------------------------
| A | B | C | D | |
| Nextcloud Parent Folder URL | Study/Covidence # | Formula (remove "`") | Result | |
| https://cloud.ca/s/ABC?path=%2F | 1 | `=CONCATENATE(A2,B2) | https://cloud.ca/s/ABC?path=%2F1 | |
| https://cloud.ca/s/ABC?path=%2F | 2 | `=CONCATENATE(A3,B3) | https://cloud.ca/s/ABC?path=%2F2 | |
| https://cloud.ca/s/ABC?path=%2F | 3 | `=CONCATENATE(A4,B4) | https://cloud.ca/s/ABC?path=%2F3 | |
Generating "Data Storage Location" URLs using a spreadsheet application.
Dynamic Spreadsheets
Begin building your collection templates. Collection template tables are designed so that they import reference information from a main/master sheet; when the reference sheet is updated the changes appear on individual data collection sheets. This keeps data collectors in sync when it comes to the table legends, descriptions, examples, etc. These imported cells are protected so that only the project lead and/or the methods lead/manager can edit them to avoid users (i.e. data extractors) from accidentally breaking a formula.
Dynamic spreadsheets sending protected reference information from a "Main/Master/Reference" version to individual data extractor templates.
Note
BEFORE YOU BEGIN: If you are the only data collector you do not need to proceed with dynamic spreadsheets and can instead use your reference as the master.
Note
CONSIDER RECRUITING MORE DATA EXTRACTORS: One of the benefits of having a diverse group of data extractors is that it leads to engaging discussions on what qualifies for different types of data extraction and how to define the boundaries. Assumptions that may not have felt needed (e.g. obvious or overlooked) to be verbalized by experienced data extractors become drawn into the open and examined.
While in your "Main/Master/Reference" worksheet in Google Sheets go to "Data" in the upper ribbon and select "Protect sheets and ranges" from the dropdown.
Add a "Description" that clarifies what this protection is, select the "Sheet" option, and then "Set permissions".
Select "Restrict who can edit this range" and then "Only you" or "Custom" if adding an additional team member (it is recommended to always have a backup access option).
Bonus protection: Repeat setting permissions for your sheet but instead of "Restrict who can edit this range" select "Show a warning when editing this range" so that your main editors get a reminder that changing this range impacts other sheets.
Repeat the same steps for all tabs. By the end you should have protected the following tabs:
- README
- Overview Legend
- Overview Table
- Metadata Legend
- Metadata Table
Note
TIP: When you get to "Range editing permissions" after the first time through, instead of selecting "Custom" under "Restrict who can edit this range", you can select "Copy permissions from another range".
Now we are going to prepare a "blank template" worksheet with the imported reference material. This template can then be duplicated for data collector assignment during the pilot and full data extraction. This is a completely new worksheet, not a new tab sheet in the "Main/Master/Reference" worksheet.
We will be using the Sheets "=IMPORTRANGE()" function as follows:
=IMPORTRANGE("google sheets URL", "'Tab Name'!Range-from:Range-to")
To get your "google sheets URL" go to the main reference sheet URL and select everything that appears before "/edit?gid=...".
=IMPORTRANGE("https://docs.google.com/spreadsheets/d/1zjzqvzXA92DE-ofV27QFWZQ2Opjdfg7rk", "'Tab Name'!Range-from:Range-to")
Google Docs URL with the relevant portion highlighted for use within the =IMPORTRANGE() function.
Now reference the name of tab in "'Tab Name'" that you wish to import from, e.g. the "README" tab.
=IMPORTRANGE("https://docs.google.com/spreadsheets/d/1zjzqvzXA92DE-ofV27QFWZQ2Opjdfg7rk", "'README'!Range-from:Range-to")
Specify the range in "!Range-from:Range-to" that you want imported, e.g. "!A1:A" for all of column A, "!A1:B" for all of column A and B, "!A1:B14" for column A and B down to row 14, etc.
=IMPORTRANGE("https://docs.google.com/spreadsheets/d/1zjzqvzXA92DE-ofV27QFWZQ2Opjdfg7rk", "'README'!A1:B14")
Note
REMEMBER: Importing an entire column will slow down your worksheet. In many ways importing the entire column is more convenient to work with because when you add rows you don't have to go into the individual worksheets and add to the import range, but if you are noticing a slowdown or if you know it is unlikely you will be adding more rows, we recommend indicating a terminal row.
Since we are importing from another worksheet, not simply another tab within the same worksheet, you will need to "Allow access" to that sheet to ensure the data is pulled in.
The "Allow access" warning that shows when you hover over the "#REF!" error that results from using =IMPORTRANGE() to pull from a different worksheet.
Add cell protections by navigating to "Data" > select "Protect sheets and ranges" > select "Add a sheet or range" > select "Range" > indicate which cells you would like to permit and then proceed with the "Set permissions" described above.
If you want to keep it simple you can just protect the =IMPORTRANGE() cell to prevent people from breaking the formula, but the import range will also get a "#REF!" error if any of the cells it is importing data over is edited. So, by protecting the entire range you will be less likely to have confused users who accidently input a value in a cell.
-------------------------------------------------------------------------------------------------------------
EXAMPLE ERROR
-------------------------------------------------------------------------------------------------------------
Importing as expected.
Adding the text "test" to a cell within the range of the cells the =IMPORTFUNCTION() outputs over.
Getting a #REF! error because "test" text in A3 is overwriting the imported data.
Import "README" Template.
Note
In the future you may want to do the "Apply formatting" step before the "Import" step, but since it is optional and to avoid confusion it is being listed after this process.
=IMPORTRANGE() applied to column A. Import column A (applicable range).
EXAMPLE FUNCTION:
=IMPORTRANGE("https://docs.google.com/spreadsheets/d/1zjzqvzXA92DE-hbXiDscOb_ofV27QFWZQ2Opjdfg7rk", "'README'!A1:A14")
=IMPORTRANGE() applied to column A.
Import column B (applicable range); make sure you exclude the cells that you want your users to be able to input data into.
=IMPORTRANGE() applied to column B below the cells that users are expected to edit.
Cells highlighted to apply editing protections. Add placeholder text and editing protections.
Cells highlighted to apply editing protections. Column B1 & B2 (placeholder text cells) are not selected for editing protections because users need to be able to edit this information.
Apply formatting to the "README" tab.
README with custom formatted text/cells. Copy the formatted "Reference" version and paste it (with formatting) into a new tab.
README with custom formatted cells.
Delete all cell values (do not clear the formatting).
README with custom formatted cells with the text contents deleted.
Copy your "Import column A" formula and paste special "Formula only".
"Formula only" paste option within the right click menu.
Text will display with the formatting preserved within the cells.
Copy your "Import column B" formula and paste special "Formula only".
"Formula only" pasted contents.
Add your placeholder values and apply text wrap formatting (if applicable).
README tab with placeholder text and formatting.
Delete the non-formatted tab you took your formulas from.
Note
MOVING FORWARD you do not need to create a second tab to move your formula over with, this was just to help you avoid having any errors on your first attempt.
Import "OVERVIEW LEGEND" Template.
Apply formatting (Optional): Copy the formatted "Reference" version and paste it (with formatting) into a new tab and then delete all cell values (do not clear the formatting).
"Overview Legend" with formatted cells, cell contents deleted.
Import columns (applicable range, don't forget your version information).
EXAMPLE:
=IMPORTRANGE("https://docs.google.com/spreadsheets/d/1zjzqvzXA92DE-hbXiDscOb_ofV27QFWZQ2Opjdfg7rk", "'Overview Legend'!A1:E38")
"Overview Legend" with formatted cells, cell contents imported.
Protect non-editable import cells / ranges.
"Overview Legend" with formatted cells, cell contents imported and protected from editing.
Import "METADATA LEGEND" Template:
Apply formatting (Optional): Copy the formatted "Reference" version and paste it (with formatting) into a new tab and then delete all cell values (do not clear the formatting).
"Metadata Legend" with formatted cells, cell contents deleted.
Import columns (applicable range, don't forget your version info).
EXAMPLE:
=IMPORTRANGE("https://docs.google.com/spreadsheets/d/1zjzqvzXA92DE-hbXiDscOb_ofV27QFWZQ2Opjdfg7rk", "'Metadata Legend'!A1:H108")
"Metadata Legend" with formatted cells, cell contents imported.
Protect non-editable import cells / ranges.
"Metadata Legend" with formatted cells, cell contents imported and protected from editing.
Import "OVERVIEW TABLE" Template:
Apply formatting (Optional): Copy the formatted "Reference" version and paste it (with formatting) into a new tab and then delete all cell values (do not clear the formatting).
"Overview Table" with formatted cells, cell contents deleted.
Import columns and/or rows (applicable range, don't forget your version info).
EXAMPLE:
=IMPORTRANGE("https://docs.google.com/spreadsheets/d/1zjzqvzXA92DE-hbXiDscOb_ofV27QFWZQ2Opjdfg7rk", "'Overview Table'!A1:U3")
"Overview Table" with formatted cells, cell contents imported.
Protect non-editable import cells / ranges - in this tab it will be your header rows because you want users to input data below them.
"Overview Table" with header rows selected/highlighted to receive editing protections.
Create any data input functionalities you want and apply to the entire column.
EXAMPLE:
Adding custom dropdown menu for enumeration data entry.
The resulting dropdown menu.
Copying the dropdown menu, then using "CTRL/CMD+Shift+down" to select the remainder of the column before pasting.
Import "METADATA TABLE" Template:
Apply formatting (Optional): Copy the formatted "Reference" version and paste it (with formatting) into a new tab and then delete all cell values (do not clear the formatting).
"Metadata Table" with formatted cells, cell contents deleted.
Import columns and/or rows (applicable range, don't forget your version info).
EXAMPLE:
=IMPORTRANGE("https://docs.google.com/spreadsheets/d/1zjzqvzXA92DE-hbXiDscOb_ofV27QFWZQ2Opjdfg7rk", "'Metadata Table'!A1:D83")
"Metadata Table" with formatted cells, cell contents imported.
Add header row of the data input columns. You can do this manually or make the reference work so you can import them (this may result in your user seeing more columns than they need for data entry).
Adding "Value" and "Motivation" column labels.
Protect non-editable import cells / ranges - the "header columns" and optionally the data input header row.
"Overview Table" with header and support columns to receive editing protections.
Pilot Preparation
Decide on how many papers you want the pilot to cover and which papers. If possible, prepare at least five pilot papers for review - one that will be an example, two for the pilot, and two more for additional practice for everyone or at least those who struggled with the first pilot. Choose papers that get a mix of study types (e.g. one that focuses on a disease outbreak, one that focuses on surveillance, at least one with supplementary files, at least one with accession data, etc.).
Note
IMPORTANT: Select papers that are under your assignment so that (A) your version is the one in the final dataset and (B) other data extractors don't end up accidently repeating your work. If you would like to use a paper assigned to someone else just rebalance the assignments between you and that individual by giving them one of yours.
Prepare your files. We used Google Drive because this is compatible with the data collection from Google Sheets; you could also consider using Nextcloud. Here is a possible folder layout:
- Papers - The papers users will practice extracting data from.
- Example - Example results that users can reference as they do their data extraction.
- Data Collection - Copies of the data collection form assigned to the different collectors, each data collector should only have access to their own worksheet.
- Answers - Where the answers for the pilot will be, including the additional files that should have been identified and undergone extraction.
-------------------------------------------------------------------------------------------------------------
EXAMPLE
-------------------------------------------------------------------------------------------------------------
What the final pilot workspace may look like (with "Answer" subfolders collapsed).
Download your papers, rename them with their assigned "Study/Covidence #".
Download all the supplementary files you can find into "Answers". Be sure to check inside the papers for data availability statements and accessions - when you find any, navigate to a single sample accession and save it as a PDF file. If you are dealing with a small dataset you can choose to check every sample accession, but that can be repetitive and inefficient when there are hundreds or even thousands of samples.
Note
LIMITATION: It is possible that different samples have different contextual metadata available; this will be lost by the selection of only one random sample.
An example "Answers" folder with expanded subfolders.
Rename the supplementary files so that they all reference the associated "Study/Covidence #" and then upload them to "Study/Covidence #" folders within the "Answers" folder.
Make a copy of each paper from "Papers" in their respective "Answers" subfolder. These are the copies you will use as you prepare the answer key - highlighting text you decide to extract and adding comments as you so choose. This way if data extractors are confused by your answers (e.g. finding a "TRUE" where they had indicated "FALSE") they can look at the paper, find the highlighted text, and see the context of your extraction.
Start a protocol document of some sort. This can be a Google Doc, protocols.io, or in the reference README (so that it automatically updates the collection templates). You may find you want to adjust the guidance provided in this protocol to be specific to your setup as you go through generating the answers. If you aren't putting this directly in the README file, now is a good time to add a link to this resource in your reference README.
Create a copy of version 1 of your data collection template (not the reference) and put it in the "Answers" folder. We will reference this file as "Pilot_Data-Extraction_ANSWERS" moving forward. Do not make copies for participants yet.
Update the "Overview Table" in "Pilot_Data-Extraction_ANSWERS" so that only the papers relevant to the pilot are listed. Also remove the "Data Storage Location" information, these are going to be reserved for the final data extraction.
"Overview Table" show basic information for the example and pilot papers.
Make sure the "Papers" folder's "General access" is set so that "Anyone with the link" is a "Viewer" so that participants can access the files to view/download but not edit/delete.
Permissions settings for a Google Drive document.
Update the "Overview Table" in "Pilot_Data-Extraction_ANSWERS" with paper URLs under "Data Storage Location".
Getting the study URL.
Listing URLs under "Data Storage Location" in the "Overview Table".
Prepare the answers by going through the "Data Extraction (Pilot)" steps yourself for all of the pilot studies ("Example" and "Answers" papers, as well as any additional supporting materials). You want to leave the "Papers" folder documents untouched and without highlighted text because these are what participants download for their attempts.
Note
While the "Data Extraction (Pilot)" procedure says highlighting extracted text in sources is optional, it is not optional for you since you are preparing the resources that participants are using to understand your decisions and double check their work. When developing answer keys as such, it is advisable to highlight the sources of extracted text.
The resources you will be highlighting.
Make sure "Pilot_Data-Extraction_ANSWERS" is under "Restricted" access in case someone gets curious and follows the import link from their template, accidently exposing themselves to the answer key before they have attempted the pilot data extraction themselves.
Prepare participant collection templates.
Make a copy of "Pilot_Data-Extraction_ANSWERS", move it to "Data Collection" and rename it "Pilot_Data-Extraction_BLANK".
Make sure the "README" editable fields in "Pilot_Data-Extraction_BLANK" are replaced with placeholders and not your information.
"README" tab with placeholder text in the fields participants can edit.
In "Pilot_Data-Extraction_BLANK", delete your extracted answers for the "PILOT" papers in the "Overview Table" and "Metadata Table".
"Overview Table" with the data collection fields emptied for "PILOT" rows.
In "Pilot_Data-Extraction_BLANK", replace your "Overview Table" "EXAMPLE" row with an imported version that takes the data from "Pilot_Data-Extraction_BLANK". Don't forget to protect the import range from edits.
EXAMPLE FUNCTION:
=IMPORTRANGE("https://docs.google.com/spreadsheets/d/1zjzqvzXA92DE-hbXiDscOb_ofV27QFWZQ2Opjdfg7rk", "'Overview Table'!A4:U4")
"Overview Table" with the "EXAMPLE" row replaced by an imported version.
Note
Importing rows is also how you will eventually provide answers to participants. I.e. you will add import lines to their specific worksheets. People work at their own pace, so if you give everyone the answer key at a specific time some may not be ready for it. This is also an easy way for participants to check against their answers, and you can limit which answers they see (e.g. only show the answers for the first two pilot papers in case they later decided to do the final set of pilot papers).
In "Pilot_Data-Extraction_BLANK", replace your "Metadata Table" "EXAMPLE" columns with an imported version that takes the data from "Pilot_Data-Extraction_BLANK". Don't forget to protect the import range from edits.
EXAMPLE FUNCTION:
=IMPORTRANGE("https://docs.google.com/spreadsheets/d/1zjzqvzXA92DE-hbXiDscOb_ofV27QFWZQ2Opjdfg7rk", "'Metadata Table'!E1:F83")
"Metadata Table" with the "EXAMPLE" columns replaced by an imported version.
Make copies of "Pilot_Data-Extraction_BLANK" in the "Data Collection" folder and label with the respective participant names. Do not overwrite "Pilot_Data-Extraction_BLANK" in case you end up with more participants joining at a later time.
"Data Collection" templates for individual participants and a backup.
Open all "Pilot_Data-Extraction_name" collection templates and confirm all the import functions have access to the file they are importing from.
"README" import function showing a "#REF!" error because it has not been allowed access to the spreadsheet it is trying to import from.
Do a final review of the protocol and polish up anything you can think of.
Set-up permissions so participants have "Editor" access to their individual "Pilot_Data-Extraction_name" worksheet. You may also want to copy the "Share" link and send it to them directly using your normal means of communication so that they don't accidently miss the notification.
Permissions settings for a Google Drive document - giving editor access to an individual instead of making the entire document editable via a URL.
Data Extraction (Pilot)
Practice Contextual Data (Metadata) Extraction Scenario (Optional)
Run through this practice extraction scenario designed by Dr. Emma Griffiths. It will give you a sense of how you will be extracting data for this protocol.
Locate your individual "Pilot_Data-Extraction_name" collection form and confirm you have edit permissions.
Review the "README" and the pilot data extraction protocol.
Go to the "Overview Table" and download the "PILOT" papers using the URLs listed under "Data Storage Location".
Find all associated supplementary data using information within the paper and/or the DOI listed in the "Overview Table". Look for data availability statements and reference to databases and database accessions. Download and label with the "Study/Covidence #" of the associated paper.
Fill in the "Overview Table" for the study according to the guidance in your protocol and the "Overview Legend". We recommend highlighting the information within the files as you extract to make it easier to review later.
Note
Depending on your preference, you can fill in the "Overview Table" for all studies and then do the "Metadata Table" for all studies, or you can fill in the "Overview Table" for one study and then immediately do the "Metadata Table" for the same study. We recommend you do the latter for the pilot, so that you keep your head in one "study" at a time, but when you get the hang of the process it tends to be more efficient to do the former.
Fill in the "Metadata Table" for the study according to the guidance in your protocol and the "Metadata Legend". We recommend highlighting the information within the files as you extract to make it easier to review later.
Review both the "Overview Table" and "Metadata Table" for completeness. Blank cells are not the same as "FALSE". If you notice blanks you should re-review your sources to see if you can find a value that specifically indicates the presence of a variable. If you do not find any, you can then indicate "FALSE".
Request Answers / Provide Answers. The methods manager will add in import lines for their solutions into to your "Pilot_Data-Extraction_name" for the studies you worked on.
Check your answers against the key.
- Did you find all the supplementary files?
- Did you find the accession associated data? It doesn't have to be the exact same sample.
- Did you have extracted metadata where the key had extracted metadata? I.e. did you have "TRUE" values where the answer key had "TRUE" values, even if you didn't extract the same metadata value?
- Did you identify similar objectives?
Post-Pilot Group Discussion.
- Were there any problems with the answer key?
- Was there any confusion on how to extract data for specific fields?
- Can improvements/clarifications be made to the Legends or Guidance?
- Are there any variables of interest that should be changed?
Update reference resources and extend pilot as necessary.
Give users who struggled an additional two papers to review. If they had already gone through all the prepared answers, prepare more. Doing more will not be a waste of time as they will still be used as part of data collection and it is important you data collectors feel self-assured in this process before the final data extraction.
Note
REMINDER: Keep updating your versioning as you make changes.
Final Preparation
Prepare the data collection forms. Once again using Google Drive and Sheets. Make a copy of your most up-to-date data extraction form ("Final_Data-Extraction_BLANK") and move it to a new "Data Collection (Final)" folder.
Note
CHECK: The reference template used to make "Final_Data-Extraction_BLANK" should be updated and refined from the pilot.
Make sure the "README" editable fields in "Final_Data-Extraction_BLANK" are replaced with placeholders and not your information.
Make copies of "Final_Data-Extraction_BLANK" and label with the respective participant names. Do not overwrite "Final_Data-Extraction_BLANK" in case you end up with more participants joining at a later time.
Data collection forms with a blank version being kept as backup.
Go to your Main/Master "Overview Table" where the complete list of papers are and make sure it is sorted by "Assignee".
Main/Master "Overview Table" sorted by "Study/Covidence #".
Main/Master "Overview Table" sorted by "Assignee".
Copy the Main/Master "Overview Table" for a data extractor over to the "Overview Table" in their respective "Final_Data-Extraction_name" worksheet.
OPTIONAL: Fill in the study number information across the columns in the "Final_Data-Extraction_name" "Metadata Table". This can also be left to the data extractor using the form to fill in for themselves.
Do a final review of the protocol and polish up anything you can think of.
REMINDER: Make sure you copy over your solutions from "Pilot_Data-Extraction_ANSWERS" over to "Pilot_Data-Extraction_you" for the "Overview Table" and "Metadata Table", and also upload the papers/supplementary files to the agreed upon storage location (e.g. Nextcloud).
Set-up permissions so data extractors have "Editor" access to their individual "Final_Data-Extraction_name" worksheet. You may also want to copy the "Share" link and send it to them directly using your normal means of communication so that they don't accidently miss the notification.
OPTIONAL: Prepare a "Final_Data-Extraction_RESULTS" file that gives you an overview of everyone's progress. To do this you can make empty copies of the "Overview Table" and "Metadata Table" and then import the information from individual data extractor collection forms. If you have a large group you may want to keep separate "Metadata Table" tabs because having them all in one may be quite slow from the import function; it'll be easier to combine these into one table in the end by copying the data values instead of importing.
Some benefits of doing this is you can go to a single location to get a sense of everyone's progress, and it updates "live" so if people end up going back to re-review a paper you won't have to re-extract their results.
Results from individual sheets being consolidated using "imports" into a final sheet.
Data Extraction (Final)
Locate your individual "Final_Data-Extraction_name" collection form and confirm you have edit permissions.
Review the "README" and the data extraction protocol for changes since the pilot.
Go to the "Overview Table" and find your papers using the URLs listed under "Data Storage Location".
Find all associated supplementary data using information within the paper(s) and/or the DOI listed in the "Overview Table". Look for data availability statements and reference to databases and database accessions. Download and label with the "Study/Covidence #" of the associated paper.
Upload the supplementary data to the associated "Data Storage Location".
Note
Consider doing this for all your papers before performing data extraction for the "Overview Table" and "Metadata Table". This way you can get into a rhythm with it and have this stage completely out of the way for the rest of your data extraction work.
Fill in the "Overview Table" for the study according to the guidance in your protocol and the "Overview Legend".
Note
Depending on your preference, you can fill in the "Overview Table" for all studies and then do the "Metadata Table" for all studies, or you can fill in the "Overview Table" for one study and then immediately do the "Metadata Table" for the same study. We recommend you do the latter for the pilot, so that you keep your head in one "study" at a time, but when you get the hang of the process it tends to be more efficient to do the former.
Fill in the "Metadata Table" for the study according to the guidance in your protocol and the "Metadata Legend".
Analysis
The purpose of this section is to give a general overview of the analyses performed with the first version of this protocol before the data visualizing stage. It is important to consider whether these outputs align with your designed data outcomes before you begin implementing the protocol so you have time and awareness to adjust the protocol as needed.
Note
These analyses were part of a scoping review that looked at the correlation between outbreak and/or surveillance research settings/objectives and different metadata types, as a precursor for more narrow focused systematic review(s) of contextual metadata in the future. For a systematic review and for evaluating significance more rigorous analysis is needed.
Objective Coding
Objectives are extracted out into their own table, distilled into themes/category codes which can then be used to organise the unstructured research objectives. The objective quotes can be left as raw data and are not needed for further analysis. The coded objectives can be added back into the Overview analysis table.
"OBJECTIVES" Intermediate Table.
Objectives Aggregated
Once the objective categories are defined, create a copy of your results "Overview Table" and then classify each study or each study objective into the categories. This can be done by adding a dropdown menu with the category options.
"Overview Table" objectives aggregated into categorical bins.
You can now get summary counts of your results, and use this information to look at the frequency of different contextual metadata types across your different objective categories.
Objective aggregate counts.
Metadata Table Value Preparation
Check for empty cells and make sure none are “missing” data (e.g. overlooked during data extraction as opposed to being “FALSE”).
You’ll want to consolidate all the results into one table. You can do this with import functions but it will be easier to copy/paste.
Remove the “Definition” and “Example Subfield” columns, and clear all informative text from the “Required Subfield” columns.
Separate out the “Values” and “Motivations” into their own versions of the tables. Continue these steps on the “Values” table.
If a value is NOT “FALSE” (i.e. “TRUE” or “<value>”) then it is “TRUE”.
Metadata Intermediate Table where values are TRUE/FALSE.
Convert all “TRUE”s to 1 and all “FALSE”s to 0.
Replace empty “Required Subfield”s with N/A or some other null value or preference.
Repeat the “Metadata Type (Field Name)” value for the associated “Required Subfield”.
Metadata Intermediate Table where values are 1/0 (binary).
OPTIONAL: Pull out the "Category/Bin"/“Overarching Group” headers (if using hierarchical levels). This is optional as they were added to facilitate data extraction/collection as opposed to being defined overarching categories of interest.
Now you have frequencies for the “Overarching Group”, “Metadata Type (Field Name)”, and “Required Subfields”. The “Metadata Type (Field Name)” is covered by any rows that have “N/A” for required subfields because these were collected such that they are TRUE (1) if a required subfield is present, or independently if an example subfield was identified. So “N/A” rows can be “TRUE” (1) if at least one “Required Subfield” is “TRUE” (1) or even if all “Required Subfields” are “FALSE” (0). However, it should never be the case that an “N/A” row is “FALSE” (0) and one or more “Required Subfields” are “TRUE” (1), so we should perform a quick error check before proceeding.
ERROR CHECK: This can be done in Google Sheets using the formula
=if(and(or(<Required Subfield Range>),not(<N/A Range>)),"ERROR","PASS")
You’ll need to add “Error Check” rows to apply the formula and then fix the “N/A” values that raise an “ERROR”. An example layout is available here. You can easily copy/paste the formula across all the relevant columns and it’ll update the range to be in the appropriate column.
Error checking table for catching inconsistencies between categories/bins, fields, and subfields.
Remove the ERROR CHECK rows.
"Metadata Table" results with error checking rows removed.
You can work with the table as is but it is probably easier to separate this out into three tables for the different levels.
- “Required Subfield” Table (i.e. all “Required Subfield” rows except for the “N/A”s).
- “Metadata Type (Field Name)” Table (i.e. all the “Required Subfield” “N/A”s).
- OPTIONAL: “Overarching Group” Table (i.e. is “TRUE” (1) if any of the associated “Metadata Type (Field Name)” values are “TRUE” (1)).
Note
These header names can also be changed at any point, just try to be consistent with the current version of the "Metadata Table" to avoid miscommunication.
You can now easily calculate sums for any of these tables to get the frequency counts across papers. You can now also use the "Covidence #"s to cross reference the metadata table with the overview table. An example of which will be shown next in preparing a “Metadata x Objective” table.
Note
At this point it’s probably best to shift to working in an R notebook, Python notebook, Tableau, or whatever you are most comfortable using for analysis.
Metadata x Objective Table Preparation (using R)
Goal: Indicate what metadata elements/categories are present per objective. We can also get frequencies of occurrence for different research objectives.
Make a pivoted version of the metadata table that makes the columns your metadata element variables.
Cross reference with the overview table to bring in the “Objectives” column associated with the respective “Covidence #”
"Metadata x Objective" intermediate table where objectives are grouped by study number.
Now you want to separate “Objectives” out into their own rows. All “Objectives” will have the same counts for the same “Covidence #”. This can be done using tidyr `separate_rows`.
"Metadata x Objective" intermediate table where objectives are separated out into their own rows; one study may have several rows of objectives.
You can get rid of or hide the “Covidence #” column.
Consolidate “Objectives” so there is only one row per objective code. We recommend using dplyr `group_by` and `summarise`.
"Metadata x Objective" final table.
Results (Theoretical)
We can look at which objectives have the highest frequencies of which metadata.
Theoretical results for an objective category across different contextual metadata fields.
We can also look at which objectives are most frequently associated with a metadata category; may be more useful for less frequently used metadata items.
Theoretical results for how frequently different objectives occurred for a specific contextual metadata field (example: "Host Vaccination").
Motivations
We captured both positive and negative motivations. A positive motivation would be along the lines of “this metadata allowed us to do this”, while a negative motivation could be “a limitation of that study was we couldn’t study x because we didn’t have y”. It was determined that a "Narrative Summary" would be the appropriate approach; summarizing results using "evidence statements" (summaries of the evidence from the literature reviewed)1. We also thought it would be interesting to do a "Frequency Table" to understand what contextual metadata was being most advocated for. Additionally or instead of the aforementioned analyses, quotes can simply be used as needed for discussion regarding the associated contextual metadata field(s).
Citation
LINK
Motivations - Narrative Summary
Extract all “Motivation” columns from the “Metadata & Motivation Extraction Table”.
"Motivation" Intermediate table showing raw data.
Copy and paste "transposed" into a new sheet.
"Motivation" Intermediate table showing raw data transposed and with formatting removed.
Filter out "FALSE" data and pivot to a horizontal layout that makes it easy to read quotes and group by the associated contextual metadata field.
"Motivation" final table showing quotes, easily organized by contextual metadata fields or subfields.
Qualitatively review the quotes and disqualify or relocate any that do not support the metadata field it was matched with.
Summarize the results into evidence statements.
Results (Theoretical)
Discussion around the benefits of including a metadata element.
Example: Collecting clinical host metadata was key in the study's ability to evaluate risk factors in cases where breakthrough infection occurred.
Discussion around the limitations of not including a metadata element.
Example: One (or more) study claimed that the lack of clinical host metadata made it difficult to evaluate risk factors in cases where breakthrough infection occurred.
Motivations - Frequency Counts
Using the qualitatively reviewed "MOTIVATION Table" (under the Step for "Motivations - Narrative Summary"), converting any quotes into "TRUE" values and count the frequency in which they occur.
Results (Theoretical)
The frequency at which articles advocated for the inclusion of a metadata element.
EXAMPLE: 2 out of 3 articles advocated for the inclusion of the “geographical location” of sample collection.