Jan 13, 2026
Version 2
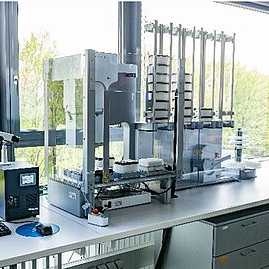
Bravo workstation: automated single-stranded DNA library preparation (ssDNA2.0) V.2
- Sarah Nagel1,
- Anna Schmidt1,
- Ayinuer Aximu Petri1,
- Anya Patova1,
- Merlin Szymanski1,
- Elena Essel1,
- Matthias Meyer1
- 1Max Planck Institute for Evolutionary Anthropology
- MPI EVA Ancient DNA Core Unit



Protocol Citation: Sarah Nagel, Anna Schmidt, Ayinuer Aximu Petri, Anya Patova, Merlin Szymanski, Elena Essel, Matthias Meyer 2026. Bravo workstation: automated single-stranded DNA library preparation (ssDNA2.0). protocols.io https://dx.doi.org/10.17504/protocols.io.kqdg32bdpv25/v2Version created by Ancient DNA Core Unit
Manuscript citation:
Gansauge, M.-T., Aximu-Petri, A., Nagel, S., & Meyer, M. (2020). Manual and automated preparation of single-stranded
DNA libraries for the sequencing of DNA from ancient biological remains and other sources of highly degraded DNA. Nature Protocols, 15, 2279-2300.
License: This is an open access protocol distributed under the terms of the Creative Commons Attribution License, which permits unrestricted use, distribution, and reproduction in any medium, provided the original author and source are credited
Protocol status: Working
We use this protocol and it's working
Created: November 19, 2024
Last Modified: January 13, 2026
Protocol Integer ID: 112351
Keywords: ancient DNA library preparation, Bravo workstation, single-stranded library, stranded dna library preparation, dna library preparation, stranded dna library, manual ssdna, workflows of the ancient dna core unit, dna libraries for the sequencing, stranded dna, ancient dna research, stranded library preparation method, dna conversion, ancient dna molecule, electronic protocol files for the bravo ngs workstation, ancient dna core unit, nucleic acids research, efficiency of dna conversion, dna from ancient biological remain, using t4 dna ligase, sequencing library, electronic protocol file, free dna, degraded dna, t4 dna ligase, dna, synthetic oligonucleotide, manual execution of the protocol, dna sequence, control oligonucleotide, automated liquid handling, internal uracils from ancient dna molecule, genome research, automated preparation, liquid handling systems from other manufacturer, oligo tl250 into the work flow, liquid handling system, library preparation method, bravo ngs workstation, genome, protocol for
Funders Acknowledgements:
Max Planck Society
Abstract
We here provide an implementation of the ssDNA2.0 single-stranded library preparation method (Gansauge et al. 2017, Gansauge et al. 2020) for automated liquid handling on the Bravo NGS workstation B in 96-well format. The method was developed primarily for ancient DNA research but is also suitable for library preparation from other sources of degraded or single-stranded DNA, such as cell-free DNA, formalin-fixed samples or synthetic oligonucleotides.
To use the protocol, a Bravo NGS workstation is required. Calibration of the instrument for this protocol has to be performed by the user and requires significant expertise in using the platform. Electronic protocol files for the Bravo NGS workstation are provided together with this protocol and a brief description of the steps performed by the liquid handling system, potentially providing a framework for setting the method up on liquid handling systems from other manufacturers. Some of the instructions, for example regarding the documentation and location of files, are specific to the environment and workflows of the Ancient DNA Core Unit of the MPI-EVA and have to be amended in other environments. We strongly advise against manual execution of the protocol, as manual handling lacks the precision of automated liquid handling and may lead to cross-contamination of samples or non-optimal results. For manual ssDNA 2.0 library preparation, please refer to Gansauge et al. 2020. Note that the adapter sequences added with this method differ from standard Illumina adapters by a 5-bp deletion in the P5-adapter, requiring a custom sequencing primer (see Gansauge et al. 2020).
This protocol consists of two parts: (i) library preparation, with or without Uracil-DNA-glycosylase treatment for the removal of internal uracils from ancient DNA molecules, and (ii) library quantification by quantitative real-time PCR. A protocol for library amplification and indexing is provided separately.
Two control oligonucleotides are added during library preparation. CL304 (60 million molecules) is added at the beginning of the workflow to assess the efficiency of DNA conversion into sequencing libraries (Glocke & Meyer 2017) and to identify inhibition or saturation in individual reactions. TL250 (1 million molecules) is added during the elution step for additional quality control.
References
Gansauge, M.-T., Gerber, T., Glocke, I., Korlevic, P., Lippik, L., Nagel, S., Riehl, L. M., Schmidt, A., & Meyer, M. (2017). Single-stranded DNA library preparation from highly degraded DNA using T4 DNA ligase. Nucleic Acids Research, 45(10): e79.
Gansauge, M.-T., Aximu-Petri, A., Nagel, S., & Meyer, M. (2020). Manual and automated preparation of single-stranded DNA libraries for the sequencing of DNA from ancient biological remains and other sources of highly degraded DNA. Nature Protocols, 15, 2279-2300.
Glocke, I., & Meyer, M. (2017). Extending the spectrum of DNA sequences retrieved from ancient bones and teeth. Genome Research, 27, 1230-1237.
Changes from v1
- Tube type changed to 0.8ml Fluidx tubes in step 11 and Materials
- Addition of spike-in oligo TL250 into the work flow as additional QC measure
Materials
Materials
| Reagent | Supplier | Cat. no. | Decont.* | |
| Master mixes | ||||
| Dephosphorylation mix † | self | - | - | |
| Adapter/splinter mix † | self | - | - | |
| Ligation mix I † | self | - | - | |
| Fill-in mix † | self | - | - | |
| Klenow mix † | self | - | - | |
| Ligation mix II † | self | - | - | |
| Large-volume buffers/reagents | ||||
| 0.1xBWT † | self | - | - | |
| 0.1xBWT+SDS † | self | - | - | |
| Stringeny Wash † | self | - | - | |
| EBT † | self | - | - | |
| EBT (decontaminated) † | self | - | UV | |
| TE † | self | - | UV | |
| TET † | self | - | UV | |
| Other reagents | ||||
| Library negative controls (LNCs) † | self | - | - | |
| Library positive controls (LPCs) † | self | - | - | |
| Optional: Positive test extracts (PTEs)† | self | - | - | |
| T4 DNA Ligase, HC (30 U/µl) | Thermo Fisher Scientific | EL0013 | - | |
| Fast AP (1U/µl) | Thermo Fisher Scientific | EF0652 | - | |
| Klenow fragment (10 U/µl) | Thermo Fisher Scientific | EP0052 | - | |
| T4 DNA Ligase (5 U/µl) | Thermo Fisher Scientific | EL0012 | - | |
| USER (1 U/µl) | New England Biolabs GmbH | M5505L | - | |
| Dynabeads MyOne Streptavidin C1 (10 mg/ml) | ThermoFisher Scientific | 65002 | - | |
| Spike-in oligonucleotide CL304 1 µM ‡ | Sigma/Merck | - | - | |
| Spike-in oligonucleotide TL250 167 pM $$ | IDT | - | - | |
| Water, Milli-Q | - | - | - | |
| 2x probe qPCR master mix | ThermoFisher Scientific | K0263 | - | |
| 10 µM primer IS7 § | Sigma/Merck | - | - | |
| 10 µM primer IS8 ‖ | Sigma/Merck | - | - | |
| 10 µM primer CL107 ¶ | Sigma/Merck | - | - | |
| 10 µM primer IS10 ** | Eurogentec | - | - | |
| 10 µM primer CL118 $ | IDT | - | - | |
| qPCR standard dilution †† | self | - | - | |
| Consumables | ||||
| Bravo 96LT 250 µl Sterile, Filtered Tips | Agilent | 19477-022 | - | |
| Bravo 96LT 250 µl Sterile, Filtered Tips, empty boxes | Agilent | 19477-022 | - | |
| 50 ml Falcon tube with stand | Corning | 210261 | - | |
| 5 ml screw cap tubes (rack 2d Lp W/barcode) | Thermo Scientific | SCT-5ML-S | - | |
| 5 ml LoBind tubes | Eppendorf | 15168344 | - | |
| FluidX tubes 0.8 ml External Thread Jacket | Brooks | 68-0801-11 | - | |
| Filter tip, Natur, 1250 μl, low retention | Greiner Bio-One | 778363 | - | |
| Filter tip, Natur, 300 μl, low retention | Greiner Bio-One | 775353 | - | |
| Filter tip, Natur, 10 μl, low retention | Greiner Bio-One | 771265 | - | |
| 1.5 ml LoBind tubes | Eppendorf | VB-0285 | UV | |
| 25 ml glass pipette | Greiner Bio-One | 357525 | - | |
| 50 ml glass pipette | Greiner Bio-One | 768160 | - | |
| 96 Matrix open reservoir movable | Thermo Scientific | 1064156 | - | |
| HTS deep well reservoirs | Kisker | 97813 | - | |
| 96 Deep Well PP Sqr Well Plate | Axygen | P-2ML-SQ-C-S | - | |
| Twin.tec PCR Plates 96 LoBind, skirted | Eppendorf | VB-0433 | - | |
| Twin.tec PCR Plates 96, skirted | Eppendorf | VB-0403 | - | |
| NUNC 96 deepwell plate | NUNC | 736-0600 | - | |
| Hard-Shell PCR plate 384-well, thin-wall, clear shell, white well | Bio-Rad | HSP3805 | - | |
| Peelable heatseal foil | Bio-Rad | 1814045 | - | |
| Optical heatseal foil | Bio-Rad | 1814030 | - | |
| Microseal B Adhesive foil | Bio-Rad | MSB1001 | - | |
* See documents in the Appendix for decontamination instructions.
† See documents in the Appendix for preparation of master mixes, buffers and controls.
‡ Order oligonucleotide CL304 at 0.2 µmol synthesis scale (Sigma/Merck, desalted). Dissolve in TE buffer (see document in the Appendix for preparation of TE buffer) at a concentration of 100 µM. Prepare a 1 µM working dilution in TET buffer.
Sequence: 5'-Pho-ATTCAGCTCCGGTTCCCAACGATCAAGGCGAGTTACATGA-Pho-3'
$$ Order oligonucleotide TL250 at 4 nmol synthesis scale (IDT, desalted). Dissolve in TET buffer (see document in the Appendix for preparation of TET buffer) at a concentration of 100 µM. Prepare a 167 pM working dilution in TET buffer.
Sequence: 5'-ACACTCTTTCCCTACACGACGCTCTTCCTACTGATCCGCTGTCCACCCAGCTGGAAGCGATATACGTAAGATCGGAAGAGCACACGTCTGAACTCCAGTCAC-3'
§ Order oligonucleotide IS7 at 0.2 µmol synthesis scale (Sigma/Merck, desalted). Dissolve in TE buffer (see document in the Appendix for preparation of TE buffer) at a concentration of 100 µM. Prepare a 10 µM working dilution in water.
Sequence: 5'-ACACTCTTTCCCTACACGAC-3'
‖ Order oligonucleotide IS8 at 0.2 µmol synthesis scale (Sigma/Merck, desalted). Dissolve in TE buffer (see document in the Appendix for preparation of TE buffer) at a concentration of 100 µM. Prepare a 10 µM working dilution in water.
Sequence: 5'-GTGACTGGAGTTCAGACGTGT-3'
¶ Order oligonucleotide CL107 at 0.2 µmol synthesis scale (Sigma/Merck, desalted). Dissolve in TE buffer (see document in the Appendix for preparation of TE buffer) at a concentration of 100 µM. Prepare a 10 µM working dilution in water.
Sequence: 5'-TCATGTAACTCGCCTTGATCGT-3'
** Order oligonucleotide IS10 at 1 µmol synthesis scale (Eurogentec, HPLC). Dissolve in TE buffer (see document in the Appendix for preparation of TE buffer) at a concentration of 100 µM. Prepare a 10 µM working dilution in water.
Sequence: 5'-FAM-A{G}A{T}C{G}GAAGAGC{A}CAC-[BHQ1]-3' [FAM: 6-carboxyfluorescein; BHQ1: Black Hole Quencher 1; {X}: LNA (locked nucleic acid)]
$ Order oligonucleotide CL118 at 0.25 µmol synthesis scale (IDT, HPLC). Dissolve in TE buffer (see document in the Appendix for preparation of TE buffer) at a concentration of 100 µM. Prepare a 10 µM working dilution in water.
Sequence: 5'-FAM-TTCAGCTCCGGTTCCCAACGAT-[BHQ1]-3' [FAM: 6-carboxyfluorescein; BHQ1: Black Hole Quencher 1]
†† See documents in the Appendix for the preparation of a qPCR standard dilution
Equipment
- Bravo-B NGS workstation G5522A with 96-channel LT pipette head and associated equipment (red thermal plate insert for 96-well PCR plates, silver thermal plate insert for 96-well Nunc deep-well plates, 96-well magnetic rack) for library preparation
- Bravo-B NGS workstation G5522A with 96-channel LT pipette head and associated equipment (silver thermal plate insert for 96-well Nunc deep-well plates, 96-well magnetic rack) for preparation of qPCR
- Hood for NGS workstation B with HEPA-filtered ventilation system and strip curtain (custom-built, optional)
- 384-format qPCR system (e.g., C1000 Touch Thermal Cycler CFX 384 Real-Time System, Bio-Rad)
- FluidX rack barcode reader (Brooks Life Sciences, cat. no 20-4018) .
- Tube decapper (Aperio 8-Channel Semi- Automatic Screw Top tube rack decapper, Brooks Life Sciences, cat. no. 46-6502)
- Centrifuge for PCR plates (e.g., Eppendorf, cat. no. 5948000913)
- Table-top micro-centrifuge for 1.5 ml tubes (e.g., Carl Roth Mini-Zentrifuge ROTILABO‱, cat. no. T464.1)
- Table-top micro-centrifuge for 5 ml tubes (e.g., myFuge‱5D Digital 5mL Centrifuge, cat. no. C2595-E)
- Plate sealer (e.g., Bio-Rad Px1 PCR plate sealer, cat. no. 1814000)
- Magnetic rack for Eppendorf tubes (e.g., MagJET Separation Rack, ThermoFisher Scientific, cat.no. MR02)
- Tube rotator (e.g., Labnet International: Rotator Revolver for sample tubes, cat. no. PP49.1)
Bravo electronic protocol files
The most recent versions of the electronic protocol files are provided below together with a short description. See supplementary information in Gansauge et al. 2020 for further instructions on setting up the Bravo NGS workstation (https://static-content.springer.com/esm/art%3A10.1038%2Fs41596-020-0338-0/MediaObjects/41596_2020_338_MOESM1_ESM.pdf). Additional information and auxiliary files are available at https://zenodo.org/records/3631147.
 20240112_96_ssDNAprep.vzp344.9KB
  20240112_V3_96_ssDNAprep_qPCR_setup.vzp372.7KB
  LibPrep_List_of_protocols_in_runset.docx12.9KB
 Appendix
Documents for master mixes
Documents for library controls
Document
CREATED BY
Anya Patova
Document
CREATED BY
Anya Patova
Documents for buffers
Documents for decontamination procedures
documents related to preparation of the qPCR
Safety warnings
For information about potential health and safety hazards, please refer to the Material Data Safety Sheets associated with the reagents and chemicals used.
Reagent and sample preparation (days/weeks/months before the run)
Prepare master mixes (Desphosphorylation mix, Adapter/splinter mix, Ligation mix I, Fill-in mix, Klenow mix, Ligation mix II) and aliquots of library positive controls (LPCs), library negative controls (LNCs) and if needed positive text extracts (PTEs) as described in MATERIALS.
Decontaminate other reagents and consumables as described in MATERIALS.
Prepare a FluidX sample rack containing 96 sample DNA extracts and extraction negative controls in FluidX screw-cap tubes in 30 µl volumes. Store the rack at:
- room temperature for same day library preparation
- 4 °C for next day library preparation
- -20 °C for library preparation at a later time
[Option 1 ] DNA extraction and library preparation were planned together (default)
On the day of library preparation, add LNCs and LPCs to the existing FluidX sample rack as described below.
[Option 2] Designing a new library preparation experiment
Follow the guidelines below.
Note
[Note]
Prepare a FluidX sample rack containing 96 FluidX screw-cap tubes containing sample DNA extracts and their corresponding extraction negative and positive controls (ENCs and EPCs), as well as library negative and positive controls (LNCs and LPCs). Observe the following rules:
- By default, reserve four positions each for LNCs and LPCs so that each quarter of the sample rack (i.e., columns 1-3, 4-6, 7-9 and 10-12) carries a set of controls
- EPCs and ENCs should have been included with each batch of sample extracts
- Re-position controls between different runs for unbiased monitoring of library preparation efficiency and contamination across the library plate
- Use the FluidX barcode reader to read the bottom barcodes of all tubes in the rack (see below)
Preparing and starting a library preparation run
Before each run, create an entry in Labfolder and document the experiment.
Note
[Note]
The Labfolder entry name consists of the name of the Labfolder template and the library plate ID. To document your experiment fill the provided data element fields in Labfolder. They serve as a template later for creating the CoreDB entry. Providing the plate ID and performing the database work is usually done by the main person responsible for library preparation in the Core Unit, not by the person performing the experiment.
Thaw the following components at room temperature:
- master mixes (Desphosphorylation mix, Adapter/splinter mix, Ligation mix I, Fill-in mix, Klenow mix, Ligation mix II)
- sample DNA extract rack
- aliquot of a 1 μM Library preparation efficiency spike-in oligonucleotide (CL304) dilution
- aliquot of a 167 pM Elution spike-in oligonucleotide (TL250) dilution
- LNCs and LPCs as needed below
Note
[Note]
To save time, the master mixes may also be thawed in the fridge the day before library preparation.
Complete master mixes by adding the following volumes of enzyme, starting with Ligation mix I.
OPTIONAL: For UDG-treatment of ancient DNA, add USER enzyme mix to the Dephosphorylation mix.
| Master mix | Volume master mix [µl] | Enzyme | Volume enzyme [µl] | |
| Dephosphorylation mix | 1868.8 | Fast AP (1 U/µl) | 128 | |
| optional: USER enzyme (1 U/µl) | 128 | |||
| Adapter/Splinter mix | 690 | - | - | |
| Ligation mix I | 3874.4 | T4 DNA Ligase, HC (30 U/µl) | 116 | |
| Fill-in mix | 4640 | - | - | |
| Klenow mix | 1120 | Klenow fragment (10 U/µl) | 280 | |
| Ligation mix II | 4524 | T4 DNA Ligase (5 U/µl) | 116 |
Note
[Documentation]
Note down all the required information in the respective fields in Labfolder about the reagents (lot numbers, date of preparation, etc.) and the plate, tube and reservoir types used.
After adding T4 DNA ligase to Ligation mix I, rotate the tube for at least 10 min at room temperature in a tube rotator to ensure complete mixing of the highly viscous solution.
Mix the other master mixes by flicking the tubes with a finger.
Spin down master mix tubes in a table centrifuge for 5 ml tubes.
Insert master mix tubes into the below-indicated positions of a ThermoFisher Scientific 5 ml tube rack. Before entering the tubes, make sure Microseal B Adhesive foil is attached to the bottom of the rack to secure the tubes in places during the run. Replace foil if it is no longer sticky. Store rack in the fridge until use.
| 1 | 2 | 3 | 4 | 5 | |
| A | Dephos. mix | Adapter/splinter mix | Ligation mix I | Streptavidin beads | Fill-in mix |
| B | Ligation mix II |
| 6 | |
| A | Klenow mix |
| B |
Note
[Note]
Streptavidin beads are added later .
Switch on all components of the Bravo system, including the external cooling device (set to 4 °C). Switch on light and ventilation ("Betrieb") inside the robot hood.
Log into the VWworks software using the administrator account (password "a"). Load the library preparation protocol under "S:\Bravo_protocols\MPI-EVAN-homebrew\forms\ssDNA_Library_preparation\96_ssDNAprep.VWForm". Initialize the system.
Set up Bravo deck as indicated by the form file. The MiniHub can be filled later once the robot is already running.
Unpack 34 Bravo tip boxes. Remove the lids and load tip boxes into stackers 1-3 of the BenchCel as indicated in the form file.
Note
[Note]
To save time, it is possible to load only one tip box into each stacker at this point and add the remaining ones within about 75 min after the run started.
Select the proper settings in the formfile:
- FluidX tube type (by default select "96 Ay Brooks Fluidx 0.8ml tubes")
- Spike-in (enable by clicking the box)
- Type of buffer reservoir (usually HTS deep well reservoirs are used)
Start run by clicking the "Run" button and follow the instructions by VWorks.
Note
[Note]
Run time is approximately 7 h 45 min. The first 75 min are used for aliquoting of master mixes. During this time, additional reagents have to be prepared. After 20 min, a pause point is reached at which the user will be prompted to add streptavidin beads. Inexperienced users are advised to start the run only after all components were added to the Bravo deck and MiniHub as indicated in the form file and below.
Prepare streptavidin beads:
Fully resuspend stock suspension of MyOne C1 beads by vortexing. Make sure no bead pellet remains.
Transfer 1,200 μl stock suspension of beads into an Eppendorf 1.5 ml Safe-lock tube. Pellet beads in magnetic rack, pipette off and discard supernatant. Add an additional 1200 µl stock suspension of beads (2400 µl used in total), pellet the beads and discard the supernatant.
Wash beads twice with 1,000 µl 0.1xBWT buffer and discard the wash buffer.
Resuspend beads in 680 μl 0.1xBWT buffer and transfer the bead suspension to a 5 ml ThermoFisherScientific screw-cap tube. When prompted by VWorks (approximately 20 min after the run started), add the tube into the ThermoFisher Scientific 5 ml tube rack at the position indicated above.
Note
[Documentation]
Note down the batch information about the beads in the respective fields in Labfolder.
Prepare a 100 pM dilution of the Library preparation efficiency spike-in (CL304) in a 50 ml Falcon tube by combining 20 ml of decontaminated TET-buffer and 2 μl of 1 μM oligonucleotide CL304. Mix well. Pour spike-in dilution into a buffer reservoir and load it into the MiniHub as indicated by the form file.
Note
[Documentation]
Note down the batch information about the Library preparation efficiency spike-in (CL304) in the respective fields in Labfolder.
Prepare a 50 ml Falcon tube containing elution buffer with a final concentration of 0.0334 pM Elution spike-in (TL250). To do this, combine 50 ml of EBT-buffer with 10 μl of 167 pM oligonucleotide TL250. Mix well. Pour the elution buffer into a buffer reservoir and load it into the MiniHub as indicated by the form file.
Note
[Documentation]
Note down the batch information about the Elution spike-in (TL250) in the respective fields in Labfolder.
Fill buffer reservoirs as listed in the table below and load them into the MiniHub as indicated by the form file.
| Buffer | Volume [ml] | |
| 0.1xBWT | approx. 70 | |
| 0.1xBWT+SDS | approx. 60 | |
| Stringeny Wash | approx. 60 |
Note
[Documentation]
Note down the buffer batches in the respective fields in Labfolder.
Prepare the sample DNA extract rack as follows:
Start the FluidX barcoder reader software and allow the camera to initialize.
When working with a pre-configured library plate, add FluidX tubes with LNCs and LPCs to the sample rack by replacing tubes at designated 'space holder' positions using the information from the "samples_to_screen" list available at "P:\AncientDNA\samples". Store the 'space holder' tubes for use in future experiments.
Note
[Documentation]
- Cut the lines referring to the respective library plate in the "samples-to-screen" list and copy them to the "libraries_done_list" in the same folder.
- Save copies of the updated lists with date and initials and put the old versions in the "screening_list_backup" folder.
- Note down the batch information for the LNCs and LPCs in the respective fields in Labfolder.
Use the FluidX barcode reader to read the bottom barcodes of all tubes in the rack.
Note
[Documentation]
- Check the correct arrangement of the controls by cutting the column with tube barcodes in the file created by the FluidX barcode reader and copy them in the control column in the "libraries_done_list". The barcodes of the LPCs and LNCs should differ between the two columns, all other barcodes should be identical.
Vortex and spin down the sample rack. Open the FluidX screw-cap tubes in the sample rack with the decapper and discard the lids. Place the sample rack into the position in the MiniHub indicated by the form file.
Add remaining consumables (PCR plates, waste plate) to the MiniHub and missing tip boxes into the stackers. Double-check that all required positions are correctly filled.
During the library preparation run
Observe parts of the run:
- Always check if all master mixes were correctly pipetted to the NUNC master mix plate. To do so, pause the system when it doesn't carry tips or plastic ware by clicking "Pause". Check the NUNC plate, place it back and click "Continue".
- Check if all liquid was transferred from the FluidX tubes to the sample plate by watching this step (~75 min after the run started).
- Approximately 30 min before the run ends, watch the elution step, especially the transfer of the eluate to the final library plate. Sometimes liquid may be left on the plate. This also becomes apparent by a lack of air in the tips, which is aspirated after the liquid. If the liquid transfer was incomplete, pause the robot once it finished the step and use a manual pipette to transfer remaining liquid to the library plate. Make sure to not aspirate beads.
Finishing the library preparation run
After the elution step, the run is automatically paused. Take out the final library plate from position 7 of the Bravo deck, seal it with peelable foil in the Bio-Rad plate sealer (180 °C, 3 s, use sealing frame) and briefly centrifuge it in a plate centrifuge to make sure there are no air bubbles at the bottom of the wells. Perform another visual check to make sure that all bubbles are gone. If necessary centrifuge again. Peel off the foil and place the plate back into position 7 of the Bravo deck. Press "Continue".
When the run is finished take out the final library plate (49 µl per well) and the 50x dilution plate (50 µl per well) and seal them with peelable foil (180 °C, 3 s, use sealing frame). Store the library plate and the 50x dilution plate at -20 °C in freezer 'Morpheus'. The 50x dilution plate will be transferred to the post-PCR lab for qPCR measurement later on.
Discard all the plastic ware that is still in the robot. When doing so, check the plates for any remaining liquids to make sure that all pipetting steps were performed accurately. Collect liquid waste in 500 ml bottles next to the sink using a funnel. Discard used tips to regular trash and the tip boxes to the large waste bin on the left side of the cooling unit.
Note
[Documentation]
In case of unexpected remaining volumes in the disposed plastic ware, add comments in the 'notes' section of Labfolder as well as in the documentation of the experiment on Mattermost.
Clean the robot by wiping the Bravo deck and the benches using tissues and ethanol. Switch off the robot and the cooling device and restart the computer so that remote access to the computer becomes possible. Switch off the computer screen.
Library and spike-in quantification using qPCR
In the post-PCR lab, thaw the 50x library dilution plate and all required PCR reagents as well as the PCR strip tube containing the qPCR standard dilution (ranging from 102 to 108 copies/μl) at room temperature (qPCR reagents are stored in lab B4.12, freezer 26, drawer "qPCR/ddPCR stocks").
Note
[Note]
See MATERIALS for the preparation of a qPCR standard dilution.
Prepare qPCR master mixes for assay 1 (quantification of all molecules) and assay 2 (quantification of spike-in/library preparation efficiency) in 5 ml eppendorf tubes by combining the reagents below. Mix by vortexing and briefly centrifuge in a 5 ml table centrifuge.
| Reagent | Volume (µl) | Volume (µl) per reaction | Final concentration | |
| Assay 1 | ||||
| Water, MilliQ | 1003 | 3.4 | ||
| Maxima Probe qPCR Master Mix (2X) | 1475 | 5 | 1x | |
| 10 µM primer IS7 | 59 | 0.2 | 200 nM | |
| 10 µM primer IS8 | 59 | 0.2 | 200 nM | |
| 10 µM probe IS10 | 59 | 0.2 | 200 nM | |
| sum | 2655 | |||
| Assay 2 | ||||
| Water, MilliQ | 833 | 3.4 | ||
| Maxima Probe qPCR Master Mix (2X) | 1225 | 5 | 1x | |
| 10 µM primer IS7 | 49 | 0.2 | 200 nM | |
| 10 µM primer CL107 | 49 | 0.2 | 200 nM | |
| 10 µM probe CL118 | 49 | 0.2 | 200 nM | |
| sum | 2205 | |||
Note
[Documentation]
Note down the lot/batch information about the reagents in the respective fields in Labfolder.
Pipette 320 µl of assay 1 master mix to each well of column 8 of a NUNC Plate. Pipette 264 µl of assay 2 master mix to each well of column 9. Keep NUNC plate in fridge until used.
| 8 | 9 | |
| A-H | Assay 1 (320 µl each) | Assay 2 (264 µl each) |
Switch on all components of the Bravo system, including the external cooling device (set to 4 °C).
Log into the VWworks software using the administrator account (password "a"). Load the qPCR setup protocol under "S:\Bravo protocols\MPI-EVAN-homebrew\forms\qPCR_and_dilutions\V3_96_ssDNAprep_qPCR_setup.VWForm". Initialize the system.
Select the proper settings in the form file:
- Choose "96" from drop-down menu (there is also a legacy version of the protocol supporting qPCR measurements of half library plates).
Load stacker 3 with four full Bravo tip boxes (without lids) as indicated in the form file. Make sure that all the other stackers stay empty.
Set up Bravo deck as indicated by the form file.
Start run by clicking the "Run" button and follow the instructions by VWorks.
Note
[Note]
Run time is approximately 35 min.
After the run has finished, take out the library dilution plate from position 7 of the Bravo deck, seal it with peelable foil in a Bio-Rad plate sealer (180 °C, 3 s, use sealing frame) and store it at -20 °C in freezer 23, drawer "1:50 library dilutions", for future experiments. Take out the qPCR plate from position 5, seal it with optically clear foil (167 °C for 3 s, no sealing frame; make sure the glossy side faces up) and briefly centrifuge it to make sure there are no bubbles left in the wells.
Transfer qPCR plate to the CFX384 Real-Time PCR system and perform the following steps using the BioRad CFX Manager software:
- Go to "Run setup", choose "user defined"
- from the "protocol" tab, choose "select existing" and select "CFX_3StepAmp+Melt_PROBE_10μl Assay.prcl" from "X:\public\AncientDNA\protocols\qPCR_Bravo\cycling program"
- from the "plate" tab, choose "select existing" and select "96_Sample Plate 384wells_FAM.pltd" from "X:\public\AncientDNA\protocols\qPCR_Bravo\qPCR_platefile"
Start the cycling and save the file in a new subfolder in your personal folder on the public server labeled with the respective library plate ID.
Note
Cycling is performed using the following parameters:
| Step | Temperature (°C) | Time | |
| Initial denaturation | 95 | 10 min | |
| Per cycle denaturation | 95 | 15 s | |
| Per cycle annealing | 60 (incl. measurement) | 30 s | |
| Per cycle extension | 72 | 30 s | |
| Go to 2, 44 times |
Note
[Documentation]
Note down the cycler name and number in the respective fields in Labfolder.
Note
[Note]
The cycling takes approximately 2 h and 30 min.
Discard the qPCR plate and all the plastic ware that is still in the robot. Collect liquid waste in 500 ml bottles. Keep half filled tip box from stacker 2 (clean tips), cover tips and store tip box for later use.
Clean the robot by wiping the Bravo deck and the benches using tissues and ethanol. Switch off the robot and the cooling device and restart the computer so that remote access to the computer becomes possible. Switch off the computer screen.
Perform data analysis on any computer connected to the network using the BioRad CFX Manager software.
Note
[Documentation]
- Make a copy of the qPCR MS Excel analysis template located on the server ("coreunit:\SummaryTables\Library\qPCR_library_quantification_empty_template_20240108"; also attached below). NEVER save your data in the template sheet!
- Carefully follow the instructions in the "Instructions" tab.
- Transfer the original qPCR .pcrd file, the filled analysis sheet and images of the standard curves and regression line to the coreunit server into the respective library plate folder.
- Save the same information in the Labfolder entry for your experiment.
- For quality control tracking across experiments, update the list “YYYYMMDD_XX_qPCR_control_tracking” (XX being your initials) on the core unit server with all final control values (path: coreunit\SummaryTables\Library).
 qPCR_library_quantification_empty_template_20240108.xlsx70.5KB
 Expected result
LPCs typically produce 7x10⁹ molecules in assay 1 and EPCs 1x10¹⁰ molecules with the currently used lysate. LNCs and ENCs are expected to range between 3x10⁷ and 3x10⁸.
Compare the average measurements for the EPCs and LPCs to the averages from previous library preparation experiments to determine the success of library preparation and DNA extraction.