Feb 26, 2026
Biston betularia protocols: Rearing
- Carl J. Yung1,
- Ilik Saccheri1,
- Ivy Whiteford1,
- Amy Corthine1
- 1University of Liverpool
- Saccheri Lab


Protocol Citation: Carl J. Yung, Ilik Saccheri, Ivy Whiteford, Amy Corthine 2026. Biston betularia protocols: Rearing. protocols.io https://dx.doi.org/10.17504/protocols.io.dm6gp92n8vzp/v1
Manuscript citation:
Ilik J. Saccheri, François Rousset, Phillip C. Watts, Paul M. Brakefield, Laurence M. Cook (2008). "Selection and gene flow on a diminishing cline of melanic peppered moths". PNAS. 105 (42), 16212-16217. Arjen E. van’t Hof, Nicola Edmonds, Martina Dalíková, František Marec, Ilik J. Saccheri (2011) "Industrial Melanism in British Peppered Moths Has a Singular and Recent Mutational Origin". Science. 332 (6032), 958-960. Arjen E. van't Hof, Louise A. Reynolds, Carl J. Yung, Laurence M. Cook and Ilik J. Saccheri (2019) "Genetic convergence of industrial melanism in three geometrid moths". Biol. Lett.15: 20190582.
License: This is an open access protocol distributed under the terms of the Creative Commons Attribution License, which permits unrestricted use, distribution, and reproduction in any medium, provided the original author and source are credited
Protocol status: Working
We use this protocol and it's working
Created: January 27, 2025
Last Modified: February 26, 2026
Protocol Integer ID: 119137
Keywords: Lepidoptera, insect rearing, Biston betularia, Ecological genetics, peppered moth, biston betularia, biston betularia protocol, peppered moth, textbook example of industrial melanism, industrial melanism, annual husbandry cycle
Funders Acknowledgements:
NERC
Grant ID: NE/T000597/1
Abstract
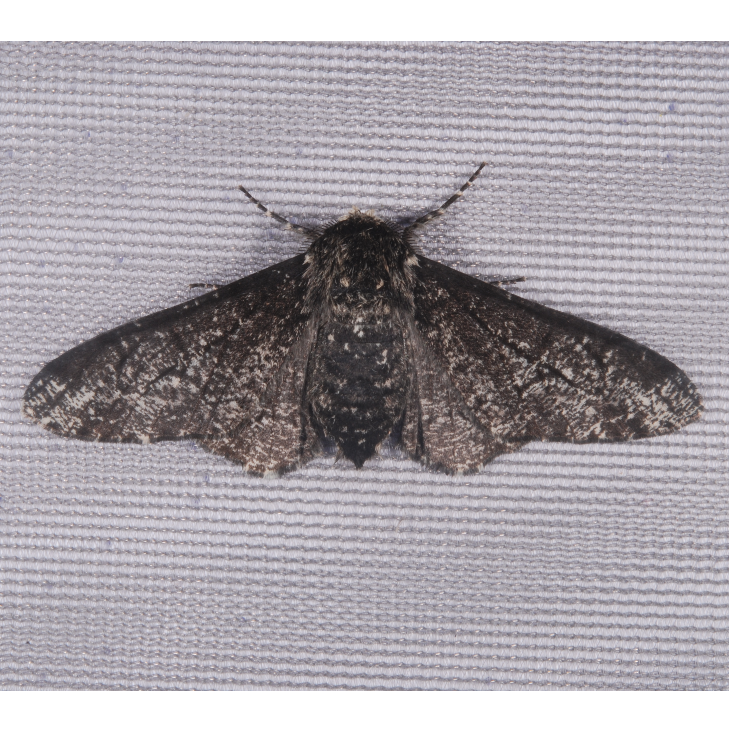
The peppered moth, Biston betularia, is a textbook example of industrial melanism. Here we describe the procedures associated with the annual husbandry cycle of a laboratory stock.
Image Attribution
ILIK SACCHERI
Safety warnings
Adult moths, particularly wing scales, are potential allergens. Repeated exposure can lead to sensitisation. Please follow proper health and safety guidance and use appropriate PPE.
Pairing Adults
2w 1d 2h
Female peppered moths are most receptive to pairing in the first 5 days after eclosion. Males are most active in the first 5-7 days. This period can be extended for several days by keeping adults in the fridge during the day. After eclosion, all adult moths should be kept individually in pill boxes with netting on the lid in a fridge (5 °C -7 °C ) or other cool place out of the sun at all times.
We have found that by far the most effective situation to achieve pairing is under outdoor natural light conditions, for example in a polytunnel. This is likely due to a combination of internal diurnal clock and light cues. If attempting to pair moths early in the season (May), the space should be heated at night to ~15 °C .
The standard set-up is to first introduce a virgin female into a cylindrical hanging net cage (30cm diameter) about 1hr before dusk. The females will usually crawl up the side of the cage and come to rest on the roof of the cage where they will droop their abdomen, and subsequently extrude their ovipositor/pheromone gland (referred to as ‘calling’). It is best not to disturb the females too much while they are in their daytime semi-dormant state, but if they do not move up to the top of the cage by dusk of their own volition they should be placed there manually.
2w
One or two (good quality) males should be introduced shortly before dusk, ideally after the female is in position and calling. Receptive males will perform a short pre-mating ritual/dance in very close proximity of the female, moving in circles with very rapid wing beats. If the female is receptive, she will allow him to pair; if not it is likely that the pair are incompatible. In this case it is worth trying with a different male or female. If a particular male is either not active at all or too active, it can sometimes work to place him in the fridge for 5-10min before trying him again. Wild-caught males are generally larger, more active and often more likely to pair than captively bred males.
Biston betularia in copula
2h
The majority of mating activity occurs within 1hr after dusk, though this may also be influenced by latitude.
Once in copula the majority of pairs will remain immobile and connected for close to 24hr till the following dusk. However, a non-trivial proportion of pairings (20-30%) will separate during the night, giving the impression in the morning of not having paired. It is therefore good practice to check for pairings up to midnight or even one am. In warm conditions during the day, in copula pairs may separate before dusk, in the afternoon, and some females will start laying eggs within the stitching of the cage material. This can be avoided by transferring females that have separated to egg-laying enclosures.
If necessary, the same male may be remated up to three times. We do not know for sure whether females remate in the wild but in captivity the only females that ‘call’ again after having paired once are those that do not start laying eggs after the first pairing, suggesting that the pairing was unsuccessful in transferring a viable spermatophore.
Several mating cages may be set-up in the same space but not at too high density (e.g., >50cm between cages) as this may confuse the source of pheromone signal within each cage.
A record of the identity of the female and male in every pairing should be kept, and given a mating family number. This information and family number is used as the label for the offspring. To minimise inbreeding depression, we try to avoid mating between close relatives, particularly sibs and half-sibs, and every two years or so introduce unrelated genetic material via wild-caught (typica morph) males.
1d
Collecting Eggs
1w
A B. betularia female will typically lay hundreds of eggs. They do not require a host food plant to lay on (as the newly hatched larvae are wind dispersed) but show a tactile preference for laying in tight crevices. We create this medium with a tightly folded and cut pocket tissue, making sure that the many leaves on both edges are not stuck together. The square of tissue is attached with two small pieces of tape (e.g. micropore) onto the side of a small plastic cube (75-80mm cube) with the two cut ends facing up and down. To make it easier for the females to position themselves to lay, a small piece of netting is draped over the tissue. Finally, as the females cannot easily grip the smooth plastic sides and may consequently become agitated, a dowel is placed diagonally within the cube. The temperature for egg laying is not critical (15 °C -20 °C ), though it is best to keep the females under a natural day/night light cycle. The air holes on the lid of the egg-laying chamber must be small enough to not let first instar larvae through, sealed with micropore tape if necessary (sticky side up).
Females may start laying on the first night after mating but more usually start on the second or even third night after mating. If a paired female has not started laying after the third night she is unlikely to lay. Most eggs are laid in the first 5 days after mating. Depending on requirements, eggs are usually collected for 5-7 days.
Female Biston betularia in egg-laying enclosure
Several Biston betularia females in egg-laying enclosures
1w
Incubation & Hatching
1w 4d
Once the female and dowel have been removed from the egg-laying enclosure, the folded tissue should be detached from the side of the box and the micropore tape either stuck to the tissue or removed. This avoids newly hatched larvae getting stuck to it. The tissue can then be placed flat on the base of the cube. Egg incubation time varies with temperature: at 22 °C eggs hatch after 11 days; at 18 °C after 14 days.
Biston betularia eggs
When eggs are first laid they are bright green ovals. A day before hatching they darken.
1w 4d
Larval Host Plants & Feeding
10w
Peppered moth caterpillars are polyphagous, feeding on a wide range of leaves of deciduous trees and shrubs. We start the newly hatched larvae on silver birch (Betula pendula) or downy birch (Betula pubescens), gradually moving them onto grey willow (Salix cinerea) or goat willow (Salix caprea); white willow (Salix alba) can also work well. They can be reared all the way through on birch although it has a tendency to dry out faster than the willows.
Freshly cut silver birch (Betula pendula) sprig with cut end wrapped in wet tissue and cling film, ready to be introduced into egg hatching enclosure.
Grey willow (Salix cinerea)
Goat willow (Salix caprea)
The first instar larvae are numerous and mobile, with a strong positive phototaxis response that overrides feeding. Therefore, once they have started hatching, we minimise opening of the incubation chamber and place the cubes inside darkened boxes (e.g., shoe box). A cut sprig of birch with three good quality leaves and small piece of damp tissue wrapped around the cut stem (to maintain freshness) should be introduced when the first larvae hatch. At this early stage, the larvae are not actively seeking food plant, and may make a dense communal silk web in a corner away from any food plant, we find that mortality is reduced by arranging the leaves in such a way that they cover as much of the sides and lid of the enclosure as possible. A second similar piece of birch is introduced after the leaves of the first have been 50-60% grazed, which takes 3-4 days. In week two, when the larvae have reached second instar they should be moved to a clean container and if necessary split across more boxes. At this point they can be transferred onto the willow food plant and out of the dark. Care should be taken to avoid condensation as the small larvae drown very easily. It works better to keep the larvae in relatively small containers, which force them to be close to the food. It is important to only supply enough food plant as will be consumed while it is still fresh.
Early instar Biston betularia larvae: on the day of hatching (top left); partially grazed birch leaf (top right); fully grazed birch leaf (bottom left); fully grazed goat willow (bottom right).
2w
The most efficient way of handling first to third instar larvae is to allow them to move themselves from depleted food branches to fresh branches of food plant, supplemented with manual handling using a small brush (check that the brush is clean of small larvae before moving on to the next box). Fourth to sixth instar larvae can be handled with fingers or soft tweezers, though transferring the defoliated branch on which several larvae are resting is preferred and more efficient. Later instars grip strongly onto branches (or other larvae) with their rear claspers; they should not be pulled from the head end but instead their rear claspers gently ‘tickled’ to induce a release response. To reduce the risk of spreading disease, rinse fingers in dilute Virkon (0.5%) or bleach (0.5%) between handling different boxes of caterpillars. Any unhealthy looking caterpillars should be disposed of promptly (in a jar of 1% Virkon).
As the caterpillars get larger, there food requirements increase quickly. They should be transferred to progressively larger plastic containers with perforated lids allowing an appropriate level of ventilation (too much ventilation leads to rapid drying of leaves; too little ventilation to mould and disease). The base of the containers should be lined with newspaper to facilitate the removal of larval frass, and replaced regularly to maintain hygiene. We use netting over the opening of the box base held on with elastic (in addition to perforated lid) to reduce the risk of larvae escaping. Plastic containers should be washed or wiped in dilute Virkon (0.2%) or bleach (0.5%) each time they are changed to reduce the risk of disease.
The density of larvae should be adjusted according to larval stage and the size of the container. The optimal density at any stage is one that produces 70-80% defoliation over 2-3 days. B. betularia caterpillars are not cannibalistic but too high densities and associated poor hygiene carry a higher
risk of disease outbreaks.
Larval rearing time is highly contingent on variables such as temperature, humidity and foodplant quality. We suggest an approximate estimate of 10 weeks from egg hatching to pupation.
Biston betularia final instar larvae showing phenotypically plastic colour variation
Food plant is best supplied to caterpillars freshly cut on the same day, but one day old cut branches may be used if the branches were left standing in water and covered with plastic to reduce transpiration.
To avoid caterpillars spending too much time in contact with frass (and mould) the branches of the food plant should ideally be arranged such that the fresh food is placed on a structure that keeps them largely off the floor. This structure may consist of forked branches or straight branches wedged across the box at mid height.
Two days supply of freshly cut grey willow during the peak feeding period
8w
Pupation & Overwintering
Approximately 6 weeks after hatching, final instar larvae will stop feeding quite suddenly, and crawl around the base of the container for several hours looking for a place to pupate. This crawler stage should be transferred every day to a clean box containing 3-4cm of coarse wood shavings dampened in clean water or dilute Virkon (0.1-0.2%). The crawlers are often found underneath or between the newspaper on the base of the containers.
Biston betularia crawler stage
Once all the caterpillars have pupated (mid-August to mid-September) they should be transferred to progressively cooler temperatures to mimic autumn and winter. It is important not to keep them at >15 °C in the autumn as this will lead to elevated energy consumption and desiccation. Pupae can be kept at outdoor ambient temperature in a shed through the winter but we prefer to hold them in a cold room or fridge at 15 °C as this allows closer control of emergence timing.
Note
The box used to overwinter the pupae should be lightly ventilated (e.g., small holes in the lid) to reduce fungal growth whilst retaining high humidity, and also preventing the entry of tiny fungus gnats (sciarid flies). When reared in large numbers, Biston pupae are susceptible to attack by the larvae of these flies, who lay their eggs in damp soil or wood shavings, in the first two weeks as pupae, when they are still relatively soft. The gnat fly larvae are able to enter Biston pupae through the softer tissue between the abdominal segments and can cause major losses to stocks. To reduce the risk of gnat fly infestation, hang yellow sticky papers around the rearing space and keep unused wood shavings dry and sealed.
Density and spacing of pupae
Stacking of boxes to increase ventilation
Fungus gnat larvae infestation
Overwintering pupae may die of various causes that are not always obvious, but the main ones are fungal infection (box environment too wet and unventilated) and desiccation (box environment too dry and excessively ventilated). To reduce the spread of any cause of mortality we regularly check all the overwintering boxes for dead pupae and remove these. The first check should happen within a fortnight of the last crawler within a family (it is best to avoid handling pupae in the first week after pupation when they are soft). Subsequent checks should be performed once per month. These checks are also an opportunity to adjust the moisture conditions if too wet or too dry. Live pupae have a firm but flexible abdomen when wiggled at the cremaster (abdominal spike); dead ones are either soft or inflexible.
Optionally, pupae may be transferred from the wood shavings to boxes with a dampened dimpled foam base. This arrangement minimises physical contact between pupae and the foam is a less attractive medium for both gnat flies and fungal growth, particularly if dampened with dilute Virkon.
Overwintering Biston betularia pupae spaced out on dimpled sponge
Eclosion
6w
To approximate natural conditions but avoid premature eclosion, laboratory reared pupae are kept in storage boxes (covered in a separate protocol), initially in an unheated outbuilding through the autumn and early winter, then transferred to a 5 °C fridge or cold room.
Pupae are brought out of their winter diapause by moving the storage boxes to incubators (Sanyo MLR) set to 10 °C for one week, followed by 15 °C for one week. Low level lighting is kept on 12:12 cycle. After this period, pupae are ready to be set up in cages for emergence in the insectary.
During eclosion the insectary should be maintained at 20 °C with a relative humidity of 60-80% and 12:12 light cycle. Very high humidity can encourage fungal growth and increase pupal mortality; low humidity causes the pupae to dry out and can adversely impact wing expansion. Eclosion cages should not be in contact with each other to prevent unwanted mating between cages. If you do not have access to an insectary, satisfactory eclosion can be achieved in any space at 15-22°C, but the timings will differ accordingly.
Safety information
Adult moths are a source of allergens, particularly wing scales. Repeated exposure can lead to sensitisation. Please follow proper health and safety guidance and use appropriate PPE.
2w
Sexing pupae & adults
1m
Sexing pupae is useful to minimize the risk of unwanted matings within eclosion cages. Pupae can be sexed by size and shape difference (females are generally larger with slightly wider, more rounded, abdomens). More reliable sexing can be performed by observation of the position of the genital pore, though magnification is often necessary.
Adults can be sexed by antennal morphology (and abdomen shape). Males have pectinate antennae, females do not.
1m
Eclosion
6w
After the two week warming procedure described in step 1, pupae are moved into the insectary set up described in step 2. Pupae are moved from their storage boxes to bowls of damp wood shavings placed inside net cages. This allows the pupae to continue warming without drying out. During the period of peak emergence ~10% of pupae will eclose overnight. The maximum number of pupae per cage is designed to avoid too high densities of flying adults.
20m
Adults begin eclosing approximately 28 days after the pupae were first transferred to 10°C. Avoid handling adults until wings have hardened (the timelapse shown below is played at x80 speed). The eclosion process itself takes 60-90 min, and hardening takes another 2-3 hr.
2w
Eclosion cages should be checked every morning and late afternoon for new moths. Adults should be labelled (family number, eclosion date, sex, wing morph) and transferred to individual containers soon after eclosion to prevent mating (mating occurs very rarely during the day time but may occur in the first night after eclosion, including among close relatives). It is important to maintain virgin females for pheromone trapping and for setting up desired crosses. To slow the rate of ageing and eliminate flight activity, adults intended for mating at a later date may be stored at 5-7°C for up to two weeks, though mating success declines quite rapidly over this period, particularly for females. Biston betularia adults do not feed.
1m
Scoring adult wing patterns
1m
Wing patterns are graded from A (the lightest typica patterns) to G (completely melanic). There are some exceptions to this system, notably the R morph, which shows a medial band of typica patterning on the wing flanked by melanic regions (pictured below in copula with a typica male).
1m