Feb 02, 2026
Best practices in Xenopus Housing, Husbandry and the 3Rs
- Anna Noble1,
- Gretel Nicholson1,
- Billie Dolphin1,
- Mel Ersin1,
- Esther Pearl2
- 1EXRC;
- 2NC3Rs
- Xenopus protocols


Protocol Citation: Anna Noble, Gretel Nicholson, Billie Dolphin, Mel Ersin, Esther Pearl 2026. Best practices in Xenopus Housing, Husbandry and the 3Rs. protocols.io https://dx.doi.org/10.17504/protocols.io.36wgq1m8kvk5/v1
License: This is an open access protocol distributed under the terms of the Creative Commons Attribution License, which permits unrestricted use, distribution, and reproduction in any medium, provided the original author and source are credited
Protocol status: Working
These are the housing and husbandry protocols used by the EXRC, Portsmouth, UK.
Created: January 30, 2026
Last Modified: February 02, 2026
Protocol Integer ID: 241842
Keywords: Xenopus, 3Rs, Housing, Husbandry, Reduction, Refinement, Environmental Enrichment, Stress, Disease, Health indicators, Rack sterilisation, Ultrasound, Embryo surface sterilisation, Humane killing, Post-mortem examination, Breeding records, husbandry practices for laboratory xenopus, best practices in xenopus housing, husbandry protocols for xenopus laevi, laboratory xenopus, xenopus in research, xenopus housing, using xenopus, different xenopus species, maintaining healthy frog, xenopus, xenopus protocol, current protocols of the european xenopus resource centre, frogs in the best condition, xenopus tropicali, xenopus laevi, european xenopus resource centre, healthy frog, frog facility, laboratory species for decade, individual frog, staff at frog facility, laboratory species, frog, identification of individual frog, breeding, husbandry protocol, embryo, husbandry practice, reliable experimental result
Disclaimer
These are the current protocols used by the European Xenopus Resource Centre (EXRC) based in Portsmouth, UK. Many of the best practices outlined here are based on the ‘wisdom of crowds’ (practices that work well in a number of different animal facilities) as there is no empirical evidence for most aspects of frog housing and husbandry. The EXRC protocols are periodically reviewed as housing, husbandry and 3Rs best practices evolve, this chapter represents the protocols in use in 2025. The National Xenopus Resource (NXR) in Massachusetts, USA has slightly different protocols to the EXRC [5], both sets of protocols work well for maintaining healthy Xenopus colonies.
Abstract
*****
This is a preprint of the following chapter
Authors: Anna Noble, Gretel Nicholson, Billie Dolphin, Mel Ersin and Esther J. Pearl
Chapter: Chapter 1 - Best practices in Xenopus Housing, Husbandry and the 3Rs
Book title: Xenopus protocols (part of the Methods in Molecular Biology series)
Edited by Caroline W. Beck
Publisher: Springer Nature.
Expected publication in 2026. Once the book is published a link to the final version will be added to a version of this protocol.
This is the version on the author's manuscript prior to acceptance for publication and has not undergone editorial and/ or peer review on behalf of the publisher.
*****
Appropriate housing and husbandry practices for laboratory Xenopus are key to maintaining good welfare standards and generating reliable experimental results. Although we lack empirical evidence for many housing and husbandry practices, Xenopus have been used as a laboratory species for decades. As a result, best practices have evolved over time as researchers and staff at frog facilities have built up experience on what helps to keep frogs in the best condition.
Different Xenopus species have different care needs, this chapter covers housing and husbandry protocols for Xenopus laevis and Xenopus tropicalis. These are the current protocols of the European Xenopus Resource Centre (EXRC) in Portsmouth, United Kingdom. The EXRC provides services supporting researchers using Xenopus in research, including guidance on housing, husbandry, breeding and colony management and maintaining healthy frogs to enable collection of reliable data. Here, we describe how to set up and seed a new recirculating system, surface sterilisation of embryos and identification of individual frogs. We also outline best practices for each life stage, including indicators of good health and normal behaviour as well as signs of distress or poor health and protocols for handling disease outbreaks.
Attachments

Image Attribution
Images in this protocol were created for this protocol. Photographs were taken by EXRC staff.
Guidelines
These are the current protocols used by the European Xenopus Resource Centre (EXRC) based in Portsmouth, UK. The EXRC protocols are periodically reviewed as housing, husbandry and 3Rs best practices evolve, this chapter represents the protocols in use in 2025.
Materials
Materials
Materials for colony maintenance
1. Recirculating aquatic system suitable for housing Xenopus (e.g. a system including tanks, UV, carbon, biological and mechanical filters) The EXRC uses recirculating systems from MBK installations limited. Alternatives, such as “fill and dump” or flow through systems, are no longer in common use and will not be discussed.
2. Instant Ocean Salt (MBK installations limited)
3. Black uPVC plastic guttering and downpipe (food grade plastic).
4. QuickStart API for aquarium systems (a bacterial supplement to help rapidly establish the nitrogen cycle)
5. Water testing strips that test for ammonia, nitrate, nitrite
6. 1 x MBS (Modified Barth’s Saline): (): 88 mM NaCl, 1 mM KCl, 2.4 mM NaHCO3, 0.82mM MgSO4 x 2H2O, 0.33 mM Ca(NO3)2 x 2H2O, 0.41 mM CaCl2 x 6H2O, 10 mM HEPES, adjust pH to 7.5
7. 1 x MMR (Modified Marc’s Modified Ringer’s) :0.1 M NaCl, 2 mM KCl, 1 mM MgSO4, 2 mM CaCl2, 5 mM HEPES (pH 7.8), adjust to pH 7.4
8. Disinfectants such as Safezone plus, Anigene and 10% Distel, and F10.
9. Evans descaler
10. Horizon 23 2.3 mm trout pellets
11. Lamb heart
12. Frozen bloodworm
13. Generic tropical fish food flakes (for example Tetra brand, via online marketplace)
14. Sera micron algae– NOTE: there are often shortages of sera micron powder in the UK so reorder before stocks get low.
15. Spirulina powder
16. Syringe needles – 30-gauge hypodermic and 23-gauge hypodermic
17. Scalpels with number 10 blades
18. Artificial lily pads (Amazon)
19. Red mouse tunnels
20. Red mouse igloo hides
Materials for humane killing
21. Tricaine methanesulfonate (MS-222) (Sigma/PharmaQ)
22. Bone forceps with sharp ends (Fisher)
Materials for post-mortem examinations
1. Tricaine (Sigma/PharmaQ)
2. Camera
3. Paper towels, such as Tork Hygiene Rolls
4. Greiner Bio-One Charcoal Wet Swabs
5. PBS buffered Formalin 10%
6. PBS buffered 4% Paraformaldehyde
Materials for colony management
1. Microchipping needle + Radio Frequency Identification (RFID) chips – (iDLogic, 7mm). Review the availability of smaller microchips annually and use the smallest available.
2. Tricaine/MS222 (Sigma/PharmaQ)
3. Nitrile gloves
4. 5.9 L buckets with lids
5. Paper towels, such as Tork Hygiene Rolls
6. 1.5 mL microcentrifuge tubes
7. Forceps
8. Disinfectant such as Safezone Plus
9. 70% Ethanol
10. 0.1 mg/mL Thimerosal in 0.1 x MBS
11. 0.1% Bovine Serum Albumin (BSA) in 0.1 x MBS
12. 2% (w/v) L-cysteine, pH 8.0
13. Double edge razor blades
14. Ultrasound (e,g. Clarius Scanner L20 HD3 wireless scanner with Clarius Power Fan HD3) and tablet
Safety warnings
When sterilising recirculating systems appropriate personal protective equipment must be worn, this includes safety goggles, gloves, a face mask and long hair should be tied back.
Note 1: Anigene/Distel, will generate a lot of foam once put into the system, despite the label stating they are ‘non-foaming’. Do not touch the foam as it is a skin and eye irritant. If contact is made with the foam rinse the exposed area immediately with water.
Ethics statement
Before conducting any work involving animals ensure that you have prior approval from your local ethical review body (e.g. IACUC, AWERB etc). All animal work at the EXRC is approved by the University of Portsmouth AWERB.
Best practices in Xenopus Housing, Husbandry and the 3Rs
Considering the 3Rs (Replacement, Reduction and Refinement) throughout the research cycle is important to the quality of the research produced and is also expected by most research funders. When animal research is necessary to answer a scientific question, implementing reduction and refinement, including as part of the care and monitoring of laboratory animals, is key to ensuring that any data produced is reliable and reproducible. For example, using best practices when taking care of laboratory Xenopus is key to reliable results as housing and husbandry conditions influence not only frog health but also research outcomes, as different aspects of environmental conditions can affect behaviour and physiological responses [1,2]. Making sure results are as reliable as possible is a key aspect of the ‘R’ of reduction – reducing the number of animals wasted in experiments that produce unreliable results. Additionally, careful management of frog colonies can reduce the number of excess animals bred, raised and maintained. Implementing best practices in housing and husbandry, for example introducing environmental enrichments that enable frogs to perform natural behaviours, is a key aspect of the ‘R’ of refinement as well as contributing to more reliable science by reducing physiological changes due to stress [3,4].
These are the current protocols used by the European Xenopus Resource Centre (EXRC) based in Portsmouth, UK. Many of the best practices outlined here are based on the ‘wisdom of crowds’ (practices that work well in a number of different animal facilities) as there is no empirical evidence for most aspects of frog housing and husbandry. The EXRC protocols are periodically reviewed as housing, husbandry and 3Rs best practices evolve, this chapter represents the protocols in use in 2025. The National Xenopus Resource (NXR) in Massachusetts, USA has slightly different protocols to the EXRC [5], both sets of protocols work well for maintaining healthy Xenopus colonies.
Colony maintenance
This section includes protocols for setting up a recirculating system including sterilising the system, seeding the system with bacterial biofilters and adding frogs. Additionally, we outline conditions for rearing and maintaining both X. laevis and X. tropicalis, including water quality parameters, the best conditions for raising tadpoles for each species, species-specific environmental enrichment and daily, weekly and monthly checks.
Sterilising recirculating aquatic frog housing systems
When the opportunity arises (i.e. when a system is empty due to stock movements) it is good practice to ‘sterilise’ a recirculating system to reduce the pathogen load, including pathogens such as chytrid, Mycobacterium liflandii, Mycobacterium ulcerans. Recirculating systems can then be reseeded with surface sterilised embryos or the offspring from surface sterilised embryos and the system can be considered a ‘clean’ system. It is generally not advised to sterilise the rack when there are other animals in the room or near the rack being cleaned due to the foaming/fumes, and risk that these fumes pose to the other animals.
Safety information
When sterilising recirculating systems appropriate personal protective equipment must be worn, this includes safety goggles, gloves, a face mask and long hair should be tied back.
Start by draining down and removing tanks from the system. Clean and, if necessary, descale thoroughly.
Remove sock filters, mechanical and carbon filters and sump biofilters from the rack. Throw away the biofilters and filters. Soak each filter housing in a bucket containing 5% bleach and clean after 20 minutes.
Switch off the chiller and rack controller if fitted.
Drain down the sumps using a siphon and wipe down the inner sides of the sumps, removing any loose dirt stuck on the sides.
Wipe down the entire external outer racking using 2% Anigene/10% Distel solution.
Replace the cleaned tanks and filter housing back onto system. Switch the rack controller back on, but NOT the chiller. Only refill the tanks when the sump reservoir has fully replenished (refill the tanks slowly since the water level may be detected as low in the sump and the rack switched off automatically, the EXRC refill two tanks at a time).
Once the sump has filled, siphon out any loose debris left over from cleaning.
Once the system appears clean and is fully up and running, carefully add undiluted Anigene and undiluted Distel into the sump to a final concentration of 2% Anigene and 10% Distel. To calculate this correctly, you
must work out how many litres are in the sump as well as the tanks on the rack (see Note 1).
Safety information
Do not touch the foam as it is a skin and eye irritant. If contact is made with the foam rinse the exposed area immediately with water.
Note
Note 1: Anigene/Distel will generate a lot of foam once put into the system, despite the label
stating they are ‘non-foaming’.
Turn system water changes down to 1%
Leave the Anigene/Distel to flow through the system for at least 48 hours. Whilst the rack is running with
disinfectant through it, using a clean cloth, wipe down any areas which are not submerged in water.
After 48 hours, turn rack up to a 50% water change to flush out the Anigene/Distel. This can take up to 1-2
weeks. This process can be sped up by flushing filtered mains water through the sump via a hose.
Ensure there are no traces of Anigene/Distel left in the system. There should be no disinfectant odour left in the water or on surfaces. There should be no foam floating on any surfaces.
Drain down the tanks once again and remove all the tanks from the rack. Wipe the tanks down with a clean cloth under running water for at least 3-4 minutes. This is to ensure there is no residue is left embedded on the plastic of the tanks.
When confident that all traces of Anigene/Distel have been flushed from the system, the water changes can be set to 10%.
Turn the chiller back on.
Add new mechanical, carbon and sock filters to the filter housing and add new biofilters to sump.
Check all water parameters daily to ensure they read consistent and correctly for at least one week.
When parameters are stable and correct, frogs can be added. Frogs must be added very slowly (around 5 frogs per day).
Alongside adding the frogs, add QuickStart (API) to the sump (10ml per 38L).
Monitor Nitrates, Nitrites and Ammonia levels daily for at least one month or until water parameters stabilise. If there is a spike in Ammonia, up the system water changes to 30% and/or add more QuickStart.
Seeding systems and introducing frogs
Seeding a recirculating system sets up the biofilter (the bacteria that help process frog waste). The protocol for seeding a system is different depending on whether the new recirculating system is going to be considered ‘clean’ or not. A ‘clean’ system is one that only houses tadpoles and frogs that have grown from surface sterilised embryos and have never been in contact with ‘non-clean’ animals.
Seeding a system for ‘non-clean’ animals using materials from another existing system:
Once the recirculating system has been confirmed to be running smoothly it can be seeded.
Two weeks before adding any frogs to the system add a used sock filter or dirty pad filter from another recirculating system to introduce and feed de-nitrifying bacteria.
Add biofilter beads (about five bags per sump).
The day that frogs will be added to the system add QuickStart API.
Monitor the water parameters (ammonia, nitrates and nitrites) daily. Spikes in values, if any, can occur for between two weeks and a month.
Alternatively, if seeding a system for ‘clean’ animals or if there is no existing recirculating system in the facility, follow this variation of the protocol:
Once the recirculating system has been confirmed to be running smoothly (if applicable) it can be seeded.
The day that the frogs or tadpoles will be added to the system add biofilter beads (about five bags per sump) and add QuickStart API. Add frogs or tadpoles (see Note 2).
Note
Note 2: The ideal way to start a colony in a newly sterilised rack and keep ‘clean’ status is to seed the biofilter with tadpoles grown from surface sterilised embryos.
Monitor the water parameters (ammonia, nitrates and nitrites) daily. Spikes in values can last for one to two months (see Note 3).
Note
Adding too many frogs to a new system at once increases the duration of ammonia, nitrate and nitrite spikes, which can lead to stress and increase the chances of opportunistic pathogens infecting animals. Consider starting with fewer than 25% of the total number of frogs the system can house. Ammonia, nitrate and nitrite spikes can be kept to a minimum by adding frogs slowly over several months. Ammonia spikes can be in the range of 0-6 ppm. Nitrate spikes can be in the range of 0-200 ppm and nitrite spikes can be in the range of 0-10 ppm.
If ammonia levels get above 1 ppm consider adding more QuickStart API to the system.
If nitrates are above 160 ppm increase the water change percentage in 5% increments starting with a 10% water change.
Conditions for rearing and maintaining X. laevis adults
X. laevis tadpoles are reared from embryos either in an incubator or embryos can be placed directly into recirculating systems. If using an incubator, this should have an internal light source and both high and low temperature cut offs. The light source prevents tadpoles from developing vision defects and the temperature cut offs prevent extreme high or low temperatures affecting the tadpoles.
The environmental conditions the EXRC use to rear and maintain X. laevis in recirculating systems are provided in Table 1.
Table 1. Environmental conditions for rearing and maintaining Xenopus laevis in a recirculating system.
| A | B | C | |
| Parameter | Value | Other information | |
| Room temperature | 20 °C (range 18 – 20 °C) | ||
| Water temperature | 18.5 °C (range 17 – 19 °C) | ||
| Conductivity | 1550 µS (range (1500 – 1600 µS) | Maintained by Tropic Marin or Instant Ocean | |
| pH | 7.9 (range 7.5 – 9.0) | Local mains water is within the pH range (See Note 4.) | |
| Water | Local mains water filtered through two mechanical filters (1 micron) and one carbon filter before reaching any recirculating systems. | ||
| Tank size | 23 or 27 litres | ||
| Maximum stocking density | 7 adult females or 18 males per 23 litres. 10 adult females or 25 adult males per 27 litres. | ||
| Flow rate | 1.33 L/minute in adult tanks, 250 mL/min in tadpole tanks. | ||
| Lighting | LED lighting, 12 hours light, 12 hours dark with night light (a dim bulb). Changes from light to dark are instant, with no dimming. This light cycle is not ideal, the EXRC have plans in place to move to a 12 hours light 12 hours dark light cycle with two hour dawn and dusk transitions. |
Note 4: If local mains pH water is too low this can be raised by adding sodium bicarbonate, if it is too high it can be lowered using monosodium phosphate anhydrous (food grade).
Conditions for rearing and maintaining X. laevis tadpoles in recirculating tanks
Tadpoles can be reared from embryos in tanks in a recirculating system or in Petri dishes in an incubator. Embryos produced to maintain stock can be introduced into tanks immediately after fertilisation without dejellying.
Embryos are placed into a recirculating system in a tank in which a mesh filter has been added to the water egress to prevent tadpole escape. After a few days, the eggs will begin to hatch. When the tadpoles are free from their jelly coating, remove any dead eggs from tank using a pipette.
After around 5 days, the tadpoles’ mouths have fully formed and are ready to filter-feed. Sera Micron/spirulina mix (1:3) is dispensed into a beaker then system water is added and stirred before adding to the tanks. This disperses the feed and prevents a layer of algae floating on the surface of the water. Add enough of the mixture to make the water turn a slightly dark shade of green, the tadpoles at the back of the tank should still be visible (see Note 5).
Note
Note 5: The amount of sera micron can be added to the tank either based on tank volume and/or the number of tadpoles. As a guide try 16 mg per tadpole (for example when singly housed in a 3 L tank) or 80 mg/L based on the number of litres in the tank. Adjust as appropriate based on observations.
Tadpoles are fed twice a day per day except for weekends when they are fed once a day.
After a few days, there should be a layer of algae forming at the bottom of the tank. This should not be removed as the tadpoles like to eat this between feeds.
Tadpoles tend to do better in a mature tank setting (tanks with a thin layer of algae on the bottom) with as little disturbance as possible. Tanks are thoroughly cleaned or swapped every 2 -3 weeks (possibly longer depending on the age of the tadpole).
Mesh filters are cleaned/replaced if the water level has risen above mesh filter (see Note 6).
Note
Note 6: Overfeeding can lead to mesh filters getting clogged resulting in tanks overflowing.
When tadpoles have developed front and back legs, supplement daily feeds with a mixture of finely crushed trout pellets.
As soon as tadpoles have metamorphosed move them into a fresh tank for froglets (see Note 7).
Note
Note 7: Move individual froglets as soon as they metamorphose.
Rearing X. laevis tadpoles in an incubator
Tadpoles can be reared in Petri dishes in an incubator (e.g. if tadpoles need to be screened for presence of a transgene).
Keep tadpoles in an incubator ideally only until feeding stage. After that point they should be moved to the main system or moved to an incubator with a normal light dark cycle.
Petri dishes must be checked at least once per day.
Pipette out any dead eggs/tadpoles.
Remove any tadpoles that are developmentally abnormal and kill them humanely. The first indication is often the inability to swim in their normal head down, tail up orientation.
Use a Pasteur pipette to remove fecal material. Change around 10% of the water daily and replace with 0.1 x MBS solution located in incubator (to avoid temperature shock).
As needed move the tadpoles to larger Petri dishes or tanks, to judge this the tadpoles must be able to swim in their normal orientation in whatever size dish used. Keeping tadpole density low will promote growth.
If rearing in an incubator post feeding stage then feed with sera micron alone (see Note 8), dilute sera micron in system water, the desired colour is a slightly dark green.
Note
Note 8: The sera micron solution should be made fresh immediately before each use.
After checking and cleaning tadpole dishes a few drops of sera micron suspension should be added with a pipette into each Petri dish (see Note 9).
Note
Note 9: There is a fine line between over feeding and under feeding, both under and over feeding can lead to increased mortality. Observe the tadpoles feeding and the colour of their water regularly to ensure they are fed the correct amount. The food should be cleared within a couple of hours with the water becoming clear. Over feeding will lead to excess waste in dishes the following day and is more likely to lead to mass mortality than under feeding. Under feeding can lead to slowed or arrested development.
If tadpoles are eventually being added to a recirculating system, gradually introduce tadpoles to system water. This can be done by changing 10% of the petri dish fluid with system water rather than 0.1 x MBS.
To introduce these tadpoles into the recirculating system balance the Petri dishes on the surface of the tank water to acclimatise the dishes to the temperature of the system water.
Gradually add drops of system water into the Petri dishes over a period of a couple of hours and then sink the Petri dishes. Once the tadpoles have dispersed remove the Petri dishes from the tank.
Feeding X. laevis
Observing the animals while feeding is an important part of feeding both frogs and tadpoles. If you overfeed the system filters get clogged, water quality is affected, and it can encourage disease. If you underfeed, frogs lose weight and body condition deteriorates which impacts fertility. The feeding regimen the EXRC uses for X. laevis at different life stages is described in Table 2.
Table 2. Feeding X. laevis at different life stages.
| A | B | |
| Life stage | Feed and feeding regimen | |
| Tadpoles from Nieuwkoop and Faber [6] stage 45 | Sera-micron algae fed daily, 16 mg per tadpole or 80 mg/L based on volume of the tank. | |
| Froglets (up to 3 months) | Horizon 23 trout pellets (2.3 mm pellets) crushed in a coffee grinder, two to three times per day. ~3 crushed pellets per frog. | |
| Froglet (3 months +) | A mixture of crushed and whole Horizon 23 trout pellets until their mouths are large enough to eat whole pellets. | |
| Adults | Adult frogs are fed three non-consecutive days per week with Horizon 23 pellets. Feed two to three times per day, around 3 to 5 pellets per frog depending on their appetite. Occasionally supplement (especially for frogs suffering weight loss or those that are not competitive regarding food) with: lamb heart (cut to approximately 2 mm cubes) or frozen bloodworm. |
Environmental enrichment for X. laevis
Environmental enrichment encompasses any objects or general practices that enhance the physical, mental or social stimulation of laboratory animals. Good environmental enrichment should allow animals to express natural species-specific behaviours in a healthy way and give them some level of control over their environment.
The EXRC use dark coloured plastic guttering and downpipe tubes cut into 20 cm lengths in all tanks as environmental enrichment for Xenopus laevis. The plastic should be food grade to minimise leaching of chemicals from the plastic. Experimental animals have an image of pebbles and underwater scenes on the sides of tanks as additional enrichment.
Before introducing any novel environmental enrichment to an entire Xenopus colony it should be tested on a few frogs to ensure that it is not aversive or harmful. The NC3Rs (National Centre for the Replacement, Reduction and Refinement of Animals in Research, UK) has created an Evaluating Environmental Enrichment resource in collaboration with the RSPCA (Royal Society for the Prevention of Cruelty to Animals, UK) and the IAT (Institute of Animal Technologists, UK) to help animal technicians design and carry out experiments to test new enrichments. The following protocol for Assessing use of an environmental enrichment item is from the Evaluating Environmental Enrichment resource (https://nc3rs.org.uk/3rs-resource-library/evaluating-environmental-enrichment).
Create an ethogram. The behaviours of interest will vary depending on the species of Xenopus and the type of enrichment being trialled. For example, for Xenopus laevis how often the frogs interact with the enrichment and the type of interaction could be recorded. If the enrichment is a plastic pipe, outcomes recorded could be frequency and duration both inside the pipe and adjacent or if a frog is interacting with the item at the time point of observation. Also record any negative behaviours, such as aggression towards other frogs and repetitively bumping noses on the tanks. The NC3Rs/RSPCA/IAT Evaluating Environmental Enrichment resource has more information about developing ethograms (https://nc3rs.org.uk/3rs-resources/evaluating-environmental-enrichment/evaluating-enrichment-approach-1-monitoring).
Create a data collection sheet that is specific to the evaluation. As an example, this could include columns for tank number, focal animal ID, date, time, contact Y/N, contact type or behaviour, and observation notes.
Select five tanks to observe (best practice would be to randomly select which tanks to observe, but this may not always be feasible depending on the experiments the frogs are involved in).
If there is not already a system in place to individually identify frogs it is necessary to adopt one (see section 3.5.1 for how to use photographs to identify individual Xenopus). Select one frog from each tank (preferably randomly) to be the ‘focal animal’, this is the animal that will be observed for this tank. Record the focal animal for each tank on the data collection sheet. Use the same focal animals throughout the study.
Choose manageable time points for recording observations. Choose days where observations of the animals can be done at multiple time points (e.g. 08:00, 10:00 12:00. 14:00 and 16:00). If observations can only be done a few times a day, make sure these occasions are evenly spread out (e.g. 09:00, 12:00 and 17:00). Observation time points should stay the same throughout the study.
If tanks are not already numbered allocate a number to each tank and use these numbers to determine the order in which observations will be made each day. Observe the tanks in a different order on each occasion (preferably randomise the order that observations are made). Fill out ethogram sheets with the tank observation order ahead of time.
Introduce the enrichment item to the tanks, if not already present, at least 24 hours before observations begin.
Gather all the items needed for recording behaviour and keep them near to where observations will be made; for example, ethogram, data collection sheets (complete with cage numbers and focal animal ID), a pen and information on the schedule. Having everything to easily to hand will save time and keep things running smoothly.
Consider acclimatisation when observing. Following the schedule set out previously, observe from where tanks can be seen while also being aware of the effect of the observer on the animals. For example, try not to loom over the tanks and, if possible, allow the frogs five to ten minutes to acclimatise to observer presence. If an acclimatisation period is used, keep it the same throughout the study.
Note the behaviour of each focal animal on the ethogram sheet (preferably observing them in a random order). Record a) contact with the enrichment (Y/N); and b) type of contact. Spend a few seconds observing an animal before moving on to the next tank. Try to keep this time period the same for each animal. To increase observer consistency and reliability, carry out observations in pairs where possible.
Stay on top of data input, entering data into the spreadsheet each day.
Following the schedule, repeat observations until all data for all scheduled times and dates is collected.
Further information on adapting the protocol and looking at the data as well as other protocols for assessing environmental enrichments can be found at the following website: https://nc3rs.org.uk/3rs-resource-library/evaluating-environmental-enrichment
Daily checks for X. laevis colony care
The following lists outline the daily tasks and checks for one of the Xenopus laevis rooms at the EXRC. These can be used as a template for other facilities.
Check rack parameters and fill out Environmental Data sheet (Room Temperature, Conductivity, pH and Water Temperature for each rack).
All racks must be kept separate so gloves must be changed between racks. Each rack has separate equipment (food containers, nets, buckets for moving frogs etc).
Health check all frogs.
Check water levels on adult frog tanks - If water level is too high check the water egress is clear, for EXRC tanks wiggle the outer clear tubes in tanks so frog waste gets washed away. If the inner clear tube is blocked, remove and replace with clean one.
Check water levels on tadpole/froglet tanks – If the water level is too high, remove the mesh and replace with a clean one (if none are spare, wash thoroughly and put back).
Feed the frogs and tadpoles (see Note 10). Check you are using the correct equipment for the rack. Feed tadpoles, froglets and adults (if it is their feeding day) (refer to Table 2 for details).
Note
Note 10: If different tanks or racks are being fed different food or on different schedules consider using colour coding to reduce risk of errors.
Fill up the conductivity and pH boxes with salt and buffer, respectively.
Wash sock filters if needed.
Feed frogs and tadpoles again. See Table 2 for feeding regimen based on life stage. Do not feed the frogs if there are any pellets still in the tanks from the morning feed.
Check for water on the floor, if there is any water this must be mopped up both for health and safety reasons and to enhance biosecurity.
Clean tables, sink and surfaces.
Sweep and mop the floor daily with disinfectant (e.g. the EXRC use F10).
Empty bins and dispose of the discarded material according to local regulations.
Weekly and monthly tasks and checks for X. laevis colony care
The following lists outline the weekly and monthly tasks and checks for one of the Xenopus laevis rooms at the EXRC. These can be used as a template for other facilities.
Test water on Mondays using the water testing strips. Use strips for Ammonia levels, Nitrite and Nitrate levels.
The oxygen probes must be calibrated every 2 weeks. Refer to manufacturer’s instructions.
Check the floor drain filters weekly clean or replace as needed.
The sumps for each rack should be cleaned once a month. Siphon the detritus from the bottom of the sump. Once the sump has been cleaned, make a note of it in your records (e.g. the frog room log book or room records).
Make a note of the results and maintenance completed in your records (e.g. the frog room log book and report any divergent results to the facility manager).
Other routine maintenance tasks for X. laevis colony care
The following lists outline other routine maintenance tasks and checks for one of the Xenopus laevis rooms at the EXRC. These can be used as a template for other facilities.
Tank cleaning – the front of tanks can be wiped with a disposable cloth using water. These cloths should be disposed of after use. If the tank hasn’t been cleaned for a long period of time, then the frogs are removed from the tank and the tank is washed thoroughly with bleach/F10 and then soaked in a non-leaching acid (Evan’s descaler) to remove limescale (if the facility is in a hard water area) and thoroughly rinsed again with water before the frogs can be put back in (see Note 11).
Note
Note 11: Ensure descaling is done with the appropriate acid and followed by thorough rinsing to avoid frog mortality.
Wash the cupboards and walls where frog waste tends to splash.
Tidy up the room, keep it organised, especially build-up of clutter on tables.
The larger racks filters need to be changed once a month. The smaller stand-alone racks need to be changed weekly.
Make a note of the maintenance completed in your records (e.g. the frog room log book or room records).
Conditions for rearing and maintaining Xenopus tropicalis adults and tadpoles
Adults are maintained in recirculating aquarium systems using the parameters in Table 3.
Table 3. Environmental conditions for rearing and maintaining X. tropicalis in a recirculating system.
| A | B | C | |
| Parameter | Value | Other information | |
| Room temperature | 23 °C (range 23 – 25 °C) | X. tropicalis tend to spend time on environmental enrichment partially or completely out of the water therefore maintaining room appropriate temperature is important. | |
| Water temperature | 25.5 °C (range 24 – 27 °C) | ||
| Conductivity | 800 µS (range (700 – 900 µS) | Maintained by Instant Ocean Sea Salt | |
| pH | 7.9 (range 7.5 – 9.0) | Local mains water is within the pH range (see Note 12). | |
| Water | Local mains water filtered through two mechanical filters (1 micron) and one carbon filter before reaching any recirculating systems. | ||
| Tank size | 3, 10 and 23 litres | ||
| Maximum stocking density | 3 adults per 3 litre tank, 8 adults per 10 litre tank, 23 adults per 23 litre tank. | ||
| Flow rate | 1 L/minute for froglet/adult tanks, 500 mL/minute for tadpole tanks. | Note: If the room temperature is lower than 22 °C, turn up the flow rate for tadpoles to keep the tanks warm. | |
| Lighting | Fluorescent bulbs, 12 hours light, 12 hours dark with night light (a dim bulb). Ideally include a two hour dawn and two hour dusk stage. |
Note
Note 12: If local mains water pH is too low this can be raised by adding sodium bicarbonate, if it is too high it can be lowered using monosodium phosphate anhydrous (food grade).
Rearing X. tropicalis tadpoles in an incubator
Xenopus tropicalis tadpoles are reared from embryos in dishes in an incubator with an internal light source and both high and low temperature cut offs. The light source prevents tadpoles from developing vision defects and the temperature cut offs prevent extreme high or low temperatures affecting the tadpoles. Raising X. tropicalis in Petri dishes also allows closer monitoring and easy removal of abnormal or dead tadpoles.
Put fertilised and dejellied embryos into plastic petri dishes in 0.1 x MMR (see Chapter 2 for ovulation and fertilisation protocols).
Change at least 50% of the 0.1 x MMR solution daily for fresh 0.1 x MMR located in incubator (so there is no temperature shock). When tadpoles reach free feeding stages, start to change the 0.1 x MMR with system water directly from the X. tropicalis recirculating system. This will ease their eventual transfer into the recirculating system if they are being raised beyond tadpole stages.
Check once a day for any dead or abnormal tadpoles. Remove any developmentally abnormal tadpoles and kill them (see Section 3.2 for protocols for humanely killing Xenopus tadpoles).
Move into large glass Petri dishes (200 mm diameter, 45 mm high) once tadpoles are independently feeding (see Note 13). Deeper glass Petri dishes (200 mm diameter, 95 mm deep) are recommended for tadpoles that will be maintained in an incubator beyond one month post fertilisation. The tadpoles must have depth and space to be able to swim in their normal head down, tail up configuration.
Note
Note 13: Anecdotal observations from EXRC staff suggest X. tropicalis tadpoles survive better in glass rather than plastic petri dishes once they reach feeding stages.
Feeding regime for X. tropicalis at different life stages
The feeding regimen the EXRC uses for X. tropicalis at different life stages is described in Table 4.
Table 4. Feeding regime for X. tropicalis at different life stages.
| A | B | |
| Life stage | Feed and feeding regimen | |
| Tadpoles raised in the incubator | Sera micron algae fed daily. Make sera micron solution up fresh daily. For single large glass petri dish of tadpoles (no more than 100 tadpoles), use a 1.5 mL microcentrifuge tube and add sera micron powder up to the 50 µL mark and dissolve in system water. Start with a couple of drops of sera micron solution in the petri dish and observe tadpoles eating to dictate the amount given. | |
| Tadpoles raised in tanks (i.e. tadpoles older than 14 days post fertilisation) | Sera Micron/spirulina mix (1:4). 16 mg per tadpole (for example when singly housed in a 3 L tank) or 80 mg/L based on tank volume. | |
| Froglets (from metamorphosis to 2 – 3 months old, depending on body size) | Crushed Horizon 23 trout pellets two to three times a day. Equivalent of a couple of pellets per froglet depending on size. | |
| Adults | Adult frogs are fed five days per week. Horizon 23 trout pellets at least twice a day (depending on appetite and size/recently used in an experiment). As a guide start with 1 pellet per male and 2 pellets per female. |
Environmental enrichment for X. tropicalis
The Xenopus laevis environmental enrichment section (step 11) defines environmental enrichment for laboratory animals, signposts a useful resource for assessing a new form of environmental enrichment, and includes a protocol for assessing the use of a new environmental enrichment item.
The EXRC use red mouse tunnels and igloo hides as well as artificial lily pads as environmental enrichment for X. tropicalis. Anecdotally, when first introducing mouse tunnels and hides, EXRC staff noticed that the frogs interacted more with the red coloured tunnels and hides over the clear ones. The EXRC now exclusively use the red coloured tunnels and hides for enrichment.
Daily checks for X. tropicalis colony care
The following lists outline the daily tasks and checks for one of the X. tropicalis rooms at the EXRC. These can be used as a template for other facilities.
Check rack parameters and fill out Environmental Data sheet (room temperature, conductivity, pH and water temperature for each rack).
Frogs that have been injected should be thoroughly health checked for two weeks post injection. Make sure these frogs are clearly identified.
Check the frogs in salt baths (if there are any). These should be moved into a tank of fresh salt water with their flow turned off (if salt tanks are part of a recirculating system) or returned to their home tank if it has been 48 hours.
Health Check the rest of the room - remove any dead tadpoles/frogs noting their NF stage, tank number and age in the facility database or log book.
After removing any dead/sick tadpoles, feed all tadpole tanks. If any tadpoles are becoming froglets either mark them with froglet colour coding to feed with crushed pellets or move into a froglet tank with their other froglet siblings.
Feed all adult and juvenile frogs with trout pellets. See Table 4 for feeding regime.
Check all filters for blockages and wiggle baffles and tubes to clear debris buildup. Blockages are indicated by water being above the holes/gaps in the filter’s attachments. Carefully replace these for new attachments, avoiding any animals going out the back of the tank.
Change/rotate the pad filter (if applicable).
Check the sock filters are not blocked/overflowing.
Make sure all the tanks are clean and frogs are visible for welfare checks.
Sweep and mop the floor.
Weekly and monthly tasks and checks for X. tropicalis colony care
The following lists outline the weekly and monthly tasks and checks for one of the X. tropicalis rooms at the EXRC. These can be used as a template for other facilities.
Wash the sock filters every 7 days, consider doing this on a Thursday or Friday in preparation for the weekend.
Bleach sock filters once a month for 5 minutes in 10% bleach.
Conduct water testing with water test strips (API) once a week. Check levels of nitrates, nitrites and ammonia.
Top up the conductivity box if needed (300 g per 10 L).
Change the mechanical filters and change/rinse carbon when the water pressure in the top row of tanks noticeably drops, as this indicates the filter is getting clogged (see Note 14).
Note
Note 14: The frequency of filter changes needed varies greatly depending on system type, filter sizes and frog colony size. Larger systems tend to have filters changed once a month; smaller systems tend to have weekly filter changes.
Other maintenance tasks for X. tropicalis colony care
The following lists outline other maintenance tasks and checks for one of the X. tropicalis rooms at the EXRC. These can be used as a template for other facilities.
If there are X. tropicalis that have been recently microchipped/toe clipped/tail clipped, thoroughly check their health and progress of recovery – look for signs of wound healing or lack of and report to senior staff in charge of animal welfare (e.g. the Named Animal Care and Welfare Officer, NACWO, in the UK).
If any genetically altered X. tropicalis are found dead or in poor condition report to the senior staff in charge of animal welfare so they can decide on actions to be taken. See step 26 for signs of poor condition.
Write all tadpole/froglet/adult deaths in room logbook and include details related to their death/reason for killing.
Any frogs found dead within 14 days of any procedure must be reported to person responsible for the project the procedure was in relation to (e.g. in the UK this will be the person named on the project licence under which the procedure was performed).
Humane killing of Xenopus adults
Killing adult Xenopus at the EXRC is by overdose of anaesthetic using MS222/Tricaine. The protocol is the same for Xenopus laevis and X. tropicalis. As there is no empirical evidence regarding the best anaesthetics to use for amphibian species, the methods outlined in this section represent best practice based on our current understanding.
Ensure there is fresh 2% Tricaine solution to kill the frog/s (maximum 48 hours old). Make Tricaine solution: add 2 g of Tricaine and 1.5 g of sodium bicarbonate to each 1 litre of water (to buffer pH 7.0 - 9.0).
Place frog to be killed into a black 27 L bucket (see Note 15) with 4L of Tricaine solution (8 g Tricaine and 6 g sodium bicarbonate) and leave immersed for at least 20 minutes. The frog should then be immobile. Ensure the frog is completely unconscious by a toe pinch using forceps to ensure all reflexes have been lost. A 4 L solution can be used to kill up to 3 full sized adult female X. laevis (between 10 – 12 cm snout to vent length) and 6 full sized adult male X. laevis (between 4-6 cm snout to vent length).
Note
Note 15: The bucket is black as dark colours are less stressful for frogs. Additionally, Tricaine is light sensitive so using an opaque or black bucket slows degradation. If the solution has become very cloudy or has a potent odour this indicates the dosage is no longer appropriate and should be replaced with a fresh solution before using to kill an animal.
With a strong pair of scissors (for X. tropicalis) or bone forceps (for X. laevis), cut through the spinal cord below the skull (just above the shoulders) and cut between the eyes (above the top of the nose/snout), destroying the brain.
As an additional confirmation of death the heart can be removed (see Note 16).
Note
Note 16: As an alternative confirmation of death, you can wait for the onset of rigor mortis. This could be used for experiments that require the brain or spinal cord intact.
Once death has been confirmed, and any tissues required for experiments removed, dispose of the carcasses appropriately (e.g. the EXRC place the carcass in clinical waste bins in a chest freezer).
Frog facility records must be updated to record the death and reasons for killing.
Humane killing of Xenopus tadpoles
Killing Xenopus tadpoles at the EXRC is by overdose of anaesthetic using MS222/Tricaine. The protocol is the same for Xenopus laevis and X. tropicalis. As there is no empirical evidence regarding the best anaesthetics to use for amphibian species, the methods outlined in this section represent best practice based on our current understanding.
Use only Tricane that is less than 12 hours old to kill tadpoles. If you need to make up fresh Tricane add 2 g of MS222 and 1.5 g of sodium bicarbonate to each 1 litre of water (to buffer pH 7.0 - 9.0).
Place tadpole/s to be euthanised into the made up Tricaine bucket and leave immersed for minimum of 1 hour. The tadpole should be immobilised. Ensure the tadpole is completely unconscious by gently pinching the tail using forceps or fingers to ensure reflexes have been lost. They should have turned grey in colouring and may have bent/curled tails.
Confirmation of death is via cessation of circulation (the tadpole turns grey), destruction of the brain (by maceration of the whole tadpole) or rigor mortis.
Once death has been confirmed, place the carcass in the appropriate location for disposal (e.g. in the EXRC carcasses are placed in a small black bag which is then placed in the clinical waste bins in the chest freezer to prevent odour. For macerated tadpoles these can be poured into clinical waste bins directly).
Update the facility records with the death of any tadpoles that have reached feeding states.
Escape prevention
Mesh over the drains in tanks should be checked daily for blockage or damage and mesh cleaned or changed as necessary.
All filters on tank overflows should be checked daily for blockages this is indicated by a rise in water level in the tank.
Carefully assess the overflow filters especially when frogs are added to tanks for the first time or if tanks have fine overflow filters. A very fine gauze is used in a tank where fertile eggs are likely to be produced (e.g. a breeding tank) and appropriately sized mesh filters will be in tanks being used to rear fertile eggs to tadpoles through to froglets.
Carefully assess the overflow filters especially when frogs are added to tanks for the first time or if tanks have fine overflow filters. A very fine gauze is used in a tank where fertile eggs are likely to be produced (e.g. a breeding tank) and appropriately sized mesh filters will be in tanks being used to rear fertile eggs to tadpoles through to froglets.
Check siphon tubes regularly for blockages to prevent overflowing.
No tank water in rooms containing genetically altered animals should be tipped down any sink without filtration.
All tanks/containers are emptied through a net into another tank and the contents of the net are frozen.
Unwanted eggs are bleached and then disposed of down the sink.
Unwanted tadpoles or frogs are placed in Tricaine (an anaesthetic) and then frozen (see section 3.2 on Humane killing).
Males and females should be separated as soon as they can be reliably sexed and tanks containing juveniles monitored regularly to prevent unwanted production of fertile eggs (see Note 17.).
Note
Note 17: Unrequired embryos are more likely if the animals have just been transported in mixed sex groups.
Clinical/veterinary signs and positive health indicators
There are currently only limited signs of poor and good health in Xenopus and most are based on observations of frog caretakers rather than empirical evidence (see Table 5).
Table 5: Signs of poor health used by EXRC, and actions recommended.
| A | B | |
| Sign | Action | |
| Amplexus sores, cuts or lesions with no change in behaviour | Isolate and monitor in a separate tank. | |
| Amplexus sores, cuts or lesions with a change in behaviour: if the frog is not swimming normally, seemingly lethargic and not trying to escape when removed from the tank. | Kill | |
| Post ovulation behaviour changes: if the frog is not swimming normally and is lethargic, buoyant or visibly bloated with tautness. | Kill | |
| Spinning tadpoles: if the tadpoles are sitting on the bottom of the tank and upon touching swim in circles. | Kill | |
| Weight loss with behaviour change: if the frog is obviously underweight and floating on the top of the tank or not swimming normally, if they seem lethargic and do not try to escape when removed from the tank. | Kill | |
| Scoliosis in tadpoles. | Report to the head animal welfare person for the species. | |
| Weight loss with no behavioural change. | Report to the head animal welfare person for the species. A weight gain protocol may be implemented which would involve additional feeding/supplements. | |
| Hunchbacks, bumps or other deformities. | Report to the head animal welfare person for the species. |
Additionally, engagement with environmental enrichment could also be used as a health and welfare indictor, a sick frog may not engage with environmental enrichment as much as it usually would. If there is a welfare concern regarding a frog, take the animal out of its original tank and put it into a bucket of tank water to fully health check the frog. This would involve a full visual check of its body and behaviour without any enrichment/other frogs, and assessment of their swimming capabilities. If there is a health concern the frog may be: isolated and monitored further, culled and used for tissues or culled and a post-mortem examination conducted.
Positive health indicators for frogs include good skin condition – smooth and free from abrasions and redness, Consistent body shape – consistent with the history of the frog (i.e. a known larger or smaller frog) without large fluctuation, consistent body weight, responsiveness to feeding and relaxed behaviour. For example, X. tropicalis they can be seen relaxing on the lily pads together with their tank mates.
Environmental stressors
If frogs in the colony start dying or showing signs of illness without any obvious changes to husbandry routines look for new environmental stressors. For an example, when building work was occurring directly above the EXRC (on and off for 8 weeks over December 2024 to January 2025, with additional drilling in July 2025) both the X. laevis and X. tropicalis colonies were affected. The incidences of red leg in X. laevis increased sharply shortly after the building work began with the frogs recovering within 4 months of the first incident. However, there was additional drilling which triggered a new peak of red-leg incidents which, after 4 months, the X. laevis have not fully recovered from. During this time, however, X. laevis ovulation was unaffected. Conversely, the X. tropicalis ovulation was extremely affected with all regularly used research frogs unable to produce viable embryos. Virgins were able to produce embryos using in vitro and natural mating methods. However, the additional drilling that occurred during their recovery, eliminated tropicalis ovulation for all the virgins as well. The red-leg lesions were found commonly with X. laevis, were much less frequent in the X. tropicalis. On the other hand, X. tropicalis had a large increase in cases of severe and sudden weight-loss, oedema, unexpected deaths and post ovulation sickness and death. Post-mortems showed presence of granulomas developing on lungs, kidney and livers.
Vibrations from regular facility or building systems, such as air conditioning units, can also cause stress in frogs. Vibration damping mats can be used under individual tanks, or between a rack of tanks and the floor to reduce the vibrations frogs are exposed to. The EXRC is currently trialling this.
Although Xenopus are aquatic, they do spend time with at least some of their body outside of the water, especially X. tropicalis when using environmental enrichment. For this reason, it is important that the room temperature is appropriate for the species and maintained within the appropriate range to avoid stress from non-optimal temperatures.
Disease outbreak control - rack level controls
In the event of a disease outbreak steps must be taken to ensure containment of the disease. Prior to carrying out the steps outlined below the people in charge of frog welfare should be informed of any unusual deaths and health concerns. In the UK these people are Named Animal Care and Welfare Officer (NACWO) and the Named Veterinary Surgeon (NVS). Together the decision will be made on whether to enforce the disease outbreak control actions.
Step 28 covers rack level controls. Step 29 covers room level controls.
Before entering the room thoroughly wash hands, put on new scrubs or overcoat and clean footwear by walking over a disinfectant floor mat.
Gloves should be always worn in case the disease is zoonotic. Change gloves between tanks and racks.
Isolate the affected rack immediately. For example, use separate buckets, separate food and separate staff members to service the racks. Do not move any frogs between racks in the room. Do not use tank parts from other systems even when disinfected until the pathogen is identified. Plastic barriers or shower curtains can be used to prevent splashes between different racks.
Remove animal(s) from the rack that are displaying symptoms and contact a senior member of staff. If the animal is not killed, place the frog in a solitary tank within the same system for observation and label accordingly. (see step 26 for signs frogs may be displaying).
Conduct a post-mortem examination (see step 30 for post-mortem examination protocol) on frogs that are found dead. All cadavers from the affected rack must be double bagged. Record details of the post-mortem (e.g. the EXRC has a post-mortem form and save photos from the post-mortem to a specific folder on the facility computers).
Prior to killing any sick frog(s) refer to the post-mortem protocol to ensure correct samples are collected, particularly if samples need to be sent externally for testing. If unsure discuss with the persons in charge of frog welfare (e.g. in the UK the NACWO and the NVS).
Record deaths appropriately in the systems used to track the colony.
The persons in charge of frog welfare should decide if the tank mates of affected frogs should be killed. If tank mates are killed the tank must be emptied, removed from the rack and thoroughly cleaned and disinfected (the EXRC uses F10 for this).
Check the rack system water ammonia, nitrate and nitrite levels.
Use separate equipment for the isolated rack (e.g. nets, buckets, tank accessories, Tricaine buckets and food containers). Any affected tank should have its own equipment separate from the equipment for the rest of the rack. Disinfect buckets, nets, tanks and accessories between uses (the EXRC uses F10 for this).
Any tanks from this rack that need to be cleaned should also be disinfected (the EXRC uses F10 for this).
If possible, have a separate person look after the isolated rack and not any other racks.
Disease outbreak control - room level controls
In the event of a disease outbreak steps must be taken to ensure containment of the disease. Prior to carrying out the steps outlined below the people in charge of frog welfare should be informed of any unusual deaths and health concerns. In the UK these people are Named Animal Care and Welfare Officer (NACWO) and the Named Veterinary Surgeon (NVS). Together the decision will be made on whether to enforce the disease outbreak control actions.
Step 28 covers rack level controls. Step 29 covers room level controls.
If anyone has entered the room with the isolated rack they should not enter any other aquatic rooms. If this cannot be avoided due to animal/facility needs they must shower, disinfect any footwear and discard their scrubs in an allocated laundry bin. A fresh set of scrubs/overcoat must be worn.
A disinfectant floor mat must be placed in the room and disinfectant should be topped up daily (e.g. 20 mL F10 10:1 dilution per 1 L of water). Mats must be walked over before exiting the room.
NO WATER OR FROGS ALLOWED TO MOVE IN TO OR OUT OF THE ROOM. Any dead animals must be double bagged and gloves changed before the carcass is appropriately disposed of. In the EXRC this means putting the double bagged carcass into the clinical waste bag in the freezer.
If the room has more than one sink use one sink only for the affected rack (ideally the closest sink to that rack). Clearly label the sink so all staff know which sinks to use with which rack. If this is not possible then disinfect the sink in-between servicing of each rack.
Hands must be cleaned/washed thoroughly, and gloves must be changed between racks in the room.
Monitor frogs in the affected room more frequently than normal, especially on the affected rack.
Post-mortem examinations
All frogs found dead or killed because of poor body condition should undergo a post-mortem and details should be recorded. For example, the EXRC have a post-mortem form that is filled out every time a frog dies. If there is anything unusual or if the post-mortem occurs on a weekend, contact the person in charge of frog welfare (e.g. in the UK this is the NACWO) and take photographs and send them to this person. They will decide if a veterinarian needs to be called.
Prepare any forms or log books that need to be filled out and fill in details such as date, frog ID and any procedures the frog has recently undergone. It is important to accurately record the details of the frog that lead to the decision to kill it, or any observations if the frog was found dead. Records should include a description of the appearance of the frog such as skin condition, body condition, any visible injuries.
Clean utensils.
If needed gather fixative and swabs.
Make sure you have access to a camera and paper towels.
If the frog will be killed because the skin shows signs of disease, swabs should be taken. Use a wet swab and ensure they are within their ‘use by’ date. Label swabs with the frog ID, region swabbed, date and tank ID. Gently swab areas of the body that are of concern (e.g. abrasions, reddened skin). Swabs are sterile so should not touch anything apart from the animal before being put back into the tube without touching the edges. Used swabs should be refrigerated before being sent for external analysis.
Put frog into Tricaine (unless found dead) for 20 minutes.
Confirm the frog is dead (see steps 23 and 24 for human killing methods for adults and tadpoles respectively).
If frogs are part of an experiment, discuss with the project lead whether or not the frog needs to be fixed before starting to dissect the frog. If the frog was killed because the skin showed signs of disease the skin can be fixed whole in 10% formalin (1:10).
Weigh the frog.
Measure the length of the frog from snout to vent.
Put on gloves and goggles for handling formalin.
If the whole frog is being fixed: fix the frog at a 10:1 ratio of 10% formalin to frog volume. Prior to fixing, place the frog on its back and make an incision through the abdominal cavity, through both layers of skin, exposing the organs. This ensures the formalin can permeate through the entire animal. Adult X. tropicalis can typically be fixed in a container at least 600 mL, adult X. laevis can be fixed in 6 L buckets. Assume an adult X. tropicalis is 50 mL and use 500 mL of formalin. Assume an adult X. laevis is 300 mL and use 3 L of formalin.
If the whole frog is not being fixed: begin the dissection of layers of skin being careful not to clip any organs.
Remove the first and second layer of skin and take photos of the abdominal cavity of the frog.
Dissect out each organ individually and write observations in the appropriate record book/form. If any organs look unusual or abnormal take photographs and describe findings in the record book/form. Send the photographs and descriptions to the person in charge of animal welfare and to the facility veterinarian.
Fix any abnormal tissues or organs in 10:1 4% paraformaldehyde (unless they are very large organs) see Table 6 for guidance on the appropriate container for different organs.
If sending samples for external testing, follow the instructions from the company. The EXRC sends tissues to the International Zoo Veterinary Group (IZVG, UK).
Table 6. Organ fixing guidance: appropriate container sizes for different organs.
| A | B | C | D | |
| Species | Organs that can be fixed in a 1.5 mL microcentrifuge tube | Organs that can be fixed in a 30 mL universal tube | Organs that can be fixed in a 500 mL container | |
| X. tropicalis | Spleen, gall bladder, lungs, heart, testes | Liver, stomach, intestines, oviduct, oocytes | ||
| X. laevis | none | Spleen, gall bladder, lungs, heart, testes | Liver, stomach, intestines, oviduct, oocytes |
Photographing X. laevis and generating ID cards
Tracking the performance of individual frogs requires the ability to individually identify each frog. Having printed frog IDs with typed information, rather than handwritten, eliminates problems interpreting handwriting and accidentally losing information when marker wipes off laminated ID cards.
Ensure ID cards and tank labels include the specific information necessary based on the local regulation (e.g. in the UK this is the project licence number of the project that has been approved by the Home Office and the personal licence number of the person performing the procedures on the animals or the person to contact in case of welfare concerns). See Figure 1 for example tank labels and Figure 2 for an example ID card from the EXRC.
Figure 1. Examples of ID labels for Xenopus stock frog tanks. A) blank ID card, B) Card from a genetically altered example tank showing strain number, common strain name, full nomenclature of the strain as well as bred date, tank number. PIL and PPL refer to UK Home Office project and personal licences.
Figure 2. Individual ID cards for X. laevis. A) Isolated female, B) close up of A showing the skin pattern. C) ID Card photo of the same frog associated to ID number. D) Flip side of C showing breeding and induction notes for this animal. E) The tank showing the attached photo ID card and typical enrichment.
X. laevis dorsal skin patterns differ enough that photographs can be used as a refined method of identifying individuals, replacing the need to use RFID tags or ID tags that pierce the skin webbing. When photographing the frogs assign a digital animal ID number to each frog, this enables tracking of the frog throughout their life in the colony and is especially important for matching parents to their offspring and tracking embryo quality over time. Note that albino X. laevis cannot be identified by photograph.
Fill the bucket with about 3 L of tank water, make sure the water is clear and free from debris.
Net out the frog to be photographed and gently place it in the bucket (see Figure 2A).
Wait until the frog settles and take a photo (see Figure 2B).
Double check that the photo is in focus (frogs are notorious for suddenly swimming as the picture is taken).
Return the frog to their home tank.
Repeat steps 2-5 until all frogs are photographed.
Designate an animal ID to each frog.
Add the photographs into a Word document. Line up the photo against a text box containing all the information regarding the frog i.e. the animal ID, whether they are wild-type or genetically altered (if genetically altered, include the strain information). Save the file as part of the colony records (see Note 18).
Note
Note 18: Save all ID photos taken of all frogs for reference in case the ID goes missing, pigment on frog has changed over time, and as an extra record of all animals’ IDs that have been in the colony.
Print and cut out the photo and textbox, placing back-to-back and laminate. Leave plenty of room around the edges to prevent water damage (see Figure 2C, D).
The ID is stored on the tank the frog is kept in, making the process of identification quicker (see Figure 2E).
Microchipping X. tropicalis
X. tropicalis skin patterns do not differ as much as those for X. laevis and so X. tropicalis frogs cannot be individually identified by photographs. The EXRC uses RFID microchips to make individual X. tropicalis identifiable. X. tropicalis are not microchipped until they reach at least 7 months of age and an appropriate size. If frogs will be genotyped also, consider collecting samples for genotyping at the same time as microchipping as this reduces the number of times the frogs need to be anaesthetised. Whether genotyping should be done at the same time as microchipping depends on the experiment, the frog line and the generation.
The frog is anesthetised as normal and anaesthesia checked.
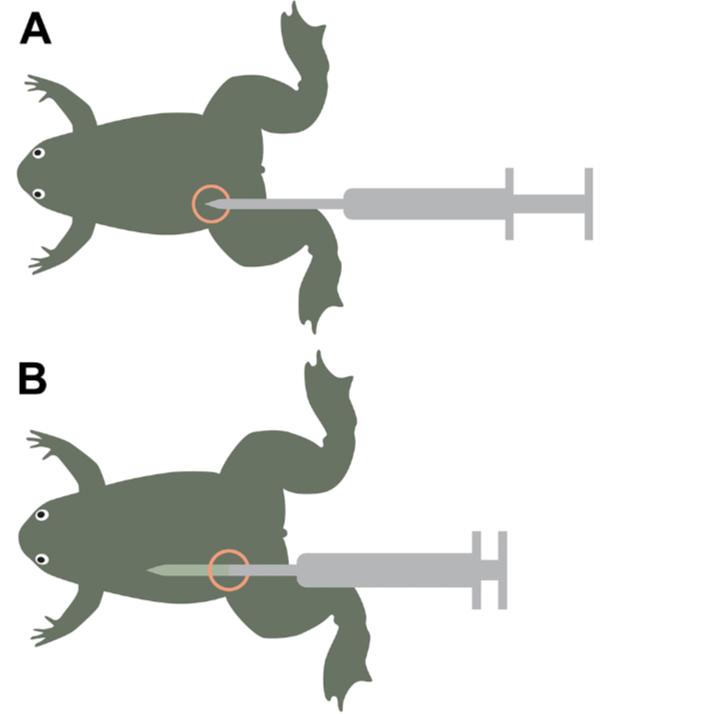
The area circled in red is the location targeted on the X. tropicalis with the microchipping needle (see Figure 3A).
Figure 3. Microchipping of X. tropicalis schematic. A) showing site of ideal subcutaneous injection,
B) showing the ideal depth for ejecting the RFID chip under the skin. C) Withdrawing the needle, showing location of the chip.
Hold the first layer of skin taut and use the needle to pierce the skin in between the first and second layers of skin.
Gently push the needle further upwards around 1 cm from the incision site (indicated by the location of the needle tip in Figure 3B). Then depress the plunger until it clicks.
Holding onto the sides of the frog, remove the needle. The ideal microchip location is indicated by the RFID chip graphic in Figure 3C. It should be visible by eye slightly protruding under the skin.
Enter the RFID chip number into the frog database/spreadsheet. A shorter number, that is easier to print on tank cards and frog IDs may also be given to the frog at this stage and saved in the database/spreadsheet.
Samples for genotyping of genetically altered Xenopus
The EXRC currently uses toe clipping of anaesthetised animals to collect samples for genotyping. Although there are protocols for using skin swabbing of fish to obtain DNA samples, the tendency of Xenopus to lie on top of each other in tanks makes this approach less reliable for frogs.
Prepare the appropriate anaesthetic for the frog species and age (see Table 7).
Table 7. Recovery anaesthetic guide for Xenopus by species and life stage
| A | B | C | D | |
| System Water | Sodium Bicarbonate | MS222 | ||
| Adult X. laevis | 4 L | 3 g | 2 g | |
| Juvenile X. laevis (3 – 8 months) | 1.4 L | 1 g | 1.2 g | |
| Froglet X. laevis (up to 3 months) | 1.4 L | 0.6 g | 0.5 g | |
| Tadpole X. laevis (up to metamorphosis) | 500 mL | 0.75 g | 0.125 g | |
| Adult X. tropicalis | 1.4 L | 1 g | 1.2 g | |
| Juvenile X. tropicalis (6 – 9 months) | 1.4 L | 1 g | 1 g | |
| Froglet X. tropicalis (1 – 5 months) | 1.4 L | 0.6 g | 0.5 g | |
| Tadpole X. tropicalis (up to 1 month) | 500 mL | 0.75 g | 0.125 g |
Label a small bucket (5.9 L) and lid with a number for each frog being toe clipped.
Place two sheets of damp paper towel inside each bucket (this will be the recovery bucket).
Prepare for toe clipping before anaesthetising the frogs.
Ensure equipment is sterilised (e.g. razor blades, forceps, microcentrifuge tubes).
Disinfect bench (e.g. with SafeZone Plus or F10).
Place sheets of paper towel with a clean pair of forceps and a clean razor blade for each frog.
Number microcentrifuge tubes to match the buckets and place in a tube rack.
Prepare a 5.9 L bucket with system water.
Place up to four frogs in anaesthetic at a time. Watch them until they lose consciousness.
Gently pinch a hind digit, if the frog does not retract their leg/making a gulping motion they are considered sufficiently sedated.
Once the frog is anaesthetised wash the frog in the bucket of water to remove tricaine.
Line anaesthetised frogs in a row on the paper towel.
Spread out the frogs’ hind digits. With a razor blade cut the very end of the toe (1 – 5 mm depending on the size of the frog). Take a tissue sample from the toe closest to the midline or the one next to it. Neither of these have black claws.
Place the frog in a recovery bucket, wrapping the paper towel around its body, leaving the head exposed.
With fine forceps, carefully pick up the tissue and place it in a numbered 1.5 mL microcentrifuge tube that corresponds with the number on the recovery bucket.
Swap or clean the forceps between each tissue collection (e.g. the EXRC uses Safe Zone) and change gloves between each tissue collection.
Repeat steps for all frogs that require toe clipping.
When all frogs have been toe clipped, move them to a temperature-controlled room suitable for their species.
Check the frogs at 20 minute intervals after the procedure. Signs of a fully recovered frog are jumping, righting themselves and fully mobile and trying to escape the bucket.
For X. laevis: Part fill the recovery bucket with system water and await confirmation to return the frogs back to home tanks after genotyping results. If the frogs already have individual IDs they can be returned to their home tanks straight away.
For X. tropicalis: Put frogs into individual tanks until genotyping results are ready. Ensure frogs have visual contact with each other, and only keep them singly-housed for the minimum amount of time required to get genotyping results or, if microchipping the frogs at the same time as collecting genotyping samples, until they are healed enough after tag insertion to be returned to a multiple-frog tank, this is usually 1 – 2 weeks.
Keeping records of breeding performance
Keeping records of breeding performance is a key part of colony management. Frogs with a history of poor breeding performance may require supplementary feeding and subsequently improve performance, or they may not improve and be humanely killed. A sudden change in the breeding performance of an individual frog, or a rack of frogs, could indicate an environmental stressor, a pathogen or another welfare hazard that should be addressed.
The EXRC maintains records of the breeding history of all adult females in the colony in a database, but this could be recorded in a spreadsheet for smaller colonies. Record the following for each ovulation:
1. If the female laid any eggs
2. Egg quality
3. Approximate egg quantity
4. If the eggs fertilised
5. If the tadpoles developed normally
The EXRC uses an in-house managed database using Microsoft Access (see Figure 4A). This allows the database to adapt as needed and the only costs associated are around maintaining access to Microsoft Access. The database can generate reports based on queries to retrieve information regarding all ID’d frogs that have undergone a procedure (see Figure 4B, C).
Figure 4. Examples of database records from EXRC. A) Frog reuse database menu options screenshot. B) A screenshot of the database record for a X. laevis frog. The record includes the ID, batch code, weight and sex of the frog as well as the dates the frog was injected and details of the egg yield and quality. C) A screenshot of the database record for a X. tropicalis frog. The records includes the ID, the RFID tag code and date on implantation, batch code, weight, sex, as well as the dates the frog was injected and details of egg yield and quality
Records for each frog line should also include any welfare concerns that are specific to that line. For example, albino frog lines may have vision defects or tadpoles with scoliosis might be more prevalent in a specific mutant line.
Female X. laevis frogs in the EXRC are killed if they do not lay, or lay poor quality eggs, for three ovulation cycles in a row or once they reach 16 ovulation cycles.
Female X. tropicalis frogs are killed if they do not lay for three ovulation cycles in a row or once they reach 16 ovulation cycles.
All frog and froglet deaths should be recorded in colony management records for each line, including if they were killed for research use, killed for health reasons or found dead. Any tadpoles that die after they start feeding should also be recorded here, ensuring to follow local regulations especially related to the use of genetically altered lines.
Breeding
How animals are bred should be carefully planned to avoid unnecessary breeding (which wastes animals and other resources) while still maintaining sufficient animals to maintain lines and generate experimental cohorts.
When breeding lines, the EXRC tend to keep approximately 100 tadpoles per line. After metamorphosis they usually three tanks of twenty frogs each are kept.
Once the frogs reach about four months old numbers are reduced to 15 per tank.
Between seven and ten months the frogs can be sexed. Initially all males are kept, once males reach 12 months old one tank of 12 males is kept and the testes from the rest are cryopreserved. Two tanks each with six females are usually kept for most lines.
This number is based on both space constraints and interest in the line from other researchers, including whether the frogs are transported as live adults or embryos or as fresh or frozen sperm. The EXRC regularly reviews stock numbers.
When a new genetically altered frog line is created sperm is frozen from at least one male and stored at -80°C. This acts as a back-up for the live frog line and enables lines to be shared as frozen sperm, avoiding the need to transport live animals, as transport is inherently stressful to frogs. As sperm from each male is frozen in many aliquots, freezing sperm can also reduce the number of male frogs used as sperm from one male frog can be used to fertilise more clutches of eggs over a longer period of time, than fresh sperm.
Determining fecundity of X. laevis using ultrasound
An ultrasound can be used to identify the presence of oocytes in female X. laevis before injecting or transporting live frogs with other researchers. The ultrasound provides a less invasive and less stressful method of checking the animals’ capability to breed – compared to the current gold standard of injecting HCG and encouraging egg laying with gentle abdominal pressure. Large quantities of frogs can be checked via ultrasound, this is not feasible using the method of injecting and harvesting eggs from large numbers of individual X. laevis to determine fertility. By scanning all the frogs before transport to other labs, frogs without oocytes can be identified, meaning those frogs do not undergo the stress of transport only to be killed when they do not ovulate. Ultrasound can also prevent frogs without oocytes from being injected more times in the future to ‘check if they are laying’, instead they can have another ultrasound scan in the future. If they do not develop oocytes they can then be humanely killed.
Training in how to correctly identify oocytes can be performed by scanning cadavers using ultrasound, followed by a post-mortem examination to confirm the presence or absence of oocytes. Frogs identified as having no oocytes by ultrasound should have either no oocytes or less than 10 mL of oocytes in post-mortem. Once oocytes can be accurately identified in cadavers training on live frogs that will be killed imminently for tissues is recommended (see protocol below). Once again use post-mortem examination to confirm what was seen in the ultrasound.
This ultrasound scanning protocol requires a minimum of two people.
Power up the ultrasound (e.g. the EXRC uses the Clarius Scanner L20 HD3 wireless scanner with Clarius Power Fan HD3) and connect to a tablet computer using the appropriate application.
Select small organs on the app and the greyscale imaging mode.
Place frogs that are going to be scanned into a bucket with system water.
Examine frogs one by one.
Due to the wet surface of Xenopus laevis skin, no ultrasound gel is required. However, if scanning cadavers, ultrasound gel must be used.
One person picks up a frog from the bucket and holds it in two hands with the head near the heels of their hands, the feet near their fingers and the abdomen exposed (as shown in Figure 5A). The other person places the ultrasound probe on the abdomen of the frog applying just enough pressure that contact is maintained (see Figure 5B).
Figure 5. Ultrasound of a female X. laevis. A) Showing appropriate holding position and equipment. B) Performing the ultrasound by scanning the abdomen. C-D) Examples of scans where oocytes can be seen as horizontal white flecks. The bright layer at the top is the frog’s skin, E) Example of a negative scan, where no oocytes are seen.
Ultrasound images can be seen in real time and images can be captured.
Oocytes can be identified as multiple flecks directly under the skin at the abdomen (see Figure 5C, D).
The absence of oocytes can be identified by no clear signs of flecks under the skin, instead the area is taken up by fat bodies which shows up as a brighter more consistent mass (see Figure 5E).
Once you have finished scanning the frog, place it into a new bucket of system water and repeat the process for the remaining frogs.
Once scanning is complete, place frogs back into the recirculating system.
Switch off ultrasound device and disinfect probe and whole device with ethanol wipes.
Place device on charge.
When scanning X. laevis females as part of colony management, depending on the age of the batch, frogs that appear to have no or few oocytes can be put aside to be scanned again at a later date to determine if the frog was underdeveloped at the time or missing oocytes. If the frog still appears to have no oocytes it can be humanely killed (see step 23 for the protocol for humane killing of adult Xenopus) and tissues used for other experiments.
Ultrasounds can also be used to detect abnormalities in the organs, identifying testes in males which can help with sexing animals at younger ages than is currently possible, and can be used to scan X. tropicalis.
Surface sterilisation of Xenopus embryos
Surface sterilisation reduces the pathogen load in a frog colony and this should be done periodically. When receiving adult frogs into a colony that will be maintained as a frog line, if there is capacity, it is recommended to quarantine the adults away from the existing frog colony and surface sterilise embryos produced by that line for integration into the colony or recirculating systems. The EXRC routinely does this when receiving frog lines as adults or as testes/ frozen sperm from other labs or facilities.
Surface sterilisation of embryos should be done before gastrulation.
Produce embryos either by natural mating or in vitro fertilisation (see Note 19).
Note
Note 19: The EXRC routinely performs two independent sterilisations for embryos from each female in case one fertilisation or sterilisation procedure leads to unusually high mortality or abnormality.
Surface sterilise embryos for 10 seconds by bathing in 70% ethanol in 0.1 x MBS (see Note 20). Remove MBS from the dish, pour ethanol over embryos for no longer than 10 seconds, then immediately remove the ethanol from the dish and cover embryos with 0.1 x MBS (see Note 21). DO NOT GO OVER 10 SECONDS or the embryos will develop abnormally.
Note
Note 20: If there are a lot and the fertilisation is good embryos can be sterilised in multiple dishes. Collect embryos for sterilisation using a pipette, if embryos stick to the pipette rinse it with 1 x MBS with 0.1% Bovine Serum Albumin (BSA). Put embryos in an untreated petri dish. Try to spread the egg mass so there is not one large clump. Put embryos in an untreated petri dish. Try to spread the egg mass so there is not one large clump.
Note
Note 21: Embryos from in vitro fertilisations tend to stick to the petri dish, embryos from natural matings do not usually stick to the petri dish.
Wash 2 x with 0.1 MBS
Dejelly the embryos in 2% cysteine dissolved in water, pH 8.5. Gently swirl constantly (see Note 22). It should take 2 – 2.5 minutes to dejelly.
Note
Note 22: Swirling too vigorously when dejellying leads to a higher proportion of embryos with a secondary axis.
Wash 8 – 10 times in 0.1 x MBS.
After the final wash transfer to a fresh petri dish that has been rinsed in 0.1 x MBS with 0.1% BSA to prevent embryos from sticking.
Remove dead and abnormally dividing embryos.
Surface sterilise in 0.1 mg/mL thimerosal in 0.1 x MBS for 15 minutes. Use gentle agitation on shaker platform.
Wash 5 x in 0.1 x MBS with 0.1% BSA.
Remove dead embryos and wash 2 x in 0.1 x MBS (see Note 23).
Note
Note 23: If there are a lot of dead embryos transfer healthy embryos to a fresh dish of 0.1 x MBS. Wash healthy embryos a further 2 x with 0.1 x MBS.
Protocol references
1. Hosie CA (2016) Impact of tank background on the welfare of the African clawed frog, Xenopus laevis (Daudin). Applied Animal Behaviour Science 185:131-136. doi:10.1016/j.applanim.2016.09.005
2. Holmes AM, Emmans CJ, Coleman R, Smith TE, Hosie CA (2018) Effects of transportation, transport medium and re-housing on Xenopus laevis (Daudin). Gen Comp Endocrinol 266:21-28. doi:10.1016/j.ygcen.2018.03.015
3. Poole T (1997) Happy animals make good science. Laboratory animals 31 (2):116-124
4. Grimm D (2018) The happiness project. Science 359:624 - 627
5. McNamara S, Wlizla M, Horb ME (2018) Husbandry, General Care, and Transportation of Xenopus laevis and Xenopus tropicalis. Methods Mol Biol 1865:1-17. doi:10.1007/978-1-4939-8784-9_1
6. Nieuwkoop PD, Faber J (1956) Normal table of Xenopus laevis (Daudin): a systematical and chronological survey of the development from the fertilized egg till the end of metamorphosis. 1 edn. North-Holland Pub. Co., Amsterdam, Netherlands
Acknowledgements
The authors would like to thank Matt Guille and Caroline W Beck for their comments on the protocols.