Dec 11, 2025
Acoustic Sampling Protocol
- Lola Abed1,
- Cato Vangenechten2,
- Vincent Sluydts2,
- Lucinda Kirkpatrick3
- 1WildMon;
- 2Universiteit Antwerpen;
- 3Bangor University



Protocol Citation: Lola Abed, Cato Vangenechten, Vincent Sluydts, Lucinda Kirkpatrick 2025. Acoustic Sampling Protocol. protocols.io https://dx.doi.org/10.17504/protocols.io.j8nlkyb76g5r/v1
License: This is an open access protocol distributed under the terms of the Creative Commons Attribution License, which permits unrestricted use, distribution, and reproduction in any medium, provided the original author and source are credited
Protocol status: Working
We use this protocol and it's working
Created: July 04, 2025
Last Modified: December 11, 2025
Protocol Integer ID: 221749
Keywords: Passive acoustic monitoring, Biodiversity monitoring, acoustic sampling protocol passive acoustic monitoring, standardized biodiversity monitoring, acoustic sampling protocol passive, replicable acoustic data collection across study site, audiomoth devices in pam, acoustic monitoring, valuable tool in biodiversity assessment, replicable acoustic data collection, audiomoth device, biodiversity assessment, audiomoth configuration app, characterizing ecological community, ecological community, recording schedule, sampling protocol, device
Funders Acknowledgements:
RESTOREID
Grant ID: 101134969
Abstract
Passive acoustic monitoring (PAM) is an increasingly valuable tool in biodiversity assessments, offering a scalable and non-invasive approach to characterizing ecological communities. This protocol outlines the practical steps for the use of AudioMoth devices in PAM. It includes instructions for configuring recording schedules using the AudioMoth Configuration App, preparing the devices (e.g., inserting SD cards, ensuring power supply), and deploying them securely in the field to minimize environmental interference and theft risk. Guidelines are also provided for retrieving the devices, securing the data, and maintaining hardware between deployments. This method supports scalable, standardized biodiversity monitoring by enabling consistent and replicable acoustic data collection across study sites.
Image Attribution
Images are provided by WildMon, 2024.
Guidelines
- Ensure all AudioMoth devices are properly configured and tested before field deployment.
- Maintain consistent deployment heights and orientations across sampling sites for data comparability.
- Avoid placing recorders near artificial noise sources unless explicitly part of the study.
- Document metadata for each deployment, including date, time, GPS coordinates, habitat type, and weather conditions.
Materials
- The preferred number of AudioMoths
- One MicroSD card per AudioMoth
- A USB micro-B cable
- AudioMoth case or plastic/ziplock bags for protection. These can be painted before deployment to minimize the visibility of the AudioMoths and mitigate concerns about tampering or removal.
- Three elastic cords per AudioMoth to secure the AudioMoth to a tree. Alternatively, the plastic/ziplock bag can be secured with a clothes peg.
- Computer/laptop + necessary programs downloaded: the 'AudioMoth Configuration App' and the 'AudioMoth Flash App'
- Smartphone + necessary applications downloaded: the 'AudioMoth Chime App'
- Optional: Black tape to cover the LED lights of the AudioMoth
Figure 1. Diagram of the AudioMoth with key components indicated by the number (image provided by WildMon, 2024).
Safety warnings
When deploying or retrieving devices, wear appropriate field gear (e.g., gloves, boots, long sleeves) to prevent injury from terrain, insects, or sharp vegetation.
Ethics statement
- Passive acoustic recorders do not disturb or interfere with wildlife behavior or habitats.
- All data collection should be conducted in accordance with local and institutional regulations.
- Where applicable, permits for fieldwork and data use should be secured from relevant authorities.
Before start
- Verify that all SD cards are empty and functional.
- Conduct a short test recording to confirm settings and microphone functionality before deployment.
- Ensure all permissions (e.g., landowner consent, protected area access) are obtained ahead of time.
Charging the battery of the AudioMoth
Connect the batteries to the USB charging cable provided with the AudioMoth. You will hear a quick click once the terminals of the battery and the charging cable are properly connected.
Plug the USB charging cable into a 5V wall charger, USB hub or computer. A red light will appear on the USB charging cable. This indicates that the batteries are charging.
The red light will change to green once the batteries are fully charged.
If fully charged, connect the batteries to the AudioMoth. You will hear a quiet click once the terminals of the battery and the AudioMoth are properly connected.
Figure 1. Backside of the AudioMoth. The battery terminal is shown in the bottom-right corner (image provided by WildMon, 2024).
Configuring the AudioMoth
Updating the Firmware:
The AudioMoth must have the most recent firmware in order to properly configure and deploy the device. Download the 'AudioMoth Flash App' on your computer. Connect the AudioMoth to the computer using a USB micro-B cable. Make sure the AudioMoth is switched to the 'USB/OFF' position, and the green light is on and solid.
Select the most recent firmware version on the right-side panel and select 'Download'. Once downloaded, select 'Flash AudioMoth'. The LED light on the AudioMoth will turn off while updating, and back on when the update is completed. Check if the AudioMoth is flashed with the latest firmware version?
Configuring the AudioMoth:
Open the 'AudioMoth Configuration App' on your computer. The top section displays the date, time, and time zone currently registered on the AudioMoth. The date and time displayed will sometimes be incorrect when you first open the Configuration App. To fix this issue, you must click on the 'Configure' button so that the time and date display the present. Once this is done, you can go ahead and load the configuration file. Other data shown in the top section of the AudioMoth Configuration App is device ID, firmware description, firmware version, and battery. Make sure that the battery of the AudioMoth is fully charged (>4.2V). If the voltage is lower, charge your battery further prior to deployment. AudioMoths with batteries below 3.6V will not record properly.
Next, open 'File > Open Configuration' and select the configuration file (.config) according to your needs. Check if the parameters (e.g., sample rate, gain, sleep duration, etc.) are correct and click 'Configure AudioMoth'. Disconnect the AudioMoth from the computer. It is now configured and ready to deploy.
Deployment of the AudioMoth
Preparations before deployment:
- Ensure that you have configured the AudioMoth with the correct configuration file.
- Ensure that the batteries are fully charged and that the SD cards are empty.
- Ensure that the AudioMoth is marked with a unique ID.
Open the 'AudioMoth Chime App' on your smartphone and allow the app to detect the location. Make sure the 'Location' slider is 'on' (default setting).
Note down the metadata (e.g., coordinates and time).
Set the Audiomoth's switch to 'CUSTOM' to turn on the device. The LED lights on the AudioMoth should be solid red and flashing green.
Increase the volume of the smartphone to its maximum level and position the AudioMoth close to the phone. Select 'Play Chime'. Playing the chime is essential to activate the AudioMoth (see configuration settings).
After the chime is played, check the LED lights on the AudioMoth. A flashing red LED indicates the AudioMoth is recording, whereas a green LED indicates that the device is sleeping. After the chime is played, the LED lights should either be flashing red or flashing green.
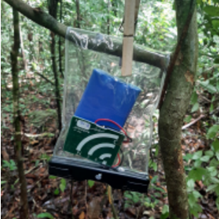
Confirm that the SD card is correctly inserted into the AudioMoth. Place the AudioMoth, along with a silica gel bag, inside the AudioMoth case or plastic bag, and secure it to a tree. Ensure that the bag's opening is facing down to prevent any water from getting in, and verify that no branches or leaves obstruct the microphone. Additionally, confirm that the battery is not obstructing the microphone and that the device is positioned in shade to prevent battery overheating. Finally, recheck that the SD card has not been dislodged during attachment.
Deployment tips:
- Flag a nearby tree (e.g., 5 meters north of the device) to aid in retrieval. Avoid flagging the location of the AudioMoth to prevent attracting attention, which could lead to tampering or theft.
- As you leave the deployment site, take note of additional markers or landmarks that could help during retrieval. It is recommended to take photos.
Retrieval of the AudioMoth
To collect the AudioMoth, simply remove the AudioMoth from the casing and slide the switch back to the 'USB/OFF' position. Disconnect the battery, remove the SD card and return indoors for data uploading.
Data uploading
Insert the SD card into your computer and transfer the files to your preferred folder.
It is essential to review the transferred audio files for potential timestamp discrepancies (e.g., incorrect time zones or dates).