Jan 25, 2023
A simple illustrated protocol to prepare over 1,000 multiplexed single cell proteomics samples per day
- Benjamin Orsburn1
- 1The Johns Hopkins University Medical School


Protocol Citation: Benjamin Orsburn 2023. A simple illustrated protocol to prepare over 1,000 multiplexed single cell proteomics samples per day . protocols.io https://dx.doi.org/10.17504/protocols.io.yxmvm2w16g3p/v1
Manuscript citation:
Orsburn, B.C., Yuan, Y. & Bumpus, N.N. Insights into protein post-translational modification landscapes of individual human cells by trapped ion mobility time-of-flight mass spectrometry. Nat Commun 13, 7246 (2022). https://doi.org/10.1038/s41467-022-34919-w
License: This is an open access protocol distributed under the terms of the Creative Commons Attribution License, which permits unrestricted use, distribution, and reproduction in any medium, provided the original author and source are credited
Protocol status: Working
We use this protocol and it's working
Created: January 25, 2023
Last Modified: January 25, 2023
Protocol Integer ID: 75884
Keywords: single cell proteomics, SCOPE-MS on TOF, single cell, multiplexed single cell proteomics samples per day, sample preparation method for multiplexed single human cell, multiplexed single cell proteomics sample, multiplexed single human cell, proteomics sample prep, single human cells into plate, single human cells per day, proteomics sample, single human cell, multiple plates per day, single cell, prepped multiple plate, illustrated sample preparation method, cell, few plate, lab sop, preparation, inexpensive automation
Funders Acknowledgements:
NIGMS
Grant ID: R01GM103853
NIA
Grant ID: R01AG064908
Disclaimer
This is for research purposes only.
TMT is a registered trademark of Proteome Sciences LLC
No guarantees are stated or implied.
Abstract
This is a simple illustrated sample preparation method for multiplexed single human cells, as described in Orsburn et al., Bumpus 2022 that better encompasses the lab SOP I have developed over the last couple of years.
With no specialized equipment or robotics, I can easily, as a single operator prepare, lyse, digest and label over 1,000 single human cells per day with just the help of a sorting core to place single human cells into plates as indicated in this tutorial.
If I try to do more than 2,000 single cells in a day, chances are I'm going to mess up more than a few plates.
I have provided this protocol to students with no prior experience in the preparation of proteomics samples and they have successfully prepped multiple plates per day.
This protocol should be amenable to rapid and inexpensive automation.
A full tutorial on this protocol is in works, look out for it in 2023 and please contact me if you have questions or concerns.
This protocol is a brazen adaptation of Budnik et al., 2018 in the simplest possible form to make SCOPE-MS approachable to even scientists with no experience in proteomics sample prep.
Prepare 96-well plates for sorting with acetonitrile lysis solution
Add 2uL of LCMS grade acetonitrile to each well of a 96 well plate
20m
Centrifuge if necessary to ensure acetonitrile is in the bottom of the plate. 1 minute pulsing is more than sufficient. A salad spinner based centrifuge can complete 4 plates/minute.
10m
Using flow cytometry or microscopy based sorting, aliquot cells into plates using the following template. In this case we have two conditions, so control cells and drug treated cells are separated. These will be combined in a later step.
IMPORTANT NOTE: This experiment was designed for pasefRIQ on a TIMSTOF with a generation 2 TIMS cartridge. I have observed no "carrier proteome effects" when using 200 cell loads on this device. The number of cells may need to be adjusted down for instruments with more pronounced carrier proteome limits, in particular D20 Orbitrap systems.
2h
Once cells have been aliquotted into plates. Seal these tightly and place the plates directly onto dry ice for at least 30 seconds. The frozen and lysed cells may then be stored on wet ice until moved to -80C storage.
Prepare reagents
First prepare the digestion buffer by adding 50 uL of 1M TEAB + 10mg of DDM (n-Dodecyl-beta-Maltoside Detergent, Thermo Fisher 89902) in 10mL of LCMS grade water.
Chill this solution on wet ice.
10m
To prepare trypsin at 5ng/uL add 4mL of digestion buffer to 20 micrograms of LCMS grade trypsin (we use Pierce 90057, but there are many alternatives). Storage of this solution on wet ice reduces self-digestion of the enzyme, but likely is not critical.
10m
Preparing cells for digestion
Prepare a heat block of thermocycler at 95C for drying off acetonitrile and further disrupting the cell membranes.
Remove cells from -80C storage and immediately place these on the heat block, removing the air tight seal as you do so. 1 minute will be enough to drive off the acetonitrile and to obtain an internal well temperature of 95C in most conditions.
20m
Add trypsin solution
*Using a multichannel pipette is the easiest here, but not essential for low cell numbers or optimization experiments
I pour the trypsin solution into a sterile multichannel trough (Heaththrow Scientific 120637) and pipette 1 microliter of this solution into each well for a total of 5ng of trypsin per well.
*In this protocol I'm using trypsin as the "sacrifical carrier" (please see Sam Choi, 2022*2 for details on this concept).
30m
Seal the plate securely. In my hands, silicone web seals do not hold in condensation successfully for low volumes. Adhesive plate seals are preferable (Fisher 60180-M143, for example. A plate seal roller may be helpful, but not necessary.
5m
Incubate for digestion
Multiple methods work well here.
45C for 2 hours with gentle shaking is very effective (Orsburn et al., 2022) particularly if the plates are centrifuged every hour to keep condensation down.
Room temperature overnight can also be effective. However, if the plates are not going to be attended, you may want to increase the total digestion volume by adding 2 microliters of the digestion buffer.
**I do not recommend high temperature overnight. The samples will simply evaporate and the reaction may not occur to completeness.
2h
Dry plates if proceeding to label free analysis, move to step 13 if TMT labeling
10m
Following incubation, centrifuge plates to concentrate all liquid.
If TMT (SCoPE-MS, pasefSCOPE, iBASIL) Move to Step 13.
Dry off the digestion buffer with vacuum centrifugation.
*If necessary, I have found when my speedvac was broken and Eppendorf could not repair it for extended periods of time, the volume may be driven off at 55C on a heat block.
**If you are doing a label free analysis you are done. Load 2 microliters of 0.2% formic acid into each well, vortex, centrifuge and load directly.
If you are labeling proceed to 13.
Prepare TMT reagents at appropriate concentrations
A single TMT kit with 0.5mg of reagent per vial (such at Thermo A44522) can label more than 60,000 single cells. If you are exclusively doing single cell prep, I suggest making multiple aliquots once opening a kit.
Choose your appropriate reagents. If using unit resolution tags some advantage may come from alternating your tags as shown below. (Full credit to Dr. Alejandro Brenes, please see Brenes et al., MCP, 2019 for further details
Labels I use:
135n
126
127n
128c
129n
130c
131n
132c
133n
134c
Add 120 uL of LCMS grade acetonitrile to each 0.5mg vial of TMT reagent to be used.
10m
If aliquoting, transfer 10 uL of each to sterile microcentrifuge tubes and rapidly dry via speedvac.
10m
For single cell labeling concentrations, dilute each 10uL aliquote by adding 190 microliters of LCMS grade acetonitrile. This creates a 20ng/uL solution.
2m
Label cells with TMT
Add 4 microliters of the TMT label to your carrier channel if 200 cells were used. This will saturate your peptides with approximately 4:1 TMT reagent
5m
For 2 condition digests, I label like this for unit resolution instruments like TOF MS/MS systems
The carrier channel is labeled with 135 reagent, the blank channel is labeled with 126 reagent and each single cell after is labeled accordingly.
15m
Add 1 microliter of the TMT label to each of your single cell digests and blank well. This will provide 4:1 for the trypsin peptides that are present, as they are in significantly higher concentration than your single cell peptides, this step is critical.
15m
Label for 20 minutes at room temperature with gentle shaking.
20m
Centrifuge all solution to concentrate solution.
5m
Quench each reaction by adding 2 uL of 0.5% hydroxylamine to your carrier channel and 0.5 uL of 0.5% hydroxylamine to each single cell and blank well. 15 minute reaction at room temperature is sufficient.
20m
Wells may be combined now or stored at -80C until combining.
*I have found single cell peptides may not be very good after a few weeks of storage. This is not quantitative, simply an observation.
Combining cells for multiconditional experiments
30m
If you are not doing multiconditional experiments you can simply combine your wells across.
If you are doing two conditions, follow these steps
First create a combined carrier channel that is an equal mixture of your digested and labeled control and treatment conditions.
I simply use a multichannel to pick up the complete volume from control wells and pipette repeatedly in the treated well, followed by a repeat in the reverse. I then adjust the pipettor to the single well volume and place half of each mixture in each well.
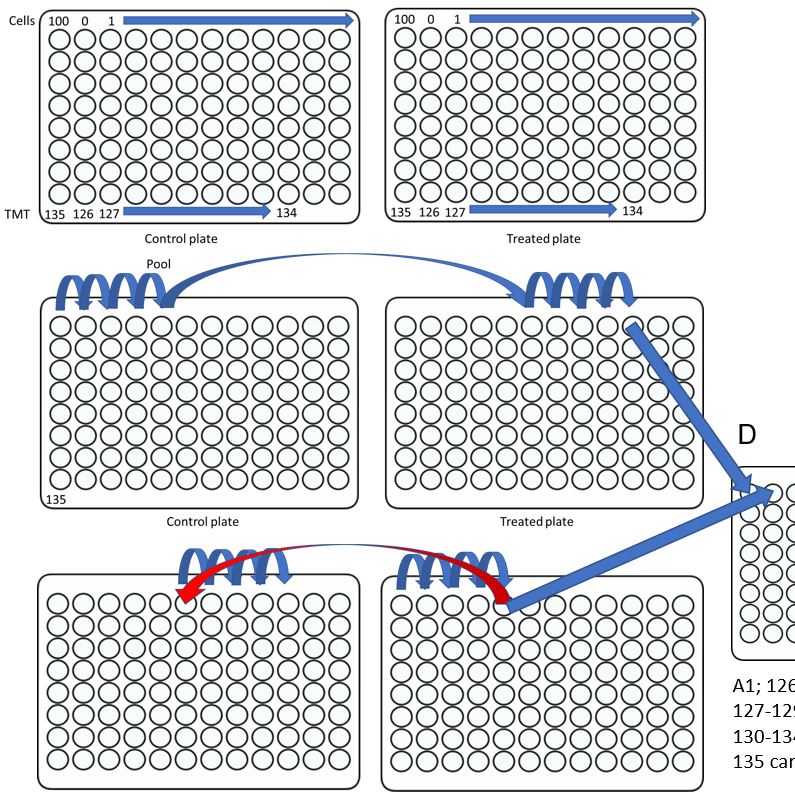
Now combine 5 wells from the control plate with 5 wells from the treated plate:
*Note, I find it helpful with my poor eyesight and bifocals to mark each plate with a sharpie as shown.
The 10th well of the treated plate now contains the following mixed, TMT labeled samples:
Pooled carrier of control and treated cells (135)
Method blank control (126)
Single cells from control plate (127-129)
Single cells from treated plate (130-134)
15m
Now reverse this pipetting order as shown
You now have the reverse of the last plate
Pooled carrier of control and treated cells (135)
Method blank control (126)
Single cells from treated plate (127-129)
Single cells from control plate (130-134)
15m
The final (10th well) of each plate can now be transferred to a new plate for drying and sample injection. I find it preferable to stack my samples alternating, so that, in this example A1-H1 will be the samples prepared in step 27 and A2-H2 are the samples prepared in 28. Running samples A1 then A2 will have alternating patterns of control and treated cells which are great for improving your confident that results are not batch related effects.
To get to approximately 1,000 single cells prepared/day you will need to prepare 16 plates at a time. On my own I have found more than 24 to be difficult to manage, but I'm also quite old and partially blind in one eye.