Mar 25, 2026
Version 3
631.1 HuBMAP Multi-Organ Tissue Microarray Protocol for MOSDAP - Seattle Children's Hospital Protocol V.3
- Xuemei Deng1,2,
- Gail Deutsch1,2,
- Gloria Pryhuber3
- 1Department of Laboratory Medicine and Pathology University of Washington;
- 2Center for Respiratory Biology and Therapeutics Seattle Children's Hospital Research Institute;
- 3University of Rochester Medical Center
- Human BioMolecular Atlas Program (HuBMAP) Method Development Community
- URMC Pryhuber Lab


Protocol Citation: Xuemei Deng, Gail Deutsch, Gloria Pryhuber 2026. 631.1 HuBMAP Multi-Organ Tissue Microarray Protocol for MOSDAP - Seattle Children's Hospital Protocol. protocols.io https://dx.doi.org/10.17504/protocols.io.yxmvmmd46v3p/v3Version created by Gloria S Pryhuber
License: This is an open access protocol distributed under the terms of the Creative Commons Attribution License, which permits unrestricted use, distribution, and reproduction in any medium, provided the original author and source are credited
Protocol status: Working
We use this protocol and it's working
Created: March 24, 2026
Last Modified: March 25, 2026
Protocol Integer ID: 313849
Keywords: Tissue Microarray, TMA, hubmap lung tissue microarray protocol, tissue microarray, precast microarray mold, multiple tissue sample, containing multiple tissue sample, tissue sample, sections from the tma block, tma block, tma, tissue usage, minimizing tissue usage, tissue, single paraffin section, single paraffin block, embedded sample, lung tissue, lung
Funders Acknowledgements:
NHLBI (LungMAP HTC) URMC
Grant ID: U01HL148861
NIH Common Fund Human BioMolecular Atlas Program (HuBMAP)
Grant ID: U54HL165443
NIH Common Fund Human BioMolecular Atlas Program (HuBMAP) - HIVE
Grant ID: 3OT2OD033759-01S5-REVISED
Abstract
The tissue microarray (TMA) allows many formalin fixed paraffin embedded samples to be represented in a single paraffin block. The TMA is routinely made using a precast microarray mold. A hand placed TMA is created when there is a need to minimize the distance between the cores or to use cores of variable shape and size. Once constructed, sections from the TMA block can be used to perform multi-omic assays on a single paraffin section containing multiple tissue samples, minimizing tissue usage, reducing reagent costs and batch effects between samples, enhancing quality of integration of data within and between sections.
Attachments

Materials
Simport M473 T-Sue Microarray mold kit (Simport Scientific, Beloeil. Qc, Canada)
- 3 mm, 36 cores, M473-36
- 4 mm, 15 cores ,M473-15
Leica Microsystems Surgipath Paraplast tissue embedding medium (23-021-751, Fisher Scientific)
Metal base mold-30mm X 24mm X 5mm (21A00J395, Thomas Scientific)
Pathology Review
From whole FFPE tissue blocks, selected regions of interest to be collected as cores to be placed in the TMA.
Requested the FFPE tissue donor block to be used in the TMA construction from BRINDL (https://brindl.urmc.rochester.edu) based on block location and appearance in the lung lobe.
Blocks shipped from URMC overnight at room temperature.
A new hematoxylin and eosin (H&E) slide was generated from each FFPE block for histologic review by the pathologist to confirm the diagnosis and annotate the tissue. Additional slides may be generated for special stains or immunohistochemical stains to assist with pathology review alongside the H&E.
The pathologist determined the best 2-dimensional representation of the 3D tissue to extract the tissue core from and used a slide marking pen to circle the region of interest on the H&E slide.
H&E images of each FFPE block to be used for the MOSDAP project TMA were reviewed with HuBMAP Tissue/ Organ experts to select optimum regions of interest for core sampling.
The corresponding area on the FFPE block was dotted with a permanent marker, using a dissecting microscope if necessary to ensure correct site.
Preparation for TMA Construction
Once pathology review was complete and list of donor blocks to be used in the TMA construction determined, a TMA construction map was created in excel, designating where the cores will be located in the completed TMA. In the TMA design, it was considered best to include:
Duplicates of each tissue sample
A core of liver, other tissues with unique structures (ie large airways vs lung parenchyma), or blank core spaces, are included to be used as orientation markers for the TMA. A TMA slide map is generated as a mirror image of the TMA construction map.
** Caution: It is very easy to flip and/or rotate the paraffin sections when the TMA is sectioned onto slides. It is very important to check the orientation of every microscopy image that is created from a TMA section to ensure core identities are correctly assigned. One or more easily identified structure or unique tissue like liver, strategically placed in each TMA, is best practice.
Create Tissue MicroArray Mold
Prepare the precast T-Sue paraffin recipient mold unless plan for hand placement of the TMA (see Step 5).
Example of 15 core precast mold to create recipient paraffin block.
Place the T-Sue Array mold in an oven for 30 minutes at 70 °C .
Slowly dispense liquid paraffin (65 °C ) until the top of the core rods are fully submerged. If bubbles form, remove them with heated forceps.
Orient an embedding plastic cassette and place it on mold.
Fill the embedding cassette with paraffin.
Cool at room temperature for 60 minutes.
Slowly separate the T-Sue Array mold from the embedding cassette containing the paraffin block.
Trim the paraffin around the edges of the recipient block which is now ready to have punches inserted.
Extract Tissue Cores
The marked region of interest in the FFPE tissue block is extracted using the T-Sue 3mm or 4mm punch needle
Place donor block on horizontal and flat surface.
Hold the punch needle in your hand perpendicular to the marked position on the donor block.
Slowly insert the punch needle into the donor block to the depth of 5mm and withdraw.
Create TMA Using Preformed Mold
Slowly push on the punch needle plunger to deliver the extracted tissue into the corresponding core well in the preformed TMA block or continue with Step 5 to create a custom TMA by hand
Gently push tissue cores in recipient block to ensure evenness prior to microtome sectioning
Place the recipient block on a glass slide facing down and incubate the block at 39 C overnight. This will allow the cores to adhere to their respective holes in the recipient block
With the recipient block still warm and tacky, heat another slide in an oven to around 70 C for approximately 10 minutes. Then place it over the slide that is already stuck to the TMA block. The TMA block surface should quickly turn to liquid. Move the two slides around on the TMA block to push any surface air bubbles away and to flatten the TMA block surface.
Remove the second slide and place TMA block with the original slide (slide down) on a petri dish at room temperature to cool down. Once the TMA block is at room temperature place the TMA block with slide on petri dish on an ice tray (no water) to cool for 20 minutes. After cooling remove the slide from the TMA block which is now ready for sectioning.
Create Tissue MicroArray
If the planned TMA needs to be of specific size or contain core number or sizes not accommodated by the pre-cast T-Sue paraffin recipient molds, create the TMA by hand using appropriately sized metal base mold for desired final block dimensions
Use coring needle or similar device to extract tissue cores. Place each core in a labeled plastic cassette.
Fill the metal base mold with melted paraffin.
As the paraffin is slowly solidifying at room temperature place the cores inverted (circled area of interest placed face down) into the metal mold ensuring they are vertical in orientation and correctly situated according to the construction TMA map. The cores should not exceed the depth of the metal mold as they will topple when the cassette is put in place.
Place the metal mold now containing the cores on the cold plate of embedding station, top with plastic cassette, and gently pour melted paraffin through the cassette into the tray of cores ensuring no air bubbles and paraffin fills to the top of the cassette so that it is firmly bound to the paraffin block once it has solidified.
Place the block on the embedding station cold plate until complete cool for 20-30 minutes.
Once solidified, gently remove the metal base mold from the cassette bound paraffin block of cores
Completion of TMA Slide Map and Storage
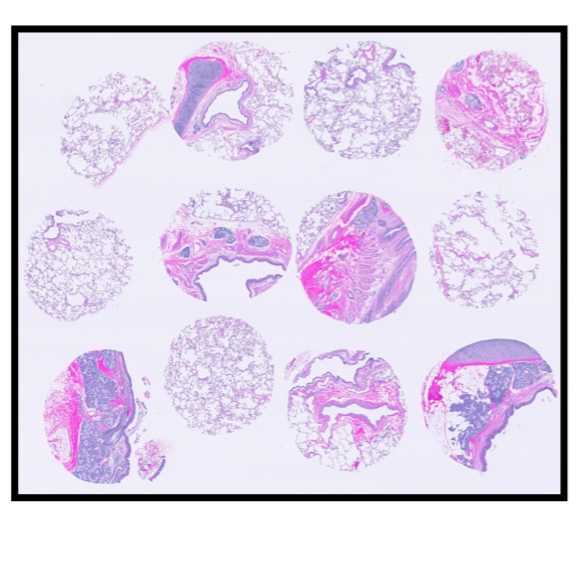
Once the TMA block is constructed, generate an H&E section for the pathologist to validate accurate tissue representation and placement of all the cores, according to the TMA slide map (mirror image of TMA construction map)
See attached MOSDAP TMA maps and representative H&E images. Further data is available on the HuBMAP Portal.
When beginning to section the new TMA block, be sure to section deep enough to have full tissue face of all cores.
The blocks are stored in a cool, dry and dark place until further sectioning or shipment to URMC.
Protocol references
Simport M473 T-Sue Microarray mold kit protocol (https://www.simport.com/en/products/2169-m473-t-sue-microarray-mold.html)
Lee Wisner, Brandon
Larson, Alanna Maguire. Manual construction of a tissue microarray using the
tape method and a handheld microarrayer. J. Vis. Exp 2002 (184), e63086