Dec 04, 2022
Version 1
621.1.HTC_H&E Stain (Paraffin or Cryosections) V.1
- Gloria S Pryhuber1,
- Cory Poole2
- 1University of Rochester Medical Center;
- 2University of Rochester
- Human BioMolecular Atlas Program (HuBMAP) Method Development Community
- LungMap2 Consortium


Protocol Citation: Gloria S Pryhuber, Cory Poole 2022. 621.1.HTC_H&E Stain (Paraffin or Cryosections). protocols.io https://dx.doi.org/10.17504/protocols.io.36wgqjnq3vk5/v1
License: This is an open access protocol distributed under the terms of the Creative Commons Attribution License, which permits unrestricted use, distribution, and reproduction in any medium, provided the original author and source are credited
Protocol status: Working
We use this protocol and it's working
Created: December 04, 2022
Last Modified: December 04, 2022
Protocol Integer ID: 73518
Keywords: H&E, Hematoxylin and Eosin, Frozen section, FFPE, hematoxylin stains cell, histological stain, coloration from the stain, standard chemical stain, stain combination, hematoxylin, cytoplasm pink, stain, assessment of general histopathology, general histopathology, histologic information, cytoplasmic part, tissue sample, cell, eosin, pathology report, coloration, digital pathology, experts in digital pathology, extracellular matrix
Funders Acknowledgements:
LungMAP
Grant ID: U01HL148861
HuBMAP
Grant ID: U54HL165443
Abstract
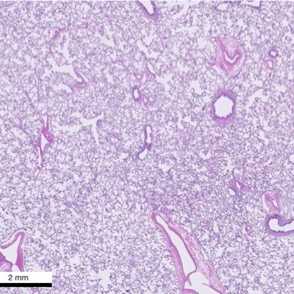
Hematoxylin and Eosin staining is the standard chemical stain used on slides to be reviewed for assessment of general histopathology and the generation of a pathology report for each donor.
(From Wikipedia) H&E is the combination of two histological stains: hematoxylin and eosin. The hematoxylin stains cell nuclei a purplish blue, and eosin stains the extracellular matrix and cytoplasm pink, with other structures taking on different shades, hues, and combinations of these colors. Hence a pathologist can easily differentiate between the nuclear and cytoplasmic parts of a cell, and additionally, the overall patterns of coloration from the stain show the general layout and distribution of cells and provides a general overview of a tissue sample's structure. Pattern recognition, by expert humans or by software that aids those experts in digital pathology, provides histologic information.
This stain combination was first introduced in 1876 by A. Wissowzky.
Guidelines
- The water steps act as good pause points if a short break (~15 minutes) is needed.
- It is normal for the final water (after the Bluing solution, before the 95% Ethanol) to have a slight purple color to it. If desired the water can be changed again and left for another few minutes.
- The Hematoxylin staining can be checked by taking 1 slide and looking at it quickly under a light microscope after the final water step making sure the section does not wash out. A few slides can be selected to verify uniformity of staining. If the Hematoxylin is not dark enough then the slides can be placed back into the Hematoxylin for another 30 seconds, followed by the waters, Bluing solution, and subsequent water steps. If the stain is too dark, an acidic water can remove some of the excess Hematoxylin, but it is best to avoid leaving the sections in the Hematoxylin for too long.
- From experience, sections seem most likely to fall off the slides in the water immediately following the bluing solution and in the 95% Ethanol before the Eosin/Phloxine.
- After the final 100% Ethanol before the final Xylenes, a few of the slides (1 at a time) can be briefly looked at under a light microscope to check for the quality of staining. This should be very brief to prevent the slides from drying out. A good rule of thumb is that the red blood cells should be a nice red color, but what constitutes a “good” H+E can be a bit subjective and very from investigator to investigator. If the Eosin/Phloxine is not dark enough the slides can be placed back into the first 95% Ethanol before the Eosin/Phloxine step and processed through once more.
- When cleaning the slides, be very careful not to remove the coverslip by wiping that side of the slide too hard. Only use a section of a Kimwipe for only 1 wipe of the slide to avoid spreading any excess mounting solution around the slide.
Materials
·1.5 Coverglass
·Permount or Cytoseal XYL
·Cotton Tipped Applicators
·Paper Towel
·Slide Folders
·Kimwipes
·Tissue-Tek Slide Staining Set
·CAT Hematoxylin (Biocare, CATHE)
·Eosin/Phloxine (Biocare, HTEP)
·Histology Grade Xylene
·28% Sodium Hydroxide
·100% Ethanol
·95% Ethanol
·70% Ethanol
·Water
·Whatman filter paper
·1 funnel
Troubleshooting
Before start
- Prepare the bluing solution by adding 1 mL of 28% Sodium Hydroxide to 400 mL of water
- The Hematoxylin should be gravity filtered through the Whatman filter paper before use
- The Eosin/Phloxine is in a ready-to-use state
Staining Procedure
Verify that all slides are completely dry. Slides can be dried in an 55C oven for one hour or more prior to use to prevent loss of tissue.
If sections were from tissue block embedded in paraffin, deparaffinize slides with 3 changes of Xylene for 5 minutes each.
If sections are from fresh frozen, unfixed tissue, consider a brief fixation with methanol or paraformaldyhyde prior to staining.
Rehydrate slides by submerging them in Ethanol in the following order for 3 minutes each.
i. 100% Ethanol,
ii. 100% Ethanol,
iii. 95% Ethanol,
iv. 70% Ethanol
v. Wash the slides briefly with 3 changes of water and leave them in the final water for 5 minutes
Place the slides in Hematoxylin for 1 minute. Adjust timing by 30 second intervals to lighten or darken the stain.
Wash slides off with water until the purple color is no longer coming off into the water. Leave them in the final water for 5 minutes.
Briefly dip the slides in the bluing solution.
Wash the slides with 3 changes of water and leave in the final water for 5 minutes.
Dehydrate the slides in 95% Ethanol for 3 minutes
Place the slides in Eosin/Phloxine for 1-2 minutes
Wash the slides for 3 minutes each in the following solutions
i. 100% Ethanol,
ii. 100% Ethanol,
iii. 95% Ethanol,
iv. 70% Ethanol
v. Wash the slides briefly with 3 changes of water and leave them in the final water for 5 minutes
Place the slides through 3 changes of Xylene (NOT the same Xylene used for deparaffinizing the slides) for 3-5 minutes each.
Coverslip the slides by removing them from the final xylene (1 at a time) and dabbing the edges with paper towel to absorb some excess Xylene. Do not allow the section to dry out. Place 1-2 drops of mounting media on the tissue section and carefully place the coverslip starting on at an angle and laying over the tissue to avoid air bubbles. Carefully use the cotton tipped applicator to push out any excess mounting media and air bubbles.
Place the slides, tissue side up, in a slide folder to dry overnight.
The next day the slides can be cleaned by using a cotton tipped applicator to apply Xylene to the front and back of the slide as needed to remove excess mounting media. A Kimwipe can be used to wipe off the applied Xylene and cleaning any residual debris from the slide, making sure to use a new section of the Kimwipe for each side.
Leave the slides overnight to dry further.
Best to place the slides in a slide box for longer term storage