Jun 23, 2026
10X Xenium In Situ Gene Expression for Fresh-Frozen Kidney
- Anna Smith1,
- Katerina Djambazova1,
- Jamie Allen1,
- Roy Lardenoije2,
- Melissa Farrow1,
- Joana Gonçalves2,
- Jeff Spraggins1
- 1Vanderbilt University;
- 2Delft University of Technology
- VU Biomolecular Multimodal Imaging Center / Spraggins Research Group
- KPMP


Protocol Citation: Anna Smith, Katerina Djambazova, Jamie Allen, Roy Lardenoije, Melissa Farrow, Joana Gonçalves, Jeff Spraggins 2026. 10X Xenium In Situ Gene Expression for Fresh-Frozen Kidney. protocols.io https://dx.doi.org/10.17504/protocols.io.36wgqpb63vk5/v1
License: This is an open access protocol distributed under the terms of the Creative Commons Attribution License, which permits unrestricted use, distribution, and reproduction in any medium, provided the original author and source are credited
Protocol status: Working
We use this protocol and it's working
Created: September 26, 2025
Last Modified: June 26, 2026
Protocol Integer ID: 228318
Keywords: Spatial Transcriptomics, 10X Xenium, frozen kidney tissue for in situ spatial transcriptomic, 10x xenium in situ gene expression, frozen kidney tissue, 10x xenium analyzer platform, situ spatial transcriptomic, frozen kidney, situ gene expression, 10x xenium, situ imaging, integrated data registration, histopathological evaluation, encompassing cryosectioning
Abstract
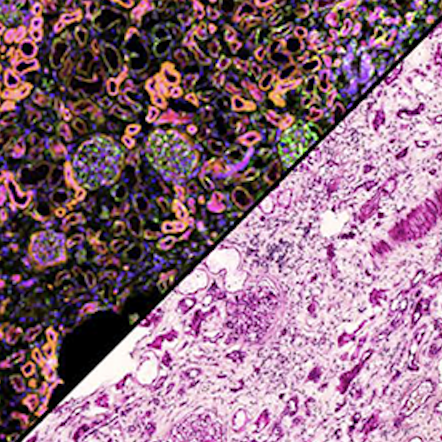
This is a protocol for preparing fresh-frozen kidney tissue for in situ spatial transcriptomics using a custom probe panel with the 10X Xenium Analyzer platform. Slide preparation is a multi-day process encompassing cryosectioning, probe hybridization, subsequent ligation and amplification, quenching and nuclei staining, and in situ imaging. Each phase of the workflow is extensively detailed within published 10X User Guides, which are cited throughout this version. After data is collected, slides are H&E stained for histopathological evaluation of healthy and diseased tissue, and used for integrated data registration to neighboring images and modalities. There are sample evaluation and QC measures built into the 10X protocols, which are carefully observed in addition to our own go/no-go criteria.
Safety warnings
Check for tissue folding, tearing, or detachment after every wash and incubation step (QC).
Ethics statement
The protocols.io team notes that research involving animals and humans, and tissues collected from either, must be conducted according to internationally-accepted standards and should always have prior approval from an Institutional Ethics Committee or Board.
I. Panel Design
Custom Standalone Xenium probe panel was developed and validated using the online 10X Xenium Panel Designer tool and targets a diverse population of cell markers and biochemical processes in the human kidney. Standalone panels are strictly compatible with the Xenium v1 assay chemistry. Custom probes are lyophilized and shipped at room temperature but can be stored for up to 3 years at -20 °C upon receipt. Reconstituted probes can be stored for up to one year at-20 °C . Custom panel .json file will be exported from the 10X Cloud and imported into the Xenium Analyzer via a local drive.
II. Fresh Frozen Tissue Preparation & Cryosectioning
Steps below are described in detail in the 10X Fresh Frozen Tissue Preparation Guide CG000579
Kidney samples are embedded in carboxymethylcellulose 2.7% solution and frozen into cryomolds over a dry ice/isopentane slurry, or flash-frozen in liquid nitrogen without embedding media.
Blocks are stored at -80 °C and transported over dry ice to the cryostat chamber. Sample blocks, Xenium slides, and slide mailers are equilibrated in cryostat chamber at -20 °C for 30 min. The cryostat specimen head is equilibrated to -10 °C for optimal sectioning.
Blocks are scored on the chuck to remove excess embedding media from sections if needed, and sections are cut at the recommended 10um thickness.
the block is sectioned until consistent high-quality sections are achieved. A section is placed on a normal glass slide to confirm presence of kidney tissue (QC) before placing a consecutive section onto the Xenium slide.
Care is taken not to accidentally cover fiducials within the imaging area (QC). Once a section is placed, a finger is placed behind the sample area for a few seconds to allow section to adhere to the slide. When cut this way, as many biopsy sections as will fit within the 10.45mm x 22.45mm sample area can be placed on each slide.
Once both Xenium slides have been sectioned, they are moved into a pre-chilled slide mailer while in the cryochamber and immediately placed on dry ice to prepare for the next step of the protocol. Or, stored at -80 °C for up to 4 weeks.
III. Fresh Frozen Tissue Fixation and Permeabilization
1h 31m
Steps below are described in detail in the user guide 10X 10X Fresh Frozen Tissue Preparation Guide CG000579.
Xenium slides are removed from slide mailer on dry ice and incubated for 00:01:00 at 37 °C on the thermocycler, using the specialized Xenium slide adapter plate. Slides are then immersed in 3.7% formaldehyde for00:30:00 and permeabilized in 1% SDS and placed in pre-chilled 70% methanol over ice for 01:00:00 .
1h 31m
Slides are then dried with lint-free wipes and assembled into Xenium cassettes and inspected to ensure there are no visible gaps between the rubber gasket and the slide surface. A photo is taken of the slides as a visual reference for tissue tearing, folding, or detachment throughout steps of the protocol (QC).
IV. Xenium In Situ Gene Expression Workflow
5h 30m
Steps below are described in detail in the 10X Xenium In Situ Gene Expression with Optional Cell Segmentation Staining Guide CG000749.
Custom Probe Hybridization – Custom probes are reconstituted in TE Buffer (pH 8.0) and combined with Probe Hybridization Buffer before being applied to the samples. The slides are then incubated overnight (16–24 hours) at 50 °C in a thermocycler. Overnight
30m
Post Hybridization Wash - Slides are washed with Post Hybridization Wash Buffer to remove unbound or partially bound probes. The slides are then incubated at 37 °C on the thermocycler. 00:30:00
30m
Ligation – Ligation Buffer along with Ligation Enzyme A and Ligation Enzyme B are applied to the slides and incubated at 37 °C . Only correctly hybridized probes undergo ligation; partially bound or mismatched probes are not ligated and cannot proceed to amplification. Following incubation, slides are washed with PBS-T. 02:00:00
2h
Amplification – Amplification Mix and Amplification Enzyme are applied to the slides and incubated at 30 °C to perform rolling circle amplification of ligated probes. Following incubation, slides are washed with PBS-T. 02:00:00
2h
Autofluorescence Quench & Nuclei Stain – Autofluorescence Mix containing Reducing Agent B is applied to the tissue to suppress endogenous background fluorescence that could interfere with imaging. Nuclei Staining Buffer is then added to stain nuclei, slides are washed, and samples must be imaged immediately or be stored at 4°C in the dark for up to 1 week.00:30:00
30m
V. Xenium Analyzer Run
4d 3h 10m
Steps below are described in detail in the 10X Xenium Analyzer Guide CG000584.
Run the system readiness test on the Xenium Analyzer before beginning a new run.
30m
Prepare all buffers fresh and on the same day as the Xenium analyzer run.
30m
Thaw and prepare decoding reagent plates A and B as detailed in the 10X Xenium protocol.
30m
Load sample slides, reagents, and consumables into the instrument. Set the run configurations; select the required custom probe panel and Xenium chemistry version when prompted.
10m
Initiate instrument preflight sample image scan. Once complete, inspect each section closely by toggling the intensity of the nuclei and autofluorescence scans to inspect for fixed or free floating debris in the buffer (QC – free floating debris will likely be siphoned off during one of the initial buffer exchanges once the run begins. Debris fixed to the tissue or slide surface cannot be removed once a run has been initiated, but it can be noted).
1h
Select FOVs – use the preflight nuclei stain and autofluorescence images to define imaging regions for each section.
30m
Start Xenium run - imaging will take between 3-5 days to complete.
4d
VI. Post-Xenium H&E Staining
2h 45m
Steps are described in detail in the 10X Post-Xenium Analyzer H&E Staining CG0000613.
2h 45m
VII. QC Data Collection and Recording
QC data is compiled in Levy-Jennings plots to longitudinally track the performance of the assays across key metrics including:
- FDR
- Genes/Cell
- Transcripts/Cell
- Cells/mm2
QC data for both KPMP samples and the reference tissue are summarized and reported on KPMP-hosted QC dashboards.
Protocol references